6.15 AMIE
The Asset Management Import Engine (AMIE) integrates with the following Inventory Management Products:
-
Absolute Manage 6.0
-
Centennial Discovery 2005, 9
-
Express Software Manager 9.0, 9.5
-
HP Universal CMDB 8.0
-
LANDesk 8.5, 9.0, 9.0 (Hardware)
-
LANrev 5.1
-
LiveTime Discovery 2005, 2007
-
LOGINventory 4.3
-
Manage Engine Desktop Central 7.0
-
Microsoft SMS Version 2003 SP1
-
Microsoft SCCM 2007
-
Spiceworks 4.0, 5.0
-
ZENworks Asset Management 6.5+
-
ZENworks Configuration Management 11.1, 11.1 (Hardware)
This section includes the following:
6.15.2 AMIE Customized Mapping
The customized mapping functionality provides the Administrator with greater control over the Item Types and Categories information accessed during the Item import process. It allows the Administrator to customize queries by defining parameters for importing Items.
IMPORTANT:As a prerequisite the Administrator should have knowledge of HQL and schema of the source database.
Export Configuration
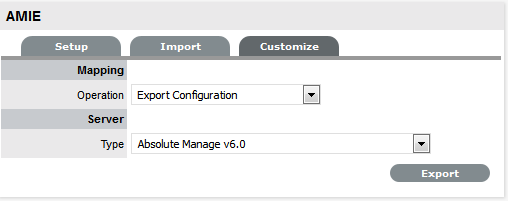
Prior to importing Items, to define the parameters of the Items to be imported, the Item parameters must be exported to a file. To export the parameters file:
-
Log in as an Administrator
-
Select Setup > Item Import > Customize
-
From the Mapping Operation drop-down list, select Export Configuration
-
Select the Server Type for the configuration export
-
Click Export.
An .xml file is produced.
Customizing the XML File
To customize the Item import, the above exported configuration file will need to be modified. To modify the file:
-
In the text editor of your choice, open the XML file
-
Modify the properties as required.
The example below explains how the ZENworks Configuration Management 11.1+ (ZENworksCM_11.1.xml) configuration can be customized.
<IMPORT_DEFN> Element
The first line within the XML file displays the following fields:
<IMPORT_DEFN SERVER="ZENworks Configuration Management" VERSION="11.1+" AUTHOR="Micro Focus">
They identify an entry for an Asset Management Server type. By modifying these fields, we can effectively create another configuration.
<IMPORT_DEFN SERVER="ZENworks Configuration Management" VERSION="11.1+" AUTHOR="Bob">
This newly configured name will be the Server Type listed as an option when setting up AMIE.
|
Attributes |
|
|---|---|---|
|
Name |
Type |
Description |
|
SERVER |
String |
Name of Asset Management Server |
|
VERSION |
String |
Version of Asset Management Server |
|
AUTHOR |
String |
Author of the XML |
|
Child Elements |
|
|---|---|---|
|
Name |
Occurrence |
Description |
|
CONDITIONS |
[0..1] |
|
|
ITEM |
[1..*] |
|
|
SCHEMA |
[0..1] |
|
<CONDITIONS> Element
To support multiple versions of AMIE source with a single XML driver:
<CONDITIONS>
<QUERY NAME="versionQuery">SELECT zDevice FROM com.livetime.assetimport.ZDEVICE zDevice WHERE zDevice.PROPAGENTVERSION = (SELECT MAX(zDevice1.PROPAGENTVERSION) FROM com.livetime.assetimport.ZDEVICE zDevice1) </QUERY>
<CONDITION NAME="version113" QUERYVALUE="versionQuery.PROPAGENTVERSION" CONDVALUE="11.3" VALUETYPE="NUMERIC" COND="EGREATER" TYPE="LOOKUP" />
<CONDITION NAME="version112" QUERYVALUE="versionQuery.PROPAGENTVERSION" CONDVALUE="11.3" VALUETYPE="NUMERIC" COND="LESSER" TYPE="LOOKUP" />
</CONDITIONS>
|
Child Elements |
|
|---|---|---|
|
Name |
Occurrence |
Description |
|
QUERY |
[0..*] |
|
|
CONDITION |
[0..*] |
|
<QUERY> Element
Define the 'Query' property to locate the table data.
For example, the query below will retrieve the ZENworks version data. The Query Name (versionQuery) is used to reference the property field as described later.
<QUERY NAME="versionQuery">SELECT zDevice FROM com.livetime.assetimport.ZDEVICE zDevice WHERE zDevice.PROPAGENTVERSION = (SELECT MAX(zDevice1.PROPAGENTVERSION) FROM com.livetime.assetimport.ZDEVICE zDevice1) </QUERY>
|
Attributes |
|
|---|---|---|
|
Name |
Type |
Description |
|
NAME |
String |
|
|
CONDITION |
String |
|
<CONDITION> Element
Get the actual condition value from the <QUERY> written for the <CONDITIONS>
<CONDITION NAME="version113" QUERYVALUE="versionQuery.PROPAGENTVERSION" CONDVALUE="11.3" VALUETYPE="NUMERIC" COND="EGREATER" TYPE="LOOKUP" />
|
Attributes |
|
|---|---|---|
|
Name |
Type |
Description |
|
Name |
String |
Name of condition, to be used later in different elements. |
|
QUERYVALUE |
String |
Value as returned from the query. |
|
CONDVALUE |
String |
Condition value to be compared using condition defined with 'COND' with value returned from the query. |
|
VALUETYPE |
ConditionValueType |
Valid value types are; NUMERIC and STRING |
|
COND |
ConditionType |
GValid value types are; REATER, LESSER, EGREATER, ELESSER, and EQUAL |
|
TYPE |
LookupType |
"LOOKUP" - retrieves the data from the VALUE attribute as specified using the query.property notation. "QUOTED" - treats the VALUE attribute as a hard-coded value. |
<ITEM> Element
The configuration mapping file is divided into "blocks" of Item Categories. In each block, we define a number of instructions to execute during AMIE's import process.
Example1:
<ITEM CATEGORY="Hardware" ID_KEY_FORMAT="NC_Workstation.ZenWorksAgentId">
Example 2:
Defining the block based upon the condition retrieved from <CONDITION> Element
<ITEM CATEGORY="Software" ID_KEY_FORMAT="NC_SoftwareComp.ComponentOID" CONDITION="version113">".
“ITEM CATEGORY" instructs AMIE to import all items within the defined XML block, as generic “Hardware”. If you want to be more specific about import for Hardware, you can break down into sub-categories. For example, “Computer”, “Printer”, and “Network Peripheral”.
Assuming the selected Asset Management Server supports the inventory control of these individual categories, defining an XML block for each category would allow the Administrator to import each Hardware Item as a “Computer, “Printer” or “Network Peripheral”.
|
Attributes |
|
|---|---|---|
|
Name |
Type |
Description |
|
CATEGORY |
String |
Specifies the category of the Items getting imported. This category must exist in Service Desk prior to import. |
|
DEFAULT_STATE |
String |
Default state of item to be imported. Refer to the Item life-cycle in Service Desk. |
|
SCHEMA |
String |
|
|
ID_KEY_FORMAT |
String |
|
|
CONDITION |
String |
To illustrate the format of the primary key field for this category in the Asset Management database. In the example, "NC_Workstation.ZenWorksAgentId" says that the “ZenWorksAgentId" column of the “NC_Workstation" table will contain the primary key for hardware. |
|
Child Elements |
|
|---|---|---|
|
Name |
Occurrence |
Description |
|
ASSET_ID_LIST |
[0..1] |
|
|
RELATIONSHIP |
[0..*] |
|
|
QUERY |
[0..*] |
|
|
OWNERSHIP |
[0..1] |
|
|
ITEM_TEAMS |
[0..1] |
|
|
ITEM_TYPE |
|
|
|
ITEM_PROPERTY |
[0..*] |
|
<ASSET_ID_LIST> Element
To get initial list of primary key of the assets to be imported. <QUERY> element will be called for each retrieved entries from this element and PARAM_NAME will be used in <QUERY> element while defining the query conditions.
For example,
<ASSET_ID_LIST PARAM_NAME="ASSETID" HEX_KEY="TRUE">
<SELECT>SELECT ncWorkstation.ZDEVICE.PROPZUID</SELECT>
<FROM>FROM com.livetime.assetimport.NCWORKSTATION ncWorkstation</FROM>
<WHERE>ncWorkstation.PROPMACHINENAME != 'Lost and Found' and ncWorkstation.PROPISDELETED is null</WHERE>
<SORT1 ASCENDING="true">PROPWORKSTATIONOID</SORT1>
<ALIAS>ncWorkstation</ALIAS>
|
Attributes |
|
|---|---|---|
|
Name |
Type |
Description |
|
PARAM_NAME |
String |
A name for the primary key. This will be used in the query written under query element. |
|
HEX_KEY |
String |
Specifies whether primary key is of Hexadecimal format. Valid values are 'TRUE' and 'FALSE' |
|
CONDITION |
String |
Whether the query has to be executed on certain condition as defined from the Condition element earlier. |
|
Child Occurrence |
|
|---|---|---|
|
Name |
Occurrence |
Description |
|
SELECT |
|
“SELECT” clause of the query |
|
FROM |
|
“FROM” clause of the query |
|
WHERE |
[0..1] |
“WHERE” clause of the query |
|
SORT1 |
[0..1] |
Sort based on column |
|
SORT2 |
[0..1] |
Sort based on column |
|
SORT3 |
[0..1] |
Sort based on column |
|
ALIAS |
|
“ALIAS” if used for the FROM clause |
|
SQLCOUNT |
[0..1] |
SQL query for count |
<Sort1>,<Sort2>,<Sort3> Element
|
Attributes |
|
|---|---|---|
|
Name |
Type |
Description |
|
ASCENDING |
boolean |
‘true/’f’alse’ |
<RELATIONSHIP> Element
When defining multiple Item Category types to import, for example Hardware and Software, an Administrator can specify how they are related. Configuring these properties will allow Items to be imported with predefined relationships.
IMPORTANT:Ensure that only children element should contain the relationship information as relationships are defined from the bottom to top.
For example, Software to Hardware Relationship block
<RELATIONSHIP RELATED_TO="Hardware" TO="is a parent of" NAME="Parent of / Child of (Inherit Owner)" FROM="is a child of" CLASS="1000" INHERIT_OWNERSHIP="1">
<NATIVE_ID_QUERY>SELECT software.NCWORKSTATION.ZDEVICE.PROPZUID FROM com.livetime.assetimport.NCSOFTWARECOMP software WHERE software.PROPCOMPONENTOID = :SW_ASSETID</NATIVE_ID_QUERY>
</RELATIONSHIP>
This "Parent of/Child of" relationship already exists as one of the factory supplied relationship types. However any newly defined relationships can be mapped and created as part of the import process.
|
Attributes |
|
|---|---|---|
|
Name |
Type |
Description |
|
RELATED_TO |
String |
The Item Category another Item Category can relate to. For example "Software" is to be related to "Hardware". |
|
NAME |
String |
The name of the relationship. |
|
FROM |
String |
A label describing the relationship from the child to the parent. For example: [Software] is a child of [Hardware] |
|
CLASS |
String |
1000=Hierarchical-based relationship.2000=Connection-based relationship. |
|
INHERIT_OWNERSHIP |
0 or 1 |
0=No (Relationship does not inherit parent ownership data.)1=Yes (Propagates ownership data (customer and organizational unit) from each parent Item to all of its children.) |
|
Child Elements |
|
|---|---|---|
|
Name |
Occurrence |
Description |
|
NATIVE_ID_QUERY |
String |
|
<QUERY> Element
Define the 'Query' property to locate the table data.
For example, the query below will retrieve the data for Hardware. The Query Name is used to reference the property field in the child elements.Example 1:<QUERY NAME="wsQuery">SELECT ncWorkstation FROM com.livetime.assetimport.NCWORKSTATION ncWorkstation WHERE ncWorkstation.ZDEVICE.PROPZUID = :ASSETID</QUERY>
Example 2:
<QUERY NAME="query1" CONDITION="version113"> SELECT ncProduct FROM com.livetime.assetimport.NCWORKSTATION ncWorkstation, com.livetime.assetimport.NCSYSTEMCOMP ncComponent, com.livetime.assetimport.NCPRODUCT ncProduct WHERE ncWorkstation.ZDEVICE.PROPZUID = :ASSETID and ncWorkstation = ncComponent.NCWORKSTATION and ncComponent.NCPRODUCTByProductoid = ncProduct and ncComponent.PROPPRODUCTTYPE = 22 and ncComponent.PROPISDELETED is null and ncProduct.PROPISDELETED is null</QUERY>
|
Attributes |
||
|---|---|---|
|
NAME |
Type |
Description |
|
CONDITION |
String |
|
<OWNERSHIP> Element
Optional element to define the ownership of the assets.
For example,
<OWNERSHIP> <CUSTOMER FIELD="userName" VALUE="wsQuery.PROPLOGINNAME" TYPE="LOOKUP" /> <ORG_UNIT FIELD="displayString" VALUE="wsQuery.PROPDEPT" TYPE="LOOKUP" /> </OWNERSHIP>
|
Child Elements |
|
|---|---|---|
|
Name |
Occurrence |
Description |
|
CUSTOMER |
[0..1] |
|
|
ORG_UNIT |
[0..1] |
|
<CUSTOMER> / <ORG_UNIT> Element
|
Attributes |
|
|---|---|---|
|
Name |
Type |
Description |
|
FIELD |
String |
|
|
VALUE |
String |
|
|
TYPE |
LookupType |
LOOKUP, QUOTED |
<ITEM_TEAMS> Element
Optional element to define field to define teams for the imported assets. Team can be assigned by either Team Name or Team ID as defined in Service desk.
|
Child Elements |
|
|---|---|---|
|
Name |
Occurrence |
Description |
|
INCIDENT_TEAM |
[0..1] |
|
|
REQUEST_TEAM |
[0..1] |
|
|
PROBLEM_TEAM |
[0..1] |
|
|
CHANGE_TEAM |
[0..1] |
|
|
CHANGE_TEAM |
[0..1] |
|
<INCIDENT_TEAM> / < REQUEST_TEAM> / < PROBLEM_TEAM> / <CHANGE_TEAM> Element
Optional element to define field to define teams for the imported assets. Team can be assigned by either Team Name or Team ID as defined in Service desk.
|
Child Elements |
||
|---|---|---|
|
Name |
Occurrence |
Description |
|
TEAM_NAME |
String |
|
|
TEAM_ID |
String |
|
<ITEM_TYPE> Element
Defines asset’s item type and manufacturer. Based upon the value existing/new item type and manufacturer will be used/created.For Example:
<ITEM_TYPE> <MANUFACTURER> <MANUFACTURER_PROPERTY FIELD="fullName" VALUE="query1.PROPMANUFACTURER" TYPE="LOOKUP" /> <MANUFACTURER_PROPERTY FIELD="name" VALUE="query1.PROPMANUFACTURER" TYPE="LOOKUP" /> </MANUFACTURER> <ITEM_TYPE_PROPERTY FIELD="itemTypeName" VALUE="query1.PROPPRODUCT" TYPE="LOOKUP" /></ITEM_TYPE>
|
Child Elements |
|
|---|---|---|
|
Name |
Occurrence |
Description |
|
MANUFACTURER |
|
|
|
ITEM_TYPE_PROPERTY |
[1..*] |
|
|
EXCLUSIONS |
[0..1] |
|
<MANUFACTURER> Element
|
Child Elements |
||
|---|---|---|
|
Name |
Occurrence |
Description |
|
MANUFACTURER_PROPERTY |
[1..*] |
|
<MANUFACTURER_PROPERTY> Element
|
Attributes |
|
|---|---|---|
|
Name |
Type |
Description |
|
FIELD |
String |
|
|
VALUE |
String |
|
|
TYPE |
LookupType |
LOOKUP, QUOTED |
<ITEM_TYPE_PROPERTY> Element
|
Attributes |
||
|---|---|---|
|
Name |
Type |
Description |
|
FIELD |
String |
|
|
VALUE |
String |
|
|
TYPE |
LookupType |
LOOKUP, QUOTED |
<EXCLUSIONS> Element
|
Child Elements |
||
|---|---|---|
|
Name |
Occurrence |
Description |
|
CONTAINS |
[0..*] |
String |
|
ABSOLUTE |
[0..*] |
String |
<ITEM_PROPERTY> Element
Define the 'Item Property' to extract column data for the above Query.Each of these entries maps an Item property, from the Asset Management Server to the service management system. For example, the value in the SerialNumber field of the Asset Management Server will be mapped to the Serial Number (field10) field of the service desk database.
|
Attributes |
|
|---|---|---|
|
Name |
Type |
Description |
|
FIELD |
String |
This is the name of the field that exists in the system database. The field "field10" for the "Hardware" Item Category maps to the "Serial Number" field.For a current Entity- Relationship Diagram that includes these database fields, please contact your local support contact. |
|
VALUE_PREFIX |
String |
This will prefix the actual value returned from the Asset Management Server database. |
|
VALUE |
String |
This value can either be a hard-coded value, or a value the Administrator wants to import from the Asset Management Server database (see: TYPE attribute below)For the latter, we define a string using the query.property notation, which will reference the actual value in the database.In our example, our VALUE attribute is "wsQuery.PROPSERIALNUMBER ".
In most cases, the property name is identical to the database column name, with the first letter capitalized followed by lower-case. Property names are always pre-appended with the word “prop”, to ensure uniqueness in the import process.Take this into consideration when defining custom properties. |
|
VALUE_SUFFIX |
String |
This will suffix the actual value returned from the Asset Management Server database. |
|
TYPE |
LookupType |
"LOOKUP" - retrieves the data from the VALUE attribute as specified using the query.property notation. "QUOTED" - treats the VALUE attribute as a hard-coded value. |
<ITEM_PROPERTY FIELD="field10" VALUE_PREFIX="" VALUE="wsQuery.PROPSERIALNUMBER" VALUE_SUFFIX="" TYPE="LOOKUP"/>
<SCHEMA> Element
Choose either <DROP> or <INCLUDE> to exclude unnecessary or to include only required.
Example 1: Using <DROP> to exclude unnecessary tables.
<SCHEMA>
   <DROP>
     <MAPPING_FILE NAME="AccessControlList"/>
     <MAPPING_FILE NAME="AccessType"/>
     <MAPPING_FILE NAME="ACLAddress"/>
   </DROP>
</SCHEMA>
Example 2: Using <INCLUDE> to include necessary tables.
<SCHEMA>
   <INCLUDE>
     <MAPPING_FILE NAME="NC_Component" />
     <MAPPING_FILE NAME="zZENObject" />
     <MAPPING_FILE NAME="zGroupings" />
     <MAPPING_FILE NAME="zMobileDevice" />
   </INCLUDE>
</SCHEMA>
|
Child Elements |
|
|---|---|---|
|
Name |
Occurrence |
Description |
|
DROP |
|
|
|
INCLUDE |
|
|
<DROP>/<INCLUDE> Element
|
Child Elements |
|
|---|---|---|
|
Name |
Occurrence |
Description |
|
RELATIONSHIP_MAPPING |
[0..*] |
|
|
MAPPING_FILE |
[0..*] |
|
<RELATIONSHIP_MAPPING>
|
Attributes |
||
|---|---|---|
|
Name |
Type |
Description |
|
NAME |
String |
|
<MAPPING_FILE>Element
|
Attributes |
||
|---|---|---|
|
Name |
Type |
Description |
|
NAME |
String |
|
Upload / Edit the XML Configuration
Once the XML has been customized it needs to be imported back into the system to enable the application to import Items using the new specifications.
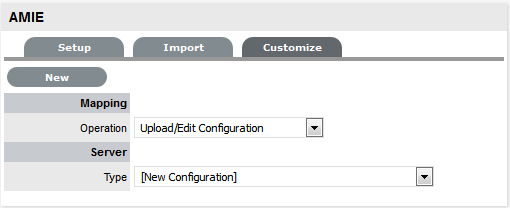
To import the XML:
-
Log in as an Administrator
-
Select Setup > Item Import > Customize
-
From the Mapping Operation drop-down list, select Upload/Edit Configuration
-
Select [New Configuration] in the Type list
-
Click New
-
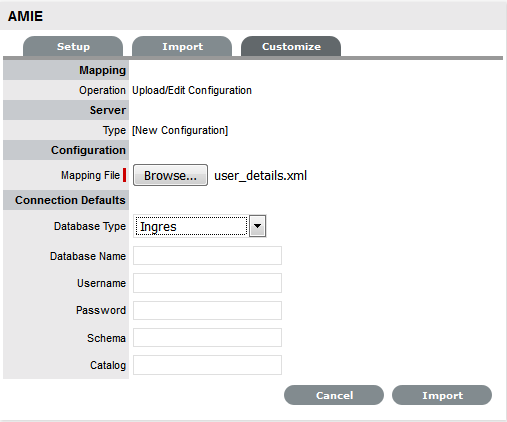
Select Choose File
-
Search and upload the XML file
-
Enter Connection Default values for the database type, name, username, password, schema and catalog, if necessary
These will be the pre-set values when selecting and mapping the new Server Type.
-
Click Import button to import the XML file
When the import is complete, the new configuration file will appear as a new Server Type.
-
The Server Connection Details can be modified or updated by clicking Edit and making the required changes
-
Click Save.
Using the customized Server Type
Once a new Server configuration has been imported into the system, it can be selected as an option when configuring AMIE in the Setup tab.
To use the new Server Type:
-
Log in as an Administrator
-
Select Setup > Item Import > Setup
-
Select the System Type as Database Mapping (AMIE)
-
From the Server Type list select the customized server
-
Configure the database connect, ownership and synchronization period
-
Click Test to confirm the connection then Save when complete.
For more information on importing Items via AMIE, see: Importing Items Using Database Mapping.
6.15.3 Managing Items using Database Mapping (AMIE)
Within the CMDB Import screen multiple asset management datasources can be synchronized with the service management system. When one or more applications are configured within AMIE, a list is displayed within the AMIE Setup tab.

Importing Items Using Database Mapping
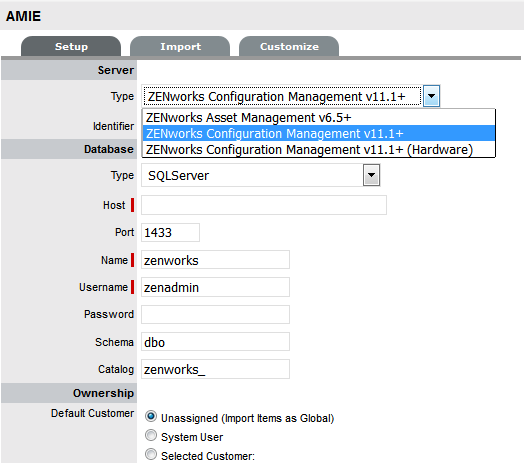
To import Items using Database Mapping, the following configuration steps need to be completed:
-
Select Setup>AMIE
-
Click New
The Server, Database, Ownership and Synchronization fields appear.
NOTE:If you have migrated ZENworks from one database provider to another database provider, then ensure that you review the database details and make the necessary changes.
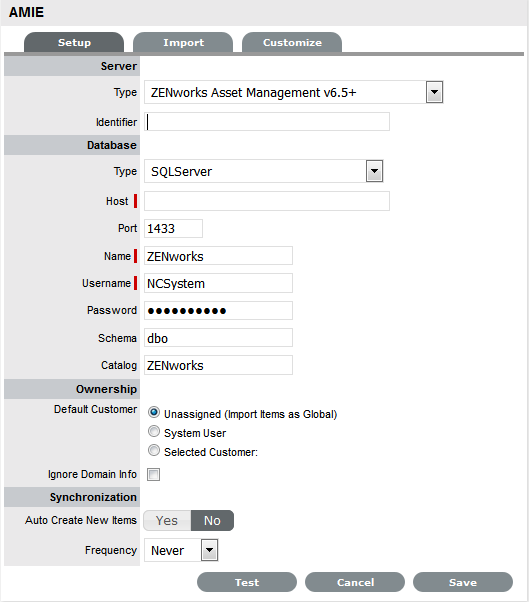
Configuration
System Type
Define the system type as Database Mapping.
Identifier
An identifying label that is used in List Views to inform Users regarding the Source of an Item.
Server
Type
Select the Type of inventory management product.
Database
Type
Select the Database Type.
Host
Enter the Host name or IP Address.
Port
Enter the Port Number for the database server.
Name
Enter the Database name.
Username
Complete User name details.
Password
Complete Password details.
Schema
Enter the Schema type.
Catalog
Enter the Catalog name. Typically this would be the name of the Database.
Notification (Only If 'Control CMS via RFC' is enabled)
Email RFC's to Tech?
Select this option if technicians are to be notified of generated change requests.
Ownership
Unassigned (Import Items as Global)
Select this option if Items are to be globally owned.
System User
Select this option to assign imported Items to the System User.
Selected Customer
Select this option to assign imported Items to a specific Customer.
Ignore Domain Info
Tick this field if the system is to disregard domain details attached to the User Name inside the AMIE source when assigning an owner.
Synchronization
Auto Create New Items
This option is only visible when a single AMIE source is defined within AMIE. When enabled, Items are automatically created upon synchronization, relative to the Control CMS via RFC setting within the Setup>Privileges>Requests tab .
If disabled, a snapshot of imported asset information is listed within the Super>Configuration>AMIE Snapshots tab.
Frequency
Choose a synchronization interval. This can be left as Never if the database will be synchronized manually.
NOTE:Synchronization times will vary depending on the connection speed with the external service and the database size.
-
Click Test, to initiate a connection and test the setup
If a connection is not made, a system message will advise which part of the configuration was not successful.
-
Click Save
-
To execute the import, click the Import button
-
After the import is complete, an Alert appears providing results of the import.
Click on the Publish link to read the Alert details.
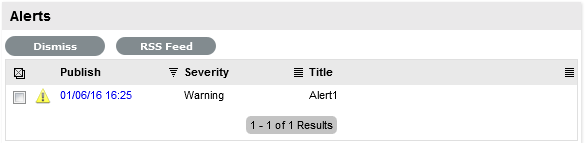
AMIE Import Alert
Alerts are generated for the Admin User after the AMIE synch is completed. The import alert summary displays:
-
the details of the system that the synchronization was run against, as it is possible to import from multiple sources.
-
the number of assets found in the datasource.
-
the number of assets automatically created if a single datasource is configured in AMIE and the auto-create option is enabled; or if the Auto-Create option is disabled and Items already exists in the system, the number of Items that were updated.
-
the number of AMIE Snapshots successfully imported, with a breakdown of new Items added and number of Items updated.
Delete Options and AMIE
The options to delete AMIE configurations can be achieved through the List View on the AMIE Setup tab, or by clicking on the a hyperlink within the Server column within the List View, which displays the expanded Setup view for the specific asset management tool.
The Delete button clicked in the AMIE>Setup tab>List View results in Global level "delete" flags being applied to all AMIE-managed Items stored in the system, however it retains the server details configured in AMIE and their associated snapshots.
The imported Items that are deleted are not completely removed from the database but are flagged as not available . By not erasing the Items completely, the historical data is maintained and allows these Items to be re-enabled in the future. It should be noted that the Item Types associated with the deleted imported Items are not disabled in the application.
The Delete button selected within the expanded Setup tab view for the specific asset management datasource, results in Configuration level deletion of the configured server and any related AMIE snapshots.
NOTE:The application must be restarted after the performance of either deletion operation, to allow the changes to take effect and prevent unpredictable behavior of the system.
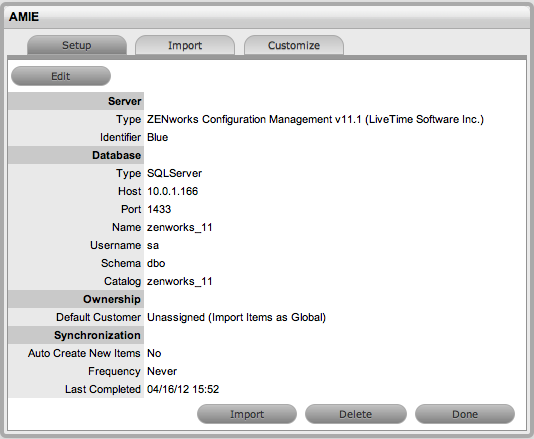
To delete the server configuration within AMIE and related snapshots:
-
Select Setup>AMIE>Setup
-
Select the Server link option within the AMIE list view
The expanded Setup screen is displayed with the Delete button.
-
Select the Delete button
A pop-up message is displayed asking your to confirm the deletion action.

-
Click OK.
A warning message is displayed informing you to restart the application server to complete the deletion process.

Re-enabling Deleted Items
To re-enable Deleted Items, initiate an Item search on deleted Items within the Configuration>Items screen of the Supervisor view.
Within the Supervisor view to search for a deleted Item:
-
Select Configuration>Items
-
Click the Search button
A simple search page will be displayed
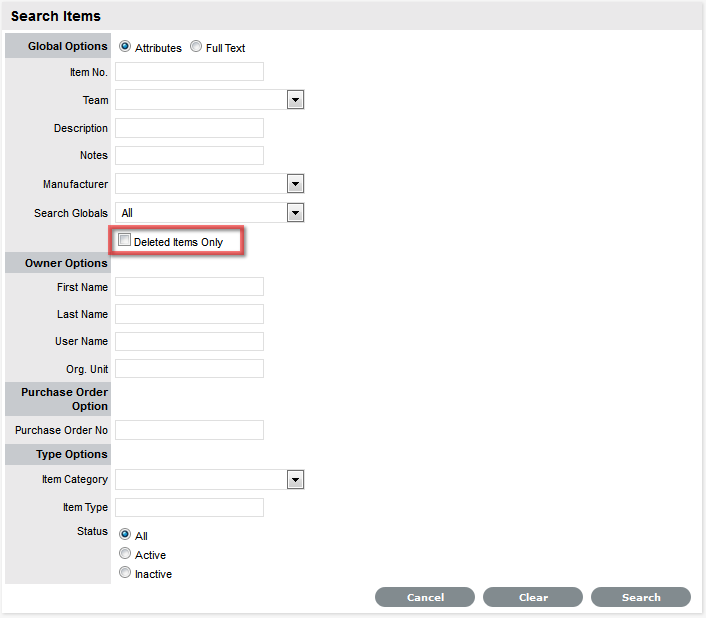
-
Enter a search term
-
Select the Deleted Item Only option
-
Click Search
A list of Items is displayed.
-
For the Item to be re-enabled, select the Item ID#
-
Click
 .
.
NOTE:Service desk now uses service name of the Oracle database configured with ZENworks. While using the Oracle database, if you are unable to connect to ZENworks, see ZENworks Core Admin for the service name.
6.15.4 Importing Items using a .CSV File
To import Items using a .CSV file, a .CSV template, containing all available fields, can be downloaded and populated. The service management system uses a field mapping Wizard to match fields in the template to those in the system. To download the template go to Setup > Item Import > Import. See Downloading an Item .CSV Template for more information on configuring the .CSV file.
Before Importing a CSV File
For an Item to be successfully imported, the following fields must be mapped:
-
Team/s
-
Status.
The Teams within the .CSV file must be created in the system before they can be associated with an Item as part of a .CSV import. Teams are created by a Supervisor under the User>Teams tab.
Items are imported based on Category (i.e. Hardware, Software, etc.), which must be configured by the Supervisor within the Configuration>Categories tab before conducting a .CSV import. The Categories configuration defines the Details recorded in the Item to be imported into the system. The Administrator must create separate .CSV files based on the Categories configured, that are then individually uploaded into the application.
For Items imported with owners, the Username in the .CSV file must match the Username within the support system. If the owner does not exist in the system, the imported Item will become a Global Item.
NOTE:If relationships are to be created between Items upon import, Parent Items should be imported first. If the system generated Item Number is to be used for the Parent Item, it needs to be included in the Parent Item Number field of the Related Items when they are imported.
Importing Items
To import a CSV File using the Import Wizard:
-
Select Setup>AMIE
-
Select the Import tab
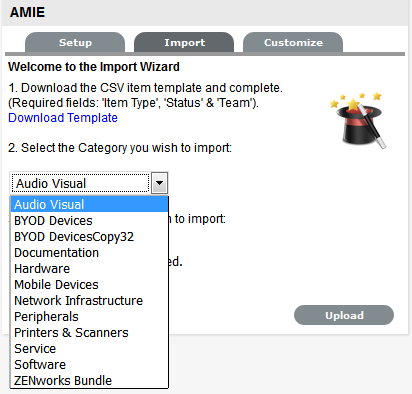
To access a template that illustrates the fields the application maps and the data types (see below), click the Download Template link on the Item Import Wizard screen within the Setup>AMIE>Import tab.
The following fields should be visible:
Item Number(Unique char 64),Item Type(char 128),Manufacturer(char 128),Incident Team(char 64),Problem Team(char 64),Change Team(char 64),Request Team(char 64), Company(char 128),Department(char 128),Room(char 64),Username (char 64),Status(char 128),Criticality(char 64)Purchase Date(datetime),Cost(decimal),Field1(char 256),Field2(char 256),Field3(char 256),Field4(char 256),Field5(char 256),Field6(char 256),Field7(char 256),Field8(char 256),Field9(char 256), Field10(char 256),Field11(char 256),Field12(char 256),Field13(char 256),Field14(char 256),Field15(char 256),Field16(char 256),Field17(char 256),Field18(char 256),Field19(char 256),Field20(char 256),Notes(CLOB),Relationship Name(char 256),Parent Item Number(char 64)
The char ### designation in parentheses after each field name signifies what type of data the import utility expects to see in each field. For instance:
-
Item Type (char 128) means that the first name field cannot exceed 128 characters.
-
Fields marked as Unique must be unique in the system.
-
Note the Room details MUST be in the following format: COMPANY-DEPARTMENT;Room
When creating a .CSV file for a Category, to determine the Field number of a configured Custom Field, within theCategory tab of an Item Category select the System defined Ordering option. The field labels will then be listed in sequential order from one to twenty.
-
-
To import, select the Item Category
The drop-down list consists of all Categories created by the Supervisor in Configuration>Categories.
-
Enter the file location, or use the Browse button
-
Select Upload
The Field Mapping Wizard appears. Fields that can be mapped to the CSV file are available in the drop-down list.
-
Review and map the fields within the .CSV
Field Mapping Wizard
General
Item Number
Unique Item number of the Configuration Item, this can be generated by the system or defined in the .CSV file.
Username
Customer owning the Configuration Item, imported by entering their user name.
Item Type II
Item Type of the Configuration Item.
Manufacturer I
Sets the manufacturer details of the Item.
Incident Team I
Incident Team assigned to the Configuration Item.
Problem Team I
Problem Team assigned to the Configuration Item.
Change Team I
Change Team assigned to the Configuration Item.
Request Team I
Request Team assigned to the Configuration Item
Criticality
Sets the default Criticality (i.e, critical, high, moderate, low, very low) for the Item. Optional.
Status I
Default Configuration Item Status.
Company I
Company owning the Configuration Item.
Department I
Department owning the Configuration Item.
Room I
The location of the Item. The .csv file data format to import this information MUST be:
COMPANY-DEPARTMENT;Room
Service Level
Configuration Item assigned SLA.
Date Format
Displays the date format required for the contract details to be imported successfully.
Contract Start Date
Sets the start date of a contract associated with an Item.
Contract End Date
Sets the end date of a contract associated with an Item.
Purchase Date
Date the Item was purchased.
Cost
The cost of the Item.
Monthly Cost
Sets the monthly Service Cost on per month basis for the Item.
Notes
Free text to add notes to the Item. Optional.
Details
Fields 1 to 20
Custom fields created for the Category are displayed and can be mapped to the Item based on information included in the .CSV file.
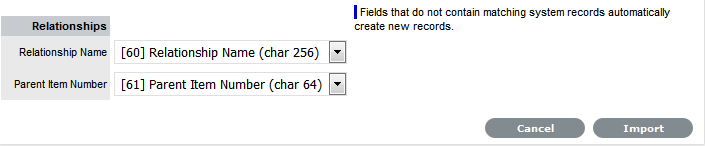
Relationships
Relationship Name
Defines the description of the relationship between the Item set in the following field.
Parent Item Number
Identifies the Item with which an Item is related using the Item Number.
Options
Ignore First Line
Option to ignore first row upon import.
Verbose Errors
Detailed description of any errors that occur during the import process.
NOTE:While specifying a date, ensure that you include time also along with date as shown in the below image.

I = Information that needs to exist in the system before the import
I = Fields that are mandatory
NOTE:If relationships are to be created between Items upon import, Parent Items should be imported first. If the system generated Item Number is to be used for the Parent Item, it needs to be included in the Parent Item Number field of the Related Items when they are imported.
-
Select the Ignore First Line checkbox if the first line of the imported CSV file has field headings
Leave the checkbox clear if the CSV file begins with usable data.
-
Click Verbose Errors to record a detailed description of any errors that occur during the import
Leaving the box unchecked will return a summarized error report.
-
Select Import to bring into the system the mapped field data
The Item Import screen displays the results of the import.
-
Select Done.
Configuring Items after the Import
During the Item Import, elements that do not exist in the database are created. These are the fields marked with a blue line within the Field Mapping Wizard:
-
Item Type
-
Warranty
-
Organizational Units.
After an import, all Item Types that have been created will need to be further configured.
To complete Item Type configuration:
-
Log in to the Supervisor Portal
-
Select Configuration>Types
-
In the Item Types screen, click on the newly created Item
The Type Information screen appears.
-
Complete the following fields:
-
Item Type
Name
Name of the Item Type.
Manufacturer
The manufacturer of the Item Type. New manufacturers can be created and existing manufacturers can be edited and deleted by using the Edit and New buttons that appear beside the drop-down menu of manufacturers.
Item Category
This signifies the type of Item. (Hardware, Software or Service are the default Types, but Users with the Supervisor Role can create more if required).
Identifier
The drop-down list that appears is drawn from the fields defined for the Item Category selected. Although this information is not required, the Identifier is used to differentiate similar Items that may be in use throughout an organization. For example, if an organization uses the same printers for all departments, an Item Category field of "Location" could be configured for the Item Details and this could also be used as a secondary Identifier for Printer Item.
Criticality
Rates the degree of importance of an Item Type within an organization, which can be adjusted on a per Item basis. The 'Impact' of a Request is initially pulled from the Criticality of the Item, but can be adjusted within the request Information screen if required. Requests logged through the Customer Portal, use the Criticality of the Item to set the Priority of the request.
The Incident Analyzer, if enabled by the Administrator in Setup>CMS>Incident Analyzer, can apply the Criticality to automatically detect Problems.
The minimum Criticality level can also be used to determine the off-line Items that appear on Outages pages, if the Outages pages are enabled by the Administrator in Setup>Privileges>System.
Icon
When the Type details are saved, the Icon selected for the Item Category will be displayed. To customize the icon for the specific Item Type, select the Icon to access the Upload
 or Cancel
  options.
Unit Price
The per-unit price of the Item Type.
Instance Total
Number of instances owned by the organization.
Assigned
Number of instances assigned to Customers as Items.
Hidden
Select 'On' to ensure Customers cannot view this Item Type within the list in the Customer Portal. If all Item Types use this selection, the Item Type list will be completely removed from the Portal.
Items created using Item Types with Hidden enabled, will not allow Customers to generate requests against them in the Customer Portal, nor will they be able to view or receive updates about requests logged by the User against Items with this functionality enabled.
Creation
Enabling this option gives Customers using the portal the ability to create new Items using this Item Type (if they have been granted the ability to create Items by the Administrator in Setup>Privileges>Customer>Create Item. (This option is not displayed when the Hidden option is enabled.)
Ignore Share
Enabling this option overrides the system level option for sharing requests raised against Items of this Type. Requests raised against Items of this Type will not appear in the customer portal when viewing shared requests is enabled.
Add Forum Topic
Create a forum topic using the Item Type Name. This option is only displayed when a new Type is being created.
Incident Default
The Team of Technicians assigned to support Incidents received related to the Item Type. See: Teams
Problem Default
The Team of Technicians assigned to support Problems received related to the Item Type. See: Teams
Change Default
The Team of Technicians assigned to support Change Requests received related to the Item Type. See: Teams
Request Default
The Team of Technicians assigned to support Service Requests received related to the Item Type. See: Teams
Service Level Default
The default service level for the Item Type. When Billing is enabled, service levels without a cost are listed as an option. The service level with an associated cost can be applied when the Item created, this ensures Item contract payment is processed.
Support Levels
All Service Level Agreements assigned to the Item Type, which will be displayed as options when a request is created applying Item that uses this Type template. SLAs listed here, are used within the Costs tab of Service Types to forecast break even points on the Service relative to the number of Users.
Find SLA (Name)
To assign multiple SLAs use this option. Click
 to view all SLAs or refine the search by entering a specific name. Select the SLA hyperlink to assign the SLA to the Type Information. Click to clear the search field.
 -
Enter the Unit Price for the Item Type. This is an optional field that is used for asset management
See Finance Role.
-
Set the Customer options
-
Assign the default support Teams
-
Assign one or multiple SLAs, as required
-
Click Save
-
Move to the Classification tab to create problem classification for this Item Type.
Click on the Item Type name to continue configuration.
Assigning multiple Companies and Departments to an Item
The .CSV file import facility can also be used to assign more than one Company and Department to an Item, if required. To assign multiple companies within the Company column of the .CSV file, enter the company names separated by a semi-colon (;) If the Company or Companies do not exist in the system, or have been deleted, a new Company will be created.
When importing multiple Departments related to the multiple Companies, the Department related to the Company must be listed in the same order as the Companies and separated by a semi-colon. For example:
Company Field: comp1;comp2
Department Field: dept1:depart2 or ;dept2 or dept1;
Any departments that do not exist in the database or have been deleted, will be created as a result of the .CSV import.
To assign rooms to one of the locations of this multiple Company/Department assignment, the full details of the Company and Department must be entered into the column followed by a semi-colon and the Room number. An example of the Room import format is:
Company Field:CompName1;CompName2
Department Field:Dept1;Dept2
Room Field: CompName1 - Dept1;Room1
Updating Item Information via .CSV
To easily update multiple Items that already exist within system, information can be imported using a .CSV file. For the update to be successful, the Item number in the .CSV file must match the Item number in the system.
Follow the above Importing Items procedure and ensure the Item Number field is mapped correctly. If an Item Number is not included in the .CSV file, a new Item will be created.
6.15.5 Downloading an Item .CSV Template
To download and populate the CSV Template for the CMDB Item Import process:
-
Select Setup>AMIE
-
Select the Import tab
To view a template that illustrates the fields the application is looking for and the data types (see below), click the Download Template link on the Item Import Wizard screen within Import tab of Item Import in the Setup tab.
The following fields should be visible:
Item Number(Unique char 64),Item Type(char 128),Manufacturer(char 128),Incident Team(char 64),Problem Team(char 64),Change Team(char 64),Request Team(char 64), Company(char 128),Department(char 128),Room(char 64),Username (char 64),Status(char 128),Criticality(char 64)Purchase Date(datetime),Cost(decimal),Field1(char 256),Field2(char 256),Field3(char 256),Field4(char 256),Field5(char 256),Field6(char 256),Field7(char 256),Field8(char 256),Field9(char 256), Field10(char 256),Field11(char 256),Field12(char 256),Field13(char 256),Field14(char 256),Field15(char 256),Field16(char 256),Field17(char 256),Field18(char 256),Field19(char 256),Field20(char 256),Notes(CLOB),Relationship Name(char 256),Parent Item Number(char 64)
The char ### designation in parentheses after each field name signifies what type
of data the import utility expects to see in each field. For instance:
-
Item Type (char 128) means that the first name field cannot exceed 128 characters.
-
Fields marked as Unique must be unique in the system.
-
Note the Room details MUST be in the following format: COMPANY-DEPARTMENT;Room
-
-
To import, select the Item Category
The drop-down list consists of all Categories created by the Supervisor in Configuration>Categories.
-
Enter the file location, or use the Browse button
-
Select Upload
The Field Mapping Wizard appears. Fields that can be mapped to the CSV file are available in the drop-down list.
-
Review and map the fields within the .CSV
Field Mapping Wizard
General
Item Number
Unique Item number of the Configuration Item, this can be generated by the system or defined in the .CSV file.
Username
Customer owning the Configuration Item, imported by entering their user name.
Item Type II
Item Type of the Configuration Item.
Manufacturer I
Sets the manufacturer details of the Item.
Incident Team I
Incident Team assigned to the Configuration Item.
Problem Team I
Problem Team assigned to the Configuration Item.
Change Team I
Change Team assigned to the Configuration Item.
Request Team I
Request Team assigned to the Configuration Item
Criticality
Sets the default Criticality (i.e, critical, high, moderate, low, very low) for the Item. Optional.
Status I
Default Configuration Item Status.
Company I
Company owning the Configuration Item.
Department I
Department owning the Configuration Item.
Room I
The location of the Item. The .csv file data format to import this information MUST be:
COMPANY-DEPARTMENT;Room
Service Level
Configuration Item assigned SLA.
Date Format
Displays the date format required for the contract details to be imported successfully.
Contract Start Date
Sets the start date of a contract associated with an Item.
Contract End Date
Sets the end date of a contract associated with an Item.
Purchase Date
Date the Item was purchased.
Cost
The cost of the Item.
Monthly Cost
Sets the monthly Service Cost on per month basis for the Item.
Notes
Free text to add notes to the Item. Optional.
Details
Fields 1 to 20
Custom fields created for the Category are displayed and can be mapped to the Item based on information included in the .CSV file.
Relationships
Relationship Name
Defines the description of the relationship between the Item set in the following field.
Parent Item Number
Identifies the Item with which an Item is related using the Item Number.
Options
Ignore First Line
Option to ignore first row upon import.
Verbose Errors
Detailed description of any errors that occur during the import process.
I = Information that needs to exist in the system before the import
I = Fields that are mandatory
NOTE:If relationships are to be created between Items upon import, Parent Items should be imported first. If the system generated Item Number is to be used for the Parent Item, it needs to be included in the Parent Item Number field of the Related Items when they are imported.
-
Select the Ignore First Line checkbox if the first line of the imported CSV file has field headings. Leave the checkbox clear if the CSV file begins with usable data.
-
Click in Verbose Errors for detailed descriptions of any errors that may occur during the import
Leaving the box unchecked will return abbreviated errors.
-
Select Import to bring into the system the mapped field data
The Item Import screen displays the results of the import.
-
Select Done.
Configuring Items after the Import
During the Item Import, elements that do not exist in the database are created. These are the fields marked with a blue line within the Field Mapping Wizard:
-
Item Type
-
Warranty
-
Organizational Units.
After an import, all Item Types that have been created will need to be further configured.
To complete Item Type configuration:
-
Log in to the Supervisor Portal
-
Select Configuration>Types
-
In the Item Types screen, click on the newly created Item
The Type Information screen appears.
-
Complete the following fields:
-
Item Type
Name
Name of the Item Type.
Manufacturer
The manufacturer of the Item Type. New manufacturers can be created and existing manufacturers can be edited and deleted by using the Edit and New buttons that appear beside the drop-down menu of manufacturers.
Item Category
This signifies the type of Item. (Hardware, Software or Service are the default Types, but Users with the Supervisor Role can create more if required).
Identifier
The drop-down list that appears is drawn from the fields defined for the Item Category selected. Although this information is not required, the Identifier is used to differentiate similar Items that may be in use throughout an organization. For example, if an organization uses the same printers for all departments, an Item Category field of "Location" could be configured for the Item Details and this could also be used as a secondary Identifier for Printer Item.
Criticality
Rates the degree of importance of an Item Type within an organization, which can be adjusted on a per Item basis. The 'Impact' of a Request is initially pulled from the Criticality of the Item, but can be adjusted within the request Information screen if required. Requests logged through the Customer Portal, use the Criticality of the Item to set the Priority of the request.
The Incident Analyzer, if enabled by the Administrator in Setup>CMS>Incident Analyzer, can apply the Criticality to automatically detect Problems.
The minimum Criticality level can also be used to determine the off-line Items that appear on Outages pages, if the Outages pages are enabled by the Administrator in Setup>Privileges>System.
Icon
When the Type details are saved, the Icon selected for the Item Category will be displayed. To customize the icon for the specific Item Type, select the Icon to access the Upload
or Cancel options.Unit Price
The per-unit price of the Item Type.
Instance Total
Number of instances owned by the organization.
Assigned
Number of instances assigned to Customers as Items.
Hidden
Select 'On' to ensure Customers cannot view this Item Type within the list in the Customer Portal. If all Item Types use this selection, the Item Type list will be completely removed from the Portal.
Items created using Item Types with Hidden enabled, will not allow Customers to generate requests against them in the Customer Portal, nor will they be able to view or receive updates about requests logged by the User against Items with this functionality enabled.
Creation
Enabling this option gives Customers using the portal the ability to create new Items using this Item Type (if they have been granted the ability to create Items by the Administrator in Setup>Privileges>Customer>Create Item. (This option is not displayed when the Hidden option is enabled.)
Ignore Share
Enabling this option overrides the system level option for sharing requests raised against Items of this Type. Requests raised against Items of this Type will not appear in the customer portal when viewing shared requests is enabled.
Add Forum Topic
Create a forum topic using the Item Type Name. This option is only displayed when a new Type is being created.
Incident Default
The Team of Technicians assigned to support Incidents received related to the Item Type. See: Teams
Problem Default
The Team of Technicians assigned to support Problems received related to the Item Type. See: Teams
Change Default
The Team of Technicians assigned to support Change Requests received related to the Item Type. See: Teams
Request Default
The Team of Technicians assigned to support Service Requests received related to the Item Type. See: Teams
Service Level Default
The default service level for the Item Type. When Billing is enabled, service levels without a cost are listed as an option. The service level with an associated cost can be applied when the Item created, this ensures Item contract payment is processed.
Support Levels
All Service Level Agreements assigned to the Item Type, which will be displayed as options when a request is created applying Item that uses this Type template. SLAs listed here, are used within the Costs tab of Service Types to forecast break even points on the Service relative to the number of Users.
Find SLA (Name)
To assign multiple SLAs use this option. Click
to view all SLAs or refine the search by entering a specific name. Select the SLA hyperlink to assign the SLA to the Type Information. Click to clear the search field. -
Enter the Unit Price for the Item Type. This is an optional field that is used for asset management
See Finance Role.
-
Set the Customer options
-
Assign the default support Teams
-
Assign one or multiple SLAs, as required
-
Click Save
-
Move to the Classification tab to create problem classification for this Item Type.
Click on the Item Type name to continue configuration.
Assigning multiple Companies and Departments to an Item
The .CSV file import facility can also be used to assign more than one Company and Department to an Item, if required. To assign multiple companies within the Company column of the .CSV file, enter the company names separated by a semi-colon (;) If the Company or Companies do not exist in the system, or have been deleted, a new Company will be created.
When importing multiple Departments related to the multiple Companies, the Department related to the Company must be listed in the same order as the Companies and separated by a semi-colon. For example:
Company Field: comp1;comp2
Department Field: dept1:depart2 or ;dept2 or dept1;
Any departments that do not exist in the database or have been deleted, will be created as a result of the .CSV import.
To assign rooms to one of the locations of this multiple Company/Department assignment, the full details of the Company and Department must be entered into the column followed by a semi-colon and the Room number. An example of the Room import format is:
Company Field:CompName1;CompName2
Department Field:Dept1;Dept2
Room Field: CompName1 - Dept1;Room1
Updating Item Information via .CSV
To easily update multiple Items that already exist within system, information can be imported using a .CSV file. For the update to be successful, the Item number in the .CSV file must match the Item number in the system.
Follow the above Importing Items procedure and ensure the Item Number field is mapped correctly. If an Item Number is not included in the .CSV file, a new Item will be created.
6.15.7 Service Portfolio Management
The Service Portfolio details the commitments and investments made by a Service Provider to its customers and within the markets they service. It contains current contractual obligations, services under development and continuing service improvement programs.
The Portfolio represents all engaged resources and resources being released during the different phases of the Service Lifecycle. It includes the Service Pipeline that consists of services under development and the Service Catalog, which includes customer visible active services that have the potential to recover costs or earn profits for the Services provided.
Service Portfolio Management is a dynamic and ongoing process that covers the following stages in work practices:
-
Define - list services, confirm business cases and verify portfolio data
-
Analyze - maximize portfolio value, set priorities
-
Approve - finalize portfolio proposal, authorize services and resources
-
Charter - communicate decision and allocate resources.
The service management system includes ITIL certified Service Portfolio Management, with Service Pipeline and Service Catalog functionality, as part of the base product. Combining the Service Item Lifecycle stored in the embedded CMDB, with assigned Service Level Agreements and service Teams, the system enables organizations to manage their Service Offerings from strategy to design through to transition, operation and retirement.
Service Portfolio Management in the system allows organizations to create Service Categories that include business-related attributes, such as business processes supported, business owners and business users. This ensures organizations record all relevant information against the Service.
Organizations can further optimize their Service Portfolio Management by tracking and reporting on Service Offering and Service Component usage, Service Level performance and costs. This includes the functionality to calculate break-even points (B.E.P.) for offering a service, which allows support organizations to charge the appropriate cost for offering the service to their internal or external customers. This is achieved by recording of financial attributes against services, including service cost, service charges and service revenue.
The service management system SPM capability also allows organizations to easily record the technical aspects of services such as applications used, IT Owners, supporting services, dependent services, SLAs and OLAs, Contracts and Agreements by defining Relationship Maps.
Working with SPM
Using the SPM functionality, organizations can create and publish all Service Offerings throughout the Service Lifecycle, which include the phases of:
-
Services under development, that are being considered but are not yet released (Service Pipeline)
-
Services in production/operation, that would be included in the Service Catalog
-
Retired/discontinued Service Offerings.
Service Items are recorded against the different stages of the Lifecycle and easily accessed through the filter views, available within the Configuration>Items screen:
|
Filter |
Relationship |
|---|---|
|
All Items |
All Items stored within the CMDB, regardless of the assigned Lifecycle State. |
|
Hardware Catalog |
All Items that use the Hardware Category Template stored within the CMDB, regardless of the assigned Lifecycle State. |
|
Service Catalog |
All Items that use the Service Category Template stored within the CMDB that are in an active Lifecycle State. |
|
Service Pipeline |
All Items that use the Service Category Template stored within the CMDB that are assigned a Pre-production Lifecycle State. |
|
Service Portfolio |
All Items that use the Service Category Template stored within the CMDB, regardless of the assigned Lifecycle State. |
|
Software Catalog |
All Items that use the Software Category Template stored within the CMDB, regardless of the assigned Lifecycle State. |
Consistent with the Lifecycle model used for all Configuration Items (CIs) throughout the application, Service CIs are created using the Service Category template, with a series of Lifecycle States customized to represent the different phases a CI can transition through (i.e., inception, design, implementation, operation or retirement phases).
Within each State of the Service Lifecycle, the relevant Users included in the Service Portfolio Team can be assigned, allowing them to manage Service Item information when the Item is allocated the State.
Using the SPM Functionality
The following outlines how the SPM Team define, analyze, authorize and charter a Service Offering in the system. This is achieved as a Supervisor User with Configuration and Service Level Management privileges enabled.
To begin:
-
Create the Service Portfolio Team in the Service > Teams tab, and assign all the relevant Users
Then within the Group tab, create the work and management groups associated with the Service Lifecycle and assign the relevant Users. (See: SPM Teams.)
-
Within the Configuration>Categories Tab, edit the existing Service Category
Duplicate and edit an existing Service Category or click New, to create a new Service Category. (See: Categories.)
-
In Edit mode, click the Service Category option and assign the Service Portfolio Team
Set field labels for the Item, including any relevant business related attributes. Save and move to the Lifecycle tab.
-
Edit the default Lifecycle, to include all the applicable States defined by the SPM Team
Some example States include requirements, defined, analyzed, approved, chartered, designed, developed, built, test, released, operational, retired. (See: Categories Lifecycle.)
-
Within each stage of the Lifecycle define the following State options:
-
Description
Status
Name
Enter the name of the Lifecycle State.
Active State
Stipulates if the Item is Active, when assigned this State.
Offline State
Only visible when Active is set to No. Indicates if the Item is offline and inactive. Items moved into states where this is enabled, have availability metrics calculated.
Pre-production State
Only visible for Service Category lifecycle states. Items that use this state are available within the Service Pipeline filter view of the Configuration>Items tab.
Entry Point
An Entry Point is used to indicate the start of a Lifecycle. To make the state a Workflow Entry Point, select the Entry Point checkbox.
As the Entry Point is the first state, the Previous States field will be removed.
Exit Point
Select whether the state will be an Exit Point. An Exit Point is used to indicate the end of a Lifecycle.
Service Team Group
Assign a Group within the associated Service Portfolio Team, to allow these Users to edit the Item details when it is assigned this stage of the Category Lifecycle.
-
Continue to configure the Category like any other Category and Save
-
Within the Configuration > Types tab, create an Item Type using the Service Category (See: Item Types.)
-
Assign one or more SLAs
Multiple SLAs can be associated with the Type template as it allows the User to calculate the service costs for all Items that apply the Type template but that may need to be associated with different SLAs.
-
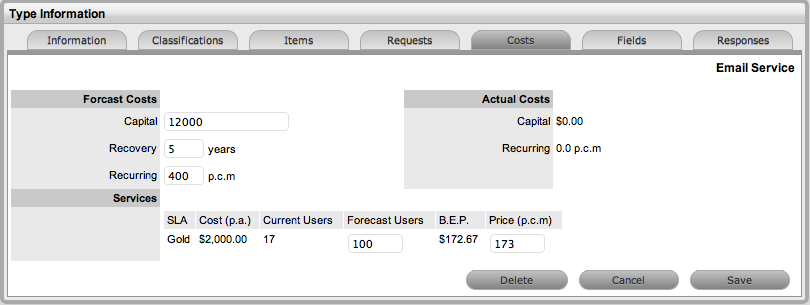
Move to the Costs tab and complete known details
Within the Costs tab, organizations can calculate the Break-Even Point (BEP) of a Service based on forecasting the number of Customers of that Service. This enables the organization to account for the per calendar month price of the Service, which is used to calculate the ongoing revenue figures within the Item Costs tab that uses the Service Type template.
-
Forecast Costs
Capital
Enter the proposed total cost to be invested in the Service.
Recovery
Complete the field with the expected number of years designated to recover the costs of implementing the Service.
Recurring
Enter the proposed ongoing cost, on a per calendar month basis, for offering the Service.
Services
Using the details entered in the Costs fields and the cost per annum of the SLA, enter the forecast number of Customers/Users to calculate the break even point (B.E.P) of the Service. Using the auto-calculated B.E.P., enter a per calendar month Price for the Service to recover costs. This figure is used in the Service Item Costs tab to calculate the ongoing Revenue figures.
Actual Costs
Capital
Content for this field is derived from the Cost field within then Costs tab of the Item created using this Type.
Recurring
Content for this field is derived from the Monthly Cost field within the Costs tab of the Item created using this Type.
-
Create the Item and assign the relevant State, which in turn associates the relevant Users included in the SPM Team.
Assign the Users and/or Org Units to set the number of affected Users, and set the appropriate SLA.
The Costs tab of a Service Item includes information related to the financial and contractual details associated with the Item. The information more specifically related to the Service Item is recorded in the Charges and Revenue fields, as this information allows service and support organizations to calculate the costs of offering a service and if appropriate, recover the costs from the customers.
-
Charges
Price (per user)
Draws the figure from the Service Item Type Costs tab and displays this as a daily amount. This figure is then multiplied with the number of Users/Customers assigned to the Item, to calculate the Revenue costs.
Cost (per user)
Draws the figure from the Inherited Costs and displays this as a daily amount. This figure is then multiplied with the number of Users/Customers assigned to the Item, to calculate the actual Costs.
Revenue
Month to Date
Uses the Charges figure, multiplied with the number or Users and days of month passed, to calculate the month to date figure.
Previous Month
A reference figure for an average monthly cost, based on the previous months revenue for the Service Item.
Availability
Avg Repair Time
Entries displayed here are automatically calculated based on the average length of time an Item is offline.
Avg Time To Fail
Figures displayed here are automatically calculated based on the average time between an Item being moved to an offline State.
6.15.8 Financial Management Applied
Financial Management can be used to forecast the costs for offering a Service and can also calculate the amount that should be charged to the Service Users in order to recover costs.
To use Financial Management as a tool for calculating the financial value of the underpinning infrastructure that provisions services and to qualify operational forecasts, you need to:
-
Provide the User access to the functionality
-
Enable SLA costing functionality
-
Enable the functionality within the Category
-
Create the Item Type and enter forecast figures
-
Create the Service Item, which automatically applies the forecast figures
-
Build the relationships between the Service and underpinning hardware and software, to associate actual costs
-
Use Finance Reports to compare forecast costs with actual costs, and chargeback costs to the Org. Unit Users.
NOTE:To complete the following outlined process, a User must have Supervisor and Administrator access.
Enable Financial Management Access
To access the Financial Management functionality a User must be assigned the Finance Role within the Information tab of their User Information screen. Assigning the Role within a system synchronized with an authentication server, the system administrator needs to include the User in the Finance group in LDAP.
To switch on the functionality for an existing User in a system not synched with an LDAP server, as a Supervisor:
-
Select the User > Users tab
-
Click on the Name hyperlink of the relevant User
-
Select Edit
-
Tick the Finance box in the Roles field
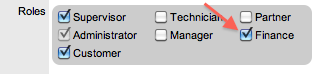
-
Click Save.
The User can now access the Finance Management functionality within the consolidated User view.
Enable Functionality
Financial information can only be calculated for Service Items that are created using a Category, which has the Service Category option enabled. By enabling this option, the Costs Tab is made available with the Item Type where baseline figures can be recorded.
As a User with the Finance Role:
-
Move to the Configuration > Categories tab
-
Click the Service Item Category hyperlink
-
Verify the Service Category option is checked
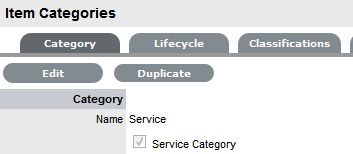
-
Click Done.
Charging for Service
If the service and support organization is to charge Organizational Units, that is companies or departments, for the ongoing service they provide the costing functionality for the Service Level Agreements (SLAs) needs to be enabled, and the Prices for the different Agreements need to be assigned to each of the SLAs.
As a User with Administrator access, within the Setup screen:
-
Select Setup > Billing
-
Click Yes for the Display SLA Prices option
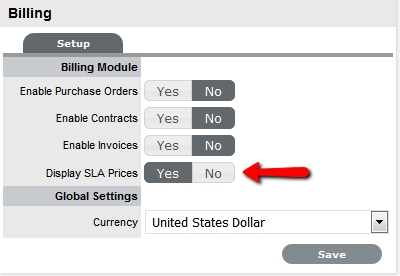
-
Click Save
The Annual, Request and Hourly Price fields are now made available within an SLA Editor screen.
-
Switch to the User Portal to access the Supervisor view
-
Move to the Service > SLAs tab
-
Select the Name hyperlink for an SLA
The SLA Editor is now displayed.
-
Click Edit
-
Enter the relevant figure in the Annual Price field
The Annual Price entered should be the per User, per year price for the SLA.
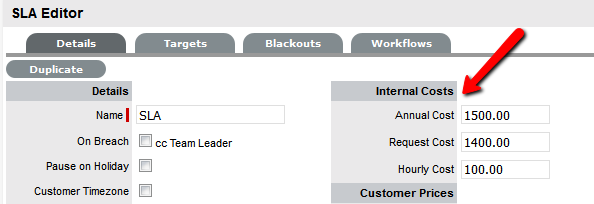
-
Click Save and Done.
Repeat the process for all relevant SLAs configured in the system. For detailed information about configuring SLAs see Creating SLAs.
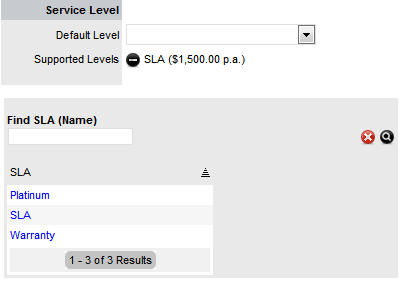
Forecast Service Costs
When proposing a Service as part of Service Portfolio Management, the investment and ongoing costs for offering a Service can be calculated. This information can then be used to project potential revenue for offering the Service and allow consumers of the Service to be charged for accessing the Service based on User access. For an example, we will use the Service Desk Service, considering the investment in hardware and software plus the ongoing SLA expense for offering the Service, when forecasting costs.
To forecast the cost of offering a Service, as a Financial User:
-
Move to the Configuration > Types tab
-
Select the default Service Desk Item Type
If creating a new Item Type refer to Creating Item Types.
-
Click Edit
-
Search and select the relevant SLAs for the Supported Levels field
This is where SLAs that have Prices are associated with them.
-
Move to the Costs Tab
The Capital, Recovery and Recurring cost fields are now displayed.
-
Complete the following fields:
-
Costs
Capital
Enter the sum total to be invested in hardware and software infrastructure that will underpin the Service.
Recovery
Complete the field with the number of years designated to recover the costs of implementing the Service.
Recurring
Enter the ongoing cost, on a per calendar month basis, for offering the Service. For example, annual support and maintenance agreement costs charged on a monthly basis.
Services
Using the details entered in the Costs fields and the cost per annum of the SLA, enter the forecast number of Customers/Users to calculate the break even point (B.E.P) of the Service. Using the auto-calculated B.E.P., enter a per calendar month Price for the Service to recover costs. This figure is used in the Service Item Costs tab to calculate the ongoing Revenue figures.
NOTE:If an SLA with an Internal Cost is assigned to the Type, the B.E.P will be the SLA cost divided by 12 plus the cost of recovering the Capital expenditure over the number of years defined for the Capital to be recovered. For example, where the SLA cost is $240 for the year, the B.E.P will never be less than $20 per month.
Actual Costs
Capital
Content for this field is derived from the Cost field within the Costs tab of the Item created using this Type.
Recurring
Content for this field is derived from the Monthly Cost field within the Costs tab of the Item created using this Type.
-
Enter a figure in the Forecast Users field for each SLA
(The displayed SLAs are based on the ones assigned to the Supported Levels field in the Information tab.)
If multiple SLAs are assigned to the Item Type and Forecast Users are assigned to each SLA, the Costs are divided by the total number of Forecast Users as calculated across the SLAs to arrive at the B.E.P. The system does not differentiate between who the Users are, it only accounts for the number of Users
-
Enter the Price for the Service to recover costs in a per calendar month
Use the calculated Break Even Point (B.E.P.) to set the Price. This figure is then used as a comparison figure for the Actual cost in the Service Item Costs Tab.
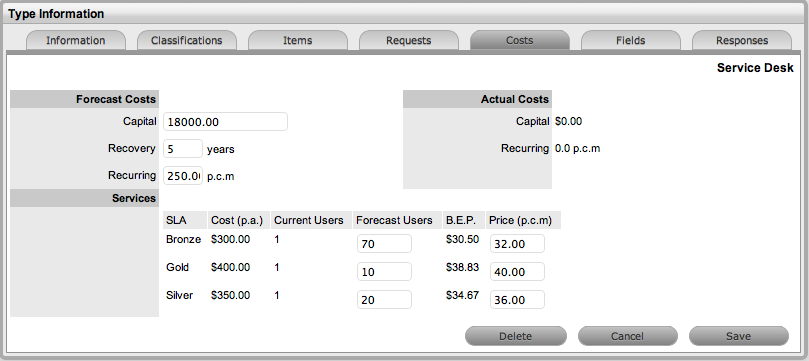
-
Click Save and Done.
The forecasted Price per User is now available within the Charges Price field on the Costs tab of the Service Item.
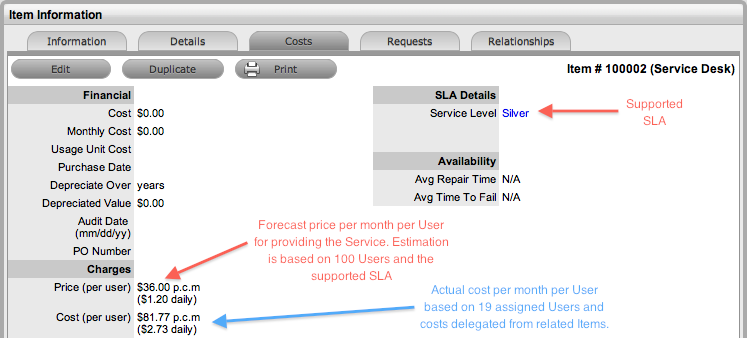
Calculate Actual Service Costs
To calculate the actual Service Costs, the relationships of the infrastructure Items that underpin the Service need to be mapped within the Relationships tab. Working with these relationships, it should be noted that the Service is considered a Child Item within the hierarchy.
To build the relationship map refer to the Relationships Tab.
After the underpinning infrastructure and its associated costs are related to the Service Item, the following financial information is available in the Service Item Costs tab:
|
Financial |
Description |
|---|---|
|
Cost |
The financial investment made to purchase the Item. This figure is also used when the Delegate Costs is enabled for allocating costs across related Items. NOTE:Typically for Service Items, the infrastructure costs would be zero as this would be derived from the associated Parent Items. |
|
Monthly Cost |
The amount invested on a monthly basis to maintain the running of an Item. This figure is also used when the Delegate Costs option is enabled for allocating costs across related Items. |
|
Usage Unit Cost |
This is used as a reference field, where the User can enter base unit cost, for example per Megabyte data charge, which can be used for calculating costs in custom reports. |
|
Purchase Date |
The date the Item was purchased. |
|
Depreciate Over |
Enter the number of years the Item is to be depreciated over, if required. |
|
Depreciated Value |
The system calculates the current value of the Item based on the Purchase Date and the number of years the Item is to be Depreciated Over. |
|
Audit Date |
Set the date the Item is next to be audited. |
|
PO Number |
If Purchase Orders are enabled for the system, the field is visible and automatically populated with the PO number generated by a User within the Finance>Purchase Orders tab, when the Item order was recorded in the system. |
|
Charges |
|
|
Price (per user) |
Draws the figure from the Service Item Type Costs tab and displays this as a daily amount. This figure is then multiplied with the number of Users/Customers assigned to the Item, to calculate the forecasted Revenue. |
|
Cost (per user) |
Draws the figure from the Inherited Costs and displays this as a daily amount. This figure is then multiplied with the number of Users/Customers assigned to the Item, to calculate the actual Costs. |
|
Revenue |
|
|
Month to Date |
Uses the Charges Price figure, multiplied by the number of Users and days of month passed, to calculate the month to date figure. |
|
Previous Month |
A reference figure for an average monthly revenue figure, based on the previous month's revenue for the Service Item. |
|
Costs |
|
|
Month to Date |
Uses the Charges Cost figure, multiplied by the number of Users and days of month passed, to calculate the month to date Cost. |
|
Previous Month |
A reference figure for an average monthly cost, based on the previous month's cost for the Service Item. |
|
Inherited Costs |
|
|
Inherited Capital |
Total infrastructure costs of parent CI's that directly contribute to the cost of the Service Item. This figure is derived from all the Cost fields within the Item Information>Costs tab of related Parent Items. |
|
Inherited Ongoing |
Running costs of all associated Items that enable the Service Item to continue to function. This figure is derived from all the Monthly Cost fields within the Item Information>Costs tab of related Parent Items. |
|
Delegate Costs |
To enable cost delegation across the relationship map allowing associated Items to inherit the costs of the current CI, select Yes. This will take the figures from the Cost and Monthly Cost fields for the Item and spread them across related Child Items. Define the technique to be used to evaluate the cost split: Child Count:Costs are split by percentage based on the number of child CI's the costs are being delegated across. User Count:Costs are split proportionally based on the number of users of the child CI's the costs are being delegated across. Custom %: Allows for the % cost to be assigned within the relationship. To do this, within the Service Item Relationships tab, all Items within the defined relationship map must have the same setting and then the Cost Split % can be set within the table included on the Relationships tab by clicking on the 0.00 link. Note, if a N/A link is visible within the Cost Split % column, then that Item does not have the Custom % option selected. |
|
Availability |
|
|
Avg Repair Time |
Entries displayed here are automatically calculated based on the average length of time an Item is offline. |
|
Avg Time To Fail |
Figures displayed here are automatically calculated based on the average time between an Item being moved to an offline State. |
Inherited Costs
Charging Organizational Units appropriately for a Service can be based on figures derived from the Items associated with the Service. For example, the Service Desk is hosted on a server and uses service management software. The costs associated with the server and software are combined to make the Inherited Capital cost, while any ongoing support contracts would be assigned as an Inherited Ongoing cost on a per month basis.
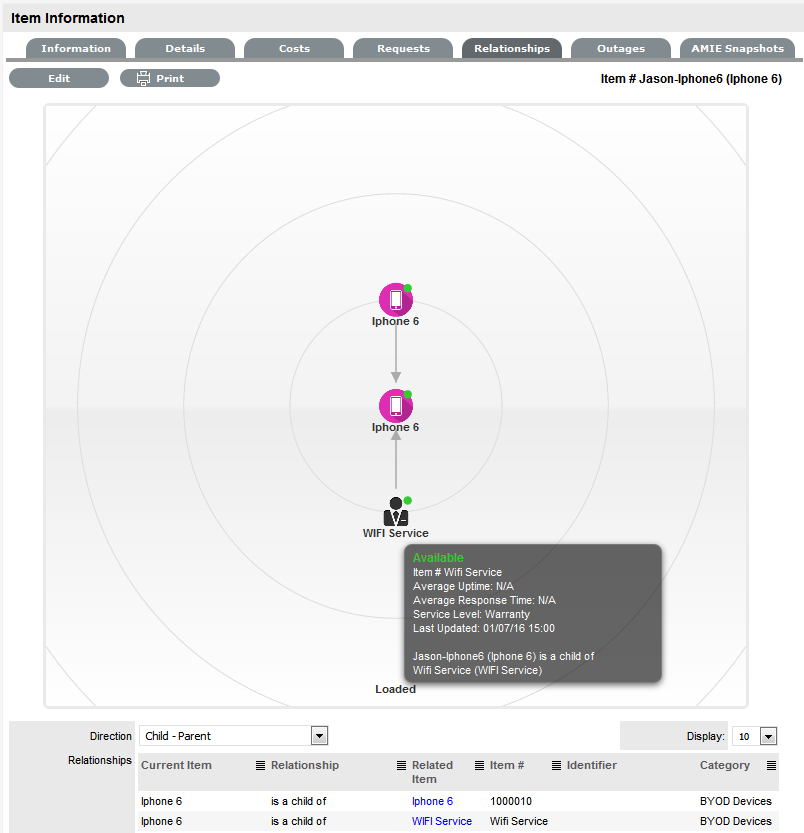
To derive the amounts from the related infrastructure and populate the fields within the Child Item, the Delegate Costs field must be enabled within the Inherited Costs for the Parent Items and the technique for deriving the cost must be assigned to the CI.
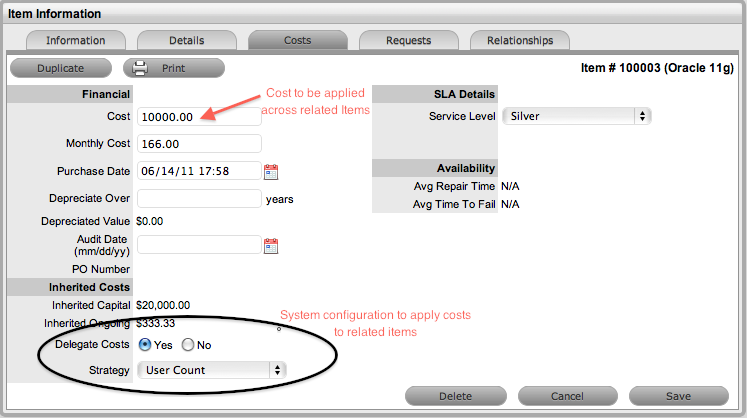
In the Service Desk example, for the server hosting the Service Desk Service it would be appropriate to delegate costs applying the Child Count technique as multiple software/service CIs may be associated with the server. While, the User Count would be used to delegate costs to the service management software.
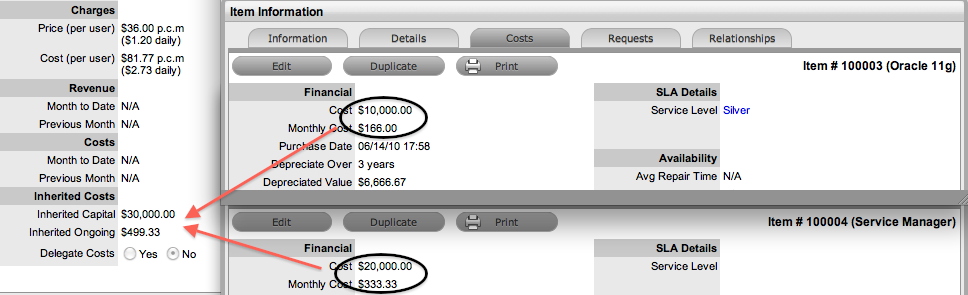
After the relationships have been defined for the Service and the Inherited Costs applied, the Finance User can verify the forecast numbers by comparing the Inherited Costs within the Item>Costs tab, to the Capital and Recurring Costs recorded in the Item Types Costs tab. Any disparity between the figures should alert the Finance User as to whether the Service is within budget and if relevant, making or costing money.
Finance Reports
The Finance User can access the following Reports within the Reports>Finance tab, to assist with verifying the cost and revenue generated by a Service, and monitoring how a Service is used.
|
Finance Reports |
Description |
|---|---|
|
Service Cost |
The cost of providing a Service is calculated nightly and saved, along with the revenue figures, in the ITEM_REVENUE table. The cost of the Service includes all the cost factors and saves a figure each night, per service, per cost centre. This is the sum of these for a Service. |
|
Service Revenue |
The price charged for providing a Service is calculated nightly and saved, along with the cost figures in the ITEM_REVENUE table. The price charge for the Service is determined in the cost calculator configured in the Service Item Type. |
|
Total Service Cost |
The cost of providing a Service is calculated nightly and saved, along with the revenue figures, in the ITEM_REVENUE table. The cost of a Service includes all the cost factors and saves a figure each night, per service, per cost centre. This is the sum of these across all Services. |
|
Total Service Revenue |
The price charged for providing all Services is calculated nightly and saved, along with the cost figures in the ITEM_REVENUE table. The price charge for the Service is determined in the cost calculator configured in the Service Item Types associated with all Services. |
|
Service Consumption |
Uses the total number of consumers of a service as recorded in the ITEM_REVENUE table, which is broken down by cost centre, to illustrate how the number of consumers of a service varies over time. |