1.6 Migrating Objects
For details on migrating objects in each group, see the topics below. Although the steps to migrate different types of objects are presented separately, it isn’t necessary to migrate one type of object at a time. You can migrate all data at once or choose what data to migrate. When you migrate inventory data, the administrator-defined fields, local product definitions, and custom report definitions are migrated by default.
When selecting objects to migrate, keep the following in mind:
-
You can only migrate objects once.
-
You need to migrate inventory data before asset management data.
-
Inventory data and asset management data must be migrated using the same version of the migration utility.
-
Workstations that have not been inventoried are not migrated. In addition, if the workstation is associated with a contract, the contract-workstation relationship isn’t migrated, either.
If you want to do a staged migration, select a subset of workstations to migrate. Do not migrate asset management data until all staging is complete. For more information about staging, see Staging a Migration.
To migrate the definitions only, see the related topics below:
For details about the Migration Console, see Section 2.0, Migration Console Reference.
1.6.1 Migrating Inventory Data
When you migrate inventory data, by default you migrate the following:
-
Devices (including workstations marked as deleted, if desired. For more information, see Section 1.6.1, Migrating Inventory Data.)
-
Device history
-
Local software products
-
Hardware/software components
-
Asset management usage data
-
Inventory and asset management administrator-defined fields (known as user-defined fields in ZENworks Asset Management 7.5)
-
Inventory and asset management custom reports
NOTE:The Migrate All Inventory Data option is not available for Oracle database migration.
Staging a Migration
You can do a staged migration by selecting a subset of workstations to migrate. Usage and inventory data is migrated when the workstation is migrated; additional usage and inventory data accumulating in ZENworks Asset Management 7.5 after initial migration of a workstation is not migrated.
NOTE:Do not migrate asset management data until all staging is complete.
Migrating Deleted Workstations
You can migrate workstations marked as deleted in ZENworks Asset Management 7.5 to ZENworks 11 SP2 Asset Management. After migration, these workstations appear as discovered devices in ZENworks Control Center (), but they are filtered out of Asset Management reports. For information on migrating deleted workstations, see Step 5.
Migrating Inventory Data
-
Click > > Novell .
-
Log in to your ZENworks Asset Management 7.5 database and the ZENworks 11 SP2 Management Zone as shown in Section 1.4, Selecting the Migration Source and Section 1.5, Selecting the Migration Destination.
-
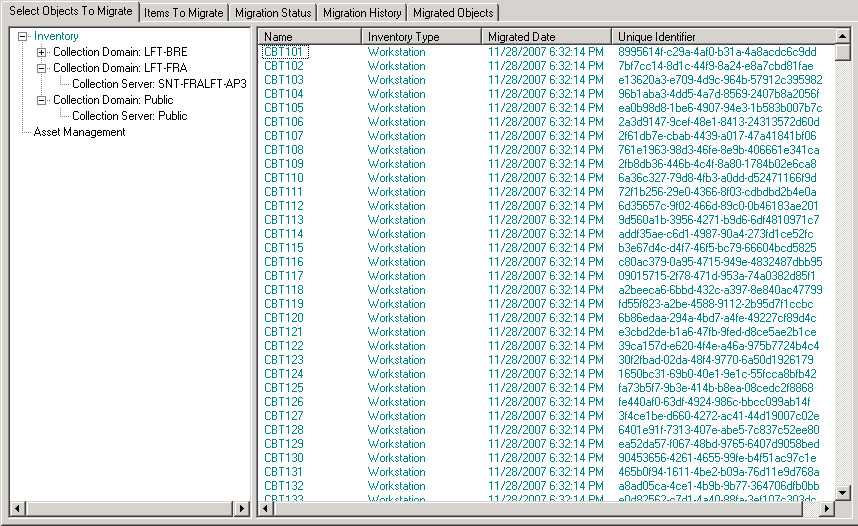
Click the tab.
-
Click and select the desired collection domain and collection server.
A list of workstations is shown on the right.
-
Select the data to migrate.
-
To select all workstations, right-click and select (The option is not available for Oracle migration.)
-
To select individual workstations, right-click a workstation listed on the right side of the panel and select . You can Shift+click or Ctrl+click to select more than one item.
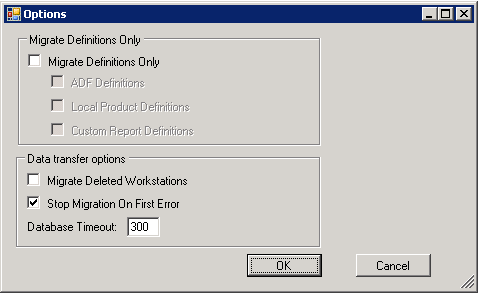
NOTE:To migrate workstations marked as deleted, click and select .
-
-
(Optional) To remove workstations from the migration list, click the , then right-click the workstation and select .
-
Click .
The tab opens and displays the migration details. Migrated workstations appear as discovered devices in ZENworks Control Center ().
If you receive any of the following messages, see Section A.2, ZAM Migration Utility Messages:
-
There are no ZENworks 7 Desktop Management GUIDs in the inventory data.
-
There are devices in your ZENworks Asset Management inventory data that are already present in the ZENworks Configuration Management target database.
-
This ZENworks Asset Management device will not be migrated because it is already present in the ZENworks Configuration Management target database.
-
1.6.2 Migrating Administrator-Defined Field Definitions
Asset management and inventory administrator-defined field definitions are migrated automatically the first time an inventory migration is run. (Asset management administrator-defined fields are known as user-defined fields in ZENworks Asset Management 7.5.) If you want to migrate just the administrator-defined fields and not the inventory data, do the following:
-
Click > > .
-
Log in to your ZENworks Asset Management 7.5 database and the ZENworks 11 SP2 Management Zone as shown in Section 1.4, Selecting the Migration Source and Section 1.5, Selecting the Migration Destination.
-
Click to open the window.
-
Select .
-
Select .
-
Click .
-
Right-click and select .
The number of user-defined fields is displayed in the tab. To remove the user-defined fields from the list, click the tab, right-click , and select . User-defined fields cannot be migrated individually.
-
Click .
The tab opens and displays the migration details. Click to stop the process.
1.6.3 Migrating Local Product Definitions
Local product definitions are migrated automatically the first time an inventory migration is run. If you want to migrate just the local product definitions and not the inventory data, do the following:
-
Click > > .
-
Log in to your ZENworks Asset Management 7.5 database and the ZENworks 11 SP2 Management Zone shown in Section 1.4, Selecting the Migration Source and Section 1.5, Selecting the Migration Destination.
-
Click to open the window.
-
Select .
-
Select .
-
Click .
-
Right-click and select .
-
(Optional) To remove the local product definitions from the migration list, click , then right-click and select .
-
Click .
The tab opens and displays the migration details.
1.6.4 Migrating Asset Management Data
Migrated asset management data includes the following:
-
Catalog products
-
Discovered products
-
Purchase records
-
Licensed products (For more information on licensed product migration, see Section 1.6.6, Migrating License Records.)
-
Software collections
-
Contracts and date notifications
-
Documents
-
License allocations, except for the following:
-
Allocations associated with “upgrade from” licensed products
-
Demographic allocations associated with the demographic value of “none”
-
NOTE:User-defined field values for catalog products and license records that are available in ZENworks Asset Management 7.5 IR 14 are not migrated.
WARNING:Do not migrate asset management data until you have migrated all the inventory workstations you intend to migrate.
To migrate asset management data:
-
Click > > .
-
Log in to your ZENworks Asset Management 7.5 database and the ZENworks 11 SP2 Management Zone as shown in Section 1.4, Selecting the Migration Source and Section 1.5, Selecting the Migration Destination.
-
Click the tab.
-
Right-click and select
-
(Optional) Click the tab to see what items will be migrated.
-
Click .
The tab opens and displays the migration details.
1.6.5 Migrating Asset Management Data Only
If you want to migrate asset management data (see Section 1.6.4, Migrating Asset Management Data) plus asset management custom reports and administrator-defined fields, do the following:
-
Click > > .
-
Log in to your ZENworks Asset Management 7.5 database and the ZENworks 11 SP2 Management Zone as shown in Section 1.4, Selecting the Migration Source and Section 1.5, Selecting the Migration Destination.
-
Click to open the window.
-
Select .
-
Select , and .
NOTE:User-defined field values for catalog products and license records that are available in ZENworks Asset Management 7.5 IR 14 are not migrated.
-
Click .
-
On the tab, do the following:
-
Right-click and select .
-
Right-click and select .
-
Right-click and select .
-
-
Click and wait for the migration to finish.
-
Repeat Step 3 to open the window once again.
-
Uncheck .
-
Click
-
Click the tab.
-
Right-click and select
-
Click .
The tab opens and displays the migration details.
1.6.6 Migrating License Records
License records in ZENworks Asset Management 7.5 have been replaced in ZENworks11 SP2 Asset Management with licensed products, which contain license entitlements. License entitlements contain the information required for compliance and proof of ownership.
When a ZENworks Asset Management 7.5 license record is migrated to ZENworks 11 SP2 Asset Management, a licensed product with a single license entitlement is created in ZENworks 11 SP2 Asset Management. The license entitlement contains all the compliance and proof of ownership information previously associated with the ZENworks Asset Management 7.5 license record, including the following:
-
Reconciled discovered products
-
Reconciled catalog products (and associated purchase records)
-
Attached documents
-
Associated contracts
User-defined field values for license records that are available in ZENworks Asset Management 7.5 IR 14 are not migrated.
If you have ZENworks Asset Management 7.5 license records with version upgrades, all license records in the upgrade path are consolidated in a single ZENworks11 Asset Management licensed product with multiple license entitlements, one entitlement for each license record in the upgrade path.
In ZENworks Asset Management 7.5, version upgrades can be linked to multiple sources, but in ZENworks 11 SP2 Asset Management, version upgrade license entitlements can only be linked to a single underlying entitlement. If you have upgrades that have been linked to multiple sources in ZENworks Asset Management 7.5, you need to review or modify the associated licensed products and license entitlements in ZENworks11 Asset Management after migration.
1.6.7 Migrating Custom Reports
The following topics provide more information on migrating custom reports:
Reports That Are Migrated
The following ZENworks Asset Management 7.5 custom reports can be migrated to ZENworks 11 SP2 Asset Management:
-
Workstation inventory reports
-
Software usage reports
-
Software management reports
-
Contract management reports
In addition, Custom Report Alerts/Schedules, along with the e-mail list from ZENworks Asset Management 7.5, are migrated with custom reports. After migration, ZENworks 11 SP2 Asset Management evaluates each report to determine if it needs to be run. The option to attach the report results in CSV format is changed during migration to attach the results in an Excel format.
You can view schedule information for a report in ZENworks Control Center by navigating to the specific report page and clicking You can view the e-mail list by clicking .
Reports That Are Not Migrated
The following reports are not migrated:
-
Reports containing the following fields:
-
Workstation Is Checked Out
-
Workstation Checked In/Out Date
-
Product License Count
-
Product License ID
-
Product License Name
-
(Product) License Required
-
License Platform
-
Last Scan Date/Time
-
Default Gateway (Workstation)
-
Subnet Mask (Workstation)
-
Over/Under (Summary) (Software Compliance)
-
Any fields related to Connection Information, Collection Servers, or Collection Domains
If you want to migrate a report containing one or more of the fields above, create a version of the report in ZENworks Asset Management 7.5 with those fields removed and then migrate that version. If you don’t remove those fields, no part of the report is migrated. Keep in mind that reports can only be migrated once.
-
-
Custom reports distributed with ZENworks Asset Management 7.5. Equivalent reports are available in ZENworks 11 SP2 Asset Management. If you have made changes to these reports in ZENworks Asset Management 7.5 and want to keep those changes, make a copy before migrating the reports, and the copy is migrated.
-
Stored report results (Stored report results can be viewed in ZENworks Asset Management 7.5.)
-
Report folder rights. By default, all ZENworks 11 SP2 Asset Management users have read-only access to the migrated report folders.
-
Reports with the following focus are not migrated:
-
Connection Information
-
Component Filtering
-
Hardware - DMI
-
License Allocation - Demographic
-
License Allocation - Workstation
-
Licenses - Associated Documents
-
Purchase/License/Inventory Infrastructure
-
-
Reports with a criteria of Workstation in Report or Workstation not in Report when the following criteria are met:
-
The referenced report will not be migrated and the reference report is not one of the predefined reports distributed with ZENworks 11 SP2 Asset Management.
-
The custom report is based on a predefined report whose report definition has been modified or deleted in ZENworks 11 SP2 Asset Management.
NOTE:A bug in ZENworks Asset Management 7.5 can cause an error when Hardware – System Board reports are imported into ZENworks 11 SP2 Asset Management. This is because in ZENworks Asset Management 7.5, both Bus 1 Slot and Bus 2 Slot columns are linked to the Bus 2 Slot column in the database. Reports containing both of these columns cause the following error message: NC_SystemBoard.Bus2Slots is not unique. To resolve this, go to the report definition and remove one of the Bus 2 Slot columns from the list of selected columns.
-
Migrating Custom Reports from ZENworks Asset Management
Custom reports are migrated automatically the first time an inventory migration is run. If you want to migrate just the custom reports and not the inventory data, do the following:
-
Click > > .
-
Log in to your ZENworks Asset Management 7.5 database and the ZENworks 11 SP2 Management Zone as shown in Section 1.4, Selecting the Migration Source and Section 1.5, Selecting the Migration Destination.
-
Click to open the window.
-
Select
-
Select .
Reports are migrated in a group; they cannot be migrated individually. Administrator-defined field definitions should be migrated with or before custom report definitions. If administrator-defined field definitions are not migrated, any custom report containing administrator-defined field columns is blocked from migration.
-
Click .
-
Click .
The tab opens and displays the migration details. Migrated folders have the prefix migrate added to the folder name.
1.6.8 Migration Performance Guidelines
Migrating all inventory data takes significantly longer than migrating asset management data only, unless the inventory has very few devices. The guidelines listed below are very broad, and your actual performance depends on several factors, including:
-
Configuration of the database server(s) hosting the ZENworks Asset Management 7.5 and ZENworks 11 SP2 Asset Management databases
-
Network speed and configuration
-
Amount of Usage and History data in the ZENworks Asset Management 7.5 database
It is strongly recommended that you purge the ZENworks Asset Management 7.5 database before you begin the migration process.
Migrating To SQL Server
-
Small databases (200 devices) should take less than 30 minutes
-
Medium databases (1500 devices) should take less than 1 hour
-
Very Large databases (30,000 devices) can take 12-24 hours
Migrating To Sybase Embedded
-
Small databases (200 devices) should take less than 30-45 minutes
-
Larger databases (1000 devices) should take less than 1 hour
Migrating To Oracle
-
Expect 30-45 seconds per device migrated