C.3 Setting Up Preboot Services for ZENworks Third-Party Imaging
Preboot Services uses PXE to find out if there is imaging work specified for a device and to provide the device with the files necessary to boot to the third-party imaging environment.
Before you can use Preboot Services with automated Preboot bundles, you need to do the following:
-
Install ZENworks Configuration Management on your Imaging Server.
For more information on how to install ZENworks 11 SP2, see
Installing the ZENworks Server
in the ZENworks 11 Server Installation Guide. -
Configure the third-party Imaging settings in ZENworks Control Center:
-
Ensure that Microsoft Windows Automated Installation Kit (WAIK) or Windows Assessment and Deployment Kit (WADK)is installed on the device running ZENworks Control Center.
You can download WAIK from the Microsoft Download Center Web site.
-
(Conditional) If you want to run ZENworks Control Center on a 64-bit device, append the WAIK_installation_path\Windows AIK\Tools\x86 to the Path Windows system environment variable.
-
In ZENworks Control Center, click tab.
-
In the panel, click > > the panel.
-
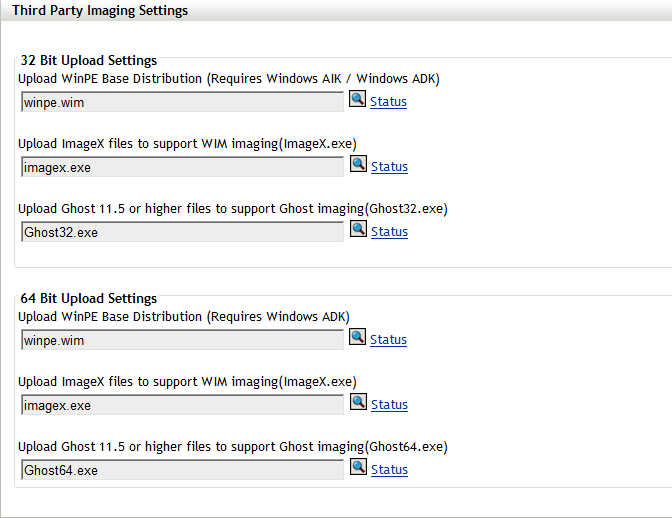
For :
Upload WinPE Base Distribution (Requires Windows AIK / Windows ADK): Click the
 icon to upload the WIM Imaging file. In the Upload WIM Imaging Files dialog box, do the following:
-
To upload a 32-bit winpe.wim file:
From WAIK: Browse to the Windows AIK\Tools\PETools\x86 folder under the installed directory, then select the winpe.wim file.
From WADK: Browse to the Windows Kits\8.0\Assessment and Deployment Kit\Windows Preinstallation Environment\x86\en-us folder under the installed directory, then select the winpe.wim file.
NOTE:Re-uploading the winpe.wim file overwrites the previous instance of this file from the server.
-
Click .
This downloads the imaging files from the server to the device where you access ZENworks Control Center and rebuilds winpe.wim with imaging files and then uploads files from the device to the server. The progress of the download and upload files is displayed in the field.
Upload ImageX Files to Support WIM Imaging (ImageX.exe):
-
Click the
icon to browse for and select the Microsoft Imaging engine (imagex.exe) on the device where you can access ZENworks Control Center.
-
After configuring the third-party imaging settings, click .
-
Click to view the status of content replication across all Primary Servers and Satellites with the Imaging role in the management zone. Ensure that you start the Imaging operation only when the status is Available.
NOTE:If you are uploading both 32-bit and 64-bit ImageX files, ensure that you do so in different instances.
Upload Ghost 11.5 or Higher Files to Support Ghost Imaging (Ghost32.exe):
-
Click the
icon to browse for and select the Symantec GHOST engine (ghost32.exe) on the device from where you can access the ZENworks Control Center.
-
After configuring the third-party imaging settings, click .
-
Click to view the status of content replication across all Primary Servers and Satellites with the Imaging role in the management zone. Ensure that you start the Imaging operation only when the status is Available.
-
-
For :
Upload WinPE Base Distribution (Requires Windows AIK / Windows ADK): Click the
icon to upload the WIM Imaging file. In the Upload WIM Imaging Files dialog box, do the following:
-
To upload a 64-bit winpe.wim file from WADK, browse to Windows Kits\8.0\Assessment and Deployment Kit\Windows Preinstallation environment\amd64\en-us folder under the installed directory, then select the winpe.wim. file.
-
Click .
This downloads the imaging files from the server to the device where you access ZENworks Control Center and rebuilds winpe.wim with imaging files and then uploads files from the device to the server. The progress of the download and upload files is displayed in the field.
Upload ImageX Files to Support WIM Imaging (ImageX.exe):
-
Click the
icon to browse for and select the Microsoft Imaging engine (imagex.exe) on the device where you can access ZENworks Control Center.
-
After configuring the third-party imaging settings, click .
-
Click to view the status of content replication across all Primary Servers and Satellites with the Imaging role in the management zone. Ensure that you start the Imaging operation only when the status is Available.
NOTE:If you are uploading both 32-bit and 64-bit ImageX files, ensure that you do so in different instances.
Upload Ghost 11.5 or Higher Files to Support Ghost Imaging (Ghost64.exe):
-
Click the
icon to browse for and select the Symantec GHOST engine (ghost64.exe) on the device from where you can access the ZENworks Control Center.
-
After configuring the third-party imaging settings, click .
-
Click to view the status of content replication across all Primary Servers and Satellites with the Imaging role in the management zone. Ensure that you start the Imaging operation only when the status is Available.
-
-
-
Enable PXE on the device.
-
Ensure that you have a standard DHCP server, either on your Imaging Server or on another network server.