6.26 Action - Registry Edit

The Action - Registry Edit dialog box lets you configure the registry file to apply. We recommend that you back up the registry before applying the specified registry file, and ensure that the file is properly formatted and well tested. You can also specify the specific requirements that a device must meet for the action to be executed on the device.

To access this dialog box in ZENworks Control Center, click the Bundles tab. Click the underlined link of a bundle in the Name column of the Bundles list, click the Actions tab, click one of the action set tabs (Distribute, Install, Launch, Verify, Uninstall, Terminate, or Preboot), click the Add drop-down list, then select an available action.

The following sections contain additional information:

6.26.1 General

The General page lets you configure the registry file to apply. You can select hives in the tree to which you want to add values and keys, rename or remove sections, or import a registry file. We recommend that you back up the registry before applying the specified registry file, and ensure that the file is properly formatted and well tested.

Figure 6-29 Action - Registry Edit Dialog Box: General Tab

Action - Registry Edit Dialog Box: General Tab

The following table lists the tasks you can perform to manage registry tree changes:

Task

Steps

Add a registry key

  1. Select a registry hive, click New, then click Key.

  2. Specify the key’s name. For example, Software.

    You can also specify multiple levels of keys by separating them with a backslash (\). For example, Novell\ZENworks\Zfd.

    Do not use the forward slash (/) as a separator.

  3. Select one of the following registry operations:

    • Create Always: Creates the key regardless of whether the key currently exists in the workstation’s registry.

    • Create If Does Not Exist: Creates the key only if the key does not currently exist in the workstation’s registry.

    • Rename: Renames the key if it currently exists in the workstation’s registry.

    • Delete: Deletes the key if it currently exists in the workstation’s registry.

    • Delete and Recreate: Deletes the key if it currently exists in the workstation’s registry and then recreates the key.

    • Delete if Empty: Deletes the key if it currently exists in the workstation’s registry and the key is empty.

    • None: Does not perform any registry operation.

Add a Value

  1. Select the check box next to the desired item, then click Value to display the Add Value To dialog box.

  2. Select one of the following options from the Value Type list:

    • Default: Adds a default string value to the selected key.

    • String: Adds a string value to the selected key.

    • Binary: Adds a binary value to the selected key. Most hardware component information is stored as binary data and is displayed in hexadecimal format.

    • Dword: Adds a DWORD value to the selected key. DWORD values are represented by a number that is 4 bytes long. Many parameters for device drivers and services are this type and are displayed in binary, hexadecimal, or decimal format.

    • Expandable String: Adds an expand string value to the selected key. An expandable string is a variable-length data string. This data type includes variables that are resolved when a program or service uses the data.

    • Multiple String: Adds a multi-value string to the selected key. Multiple string values contain lists or multiple values in a form that people can read. Entries are separated by spaces, commas, or other marks.

    • Qword: Adds a Qword string to the selected key. A Qword value is data represented by a number that is a 64-bit integer. This data is displayed in Registry Editor as a Binary Value.

    • Link: Adds a link string value to the selected key. A link string value is a Unicode string naming a symbolic link.

    • None: Does not perform any registry operation.

    • Full Resource Descriptor: Adds a full resource descriptor value to the selected key. A full resource descriptor is a series of nested arrays designed to store a resource list for a hardware component or driver.

    • Resource List: Adds a resource list to the selected key. A resource list is a series of nested arrays that is designed to store a resource list that is used by a hardware device driver or one of the physical devices it controls.

    • Resource Requirement List: Adds a resource requirements list to the selected key. A resource requirements list is a series of nested arrays designed to store a device driver's list of possible hardware resources the driver or one of the physical devices it controls can use.

  3. Specify the data. Depending on which value type you selected in the previous step, the type of data varies.

  4. Select one of the following registry operations:

    • Create Always: The setting is always created in the registry, even if it already exists. If it exists, the setting's current values are overwritten. For example, if PATH=C:\ already exists, PATH=C:\TEMP replaces it.

    • Create If Exists: The setting is created only if it already exists. The setting's current values are overwritten. For example, if PATH=C:\ already exists, PATH=C:\TEMP replaces it.

    • Create If Does Not Exist: The setting is created only if it does not already exist.


  • Delete: The setting is deleted. If the registry setting has subordinate settings, the subordinate settings are also deleted.

  • Append If Exists, Otherwise Create: Appends the Value if the value currently exists in the workstation’s registry. If the Value does not exist, it is created.

  • Prepend If Exists, Otherwise Create: Prepends the Value if the value currently exists in the workstation’s registry. If the Value does not exist, it is created.

Rename an entry

  1. Select the check box next to the desired item, then click Edit > Rename.

  2. Specify the new name.

Select all the objects of a parent folder

  1. Select the check box next to the parent folder, then click Edit > Select All Children.

Deselect all the objects of a parent folder

  1. Select the check box next to the parent folder, then click Edit > Deselect All Children.

Clear Selection

  1. Click Edit > Clear Selection.

Remove an entry

  1. Select the check box next to the desired item, then click Delete.

Import the contents of a registry file

  1. Click Import, then specify the registry file whose contents you want to import.

NOTE: A .reg file does not allow you to store the Data Type information of the value being deleted. For more information, see Deleting Registry Keys and Values at Microsoft Support Site.

Consequently, when you import a registry file that has a value marked for deletion in the file, the value defaults to a String Data Type. However, this behavior does not affect the deletion of values from the Windows Registry of the managed device.

Export the contents to a registry file

  1. Click Export to export the contents to a registry file named by default as bundle_name.reg. For example, if the name of the bundle is win, then the contents are exported to a win.reg file.

    You can choose to rename the file.

Search for a Value name, registry key, or both.

  1. Specify the name of the value or key that you want to search for.

  2. Select Registry Key/Value, Registry Value Data, or Both.

  3. Select the Search within the selected nodes only check box to limit the search to the node you selected in the Registry Tree list.

  4. Click Search.

6.26.2 Advanced

The Advanced page lets you specify how you want the action to run (as system or user) and to back up the registry file before applying the modified registry file

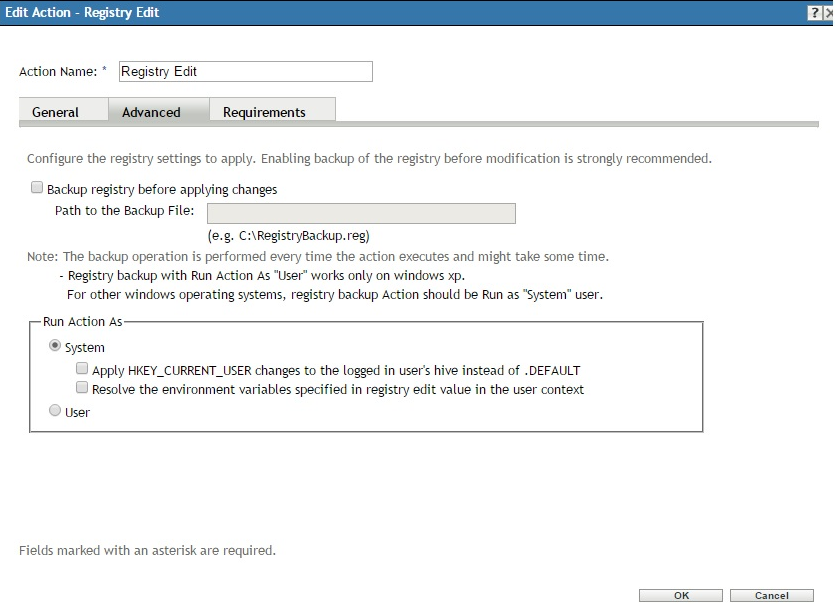
Backup Registry Before Applying the Changes

Select the check box, then specify the path to the backup file, for example, c:\BackupFile.reg.

If you select this option, the entire registry is backed up before importing the configured registry file. The backup process is performed every time this action executes. This can be a time-consuming operation and the backup file can be large.

Before you edit the registry, export the keys in the registry that you plan to edit, or back up the entire registry by selecting this option. If a problem occurs, you can then restore the registry to its previous state.

NOTE:On a non-XP Windows device, if you apply a bundle for which Backup registry before applying changes is selected and Run Action As is set to User, then the following occurs:

  • The registry backup action fails.

  • The bundle execution fails.

Run Action As

Specify how you want the action to run:

  • System: The action is run under the Local System user and inherits Administrator-level credentials. For example, the action has full rights to the HKEY_LOCAL_MACHINE hive.

    • Select the Apply HKEY_CURRENT_USER changes to the logged in user's hive instead of .DEFAULT option to enable the changes to be made in the user’s hive instead of the DEFAULT hive of HKEY_USERS.

    • Select the Resolve the environment variables specified in registry edit value in the user context option to resolve the environment variables that you have specified in the registry edit value, in the user context. If there are no logged in users available, then the environment variables will be resolved in the system context.

  • User: The registry file is applied using the logged-in user’s credentials. For example, the action has the same rights to the registry and the file system as the logged-in user. If you are changing keys in the HKEY_CURRENT_USER hive, you must run the action as User. Depending on the rights assigned to the user, the action might or might not have rights to the HKEY_LOCAL_MACHINE hive. If you select User, the user must be logged in to the device or the action fails.

6.26.3 Requirements

The Requirements page lets you define specific requirements that a device must meet for the action to be enforced on it. For information about the requirements, see Requirements.