2.5 Viewing an Inventory Report for a Managed Device
A device’s inventory includes information on hardware, software, and demographic data, which is gathered in an inventory scan. You can view this report through ZENworks Control Center or by using the ZENworks Icon menu. To view the Detailed Hardware/Software Inventory report, enable the rights setting from the Management Zone > .
2.5.1 Using ZENworks Control Center to View a Managed Device’s Inventory
-
In ZENworks Control Center, click .
-
Click the tab.
-
Click the folder containing the device you want to view the inventory for.
-
Click the desired device.
-
Click the tab.
The Summary panel shows basic inventory information.

-
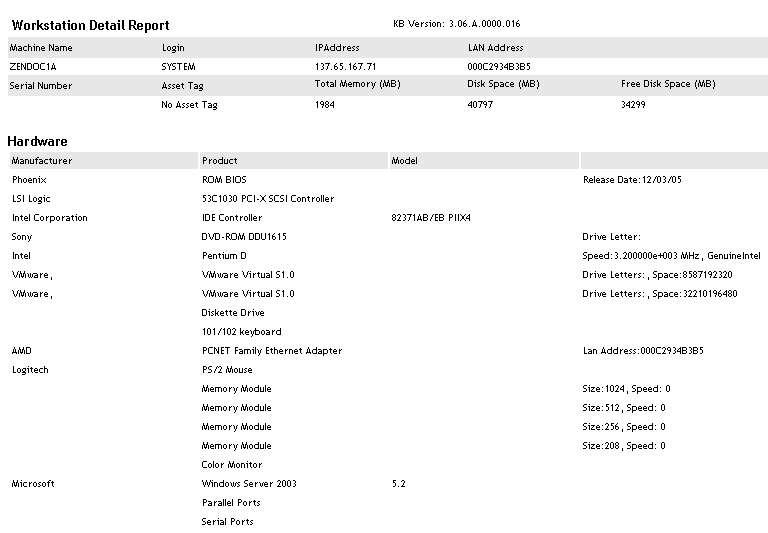
Click for a complete inventory report.
This report shows detailed information about the device, including demographic data, hardware information, and software. From this page, you can click the various links to get more detailed information about the device.
Check the tab, to view the changes made on the device. The software or hardware creation dates are based on the scan file processed on the server. If you have set a weekly scan on the device for a certain day of the week, the change history shows the changes made between two successive scans, with the date the scan is run. Only hotfix components show the actual install date for the particular device.
You can export the report to Excel, CSV, or PDF formats. You can also edit selected data. For more information, see Section 2.6, Editing a Managed Device’s Inventory Data.
2.5.2 Using the ZENworks Icon Menu to View a Managed Device’s Inventory
-
Right-click the ZENworks icon and select .
-
Click .

-
Click .
2.5.3 Cleaning Up Historical Data from the Inventory
-
Run the following procedure on the database:
Sybase: call zcm_purgehistory (n, daystokeep)
Oracle: call zcm_purgehistory (n, daystokeep)
SQL Server: exec zcm_purgehistory n, daystokeep
-
Replace n with a number to minimize transaction log growth and daystokeep with the number of days of history to be retained.
The value n is used to set a number for the records to be deleted at a time. Deleting all the records at a time might load the database with transaction logs that could affect other database operations in case they are using related tables.
If we set a value n=1000, this implies that we consider 1000 records need to be deleted for a given interval, say one year. If there is any more data present that can be deleted, set a value for n again to delete the next set of records. This can be repeated until all the records for the year are deleted, to match the number of days criteria.
For example: if you want to retain one year of history, run call zcm_purgehistory(1000, 365).
Running this script helps you delete the following outdated information:
-
Component and product data that have been marked as deleted
-
Workstation change history
-
Component change history
-
Software usage history
-
Cascade objects that reference component and product rows that were deleted
NOTE:Using the Purge Inventory History option (under Inventory Settings) that is available in ZENworks 11SP3, you can now clean up historical data from the Inventory, without having to run the above mentioned script.