4.1 Configuring the Collection Data Form
When you configure the Collection Data Form, you are selecting what information you want to gather from the workstation user. The Collection Data Form is not configured by default. It must be configured before it can be deployed.
NOTE:Collection Data Form is not supported on Mac OSX managed devices.
You can define the Collection Data Form at three levels:
-
Management Zone: The settings are inherited by all device folders and devices. To configure the Collection Data Form for the Management Zone, see Section 4.1.1, Configuring the Collection Data Form for the Management Zone.
-
Device Folder: The settings are inherited by all devices in the folder. Overrides the settings at the Management Zone level. To configure the Collection Data Form for a folder, see Section 4.1.2, Configuring the Collection Data Form for Devices in a Folder.
-
Device: The settings apply only to the device for which they are configured. Overrides the settings at the folder and Management Zone levels. To configure the Collection Data Form at the device level, see Section 4.1.3, Configuring the Collection Data Form for a Device.
NOTE:If you are configuring the Collection Data Form settings on a device, you need to click before you can change the system settings.
After it is configured and deployed, the Collection Data Form appears on the desktop of a managed device and prompts the workstation user to respond to a list of predefined questions.
For more information, see the following topics:
4.1.1 Configuring the Collection Data Form for the Management Zone
-
In ZENworks Control Center, click .
-
In the Management Zone Settings panel, click .
-
In the list, click .
-
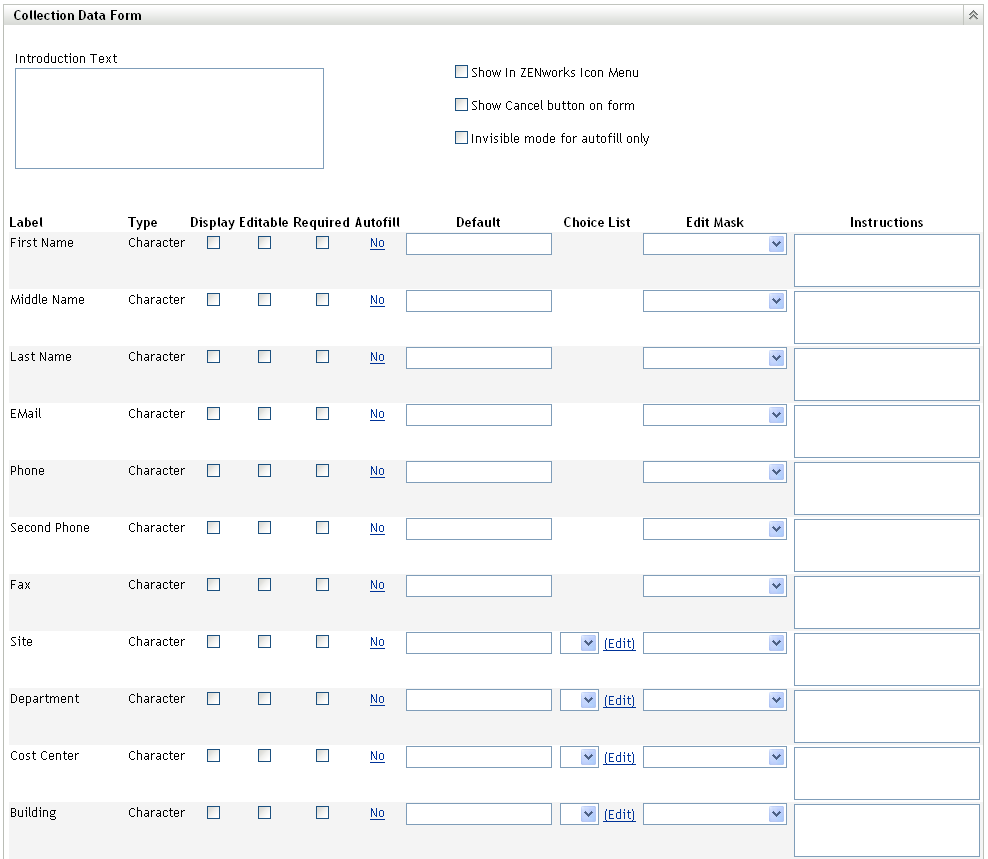
Specify any explanatory text for the workstation user in the field.
-
(Optional) If you want the Collection Data Form to be available to the workstation user to run at anytime, select .
This allows the workstation user to open the form by using the ZENworks Icon, and edit it as desired.
-
(Optional) Select if you want to allow the workstation user to opt out of the process.
-
(Optional) Select to populate the form with the autofill data. The form is hidden from the workstation user.
-
Select the data you want to gather, and configure how the workstation user can respond:
Label: Displays the name of the data you’re collecting, such as First Name.
Data Type: Specifies the data type: character, integer, decimal, or date.
Display: Displays the specified field on the Collection Data Form that is sent to the workstation user.
Editable: Enables the user to enter or edit a response in the specified field rather than being forced to accept the default value.
Required: Makes the response required. If a field is required, workstation users cannot submit the form until they enter the required data.
Autofill: Shows whether is on or off. Click (or , as appropriate) to open the Autofill dialog box, where you can specify a registry key or environment variable to populate the field with the data that the registry key or variable points to, such as HKLM\SYSTEM\CurrentControlSet\Services\Eventlog\ComputerName for this registry key, or WinDir for this environment variable. You can also use a registry key with a space in it, such as HKEY_CURRENT_USER\Control Panel\Screen Saver.Stars\Density.
Default: Specify any value you want to use as a default value.
Choice List: If there is more than one possible response, click and specify the available responses. You can also choose to allow the workstation user to create entries by selecting .
Edit Mask: Allows you to restrict how a user enters a response by selecting a format from the list in the field. The choices are phone, time, and currency.
Instructions: Add any instructions for the workstation user.
-
Click or , or click to revert to previous settings.
NOTE:You can also create custom fields, called administrator-defined fields, to gather additional data. For more information, see Section 7.0, Using Administrator-Defined Fields.
4.1.2 Configuring the Collection Data Form for Devices in a Folder
-
In ZENworks Control Center, click .
-
In the Devices panel, click next to the folder whose devices you want to configure.
-
Click the tab.
-
In the Settings panel, click .
-
In the Category panel, click .
-
Click .
This overrides the Management Zone settings for these devices.
-
In the field, specify information to configure the Collection Data Form.
For configuring the Collection Data Form, perform steps from Step 4 through Step 9 listed in Section 4.1.1, Configuring the Collection Data Form for the Management Zone.
4.1.3 Configuring the Collection Data Form for a Device
-
In ZENworks Control Center, click .
-
Click the tab.
-
Click the folder that contains the device you want to configure.
-
Click the device.
-
Click the tab.
-
In the Settings panel, click .
-
In the Catalog panel, click .
-
Click .
This overrides the Management Zone and folder settings for this device.
-
In the field, specify information to configure the Collection Data Form.
For configuring the Collection Data Form, perform steps from Step 4 through Step 9 listed in Section 4.1.1, Configuring the Collection Data Form for the Management Zone.