10.3 Managing Product Categories and Subcategories
During an inventory scan, ZENworks Control Center uses a knowledgebase of thousands of products to identify scanned products. After they are identified, these products are classified by category and subcategory. For added flexibility, ZENworks Control Center allows you to reclassify products and create new product categories.
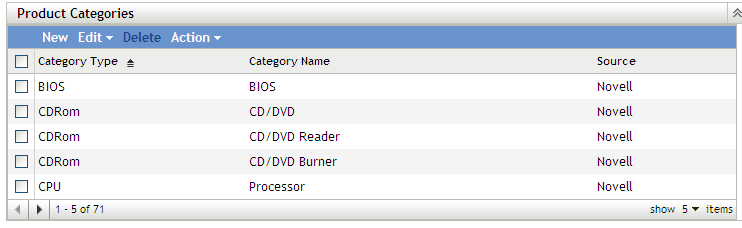
Categories and subcategories are managed through the Product Categories panel (). This panel displays the following information:
-
Category Type: The product category, such as CPU or CD-ROM. These are predefined.
-
Category Name: The name of the product category.
-
Source: Specifies whether the category name is a default value () or a user-defined value (). Only categories can be edited or deleted.
Figure 10-2 Product Categories Panel
The following sections provide more information about managing product categories and subcategories:
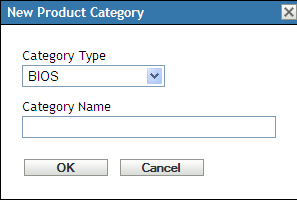
10.3.1 Creating a New Product Category
-
In ZENworks Control Center, click , then click the tab.
-
In the Product Categories panel, click .
-
Select a category type in the field.
-
Specify a name in the field.
-
Click .
The new category is added to the category list with the source shown as . You can further define this category by assigning a subcategory. For more information, see Section 10.3.4, Creating a New Product Subcategory.
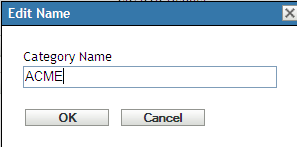
10.3.2 Renaming a Product Category
-
In ZENworks Control Center, click , then click the tab.
-
In the Product Categories panel, select the category you want to rename.
You can only rename categories whose source is .
-
Click .
-
Specify a new name in the field.
-
Click .
10.3.3 Deleting a Product Category
-
In ZENworks Control Center, click , then click the tab.
-
In the Product Categories panel, select the category you want to delete.
You can only delete categories whose source is .
-
Click .
10.3.4 Creating a New Product Subcategory
Creating a subcategory further classifies a product.
-
In ZENworks Control Center, click , then click the tab.
-
In the Product Categories panel, select a category that you want to create a subcategory for.
-
Click .
The Product Subcategories panel appears, listing any predefined subcategories for the specified category, and the subcategory source, or .

-
Click .
-
Specify a name in the field.
-
Click .
10.3.5 Renaming a Product Subcategory
-
In ZENworks Control Center, click , then click the tab.
-
In the Product Categories panel, select the category whose subcategory you want to rename.
You can only rename subcategories whose source is .
-
Click .
-
Select the category/subcategory pair.
-
Click .
-
Specify a new name in the field.
-
Click .
10.3.6 Deleting a Product Subcategory
-
In ZENworks Control Center, click , then click the tab.
-
In the Product Categories panel, select the category whose subcategory you want to delete.
You can only delete subcategories whose source is .
-
Click .
-
Select the category/subcategory pair you want to delete.
-
Click .