Using the ZENworks Imaging Floppy Boot Disk Creator Utility
With the release of ZENworks 6.5 Support Pack 2 (SP2), there are now two versions of zimgboot.exe:
Using zimgboot.exe in ZENworks 6.5 SP1 and Earlier
You can do the following with the zimgboot.exe that shipped with ZENworks 6.5:
- Create Imaging Boot Diskettes
- Prepare a CD Boot Diskette
- Configure the Settings.txt File
- Add Linux Device Drivers
- Create A Language Disk
- Create A Utility Disk
- Configure PXE-on-Disk
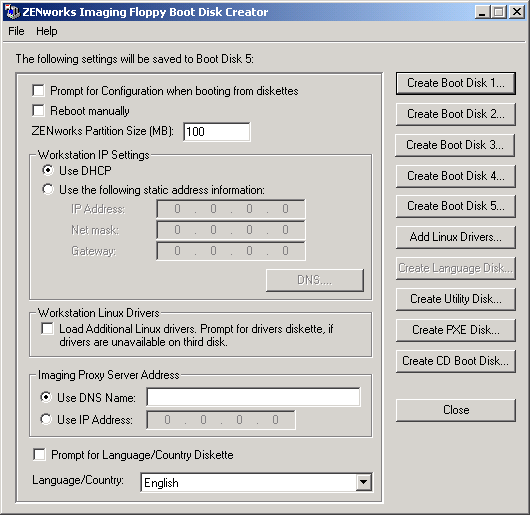
Create Imaging Boot Diskettes
Imaging boot diskettes are easy to prepare. Five diskettes are required, six if you need to image workstations that have non-English keyboards.
To create imaging boot diskettes:
-
Format five high-density diskettes, or use preformatted blank diskettes.
If you need the imaging boot diskettes to include support for booting workstations with a non-English keyboard, you need a sixth diskette.
-
Browse to the SYS:\public\zenworks\imaging folder in your Desktop Management installation (on the Imaging server) and run zimgboot.exe.
HINT: You can also start zimgboot.exe in ConsoleOne by clicking Tools > ZENworks Utilities > Imaging > Create or Modify Boot Diskette.
-
In the ZENworks Imaging Floppy Boot Disk Creator dialog box, near the bottom under Imaging Proxy Server Address, specify either the fixed IP address or the full DNS name of your Imaging server.
-
For the other fields and options on the dialog box, keep the default settings unless you have a specific reason to change a setting, such as to include support for a non-English keyboard. Click Help for details on specific settings.
-
Click Create Boot Disk 1, insert the first diskette, then click OK.
-
When the first diskette has been created, click Create Boot Disk 2, insert the second diskette, then click OK.
-
When the second diskette has been created, click Create Boot Disk 3, insert the third diskette, then click OK.
-
When the third diskette has been created, click Create Boot Disk 4, insert the fourth diskette, then click OK.
-
When the fourth diskette has been created, click Create Boot Disk 5, insert the fifth diskette, then click OK.
-
(Conditional) If you need the imaging boot diskettes to include support for a non-English keyboard: When the fifth diskette has been created, click Create Language Disk, insert the sixth diskette, then click OK.
For more information, see Booting with a Non-English Keyboard.
-
When the last (fifth or sixth) diskette has been created, click Close.
After you have created the diskettes, you can customize them for the particular imaging tasks for which you will use them, such as one set of diskettes for connecting to a server that holds Windows 2000 images, another set for connecting to a server that holds Windows XP images, and another set for installing Desktop Management Workstation Imaging (Linux) partitions. To customize the diskettes, edit the settings.txt file on the fifth diskette as explained in Imaging Configuration Parameters (Settings.txt).
When you boot a workstation using imaging boot diskettes, you are prompted when to insert the second, third, fourth, and fifth diskettes, and when to insert the language diskette (if you created one).
NOTE: You can also use the Imaging Boot Disk Creator (zimgboot.exe) to create a diskette that contains Linux utilities. See the Help in the Boot Disk Creator for more information.
Prepare a CD Boot Diskette
The CD boot diskette is easy to prepare. One diskette is required. The zimgboot.exe utility is used to create the diskette, which is used to enable devices that cannot normally boot a CD or DVD to do so.
To create a CD boot diskette:
-
Format one high-density diskette, or use a preformatted blank diskette.
-
Browse to the SYS:\public\zenworks\imaging folder in your Desktop Management installation (on the Imaging server) and run zimgboot.exe.
HINT: You can also start zimgboot.exe in ConsoleOne by clicking Tools > ZENworks Utilities > Imaging > Create or Modify Boot Diskette.
-
Insert the formatted blank diskette, click Create CD Boot Disk, then click OK.
-
When the diskette has been created, click Close.
Use this diskette to boot workstations that cannot be booted using a CD or DVD. The diskette boots the workstation, enabling access to the imaging CD or DVD.
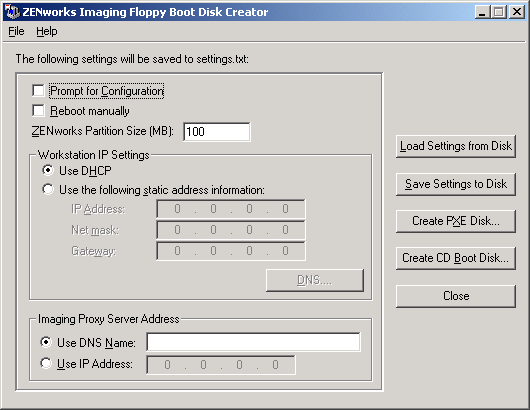
Configure the Settings.txt File
The settings.txt file is required for imaging workstations. A default copy is provided with Desktop Management that you can use to create and configure a version for an imaging session.
To configure a settings.txt file for imaging:
-
Format one high-density diskette, or use a preformatted blank diskette.
-
Browse to the SYS:\public\zenworks\imaging folder in your Desktop Management installation (on the Imaging server) and run zimgboot.exe.
HINT: You can also start zimgboot.exe in ConsoleOne by clicking Tools > ZENworks Utilities > Imaging > Create or Modify Boot Diskette.
-
Click Load Settings from Disk.
This allows you to browse for the settings.txt file. Then, it populates the fields in this dialog from information in the settings.txt file after you locate it in the next step, which you can modify in subsequent steps.
-
Browse for the settings.txt file, then click Open.
The default copy shipped with Desktop Management is located in the \zenworks\imaging folder on your imaging server.
-
(Required) In the ZENworks Imaging Floppy Boot Disk Creator dialog box, in the Imaging Proxy Server Address section, specify either the fixed IP address or the full DNS name of your imaging server.
-
(Optional) For the other fields and options on the dialog box, keep the default settings, unless you have a specific reason to change a setting, such as to specify a particular device's IP Address in the Workstation IP Settings section.
Click Help for details on specific settings, or see Imaging Configuration Parameters (Settings.txt).
-
Click Save Settings to Disk.
-
Browse for where you want to save the settings.txt file, then click Save.
The default location is A:\. You can save to a different location for use in burning it to an imaging CD or DVD.
-
When you are finished using this utility, click Close.
Create A Utility Disk
You can use the Boot Disk Creator to create a diskette that contains Linux utilities, such as df (shows disk usage), fdisk, less, more, host (performs DNS lookups in order to convert DNS names to IP addresses), ldd (shows shared library dependencies), pico (text editor), sed (stream file editor), and touch (changes file time stamps). These utilities are not needed to perform imaging, but they might be useful to you for debugging purposes when imaging is booted to manual or maintenance mode.
To create the utility disk:
Using zimgboot.exe in ZENworks 6.5 SP2 and Later
You can do the following with the new zimgboot.exe:
Prepare a CD Boot Diskette
The CD boot diskette is easy to prepare. One diskette is required. The zimgboot.exe utility is used to create the diskette, which is used to enable devices that cannot normally boot a CD or DVD to do so.
To create a CD boot diskette:
-
Format one high-density diskette, or use a preformatted blank diskette.
-
Browse to the SYS:\public\zenworks\imaging folder in your Desktop Management installation (on the Imaging server) and run zimgboot.exe.
HINT: You can also start zimgboot.exe in ConsoleOne by clicking Tools > ZENworks Utilities > Imaging > Create or Modify Boot Diskette.
-
Insert the formatted blank diskette, click Create CD Boot Disk, then click OK.
-
When the diskette has been created, click Close.
Use this diskette to boot workstations that cannot be booted using a CD or DVD. The diskette boots the workstation, enabling access to the imaging CD or DVD.
Configure the Settings.txt File
The settings.txt file is required for imaging workstations. A default copy is provided with Desktop Management that you can use to create and configure a version for an imaging session.
To configure a settings.txt file for imaging:
-
Format one high-density diskette, or use a preformatted blank diskette.
-
Browse to the SYS:\public\zenworks\imaging folder in your Desktop Management installation (on the Imaging server) and run zimgboot.exe.
HINT: You can also start zimgboot.exe in ConsoleOne by clicking Tools > ZENworks Utilities > Imaging > Create or Modify Boot Diskette.
-
Click Load Settings from Disk.
This allows you to browse for the settings.txt file. Then, it populates the fields in this dialog from information in the settings.txt file after you locate it in the next step, which you can modify in subsequent steps.
-
Browse for the settings.txt file, then click Open.
The default copy shipped with Desktop Management is located in the \zenworks\imaging folder on your imaging server.
-
(Required) In the ZENworks Imaging Floppy Boot Disk Creator dialog box, in the Imaging Proxy Server Address section, specify either the fixed IP address or the full DNS name of your imaging server.
-
(Optional) For the other fields and options on the dialog box, keep the default settings, unless you have a specific reason to change a setting, such as to specify a particular device's IP Address in the Workstation IP Settings section.
Click Help for details on specific settings, or see Imaging Configuration Parameters (Settings.txt).
-
Click Save Settings to Disk.
-
Browse for where you want to save the settings.txt file, then click Save.
The default location is A:\. You can save to a different location for use in burning it to an imaging CD or DVD.
-
When you are finished using this utility, click Close.