Customizing the Hardware Inventory Information To Be Scanned
This section describes how to customize the inventory information.
- Customizing the Hardware Inventory Scanning of Inventoried Workstations
- Scanning for IBM Computer Models
- Customizing the Hardware Scanning Information of Jaz, Zip, and Floppy Drive Vendors
- Scanning for Vendor-Specific Asset Information from DMI
- Customizing the Hardware Information for Monitor's Size
Customizing the Hardware Inventory Scanning of Inventoried Workstations
ZENworks 6.5 Desktop Management allows you to collect information that is not part of the default hardware inventory from the inventoried workstations.
To collect information that is not part of the default inventory from the inventoried workstations, you must define attributes and their corresponding values for an Inventory class. By default, each Inventory class has its own attributes called as regular attributes and the values corresponding to the regular attributes are called as regular attribute values. The Inventory Scanner stores the user-defined attributes (called as custom attributes) and the corresponding values along with the regular attributes' values. of the class in the Inventory database. This process is called custom hardware inventory scanning.
For example, you can add a custom attribute named Rate to the Processor table. The Inventory Scanner scans for the regular attribute values such as the processor type and stores the values of the Rate and the Processor Type in the Inventory database.
The following table lists the Inventory class and the regular attributes.
NOTE: The * in the table given below indicates that you need to specify the values in bytes. The + in the table given below indicates that you need to specify the enumerated values for these attributes. For more information on enumerated values, see Enumeration Values.
The following sections give information on the tasks you need to perform to do custom scanning:
- Adding Custom Attributes
- Using the Custom.ini File to Add Custom Attribute Values
- Guidelines for Creating the CUSTOM.INI File
- Viewing Custom Attributes and Custom Attribute Values
- Custom Inventory Scanning Examples
Adding Custom Attributes
To add custom attributes to an Inventory class:
-
In the Workstation Inventory policy, click the Hardware Scan tab.
-
Select Enable Custom Scanning.
-
Click the Custom Attribute Editor.
-
In the Custom Attribute Editor dialog box, click Add.
-
From the Class Name drop-down list, select the class where you want to add the custom attribute. For example: Processor
-
Enter the custom attribute name in the Attribute Name field. For example: Rate.
-
Click OK.
You can add more than one custom attribute for a class.
-
Click OK, click Apply, then click OK.
Using the Custom.ini File to Add Custom Attribute Values
To add values to the custom attributes, you must create the custom.ini file. The administrator must communicate the list of Inventory classes to which the custom attributes can be added. The Inventory Scanner uses the custom.ini file to get information about custom attributes and their corresponding values.
The contents of a custom.ini file are as follows:
[START_CIM_OBJECT]
Class = Inventory_Class_Name_as_displayed_in_the_Custom_Attribute_Editor_dialogbox or Inventory_Class_Name_in_Inventory_database
RegularAttrs = regular_attribute_name1, regular_attribute_name2, ..., regular_attribute_nameN
RegularVals = regular_attribute_value1, regular_attribute_value2, ..., regular_attribute_valueN
Action = A/D
custom_attribute = custom_attribute_value
custom_attribute = custom_attribute_value
...
...
custom_attribute = custom_attribute_value
[END_CIM_OBJECT]
where Class is a predefined Inventory class name (for the list of the predefined Inventory class names, refer to the Inventory Class Name and Regular Attributes table), RegularAttrs indicates the list of regular attribute names, RegularVals indicates the corresponding regular attribute values, the Action value A indicates the specified custom attributes to be added to the database table, and the Action value D indicates the specified custom attributes to be deleted from the database table.
You can enter comments after the semicolon (;). The data after the semicolon is ignored by the Scanner.
In the custom.ini file, the content between [START_CIM_OBJECT] and [END_CIM_OBJECT] is called as a "section". The first three lines within the section are called as a query.
A sample custom.ini file that has one regular attribute, one regular attribute value, and one custom attribute and value is as follows:
[START_CIM_OBJECT]
Class = Computer System Information       ;Inventory class name
RegularAttrs = Name                  ;Regular attribute name
RegularVals =  John                   ;Regular attribute value
Action = A
Employee Number=BLR_5000234    ;Custom attribute and its value
[END_CIM_OBJECT]
In the above query, the employee number is added to the CIM.UnitaryComputerSystem table if the value of the Name attribute is John.
You can create a custom.ini file using either of the following methods:
- Use a text editor to create a custom.ini file and save it in the windows_installation_drive/zenworks directory of the inventoried workstation.
- Develop an application to automatically generate the custom.ini file and place the file in the windows_installation_drive/zenworks directory of the inventoried workstation. You must save the application in windows_installation_drive/zenworks directory of the inventoried workstation.
After developing the application, go to the Workstation Inventory policy's Hardware Scan tab, select the Enable Custom Scanning option, and specify the name of the application. For more information, see Configuring the Workstation Inventory Policy.
This application is launched by the Scanner.
Guidelines for Creating the CUSTOM.INI File
Follow these guidelines as you work with the custom.ini file:
- If the Inventory class name is not specified, the custom attributes and their corresponding values are added to the CIM.UnitaryComputerSystem table.
- If the regular attribute name is not specified, the custom attributes and their corresponding values are added to the appropriate Inventory class only if one instance of the Inventory class exists in the Inventory database.
If multiple instances of the Inventory class exist, you must specify a minimum set of regular attributes and their corresponding values to distinguish the instances.
- Each regular attribute must have a corresponding value.
- If the action to be performed (addition or deletion) is not specified, the custom attribute values is added to the appropriate Inventory class.
- Do not use a semicolon (;) in a custom attribute name or custom attribute value. The data after the semicolon (;) is ignored by the Scanner.
- Use only alphanumeric characters in the custom attribute name.
- If the custom attribute value is a date, you must enter the date value in the format YYYY-MM-DD (year-month-day).
- If a query has more than one regular attribute or regular attribute value, use a comma (,) as the separator between regular attribute names and regular attribute values.
- If a regular attribute value has a comma (,) in it, precede the comma with a backslash (\).
For example, if the regular attribute value is "Novell, Ltd.", the regular attribute value should be written as follows in the custom.ini file:
Novell\, Ltd.
- A custom.ini file can have more than one section.
A sample custom.ini file with two sections is as follows:
[START_CIM_OBJECT]
Class = Computer System Information
RegularAttrs = Name, PrimaryOwnerContactID
RegularVals = John, 56
Action = D
EmployeeName= Tom
EmployeeId=568
[END_CIM_OBJECT]
[START_CIM_OBJECT]
Class = Diskette Drive
RegularAttrs = DisketteDeviceID
RegularVals = A:
Action = A
Manufacturer = Sony
[END_CIM_OBJECT] - If a query returns multiple instances for regular attributes, the custom attribute and its corresponding values are not added to the Inventory database.
For example, a workstation has two floppy drives, one mapped to A: and the other to B:, and the storage capacity of both the drives is 1440 KB. If you want to add "Rate" as the custom attribute, you cannot write a query using only the DisketteCapacity regular attribute as follows:
[START_CIM_OBJECT]
Class = Diskette Drive
RegularAttrs = DisketteCapacity
RegularVals = 1440
Action = A
Rate = $100
[END_CIM_OBJECT]
The above query returns two instances. One is the floppy drive mapped to a: and the other is the floppy drive mapped to b:. The custom attribute and its value are not added to the Inventory database.
You could rewrite the custom.ini file as follows:
[START_CIM_OBJECT]
Class = Diskette Drive
RegularAttrs = DisketteDeviceID
RegularVals = A:
Action = A
Rate = $100
[END_CIM_OBJECT]
[START_CIM_OBJECT]
Class = Diskette Drive
RegularAttrs = DisketteDeviceID
RegularVals = B:
Action = A
Rate = $100
[END_CIM_OBJECT]
Viewing Custom Attributes and Custom Attribute Values
You can view the custom attributes and the values of all the inventoried workstations in the Workstation Inventory. For more information, see Viewing the Inventory Summary of an Inventoried Workstation.
Custom Inventory Scanning Examples
Example 1: Adds the custom attributes Employee Name and Employee Code with values of XYZ and BLR_TERCH_5000234 respectively to CIM.UnitaryComputerSystem.
Using the Custom Attribute Editor dialog box, add Employee Name and Employee Code to Computer System Information.
Create the custom.ini file with the following contents:
[START_CIM_OBJECT]
Employee Name = XYZ
Employee Code = BLR_TERCH_5000234
[END_CIM_OBJECT]
After creating the custom.ini file, run the Novell Desktop Management Scheduler to start the scan.
Example 2: Adds the custom attributes Price and Value $4.00 to ZENworks.ExtendedDisketteDrive if the value of the regular attribute DisketteDeviceID is A:. Also adds custom attribute Price with a Value $8.00 to ZENworks.ExtendedDisketteDrive if the value of the regular attribute DisketteDeviceID is B:
Using the Custom Attribute Editor dialog box, add Price to Diskette Drive.
Create the custom.ini file with the following contents:
[START_CIM_OBJECT]
Class =Diskette Drive
RegularAttr = DisketteDeviceID
RegularVals = A:
Price = $4.00
[END_CIM_OBJECT]
[START_CIM_OBJECT]
Class = Diskette Drive
RegularAttr = DisketteDeviceID
RegularVals = B:
Price = $ 8.00
[END_CIM_OBJECT]
After creating the custom.ini file, run the Novell Desktop Management Scheduler to start the scan.
Example 3: Deletes the custom attribute Employee Name from CIM.UnitaryComputerSystem.
Create the custom.ini with the following contents:
[START_CIM_OBJECT]
Action = D
Employee Name = XYZ
[END_CIM_OBJECT]
After creating the custom.ini file, run the Novell Desktop Management Scheduler to start the scan.
Example 4: To reset the value of Employee Code from BLR_TERCH_5000234 to BLR_TEST_1200012 in CIM.UnitaryComputerSystem
Create the custom.ini file with the following contents:
[START_CIM_OBJECT]
Action = A
Employee Code = BLR_TEST_1200012
[END_CIM_OBJECT]
After creating the custom.ini file, run the Novell Desktop Management Scheduler to start the scan.
Example 5: Adds the custom attributes Price with value $100.00 to CIM.Processor if the values of the regular attributes Family and MaxClockSpeed are 178 and 1500 respectively. Also adds the custom attributes Price with its value $250.00 to CIM.Processsor if the values of the regular attributes Family and MaxClockSpeed are 178 and 2000 respectively.
Using the Custom Attribute Editor dialog box, add Price to Processor.
Create the custom.ini file with the following contents:
[START_CIM_OBJECT]
Class = Processor
RegularAttr = Family, MaxClockSpeed
RegularVals = 178, 1500 ; Pentium 4 with MaxClockSpeed = 1500 MHz
Price = $ 100.00
[END_CIM_OBJECT]
[START_CIM_OBJECT]
Class = Processor
RegularAttr = Family, MaxClockSpeed
RegularVals = 178, 2000  ; Pentium 4 with MaxClockSpeed = 2000 MHz
Price = $ 2500.00
[END_CIM_OBJECT]
After creating the custom.ini file, run the Novell Desktop Management Scheduler to start the scan.
Scanning for IBM Computer Models
The IBMNAMES information (configured using the Configuration Editor > the IBMNAMES option in the Workstation Inventory policy) is used to get information about IBM inventoried workstations running under Windows 98. The Scanner reads the model name using the machine type and model number information specified in the Configuration Editor option of the Workstation Inventory policy.
Using the IBMNAMES information is an IBM-specific method of scanning model names of IBM inventoried workstations defined by the Scanner. If you have a new IBM inventoried workstation that is not listed in the Configuration Editor, the model number of the inventoried workstation will not be scanned. To add the machine type, model number, and model description of the new IBM inventoried workstation, you must edit the IBMNAMES information in the Configuration Editor using the Workstation Inventory policy. By adding this entry, you enable the Scanner to identify the new model name.
To add the IBM computer models:
-
In the Workstation Inventory policy, click the Configuration Editor tab.
For more information, see Configuring the Workstation Inventory Policy.
-
Click the IBMNAMES suboption, then click Set Defaults.
The default values are displayed.
[Product Names]
6260-??? = IBM PC 140
6272-??? = IBM PC 300GL
6282-??? = IBM PC 300GL
6284-??? = IBM PC 300GL
...
The format of each entry in the section is as follows:
4_bytes_machine_type-3_byte_model_number=model_description
For example, if the model is IBM PC 140 and the machine type is 6260, specify the model description as IBM PC 140. The entry in the ibmnames.ini is 6260-79T = IBM PC 140.
If you want the Scanner to scan for all IBM computer models of a particular machine type with the same model description, the 3_byte_model_number is specified with three question marks (???) as wildcard characters.
For example, to scan all models of a 6282 machine type with same model description, the entry is as follows:
6282-???=IBM PC 300GL
The machine type and model number are printed at the rear of the laptop or on the back side of the desktop workstation. For example, the 760E Thinkpad* model has the following label: TYPE 9546-A98.
-
Add or modify the entries.
If you specify incorrect values for the device ID entry, the device will not be displayed in the Inventory windows.
-
Click OK.
Customizing the Hardware Scanning Information of Jaz, Zip, and Floppy Drive Vendors
The scan information of the vendors for devices such as backup and floppy devices is usually unavailable on the inventoried workstation. Also, if the information is available, the vendor information does not usually contain the details. You can customize and update information about the vendors of these devices in Workstation Inventory policy > Configuration Editor > Zipped Names. The Scanners read this information during the hardware scanning process for these devices.
To customize and update the vendor information for display:
-
In the Workstation Inventory policy, click the Configuration Editor tab.
For more information, see Configuring the Workstation Inventory Policy.
-
Click the ZIPPED NAMES suboption, then click Set Defaults.
The default values are displayed.
[Identifier]
iomega ZIP 100=Iomega 100MB Backup Device
iomega jaz 1GB=Iomega 1GB Backup Device
IOMEGA ZIP 100 D.13=Iomega Corporation
IOMEGA ZIP 1GB D.13=Iomega Corporation
...
The format of each entry in the section is as follows:
[Identifier]
device_id=vendor_display_name_you_specify
where device_id is the unique ID generated and updated in the registry by the vendor during the installation of the device on the inventoried workstation.
For example, the contents of the section are as follows:
[Identifier]
iomega ZIP 100=Iomega 100MB Backup Device
This entry is for a 100 MB Zip drive installed on the inventoried workstation.
-
Add or modify the entries.
If you specify incorrect values for the device ID entry, the device is not displayed in the Inventory windows.
-
Click OK.
Scanning for Vendor-Specific Asset Information from DMI
-
In the Workstation Inventory policy, click the Configuration Editor tab.
For more information, see Configuring the Workstation Inventory Policy.
-
Click the Asset Information suboption, then click Set Defaults.
The following entries will be populated.
[ASSETTAG]
DMI1_CLASSNAME=
DMI1_ATTRIBUTEID=
DMI2_CLASSNAME=
DMI2_ATTRIBUTEID=
[SERIALNUMBER]
DMI1_CLASSNAME=
DMI1_ATTRIBUTEID=
DMI2_CLASSNAME=
DMI2_ATTRIBUTEID=
[MODEL]
DMI1_CLASSNAME=
DMI1_ATTRIBUTEID=
DMI2_CLASSNAME=
DMI2_ATTRIBUTEID=
[COMPUTERTYPE]DMI1_CLASSNAME=DMI1_ATTRIBUTEID=
[MODELNUMBER]DMI1_CLASSNAME=DMI1_ATTRIBUTEID=
-
Specify the values.
The Asset Information contains the following sections:
- Contains Asset Tag in the section [ASSETTAG]
- Contains Serial Number in the section [SERIALNUMBER]
- Contains Computer Model in the section [MODEL]
- Contains Computer Type [COMPUTERTYPE]
- Contains Computer Model Number [MODELNUMBER]
Each section contains the particular DMI Class name and DMI Class Attribute ID.
The format of Asset Information is as follows:
[ASSETTAG]
DMI1_CLASSNAME=DMI_class_name_for_asset_tag
DMI1_ATTRIBUTEID=DMI_attribute_ID_for_asset_tag
[SERIALNUMBER]
DMI1_CLASSNAME=DMI_class_name_for_serial_number
DMI1_ATTRIBUTEID=DMI_attribute_ID_for_serial_number
[MODEL]
DMI1_CLASSNAME=DMI_class_name_for_computer_model
DMI1_ATTRIBUTEID=DMI_attribute_ID_for_computer_model
The value of the Asset Information sections can have a maximum string length of 64 characters.
A DMI Class name can be any DMI class other than DMTF|COMPONENTID|00x.
If there is more than one DMI vendor implementing different custom DMI classes, you can specify multiple DMI classes. A maximum of five classes can be specified in these sections. For example, the asset information for five classes is as follows:
[ASSETTAG]
DMI1_CLASSNAME=DMI_class_name_for_asset_tag
DMI1_ATTRIBUTEID=DMI_attribute_ID_for_asset_tag
DMI2_CLASSNAME=DMI_class_name_for_asset_tag
DMI2_ATTRIBUTEID=DMI_attribute_ID_for_asset_tag
DMI3_CLASSNAME=DMI_class_name_for_asset_tag
DMI3_ATTRIBUTEID=DMI_attribute_ID_for_asset_tag
DMI4_CLASSNAME=DMI_class_name_for_asset_tag
DMI4_ATTRIBUTEID=DMI_attribute_ID_for_asset_tag
DMI5_CLASSNAME=DMI_class_name_for_asset_tag
DMI5_ATTRIBUTEID=DMI_attribute_ID_for_asset_tag
The Scanner processes DMI1 and if the values of DMI1 are valid, the Scanner does not process the remaining DMI classes.
-
Click OK.
-
Run the scans on the inventoried workstations.
Verify that the inventory information is in eDirectory Minimal Information and the Workstation Summary window.
Customizing the Hardware Information for Monitor's Size
The attributes scanned for a monitor includes the following:
Nominal Size: A number representing the diagonal width of the monitor (the distance from one corner of the screen to the opposite corner of the screen). For example, 17".
Viewable Size: A number representing the diagonal width of the screen image excluding the black borders around the image's edge. For example, 15.8".
The Inventory scanner automatically scans for the viewable size of the monitor of Windows inventoried workstations. Using the Workstation Inventory policy, you can customize the nominal size of the monitor to be reported.
IMPORTANT: The Inventory scanner reports inventory information for the monitors that are manufactured only after 1997.
To customize the scan of the nominal size of the monitor:
-
In the Workstation Inventory policy, click the Configuration Editor tab, then click the HWRules sub-option.
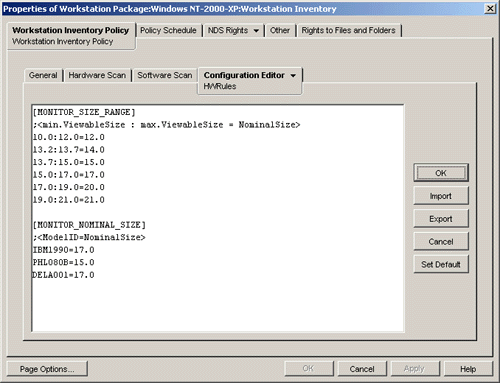
-
Click Set Default.
The default values are displayed in the Configuration Editor box.
-
Add or modify the entries.
The format of HWRules.ini is as follows:
[MONITOR_SIZE_RANGE]
minimum_viewable_size_you_specify: maximum_viewable_size_you_specify = nominal_size_you_specify
[MONITOR_NOMINAL_SIZE]
model_ID_reported_by_scanner = nominal_size_you_specify
In the [MONITOR_SIZE_RANGE] section, specify the minimum and maximum range of the viewable size, and the corresponding nominal size of the monitor. The Inventory scanner scans for the model ID of the monitor and reports the nominal size configured in the [MONITOR_NOMINAL_SIZE] section of the HWRules.ini file.
In the [MONITOR_NOMINAL_SIZE] section, specify the model ID and its corresponding nominal size as reported by the Inventory scanner. This information is available in the Inventory Summary dialog box under the Hardware/Software Inventory > Hardware > Monitor attribute.
If the scanned model ID is not listed in [MONITOR_NOMINAL_SIZE], then the scanner scans the viewable size of the monitors. On the basis the viewable size, the scanner reports the nominal size configured in the [MONITOR_SIZE_RANGE] section of the HWRules.ini file.
For example, the contents of the HWRules ini file could be as follows:
[MONITOR_SIZE_RANGE]
10.0:12.0=12.0
13.2:13.7=14.0
[MONITOR_NOMINAL_SIZE]
IBM1990=17.0
PHL080B=15.0
-
Click OK to save the contents to the Workstation Inventory policy.