Upgrading the ZENworks Handheld Management Server Software
Before upgrading the ZENworks Handheld Management Server, you must upgrade from ConsoleOne 1.3.5 to ConsoleOne 1.3.6. You must also prepare the directory by extending the Novell eDirectoryTM schema. To extend the schema, you must have root level admin privileges to the tree and you must have the Novell ClientTM installed.
Before running the schema extension tool, ensure that you are logged in to the tree that you want to extend.
To extend the schema:
-
Insert the ZENworks Handheld Management CD on a machine that has the Novell Client running.
The installation program will autorun. If it does not, run winsetup.exe from the root of the CD.
-
Select Handheld Management.
-
Select the required language.
-
Click Schema Extension and Product Licensing
-
Select the eDirectory tree to be extended.
-
Click OK, then click Next.
-
Type the license code, then click Next > Finish.
-
Click View Log File.
or
Click OK.
To upgrade the ZENworks Handheld Management Server:
-
Click Handheld Management Services.
-
Click ZENworks Handheld Management Server.
-
Click Update, then click Next.
-
In the Select Components page, select the components you want to install:
Novell ConsoleOne Snap-In: Extends ConsoleOne functionality to allow you to manage handheld devices. This option is enabled by default.
RIM BlackBerry Device Support: Adds support for managing RIM BlackBerry devices. If you select this option, you must have a MAPI profile set up for e-mail access. For more information, see Creating a MAPI Profile (BlackBerry Device Support Only).
-
Click Next.
-
In the Start Copying Files page, review the settings, then click Next.
-
(Optional) In the Install Shield Wizard Maintenance Complete page, select the Display Readme File check box to review the Readme file for installation notes and product issues that you need to know as you install and use ZENworks Handheld Management.
-
(Optional) Select the Configure Access Point HTTP and SSL Settings check box if you want to enable HTTP encapsulation, configure secure sockets layer (SSL), or change the default port settings.
-
Click Finish.
-
(Conditional) If you checked Configure Access Point HTTP and SSL Settings in Step 8, see Configuring SSL and HTTP Settings for step-by-step instructions on enabling HTTP encapsulation, configuring SSL, and changing the default port settings, then continue with Step 11.
-
Click Next.
-
Review the information in the Service User page, then click Next.
-
Review the information in the Directory User Information page, then click Next.
-
In the Product Activation page, specify the type of installation that you want to perform:
-
Click Next.
-
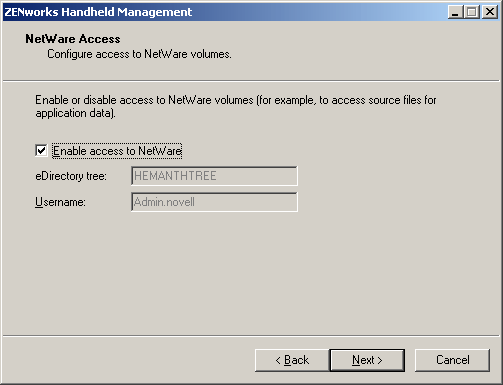
Review the information in the NetWare Access dialog box, then click Next.
If you want to access objects or store retrieved files on a Novell NetWare® volume in the specified tree, select the Enable Access to NetWare check box.
-
Review the information in the Handheld Service Object Configuration page, then click Next.
-
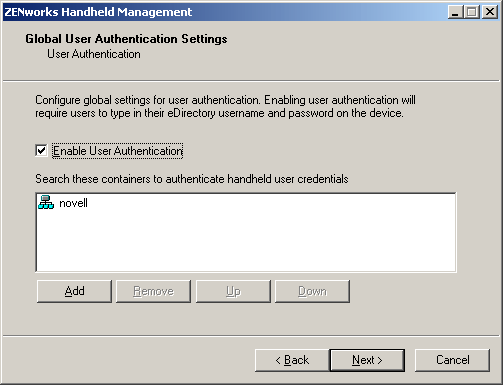
(Optional) In the Global User Authentication Settings dialog box, select the Enable User Authentication check box to require that users type their eDirectory usernames and passwords on the handheld device, click Add, specify the container where the users are going to be located, then click OK.
NOTE: You should select Enable User Authentication check box if you want to use user-based management rather than just using device-base management.
-
Click Next twice.
-
(Conditional) If you chose to enable RIM BlackBerry support, type the service user's e-mail address to be used by the BlackBerry client software, then select the MAPI profile that you created in Creating a MAPI Profile (BlackBerry Device Support Only), then click Finish.
-
Click Finish.