Managing Servers
With the Management Agent for NetWare and Management Agent for Windows software installed on your NetWare and Windows servers, respectively, you can begin collecting data, receive alarm notifications, remotely manage configuration, and generate reports for managed servers.
Server Management tasks you can perform with Novell ZENworks Server Management include:
- Displaying Server Configuration Information
- Displaying Summary Data
- Viewing Trend Data
- Managing Trend Samplings
- Configuring Server Parameters
- Executing Server Commands
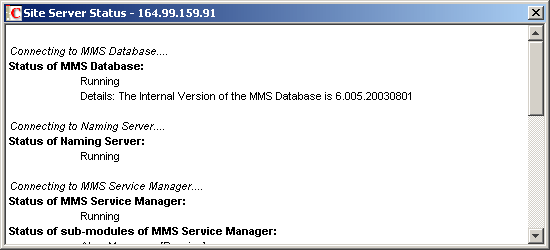
- Management Site Server Status
Displaying Server Configuration Information
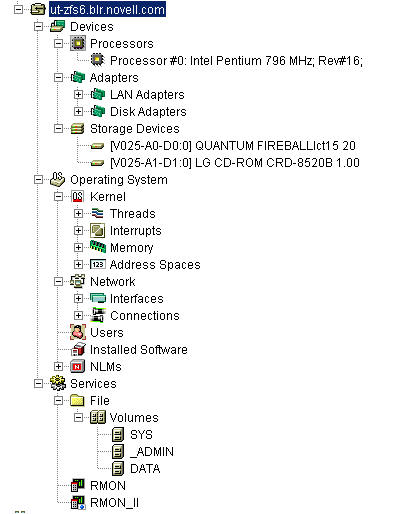
Server configuration data is organized in a hierarchical listing expanding down from the server object. You can view information about the server's configuration, memory usage, adapters, network interfaces, disks and disk controllers, volumes, queues, users, connections, open files, NLM files (NetWare), and installed software.
To display server configuration information:
-
Locate the server object you want to expand.
-
Click the plus sign (+) next to the server object.
The server object opens in the left pane under its parent object and the server contents are displayed. Server data is grouped into the following three categories:
 Devices
  Operating System
  Services
If you are unable to view the above three categories, you must perform probe manageability on the server object. Right-click the server object then select Probe Manageability. The three categories will now be displayed.
-
You can drill down into the server configuration farther by clicking the plus signs next to the Devices, Operating System, and Services objects as in the following example.
Displaying Summary Data
The Summary View contains tables of statistics obtained by SNMP GET requests to the Management Agent for NetWare and Management Agent for Windows software hosted on managed servers. Statistics are updated dynamically as the server is continually polled for data. Polling utilizes SNMP GET and GET NEXT requests to update the data. You can also control the polling of a selected object by using the stop and refresh functions.
You can view summary data for server, processors, LAN adapters, disk adapters, storage devices, threads, interrupts, memory, address spaces, interfaces, connections, users, installed software, NLM files (NetWare), and volumes. For detailed information about a specific Summary view, see Object Hierarchy and View Details.
To display summary information:
-
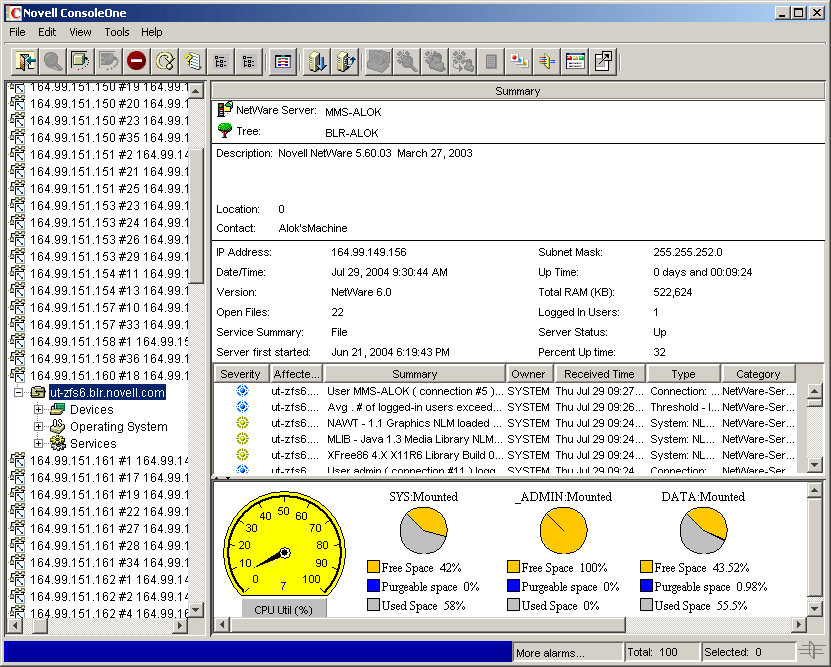
Right-click the object for which you want to view summary data, then click Views and then click Summary.
The Summary View is displayed. The following screen shows the Summary View for a server object. The server summary provides descriptive information including the server's Novell eDirectory name and tree, IP address, RAM, operating system and version, IPX address, subnetwork mask, up time, logged-in users, open files, and status. In addition, the server summary lists all alarms, affected objects, summary, and owner and volume disk space, trend graphs for cache hits and cache buffers. The Summary view displays graphical indicators of the CPU utilization that depicts the average percentage of time that the CPU was not idle for the past minute.
Viewing Trend Data
On a server managed by Management Agent for NetWare or Management Agent for Windows, the agents automatically gather trend data on CPU usage, memory usage, and network interface traffic. You can then view current trend data, or historical trend data by hour, day, week, month, or year from Novell ConsoleOne. In this view, the time interval that is being sampled is displayed on the x-axis. The parameter value over the sample period is plotted on the y-axis. Note that the values on the y-axis use the standard abbreviations K (for kilo), M (for mega), and G (for giga). Therefore, a value of 1K would equal 1000; similarly, a value of 1M would equal 1,000,000.
Monitoring trend data helps you with tasks such as setting trend alarm thresholds, determining who is using the server and when the server is used heavily, troubleshooting problems, balancing loads across multiple servers, and planning resources. You can also export trend view data to popular spreadsheet formats for sharing data with others.
You can view trend data for processors, LAN adapters, storage devices, memory, connections, users, and volumes. For information about a specific trend view, see Object View Details.
To view trend statistics:
-
Right-click the object for which you want to view trend data then click Views, and then click Trend.
The Trend View is displayed. The following sections describe the tasks you can perform using the Trend View:
Displaying the Legend
The Trend View legend indicates what each color in the graph represents.
To display the legend:
 in the Trend View toolbar.
Modifying the Time Span
The Trend View time span specifies what time period the trend graphs represent. By default, a one-hour history is displayed.
To modify the time span:
Customizing the Trend View Display
The Trend View provides several options for customizing the look of the screen. In customizing the view, you can choose from the following options:
Displaying Grid Lines
By default, the trend charts do not include grid lines.
To display horizontal and/or vertical grid lines:
 button in the Trend View toolbar.
 button in the Trend View toolbar.
Stacking and Unstacking Graphs
By default, all trends are displayed on a single graph with one vertical axis. However, you can customize the view so that each trend is displayed in its own separate graph.
To stack and unstack graphs:
 button on the Trend View toolbar.
 button on the Trend View toolbar.
Scaling the Y Axis
To display more useful information on your trend graphs, you may find that you need to modify the scale on the Y axis as follows:
-
To increase the scale on the Y axis, click the Increase Y Axis
 button, which is located to the left of the graph(s).
 -
To decrease the scale on the Y axis, click the Decrease Y Axis
 button, which is located to the left of the graph(s).
 -
To scale the Y axis to fit in the window, click the Scale to Fit
 button on the Trend View toolbar.
Modifying the Trend View Profile
The Trend View profile represents the set of parameters that are displayed graphically when the Trend View is invoked. You can modify which parameters are displayed in the Trend View by editing the profile.
To edit the profile:
-
Click the Profile button
 in the Trend View toolbar.
The Profile dialog box is displayed. The parameters that are currently displayed in the Trend View for the object are selected.
-
Edit the profile by clicking a parameter name to select or deselect it.
You can Shift+click multiple, consecutive parameters and Ctrl+click multiple, non-consecutive parameters.
-
Click OK.
Managing Trend Samplings
You can customize the parameters of the trend data displayed using the following options:
Modifying Trend Sampling and Intervals
For each trend for which the server agents collect data, you can set sampling intervals and the number of samples stored on the server as follows:
-
Right-click the object then click Properties.
-
Click the Trend tab.
-
Select the trend parameter you want to modify then click Edit.
The Edit Trend dialog box is displayed. The trend sampling and interval settings are displayed in the Sampling Parameters section of the screen.
-
To enable or disable the sampling parameter, select the appropriate value from the State drop-down list.
-
To modify the time interval (Sample Interval) at which the trend parameter is sampled, select a value from the Frequency drop-down list.
You can select one of 12 possible time intervals from five seconds to one day.
-
Specify the duration of time for which to collect samples by entering a value in the Number of Samples field.
You determine the duration of time for which a parameter is collected by the number of samples (trend buckets) you specify. You must specify a trend bucket for each sample that is collected over a specific period of time. For more information on setting the number of samples required, see Setting the Trend Buckets.
-
When you are done modifying the trend sampling and intervals, click OK.
Modifying Threshold Alarm Settings
You can set an alarm threshold for each trend parameter for which the Management Agent for NetWare and Windows, collects data. After you set the alarm threshold, the Management Agent for NetWare sends an alarm to Novell ConsoleOne if the trend crosses the threshold you set.
The Management Agent for NetWare tracks both rising and falling alarm thresholds. Each trend parameter has either a rising or a falling threshold associated with it; the type of threshold cannot be changed.
To change alarm thresholds through Novell ConsoleOne:
-
Right-click the object then click Properties.
-
Click the Trend tab.
-
Select the trend parameter for which you want to modify threshold settings then click Edit.
The Edit Trend dialog box is displayed. The threshold alarm settings are displayed in the Rising Alarm Parameters section of the screen.
-
To enable or disable the alarm parameter, select the appropriate value from the State drop-down list.
-
To set or modify the rising threshold, enter a value in the Rising Threshold field.
-
To set or modify the falling threshold, enter a value in the Falling Threshold field.
-
When you are done modifying the alarm threshold settings, click OK.
Configuring Server Parameters
In order to correct an alarm condition, fine-tune server performance, or fix other problems detected on a server, you need to modify the server configuration. Server configuration can be adjusted from Novell ConsoleOne on any NetWare server hosting the Management Agent for NetWare. SET parameters, usually set at the server console or through a remote console, can be configured from Novell ConsoleOne interface. From Novell ConsoleOne, you can see the current settings, change one or more settings, and confirm your settings before adjustments are sent to the server.
For parameter values and descriptions, see the NetWare server documentation. This information is generally found in the Utilities Reference document.
To view or modify the NetWare SET parameters from Novell ConsoleOne:
-
Drill down into the server you want to configure by clicking the plus sign (+) next to the server object.
-
Right-click the Operating System object then click Properties.
The Set Parameters tab is displayed. This tab page lists the NetWare SET parameters and their current values.
-
Click the down-arrow icon on the Set Parameters tab then click the category of SET parameters you want to display.
You can choose from the following categories: Communications, Directory Caching, Directory Services, Disk, Error Handling, File Caching, File System, Licensing Services, Locks, Memory, Miscellaneous, Multiprocessor, NCP, Service Location Protocol, Time, or Transaction Tracking.
-
Select the parameter you want to modify then click Edit.
The Edit Parameters dialog box is displayed.
-
Enter the new parameter value in the appropriate field.
-
Indicate when you want the parameter change to take effect by selecting the appropriate radio button from the Apply Value box. You can choose to apply the change at the following times:
- Now, until reboot
- Only after reboot
- Now, and after reboot
-
Click OK.
Executing Server Commands
You can execute the following frequently used NetWare server commands from Novell ConsoleOne.
- Loading and Unloading an NLM
- Mounting and Dismounting Volumes
- Clearing a Server Connection
- Restarting a Server
- Shutting Down a Server
Clearing a Server Connection
You can clear a server connection when the server has crashed and left open files on the server or before bringing down the server. This is equivalent to the CLEAR STATION command that you can execute from the server console.
To clear a server connection from Novell ConsoleOne: