What's New in the ZENworks 6.5 Server Management Initial Release
The following sections describe software changes between ZENworks 6.5 Server Management and ZENworks for Serves 3.0.2:
- General Changes
- Policy and Distribution Services
- Server Inventory
- Remote Management
- Management and Monitoring Services
For installation instructions, see Installation.
General Changes
The following sections outline what's new in general for Server Management:
- Supported Platforms Updated
- ConsoleOne Tools Menu Reorganized
- New File System Standard Used in Upgrading Linux and Solaris Servers
- New Default ZENworks Database Object Names
Supported Platforms Updated
Novell ZENworks 6.5 Server Management supports the following platforms:
- NetWare® 5.1 SP5, SP6 and SP7
- NetWare 6 SP4 and SP5
- NetWare 6.5 SP1a and SP2
- SUSE® LINUX Enterprise Server 8 and 9
- SUSE LINUX Standard Server 8 and 9
- Red Hat Advanced Server 2.1
- Red Hat Enterprise Server 2.1
- Red Hat Enterprise Linux* AS 3
- Red Hat Enterprise Linux ES 3
- Solaris* 9 (only Policy and Distribution Services)
- Windows* 2000 SP4 and Windows Server 2003 (Standard or Enterprise Edition)
For more information, see Server Requirements.
The following platforms are generally not supported by ZENworks 6.5 Server Management:
- NetWare 4.x
- NetWare 5.0
- Windows NT* 4
For more information, see Server Requirements.
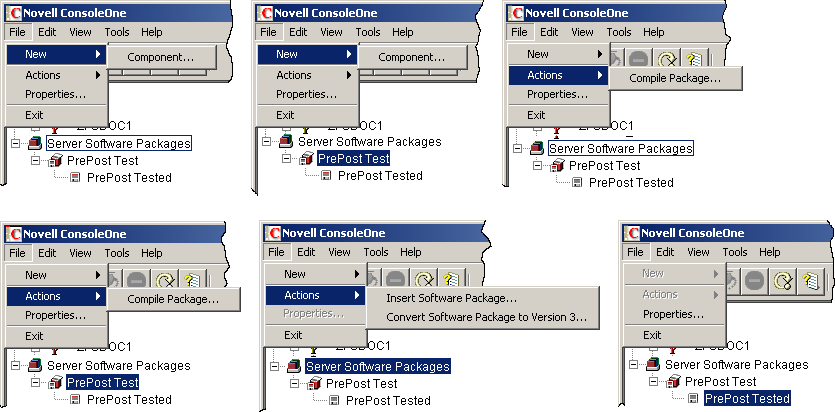
ConsoleOne Tools Menu Reorganized
Various Novell ConsoleOne® menu options were moved to different menu locations to improve ease of use. However, when right-clicking a ZENworks 6.5 eDirectory object, the options remain as they were in ZENworks for Servers 3.x.
The following illustrations show where menu options now exist. Only the menu options specific to ZENworks Server Management are shown.
Several options were removed from the File menu, leaving the following:
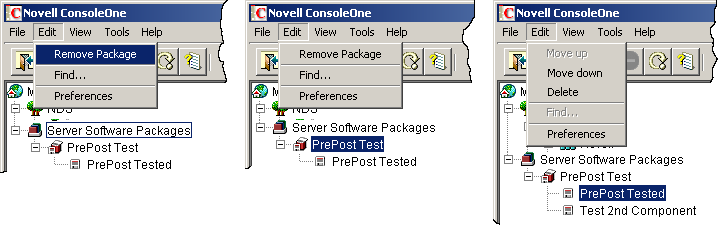
The Edit menu contains the following options:
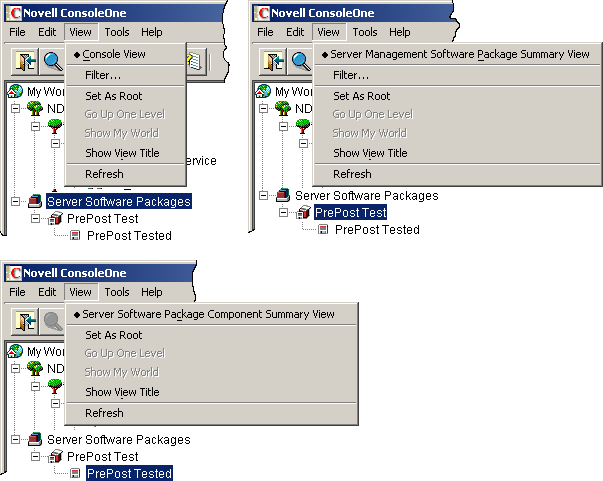
The View menu contains the following options:
The Tools menu has been expanded and now contains the following options:
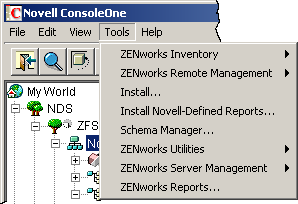
The Tools > ZENworks Inventory menu selection has the following options:

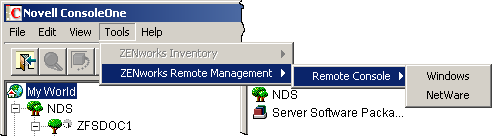
The Tools > ZENworks Remote Management menu selection has the following options:
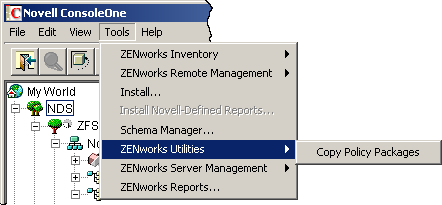
The Tools > ZENworks Utilities menu selection has the following option:
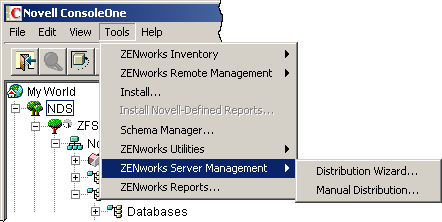
The Tools > ZENworks Server Management menu selection has the following options:
New File System Standard Used in Upgrading Linux and Solaris Servers
The ZENworks 6.5 Server Management file structure for Policy and Distribution Services has been changed to comply with the Linux File System Standards.
The following sections show the path and filename changes:
Service Script
The script that starts and stops Policy and Distribution Services has had its filename changed for version 6.5.
Old |
/etc/init.d/zfs |
New |
/etc/init.d/novell-zfs |
Log Files
The default log file locations and filenames have changed for version 6.5. However, if you are upgrading, the log files remain in the previous location.
Working Directories
The default working directories have changed for version 6.5. However, if you are upgrading, the working directories remain unchanged.
Security Directory
The location of the security directory has been changed. This is where you manually copy Distributors' certificates for encryption purposes or to establish a Distributor that the Subscriber can trust for receiving Distributions.
Old |
/usr/ZENworks/PDS/ted/security |
New |
/var/opt/novell/zenworks/zfs/pds/security |
New Sybase Version for the ZENworks Databases
Upgrading Policy and Distribution Services from ZENworks for Servers 3.x using the graphical upgrade program upgrades the Sybase engine to version 8.0.2, if it is not already at that version.
Upgrading Policy and Distribution Services from ZENworks for Servers 3.x using the .cpk file on the ZENworks 6.5 Companion 2 CD also upgrades Sybase 8.0.2.
If a zfslog.db file exists in ZENworks for Servers 3.x, it will not be replaced. If it does not exist, a new file will be installed during the upgrade.
New Default ZENworks Database Object Names
The following shows the old and new default database object names that are provided during installation:
| Old Database Name | New Database Name |
|---|---|
ZENworks Database |
Server Management Database_server_name |
server_name_Inventory Database |
Inventory Database_server_name |
No default name is given when creating a database object in ConsoleOne.
The policy names have not changed for the policies used by these databases.
Policy and Distribution Services
Policy and Distribution Services in ZENworks 6.5 Server Management provides the following new features or enhancements:
- New Consolidated Start File
- New Linux/Solaris Configuration Utility
- New Consolidated Log File
- New Server Policy: Prohibited File
- New Tiered Electronic Distribution Features
New Consolidated Start File
Previously, the zfs.ncf, ted.ncf, and zws.ncf files were used to individually start the separate Policy and Distribution Services processes. In version 6.5, they are combined into one service named ZENworks Server Management.
To start all Policy and Distribution Services processes:
Windows: Start the Windows service named Novell ZENworks Service Manager.
Linux/Solaris: Enter /etc/init.d/novell-zfs start at the terminal.
For more information, see Starting and Stopping Server Management Services.
The startup options found in the zfs.ncf, ted.ncf, and zws.ncf files are now contained in the zfs-startup.xml and zfsversion.ncf files. These newer files are located in:
NetWare: \zenworks\zfs-startup.xml and \zenworks\zfsversion.ncf
Windows: \zenworks\zfs-startup.xml and \zenworks\pds\bin\zfsservice.cfg
Linux/Solaris: /opt/novell/zenworks/bin/zfs-pds and /opt/novell/bin/zfs-pds-version
The NetWare console prompt for Server Management now defaults to:
ZENworks Server Management >
Because of the combined processes, the TED console prompt no longer exists on NetWare servers.
New Linux/Solaris Configuration Utility
A new utility has been provided for Linux and Solaris servers:
/opt/novell/bin/zfs-pds-configure
This utility has the following functions:
- Allows you to reconfigure your Distributors and Subscribers after they have been installed
- Allows you to quickly reinstall corrupted Distributor and Subscriber objects and code
New Consolidated Log File
For all platforms, the two log files:
defaultLog.txt
zfsinit.log
have been replaced with:
zfs-startup.log
After Tiered Electronic Distribution starts up and reads its configuration, all distribution-related logging is done to the ted.log file.
If a ZENworks Server Management policy is defined with a log file specified, the Policy/Package Agent starts logging to the specified file once it reads its policies. At that point, all that is left in zfs-startup.log are ZENworks Web Server messages.
Database logging continues to be made in the zfslog.log file.
New Server Policy: Prohibited File
Server Management has a new policy for the Distributed Server Package: Prohibited File policy. This new policy allows you to monitor and enforce the deletion or moving of unauthorized files from a specified volume/drive or directory.For example, you can automate deletion of .jpg, .mp3, and .avi files from a server. For more information, see "Prohibited File" in the Novell ZENworks 6.5 Server Management Administration Guide.
New Tiered Electronic Distribution Features
- Scalability
- FTP Support of Symbolic Links
- Special Character Handling
- Change in Maximum Concurrent Distributions Values
- New Option to Override a Subscriber's Extract Schedule
- Directory Sync Granularity for File Distributions
- Pre and Post Processing for File Distributions
- Cleaning Up Temporary Distribution Files
- Removing a Distribution Object - Auto Removal of Temporary Files
- Reassigning a Distribution to Another Distributor
- New Distribution Type: MSI Package
- Desktop Application Distribution Enhancements
Scalability
Server Management can efficiently process (send/receive/extract) Distributions that are large in size and contain a substantial number of files, such as an entire 4GB volume with greater than 50,000 file entries.
FTP Support of Symbolic Links
Server Management now supports retrieval of symbolic link files. This allows the Linux or Solaris environments to receive FTP files that would be considered invalid on other platforms.
Special Character Handling
Syntax differences (such as characters that are invalid to a platform) are now handled for each supported platform. For invalid characters, the agent properly gathers all files, regardless of platform of the Distributor server. The Subscriber server detects whether files in the Distribution package include invalid characters and ignores or skips files during extraction. Skipped files are logged. Previously, the whole Distribution would fail to extract and be installed.
Linux and Solaris support characters in file and directory names that NetWare and Windows do not recognize.
Change in Maximum Concurrent Distributions Values
The default value for the Maximum Concurrent Distributions field has been changed from a blank field (unlimited) to 5. The valid values are now restricted from 1 to 10. This change has been made to prevent a Distributor server from running out of memory and locking up when it tries to concurrently build too many large Distributions.
New Option to Override a Subscriber's Extract Schedule
For all Distribution types, a new option named Extract Immediately Upon Receipt has been added to the Schedule tab. This allows you to bypass a Subscriber's Extract schedule for a Distribution that needs to be extracted immediately (such as a Distribution the provides virus patterns), rather than wait for when the Subscriber's schedule normally fires.
With this new option, you have the ability to override the Send and Extract schedules. For more information, see Step 7 in "Creating a Distribution" in the Novell ZENworks 6.5 Server Management Administration Guide.
Directory Sync Granularity for File Distributions
The File Distribution has been enhanced with directory sync granularity, which allows you to specify synchronization at any directory level in the Distribution to provide synchronization "from here down." This provides much greater flexibility and more possible configurations than the previous versions of ZENworks for Servers allowed. For more information, see "Directory Sync Granularity for File Distributions" in the Novell ZENworks 6.5 Server Management Administration Guide.
Pre and Post Processing for File Distributions
Pre and post processing actions are new features for Distributions in ZENworks 6.5 Server Management to apply execution logic to a Distribution. The benefit of having pre and post actions in these Distribution types is that you are no longer restricted to using only Server Software Packages to perform those actions.
The pre and post processing actions are not available for the Policy Package and Desktop Application types of Distributions. For more information, see "Pre and Post Processing for Distributions" in the Novell ZENworks 6.5 Server Management Administration Guide.
Cleaning Up Temporary Distribution Files
To reduce the amount of disk space taken up by temporary Distribution files, those files are now automatically cleaned up. Previously, after a Subscriber server extracts a Distribution, the distfile.ted file is left in the Subscriber server's working directory. For more information, see "Clean Up of Temporary Distribution Files" in the Novell ZENworks 6.5 Server Management Administration Guide.
Removing a Distribution Object - Auto Removal of Temporary Files
Previously, when you deleted a Distribution or Channel object, removed a Distribution or Subscriber from a Channel, or in some way caused one or more Distributions to no longer be associated with one or more Subscribers, the Distributions' temporary files remained on the Subscriber servers, and you had to find them and delete them manually to recover disk space.
In version 6.5, when a Distributor refreshes, the temporary files of the Distributions that have been removed (either deleted or removed from a Channel) are automatically deleted from Subscribers to free up disk space. For more information, see "Removing a Distribution Object - Auto Removal of Temporary Files" in the Novell ZENworks 6.5 Server Management Administration Guide.
Reassigning a Distribution to Another Distributor
A single Distributor can service many Distributions, which could cause performance degradation on that Distributor's server. In version 6.5, there is a way to reassign a Distribution from one Distributor to another to balance the work load without needing to re-create the Distribution. You can select one or more Distributions and reassign them to another Distributor.
If you delete a Distributor object in ConsoleOne, you are asked if you want to reassign the Distributions that it services. For more information, see "Reassigning a Distribution to Another Distributor" in the Novell ZENworks 6.5 Server Management Administration Guide.
New Distribution Type: MSI Package
A new Distribution type has been added in ZENworks 6.5: MSI Package. It allows you to distribute Microsoft Software Installer (MSI) packages to Windows servers, where the MSI engine is used to install the Windows software included in an MSI Distribution. For more information, see Step 6 under "Creating a Distribution" in the Novell ZENworks 6.5 Server Management Administration Guide.
Desktop Application Distribution Enhancements
The Desktop Application Distribution has been enhanced in ZENworks 6.5:
eDirectory requirement for Windows servers has been removed: eDirectory is no longer required to be installed on Windows servers in order to process Desktop Application Distributions. Previously, eDirectory was required to be installed so that the server could create Application objects.
Application efficiencies have been improved: Previously, when sending a Distribution containing applications that share a common dependent application (such as Microsoft Office), the dependent application was added to the Distribution file multiple times, unnecessarily increasing its size.
Now, Desktop Application Distribution object configurations containing chained applications do not include multiple instances of the same dependent application in the Distribution file.
An option for rebuilding Distributions has been added: For more information on the Rebuild Only If Application Version Numbers Changed option, see Step 6b under "Creating a Desktop Application Distribution" in the Novell ZENworks 6.5 Server Management Administration Guide.
Support for mapped drives in source paths has been added: For more information on the Keep the Same Source Paths for the Replicated Objects option, see Step 6d under "Creating a Desktop Application Distribution" in the Novell ZENworks 6.5 Server Management Administration Guide.
A distribution delay has been reduced: The 60-second delay that was built in for when multiple applications are being distributed at the same time (whether by one or multiple Distributions), which allowed time for directory synchronization of the newly-created Application objects, is now a 30-second delay. For more information, see the IMPORTANT note at the end of the "Creating a Desktop Application Distribution" section in the Novell ZENworks 6.5 Server Management Administration Guide.
Server Inventory
Server Inventory in ZENworks 6.5 Server Management provides the following new features or enhancements:
- Enhancements in the Inventory Scan of Software Data
- New Inventory Reports
- Support for the Inventory database on Oracle 9i
- New Enhancements in the Inventory Scan of Hardware Data
- Exporting the Inventory Data to an XML File
- New User-Friendly Nomenclature for eDirectory Objects
Enhancements in the Inventory Scan of Software Data
The Inventory scanner has been enhanced with the following features that enables you to control the scanning process more effectively and efficiently:
- It supports scanning for the following software inventory information:
- Windows operating system and its patches
- Internet Explorer and its patches
- Windows Media Player and its patches
- Outlook Express and its patches
- Novell Client32TM and its installed components
- ZENworks suite and its installed components
- Microsoft Office and its installed applications
- Antivirus products such as Symantec* Antivirus Corporate Edition and McAfee* Antivirus
- Virus definition date and version for the antivirus products such as Symantec Antivirus Corporate Edition and McAfee Antivirus
- It supports scanning for the products listed in the Windows Add/Remove Programs and the MSI database.
- Includes dictionary of software titles to provide more accurate report of Installed software.
- Provides rules to control the scope of software scan.
- Reports total disk usage against configured file extensions.
For more information, see "Customizing the Software Inventory Information To Be Scanned For the ZENworks 6.5 or ZENworks 6.5 Support Packs Inventoried Servers" in the Novell ZENworks 6.5 Server Management Administration Guide.
New Inventory Reports
Server Inventory provides new software Inventory reports.
The Inventory reports that shipped with ZENworks for Servers 3.0.2 and the new reports in the ZENworks 6.5 Server Management have been regrouped.
For more information, see "Types of Inventory Reports" in the Novell ZENworks 6.5 Server Management Administration Guide.
Support for the Inventory database on Oracle 9i
ZENworks 6.5 allows the Inventory database to be configured for Oracle 9i setup on Windows servers in your network.
For more information, see "Creating the Oracle9i Inventory Database on a Windows Server" in the Novell ZENworks 6.5 Server Management Administration Guide.
New Enhancements in the Inventory Scan of Hardware Data
Server Inventory now supports scanning for monitors and system chassis.
For more information, see "Customizing the Hardware Information for Monitor's Size" in the Novell ZENworks 6.5 Server Management Administration Guide.
Exporting the Inventory Data to an XML File
Server Inventory allows you to export the inventory data from the Inventory database into an Extensible Markup Language (.xml) file by using the Data Export tool.
For more information, see "Exporting the Inventory Information" in the Novell ZENworks 6.5 Server Management Administration Guide.
New User-Friendly Nomenclature for eDirectory Objects
The nomenclature of the following eDirectory objects has been changed:
- In ConsoleOne, the Inventory Service object name is displayed as
Inventory Service_server_name instead of server_name_InvService. - In ConsoleOne, the Inventory Database object name is displayed as
Inventory database_server_name instead of server_name_Invdatabase.
Remote Management
Remote Management in ZENworks 6.5 Server Management provides the following new features or enhancements:
- Mirror Driver
- Agent Initiated Connection
- Scale To Fit
- Block Mouse Movements To Agent
- Force 256 Color Palette
- Session Encryption
Mirror Driver
This feature provides video adapter independence and coexistence with other remote control solutions. If you select to install Mirror Driver, the installation program overrides video driver checks and suppresses any Windows messages. You can view this option during the installation of ZENworks 6.5 Server Management. If you do not want to install Mirror Driver, you can deselect it and the optimization will be disabled. The Mirror Driver enhances the Remote Management performance.
Agent Initiated Connection
This feature provides an option to the user at the managed machine to send a request to the Remote Operator for Remote Control or Remote View. This feature is particularly useful if the managed server is behind a private network and cannot be directly accessed from the management console.
For more information, see "Initiating Remote Management Session from the Remote Management Agent" in the Novell ZENworks 6.5 Server Management Administration Guide.
Scale To Fit
This feature enables you to hide the scroll bars and scale the Remote Management window to fit your screen. Click the  on the toolbar.You can also use the Ctrl+Alt+G keys. For more information, see "Remote Management for Windows Servers" in the Novell ZENworks 6.5 Server Management Administration Guide.
Block Mouse Movements To Agent
This is a new option provided in the Control Parameters dialog box. You can select this option to block all the mouse movements to the Agent. For more information, see "Remote Management for Windows Servers" in the Novell ZENworks 6.5 Server Management Administration Guide.
Force 256 Color Palette
The Remote Management Agent, now forces the use of 256-color palette on the managed server during a Remote Management session. This enhances the Remote Management performance over a slow link. For more information, see "Remote Management for Windows Servers" in the Novell ZENworks 6.5 Server Management Administration Guide.
Session Encryption
The Session Encryption feature provides a secure remote session between the management console and the Remote Management Agent. For more information, see "Remote Management for Windows Servers" in the Novell ZENworks 6.5 Server Management Administration Guide.
Management and Monitoring Services
Management and Monitoring Services in ZENworks 6.5 Server Management provides the following new features or enhancements:
- Management and Monitoring Services for Linux
- Capture Packets Utility
- New Database Object Editor User Interface
- Adding Implemented MIBs to the Nodes
- Deleting Alarm Templates from ConsoleOne
- Printing the Alarm Disposition
- Exporting the Alarm Disposition to a File
- Alarm Manager Performance Enhancement
- Copying Alarm Templates to Microsoft Excel
- Sending SMTP Mail Notification to a Port
- Forwarding SNMP Traps to a Port
- Modifying the Severity and State of the Alarm Disposition
- Handling Generic Traps
- SNMP MIB Compiler
- SNMP MIB Browser
- Remote Ping
- Collecting Events from Custom Event Log Types
- Specifying Negative Filter Conditions in the Nttrap.ini File
- Available Trap Information Report on Site
- Working with Unnumbered Links
- Discovery Console
- Advanced Trending Agent
- Displaying Multiple Views in Novell ConsoleOne Views
- Node Naming Order
- View Builder
- Custom Maps
- New Views at the RMON and RMON_II Level of a Node
- Management Site Server Status
Management and Monitoring Services for Linux
The Management and Monitoring Services component of ZENworks Server Management for Linux now provides you with the ability to centrally manage and administer the Linux servers on your network.
Capture Packets Utility
The Capture packets function can now be used from any level under the atlas namespace. You can now capture packets from any of the discovered RMON agents. The capture packet settings details will be saved as a history information which you can use later.
New Database Object Editor User Interface
The Database Object Editor has been enhanced with a new user interface to provide the ability to manually update the database in an easy manner.
Adding Implemented MIBs to the Nodes
Using the Database Object Editor, you can now add MIBs to nodes. From the Available MIBs list, you can now add the MIBs that have not been discovered for the node.
Deleting Alarm Templates from ConsoleOne
You can now delete the alarm templates from the Alarm Templates list using ConsoleOne. The alarms corresponding to the deleted templates will not be processed by the Alarm Manager.
Exporting the Alarm Disposition to a File
You can export the alarm disposition information to the following file formats:
- Comma-delimited (.csv)
- HTML (.html)
- Tab-delimited (*.txt)
- Blank-space-delimited (*.txt)
Alarm Manager Performance Enhancement
The Alarm Manager can now handle up to 500,000 alarms in the Alarm database. The Active Alarms view and the Alarm History view have been enhanced to retrieve large numbers of alarms from the Alarm database.
Copying Alarm Templates to Microsoft Excel
You can now copy the alarm templates to a Microsoft Excel sheet.
Sending SMTP Mail Notification to a Port
You can now send an SMTP mail notification to a SMTP server running on a port other than the default port.
Forwarding SNMP Traps to a Port
You can forward the SNMP traps to any SNMP Trap Listener running at a port other than the default port.
Modifying the Severity and State of the Alarm Disposition
You can now modify the severity and the state of the alarm template. All new incoming alarms of the alarm template will reflect the severity or state you have specified.
Handling Generic Traps
In the previous version of Management and Monitoring Services, the The Alarm Manager dropped the 6 generic traps defined in MIB-2. The Alarm Manager no longer drops these 6 generic traps. These alarms are present in the alarm templates and you can set the disposition for these alarms.
SNMP MIB Compiler
The SNMP MIB Compiler has the following enhanced features:
- The MIB Pool on the site server now includes RFCs, which are extensively used by third-party vendors.
- The MIB Pool now includes Novell proprietary MIBs like Novell GroupWise®, Novell BorderManager®, Novell eDirectoryTM, Novell Gateways, and Novell VPN.
- The SNMP Compiler Results window now includes online help on the error codes generated during compilation. The help provides you all the troubleshooting information for the error codes, to enable you to solve the problems immediately.
- The SNMP Compiler Results window now highlights the error text in Red to enable better readability.
- The MIB Compiler now ignores minor errors in the MIB definitions. This enables the MIB Compiler to compile more MIBs.
- The type, category, generator type (TCG) of any MIB need not be unique. The SNMP MIB Compiler now captures all the traps for which the TCGs are identical.
- The SNMP MIB Compiler now works with the Alarm Management System to maintain the alarm information in synchronization with the available trap information in the MIB Pool.
- The SNMP MIB Compiler takes less time to compile the MIBs.
SNMP MIB Browser
The SNMP MIB Browser is enhanced to include the following features:
- New icons for better readability including Scalar Objects, Table and the Table Entry Objects, Columnar Objects, and the MAX ACCESS value.
- The Search utility now enables you to locate MIB variables in the MIB tree. You can locate them based on the MIB variable or the MIB OID.
Remote Ping
The Polling option in the previous version of Management and Monitoring Services was displayed when you select a segment > View > Polling. The option now appears at the atlas level also. Select any atlas, click View > Polling. You can use this option to view the status of all the services that you have added using the Monitor Services tab.
Collecting Events from Custom Event Log Types
The Server Management Agent for Windows collects events from Windows Event Log and converts these events to traps. The traps are forwarded to the site server.
Specifying Negative Filter Conditions in the Nttrap.ini File
The Server Management Agent for Windows now enables you to specify conditions with negatives.
Available Trap Information Report on Site
The Available Trap Information report lists the information of the SNMP traps currently available on the site server. The report is generated based on the MIBs compiled on the site server and provides the following information:
- Total traps
- Alarms category
- Alarm severity
- Alarm type
- Trap OID
- Trap description
Working with Unnumbered Links
Using this feature you can discover and view the unnumbered links in the atlas namespace.
Using the Unnumbered Links tab in the Database Object Editor you can add, modify, or delete the unnumbered links for the IP router. The unnumbered links include the interface type and the connected router. All the unnumbered links you created and configured will be displayed in the Atlas or ConsoleOne.
Discovery Console
The Discovery Console enables you to send a request to discover a set of IP addresses using ConsoleOne. You can discover a list of host addresses, all the hosts on a subnet, range of addresses, or addresses in the form of a regular expression. The Discovery Console also enables you to view the status of the requests that you have submitted, or to delete a request.
Advanced Trending Agent
The Advanced Trending Agent is an application that gathers and stores the trend data (historic data) for any parameter instrumented by an SNMP agent, if it is defined by a MIB variable and not just pre-configured MIB variables.
The Advanced Trending Agent functionality is available on NetWare, Windows, and Linux platforms.
The Advanced Trending Agent periodically collects and stores the samples of the configured MIB variables. The collected data is exposed through an SNMP interface. This data can be used to view the long-term trend graphs of the parameters.
You can configure the Advanced Trending Agent using a configuration file. The Advanced Trending Agent includes a command line utility, which reads the configuration file for any updates. The utility also resets the data collected and starts collecting new data. You can also configure the Advanced Trending Agent with threshold values for the parameters and generate a trap when the value exceeds the threshold value.
Displaying Multiple Views in Novell ConsoleOne Views
The View in a New Window option enables you to display multiple tabular views, trend views, and composite views in the Novell ConsoleOne Views window.
Node Naming Order
As discovery cycles proceed and more information is discovered, the names displayed in the maps can change. Different priorities are given to names, depending on the source of the name information. If none of the names are discovered, the IP/IPX address of the node is displayed as the node name.
View Builder
The View Builder provides a mechanism through which you can create a view to display information from the agents that have instrumented SNMP MIBs and traps sent by the agent to the management site server. You can use the View Builder to create views in addition to those available in ConsoleOne. These views are displayed as text, tables and graphs.
Custom Maps
Custom Maps enable you to create and delete custom atlases and custom containers and group nodes into containers. You can also create a hierarchy of objects in atlas. An atlas can contain custom containers. you can create a node or a sub container within the custom container. However nodes cannot be directly contained under the atlas.
New Views at the RMON and RMON_II Level of a Node
The following views are also displayed at the RMON level (Node > Services > RMON):
- Segment Dashboard
- Stations
- Segment Trends
- Monitor Nodes for Inactivity
You can now view the following view in the RMON_II service level (Node > Services > RMON_II):
- Protocol Distribution