19.3 RConsoleJ
This section will help you initiate RConsoleJ in the following scenarios:
19.3.1 Scenario 1: An IP Client Controlling an IP NetWare Server
Prerequisites
Setting Up a Secured IP Connection
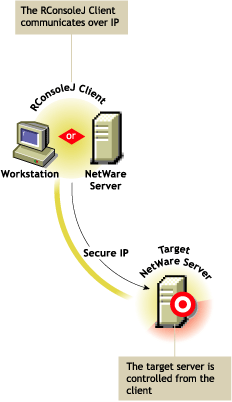
Figure 19-1 illustrates how the RConsoleJ Client communicates directly with the RConsoleJ Agent using TCP/IP.
Figure 19-1 RConsoleJ Client Communicates with the Target NetWare Server Over Secure IP
To setup a Secured IP connection, complete the following:
-
In the RConsoleJ Connection dialog box, select .
-
Enter the IP address of the target NetWare server, or click the icon and then select the target NetWare server from the list.
-
Enter the password provided during loading of the RConsoleJ Agent on the target server.
-
Enter the port number.
The default is 2036.
-
Click .
-
To ensure server authentication, read the Untrusted Certificate Verification server certificate issued by the target server and click to accept.
Setting Up an Unsecure IP Connection
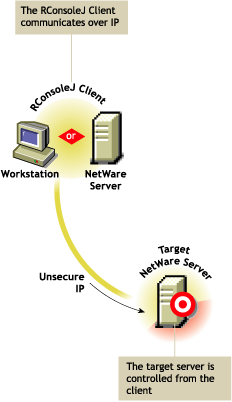
Figure 19-2 illustrates how the RConsoleJ Client communicates directly with the RConsoleJ Agent using TCP/IP.
Figure 19-2 RConsoleJ Communicates with the Target NetWare Server Over IP
When you run the RConsoleJ client from ConsoleOne, the Novell RConsoleJ dialog box is displayed with the Netware Server IP address. To run the RConsoleJ client, see Running the RConsoleJ Client.
To start an IP connection:
-
Enter the password specified during loading the RConsoleJ Agent.
-
Enter the port number.
The default is 2034.
-
Click .
19.3.2 Scenario 2: An IP Client Controlling an IPX NetWare Server
Prerequisites
Starting an IPX Connection
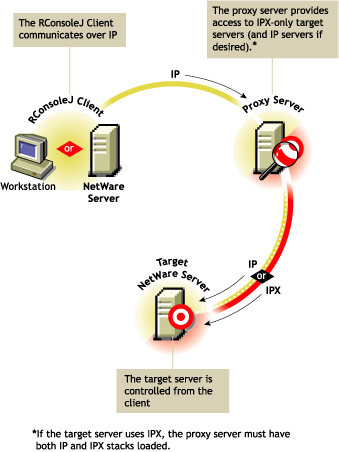
The RConsoleJ Client communicates with the RConsoleJ Agent through the RConsoleJ Proxy Agent because the target NetWare server is based only on IPX.
The RConsoleJ Proxy Agent is loaded on a NetWare server (proxy server) that has both IP and IPX stacks loaded. The RConsoleJ Proxy Agent receives all the IP requests from the RConsoleJ Client, converts them to IPX requests, and then sends them to the RConsoleJ Agent and vice-versa. Figure 19-3 illustrates this.
Figure 19-3 The RConsoleJ Client Communicates with the Target NetWare Server through the Proxy Server
When you run the RConsoleJ client from ConsoleOne, the Novell RConsoleJ dialog box is displayed with the Netware Server IP address. To run the RConsoleJ client, see Running the RConsoleJ Client.
To start an IPX connection:
-
From the Connect Type drop-down list, select . Select to get the IPX address and to get the IP address.
The default port is be selected when you make the above change.
The default is 16800 for IPX address and 2034 for IP address.
-
Enter the IP address of the proxy server, or click the icon and then select a proxy server from the list.
-
Enter the port number specified during loading the RConsoleJ Proxy Agent.
The RConsoleJ Client communicates with the RConsoleJ Proxy Agent on this port.
The default is 2035.
-
Click .