24.3 Managing the Rule-Based Alarm Management System
The Rule-Based Alarm Management System allows you to configure a rule on the site server and helps you in processing, storing, and monitoring alarms. It provides you with tools and back-end services to use, and manage the rule information. The Rule-Based Alarm Management System component is also fully integrated with other Novell ZENworks Server Management components. It provides access control through the Role-Based Services component. The Rule-Based Alarm Management System provides a centralized location for processing and viewing the rules generated by devices and systems throughout your network. In addition, you can also set specific conditions and actions to be performed when an alarm occurs.
A rule consists of two parts, namely set of conditions and set of actions. When Alarm Manager receives an alarm, it matches various parameters of the Alarm with the set of conditions in a rule. If all the conditions specified in a rule are satisfied, then the set of actions specified in the rule is performed. The rules are processed in the order of precedence and the topmost rule has the highest precedence.
When more than one rule is specified, the incoming alarm is matched with the rules beginning with the topmost enabled rule in the list. If the incoming alarm matches with any rule, then only corresponding actions are carried out, and there will be no further processing of remaining rules. If the incoming alarm fails to satisfy any of the enabled rules in the list, then the Alarm is discarded.
ConsoleOne provides a mechanism to organize the alarms based on the Alarm Disposition Rules.
For more information on the Alarm Disposition Rule, see the following topics:
24.3.1 Understanding the Properties
The Properties page available from the of Rule Configuration page contains the name of the rule and its corresponding description. The description that you specify here is displayed in the Rule Description on the Available Rules page.
The Properties page also displays the date and time when the rule was created and when it was last modified. This information is system-generated.
The title bar of the Rule Configuration page is appended with name of the rule you have provided in the Rule Name text box.
24.3.2 Understanding the Conditions
The Conditions page available from the Rule Configuration page consists of multiple conditions that you can define in order to process an incoming alarms. To configure a rule, you must define at least one Condition. You receive only those alarms that meet the conditions you have defined in the Conditions page.
The Conditions page includes the following conditions:
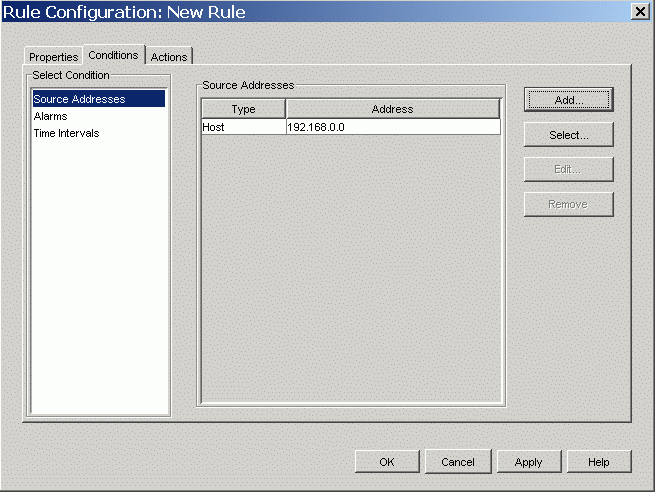
Source Addresses
Source Address conditions enable you to process on incoming alarms based on their source addresses. You can define source addresses as either the host address or a range of IP addresses. You can also select one or more nodes or containers from the Atlas, which will be configured as a source address. The Source Addresses list is updated to display the host address or range of IP addresses or nodes you have added.
If you configure a condition to process an incoming alarm based on their source addresses, you receive only those alarms that are coming from the specified addresses.
To configure a rule with Source Address as a Condition:
-
Right-click the ZENworks Server Management site object in the left frame of ConsoleOne, then click .
-
By default, Alarm Disposition page is selected. Click , and then click or .
-
Click .
-
By default, the Source Address page is selected.
-
Click .
-
In Add Source Address dialog box, specify the Host Address, DNS name, or range of IP addresses, then click .
You can select one or more nodes or containers from the Atlas by clicking on Select.
-
Click or .
As an administrator, you can also edit or remove the existing source address details.
NOTE:If you do not specify any source address, the system accepts all alarms, irrespective of the source address it comes from.
Severity, State, and Specific Alarms
The Conditions page of Rule Configuration page includes other configurations that filters alarms based on their severity, state, and ID. You can select one or more levels of severity, including Critical, Minor, Major, Informational, and Unknown. You can also select one or more state, including Operational, Degraded and Non-Operational. For example, if you select the severity as Critical and the state as Degraded, then you get alarms only if they are of Critical severity with the state as Degraded.
To configure a rule with specific alarms as a Condition:
-
Right-click the ZENworks Server Management site object in the left frame of ConsoleOne, then click .
-
By default, Alarm Disposition page is selected. Click , and then click or .
-
Click , then click .

-
Select one or more severity and state.
-
If you want to configure alarm as part of Conditions, click .
-
Select the alarms you want as part of Conditions.
You can also sort the alarms. While sorting the alarms, you can select one or more alarms by pressing Ctrl + clicking the alarms. For more details on sorting the alarms, refer to Sorting Alarm Templates
-
Click or.
As an administrator, you can also remove the existing alarms from the list.
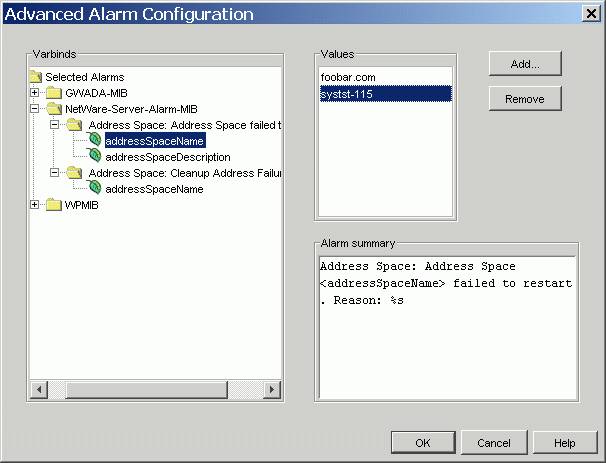
NOTE:You can also configure the alarms based on varbinds. This is an optional feature and is provided as an advanced configuration criteria. For more details on advanced alarm configuration, refer to Advanced Alarm Configuration below.
Advanced Alarm Configuration
Advanced Alarm Configuration allows you to filter and select alarms based on their varbinds. Varbinds are the predefined variables of a trap. When a trap is generated, corresponding values are filled in the predefined variables and sent along with trap.
You can also add a value to the varbinds. To add a value, you must expand the tree until you see the varbinds of a selected alarm and select the required varbind.
To configure a rule with specific varbinds as a Condition:
-
Right-click the ZENworks Server Management site object in the left frame of ConsoleOne, then click .
-
By default, Alarm Disposition page is selected. Click , and then click or .
-
Click , then click .
-
Click and select an alarm that you want to set as part of Conditions.
-
Click .
-
In Advanced Alarm Configuration dialog box, expand the tree until you see the varbinds of a selected alarm.
-
Select a varbind to which you want to add a value.
-
Click and specify a value in Add Value dialog box, then click .
The Advanced Alarm Configuration page also displays summary of the alarm you have selected. The Summary contains name of the alarm and the varbinds included in it.
-
Click in the Advanced Alarm Configuration dialog box.
-
Click or .
Varbinds values displayed in the list can also be deleted.
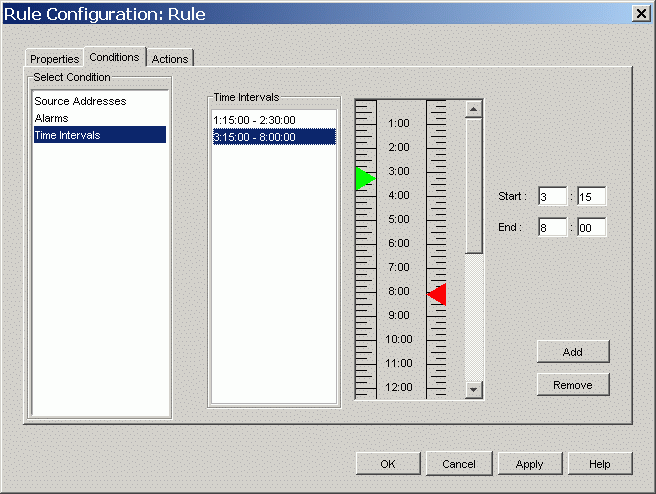
Time Intervals
You can also specify a time interval as a configuration criteria. If you do so, you will get an alarm only if the alarm arrives within the stipulated time interval.
To configure a rule with specific time interval as a Condition:
-
Right-click the ZENworks Server Management site object in the left frame of ConsoleOne, then click .
-
By default, Alarm Disposition page is selected. Click , and then click or.
-
Click , then click .
-
Move Green ruler to your desired time, which indicates starting time of an interval. Start time is set according to the ruler you have set.
You can also specify the time in field. The ruler will set accordingly.
-
Move red ruler to your desired time, which indicates ending time of an interval. End time is set according to the ruler you have set.
You can also specify the time in field. The ruler will set accordingly
-
Click .
-
Click or .
As an administrator, you can also remove the existing time interval. If you do not specify any time intervals, the system accepts all alarms, irrespective of the time when they come.
IMPORTANT:The time interval is always displayed in multiples of 15. For example, if you select the Start time as 1:10, the Alarm Management System takes the time as 1:15, and if you select the Start time as 1:30, the Alarm Management System takes the time as 1:30.
24.3.3 Understanding the Actions
Actions allows you to perform various actions when an alarm occurs. You can create a rule to automatically perform an action when an alarm occurs. To configure a rule, it is mandatory to define one of the actions.
The following sections describes the different ways you can configure Actions:
SMTP Mail Notification
SMTP Mail Notification allows you to send SMTP messages to recipients who are specified to receive e-mail notification. You can also send SMTP mail notification to the SMTP server running on a port other than the default port.
The incoming and outgoing e-mail in the SMTP Host field is handled by the IP address or the port number of the SMTP host server.
To configure a rule with SMTP mail notification as an Action:
-
Right-click the ZENworks Server Management site object in the left frame of ConsoleOne, then click .
-
By default, Alarm Disposition page is selected. Click , and then click or .
-
Click .
-
By default, the SMTP Mail Notification page is selected.
-
Select .
-
Enter the IP address or the port number (optional) of the SMTP host server that handles incoming and outgoing e-mail in the field.
If you are specifying the port number, specify the port number after the IP address with a colon (:) preceding it. For example, if the IP address of the SMTP host server is 207.68.173.245, and the port number is 12345, specify as 207.68.173.245:12345.
You can click to verify if the SMTP server is running on the specified IP address or not.
-
Enter the e-mail address from where the mail notification is being sent.
-
Enter the e-mail addresses of the recipients in the field.
You can specify more than one e-mail address by separating them with commas.
-
Enter the subject of the e-mail in the field.
-
Enter a message for the e-mail, if any, in the field.
-
Click or.
The subject and message, which you are specifying as a text strings, can contain any of the variables listed in Table 24-3. These variables allow you to add details to your message about the segment or device generating the fault or event. All variables must be preceded by a percent sign (%). For example, the subject line could include the %v variable to display the severity of the alarm. You can also specify the width for the variables. %(nnn)X can be used to limit the length of the %X value to nnn characters. X represents any format specifier. For example, %(10)a is displays up to 10 characters of the Alarm ID.
Table 24-3 List of Variables
IMPORTANT:If you right-click in the body or subject area of SMTP Mail Notification, you get a context menu that contains all the variable parameters. You can select any desired variable to insert it in the message text. This variable is added at the current cursor position.
Launching an External Program
As part of editing the disposition of an alarm, you can set options to automatically launch any program on the Novell ZENworks Server Management server when an alarm is received. For example, you might want an alarm to launch a program that sends a message to the system administrator's pager.
Although ZENworks Server Management provides the capability to launch applications, the product does not provide any predefined programs. However, you can launch an NLM and run scripting routines or use third-party programs.
You can specify any necessary arguments or script variables in the Argument field. Arguments are passed directly to the program; text is not parsed, but is read as literal text strings. Variables must be preceded with a percent sign (%). The percent sign can be followed by an optional length field that limits the length to which the parameter can expand. You can also specify the width for the variables. %(nnn)X can be used to limit the length of the %X value to nnn characters. X represents any format specifier. For example, %(10)a displays up to 10 characters of the Alarm ID.
To set up automatic application launching:
-
Right-click the ZENworks Server Management site object in the left frame of ConsoleOne, then click .
-
By default, Alarm Disposition page is selected. Click , and then click or Edit.
-
Click , then select page.
-
Select .
-
Enter the complete path and name of the application in the field.
-
Enter any necessary execution arguments or script variables in the field, then click or .
Arguments are passed directly to the program; text is not parsed, but is read as literal text strings. Variables must be preceded with a percent sign (%). The percent sign can be followed by an optional length field that limits the length to which the parameter can expand. You can also specify the width for the variables. %(nnn)X can be used to limit the length of the %X value to nnn characters. X represents any format specifier. For example, %(10)a will display the Alarm ID up to 10 characters.
Table 24-4 lists the variables you can use when launching a program:
Table 24-4 List of Variables you can use when launching a program
IMPORTANT:If you right-click in the body or subject area of SMTP Mail Notification, you get a context menu that contains all the variable parameters. You can select any desired variable to insert it in the message text. This variable is added at the current cursor position.
SNMP Traps Forwarding
The Rule-Based Alarm Management System can be configured to forward an unmodified SNMP trap. The trap is automatically forwarded to the IP address of the target management station or server.
IMPORTANT:If you are specifying the port number, specify the port number after the IP address with a colon (:) preceding it. For example, if the IP address of the SNMP host server is 207.68.173.245, and the port number is 12345, specify it as 207.68.173.245:12345. By default, the port number is 162.
You can also delete one or more targets from the list.
To forward SNMP traps:
-
Right-click the ZENworks Server Management site object in the left frame of ConsoleOne, then click .
-
By default, Alarm Disposition page is selected. Click , and then click or .
-
Click , then select page.
-
Select .
-
Enter the IP address or the port number (optional) of the server to which you want to forward traps in the field, then click .
If you are specifying the port number, specify the port number after the IP address with a colon (:) preceding it. For example, if the IP address of the SNMP host server is 207.68.173.245, and the port number is 12345, specify as 207.68.173.245:12345.
The server is added to the List of Targets. Repeat this step for all servers you want to receive the traps.
-
Click or .
Alarms Forwarding
The Rule-Based Alarm Management System can be configured to forward a processed alarm to other ZENworks Server Management servers. Specify the IP address or server name of the target management server in the Add Target dialog box and the alarm is automatically forwarded.
To add a server to the target list, select the ZENworks Server Management site and ZENworks Server Management host to which you want to forward alarms.
To remove a server from the list, select a server you want to remove and click Remove.
To forward alarms:
-
Right-click the ZENworks Server Management site object in the left frame of ConsoleOne, then click .
-
By default, Alarm Disposition page is selected. Click , and then click or .
-
Click , then select page.
-
Select .
-
To add a target server to receive the alarms:
-
Select the Novell ZENworks Server Management site to which you want to forward alarms in thefield.
-
Select the Novell ZENworks Server Management host to which you want to forward alarms in the field.
-
Click.
The server is added to the List of Targets. Repeat this step for all servers to which you want to forward alarms.
-
-
Click or .
Miscellaneous
The option on the Rule Configuration page consists of items like archiving alarms and showing received alarms on the ticker bar. In addition, it allows you to configure other options such as auto handling of an alarm and audible beeps.
The options are as follows:
Archiving Alarm Statistics
The Rule-Based Alarm Management System system provides data to the reporting tools to generate detailed reports on alarms and network events. Enabling the option stores the alarm in the alarm manager database on the management server.
This option is enabled by default. You should disable this option only on the types of alarms that you do not want to track and analyze. You disable this option by deselecting the option.
To enable or disable alarm archiving:
-
Right-click the ZENworks Server Management site object in the left frame of ConsoleOne, then click .
-
By default, Alarm Disposition page is selected. Click , and then click or .
-
Click , then select page.
-
To disable alarm archiving, click the check box to remove the check mark.
or
To enable alarm archiving, click the check box to add the check mark.
-
Click or .
Displaying a Ticker-Tape Message
The ticker-tape message is displayed in the ConsoleOne status bar and provides a summary of the most recent alarm or network event.
This option is enabled by default. You might want to edit your alarm dispositions so that only important alarms that you want to monitor display a ticker-tape message. You can disable this option by deselecting the option.
To disable or enable a ticker-tape message:
-
Right-click the ZENworks Server Management site object in the left frame of ConsoleOne, then click .
-
By default, Alarm Disposition page is selected. Click , and then click or .
-
Click , then select page.
-
To disable the ticker-tape message, click the check box to remove the check mark.
or
To enable the ticker-tape message, click the check box to add the check mark.
-
Click or .
Beep On Console
The Miscellaneous page includes configuration settings such as making an audible beep in ConsoleOne. The sound alerts the user of an occurrence of an alarm. Useful applications of this function include when a server abends, when a server is downed by user, or when the file system is full.
This option is disabled by default. You should enable this option for important alarms that you want to monitor. You can enable this option by selecting option.
To enable or disable an audible beep:
-
Right-click the ZENworks Server Management site object in the left frame of ConsoleOne, then click .
-
By default, Alarm Disposition page is selected. Click, and then click or .
-
Click , then select page.
-
To enable the audible beep function, select the check box to add the check mark.
or
To disable the audible beep function, select the check box to remove the check mark.
-
Click or .
Auto Handling of an Alarm
Auto handling store the alarms directly to History instead of storing them into active alarms.
This option is disabled by default. You should enable this option for important alarm that you want to auto handle. You enable this option by selecting the option.
To auto-handle an alarm:
-
Right-click the ZENworks Server Management site object in the left frame of ConsoleOne, then click.
-
By default, Alarm Disposition page is selected. Click , and then click or.
-
Click , then select page.
-
To enable the auto handling, click the check box to add the check mark.
or
To disable the auto handling, click the check box to remove the check mark.
-
Click or .
Displaying Alarms with Specific Severity and State
Alarms with a specified severity and state, other than the Severity and State specified in the Alarm Template, are displayed in the Alarm History and Active Alarms View.
The Severity options are Critical, Major, Minor, Informational, and Unknown, and the State options are Operational, Degraded, Non-Operational, and Unknown.
To display the alarms with specific severity and state:
-
Right-click the ZENworks Server Management site object in the left frame of ConsoleOne, then click.
-
By default, Alarm Disposition page is selected. Click , and then click or .
-
Click , then select page.
-
Select the Severity and State from the drop-down list.
-
Click or .
Assigning Alarms to the User
The users that you have added in the Manage Users list are displayed in the drop-down list. You can select any user from the drop-down list to assign an alarm to that user.
To assign an alarm to a specific user:
-
Right-click the ZENworks Server Management site object in the left frame of ConsoleOne, then click .
-
By default, Alarm Disposition page is selected. Click , and then click or .
-
Click , then select page.
-
Select a user from the drop-down list.
-
Click or .
For more details on managing users, refer Managing the Users
24.3.4 Performing Actions on Rules
You can perform the following activities on a rule associated with an alarm template:
Creating and Configuring a Rule
You can create a rule to automatically perform an action when an alarm occurs.
-
In ConsoleOne, right-click the Novell ZENworks Server Management site object, then click .
-
By default, Alarm Disposition page is selected. Click and then click .
-
In Rule Configuration dialog box, specify the name of the rule. The name you specify is added to the title bar of the Rule Configuration page.
-
(Optional) Specify a description for the rule you are creating.
-
Click . By default, the is selected.
-
Specify the source addresses from where you want users to get an alarms. For more details on Source Addresses, refer to Source Addresses
-
-
Click , then select > and as per your requirements. For more details on Alarms, refer to Severity, State, and Specific Alarms
-
Click , then select specific time durations. For more details on Time Intervals, refer to Time Intervals
IMPORTANT:To configure a rule, you must define at least one of the Condition.
-
Click .
-
Click the option. Specify , , , , and . For more details on SMTP Mail Notification, refer to SMTP Mail Notification
-
Click and select . For more details on Launching Application, refer to Launching an External Program
-
Click and select . For more details on SNMP Trap Forwarding, refer to SNMP Traps Forwarding
-
Click and select . For more details on Alarm Forwarding, refer to Alarms Forwarding
-
Click , then select the options as per your requirements. For more details on the Miscellaneous options, refer to Miscellaneous
IMPORTANT:To configure a rule, you must define at least one of the Action.
-
Click , then click .
The newly created rule is appended to the list and the description that you specified in Properties page is displayed under Rule Description on the Available Rule page.
Editing a Rule
-
In ConsoleOne, right-click the Novell ZENworks Server Management site object, then click .
-
Click the page.
-
On the Rules page, select the rule you want to edit from the list, then click .
-
In the Rule Configuration dialog box for that rule, modify the details as per your requirements.
-
Click .
Copying a Rule
You can create a copy of the any existing rule listed in the list. While creating a copy of a rule, you can also modify the details of a rule.
-
In ConsoleOne, right-click the Novell ZENworks Server Management site object, then click .
-
Click the page.
-
On the Rules page, select the rule you want to copy from the list, then click .
-
(Optional) In the Rule Configuration dialog box for that rule, modify the details of a rule.
-
Click .
Deleting a Rule
Rules displayed in the list can be deleted from the list. You can delete one or more rule entries to remove it from the list.
-
In ConsoleOne, right-click the ZENworks Server Management site object, then click .
-
Click the Alarm Disposition page.
-
On the Rules page, select the rule you want to delete from the list, then click .
You can select more than one rule by pressing Ctrl + clicking the rules you want to select.
-
Click in Confirm Deletion dialog box.
Printing a Rule
You can also print any of the rule listed in Available Rules list.
-
In ConsoleOne, right-click the Novell ZENworks Server Management site object, then click .
-
Click the Alarm Disposition page.
-
On the Rules page, select the rule you want to print from the list, then click .
You can print more than one rule by pressing Ctrl + clicking the rules you want to select.
-
In Print Rule Summaries, click .
Exporting a Rule to a File
You can export the rule information into the following file formats:
-
Comma-delimited (.csv)
-
HTML (.html)
-
Tab-delimited (*.txt)
-
Blank-space-delimited (*.txt)
-
In ConsoleOne, right-click the ZENworks Server Management site object then, click .
-
Click the page.
-
On the Rules page, select the rule that you want to print from the list, click , then click .
-
In the Export dialog box, select the file type you want to use to export the rule information
-
Specify the filename or click to select a filename.
-
Click .
Managing the Users
The Manage Users page allows you to maintain a list of users and their e-mail addresses. You can use this list to select the user to whom the alarm is to be assigned. You can perform the following activities in the Manage Users page:
Adding a New User
The Manage Users page allows you create a new user to whom you can assign an alarm. Added users are listed in the list on Manage Users page.
-
In ConsoleOne, right-click the ZENworks Server Management site object, then click .
-
Click the page.
-
On the Rules page, click .
-
In the Manage Users dialog box, click .
-
In Add User dialog box, specify a username and an e-mail address.
-
Click .
Editing an Existing User
You can edit an existing user details, which are listed in Users list. The updated user detail is displayed in the list immediately after you update the data.
-
In ConsoleOne, right-click the ZENworks Server Management site object, then click .
-
Click the page.
-
On the Rules page, click .
-
In the Manage Users dialog box, select the user you want to edit, then click .
-
In the Add User dialog box, modify the username and an e-mail address.
-
Click.
Deleting an Existing User
Users displayed in the Users list can also be deleted from the list.
-
In ConsoleOne, right-click the ZENworks Server Management site object, then click .
-
Click the page.
-
On the Rules page, click .
-
In the Manage Users dialog box, select user you want to delete.
You can select more than one user by pressing Ctrl + clicking the users you want to delete.
-
Click .
Changing the Precedence of Rule
As an administrator, you can also change the precedence of the rules that are listed in the list.
The rule with the highest precedence is listed at the top of the list. You can move a rule up or down in the list by clicking the up-arrow or the down-arrow.
The default rule has the lowest precedence among all the rules and you cannot modify its order in the list.
Enabling and Disabling a Rule
As an administrator, you can also enable or disable a rule that is listed in list.
To enable a rule:
-
In ConsoleOne, right-click the Novell ZENworks Server Management site object then, click .
-
Click the page, and then click .
-
In column, select the option pertaining to a rule you want to enable.
-
Click , and then click .
To disable a rule:
-
In ConsoleOne, right-click the Novell ZENworks Server Management site object then, click .
-
Click the page, and then click .
-
In column, deselect the option of a rule you want to disable.
-
Click , then click .
IMPORTANT:Even though you cannot delete or edit the default rule, you can disable it.