10.6 USB Connectivity
The USB Connectivity settings control access to devices that connect via the USB bus. The settings provide control at several levels: all devices, device groups (classes), and individual devices. This gives you great flexibility in defining approved devices (whitelists) and prohibited devices (blacklists).
For example, assume that your organization supports only two authorized USB printers. You could allow access to all USB devices, block access to the printer device class, and then allow access to your two authorized printers. The result is a printer whitelist that includes only your two authorized printers.
10.6.1 How the Access Setting Is Determined
To effectively use the USB Connectivity settings, you need to understand how the various settings are used to determine a device’s access.
When a device is detected, the first setting that is evaluated is the setting. If the setting is , the evaluation continues. If the setting is , the USB device is disabled and evaluation stops.
If the evaluation continues, the device’s attributes (Device Class, Manufacturer, Product, and so forth) are compared to the attributes associated with the device groups (in ) and individual devices (in the device list on the page). In some cases, the device might match more than one group and device. For example, a removable storage device might match both the Mass Storage Class group and an individually defined device.
In order to know which access setting to apply to a USB device, the Security Client builds an access filter against which to evaluate devices. If multiple security policies apply, the Security Client uses the USB Connectivity settings from all applied policies to build the access filter.
The filter includes each access setting (, , , , and ) and the device groups and devices assigned to the setting. For example, assume the following group and device assignments for each access setting:
A USB device is evaluated against the filter, beginning with the first setting () and continuing to the last (). If the device matches one of the device groups or devices assigned to the access setting, the device receives that access setting and the evaluation ends. If a device does not match any of the groups or devices, it receives the default device access.
Consider the following examples:
-
Mouse1(a Human Interface Device) is detected. It is evaluated against the first setting (). Because Mouse1 matches the Mouse1 device assignment for the setting, Mouse1 is blocked and no further evaluation is required.
-
Mouse4 (a Human Interface Device) is detected. It is evaluated against the setting. Mouse4 does not match any assignments (group or device), so it is evaluated against the assignments. Because Mouse4 is a Human Interface Device and that device group is assigned the setting, Mouse4 is allowed and no further evaluation is required.
-
Thumbdrive1 and Thumbdrive5 (two Mass Storage Class devices) are detected. Thumbdrive5 is blocked because its device assignment () precedes its Mass Storage Class group assignment (). Thumbdrive1 is allowed because it is included in the Mass Storage Class group assignment () and it does not match a device assignment.
-
Printer2 and Printer4 (two Printing Class devices) are detected. Printer4 is allowed because its device assignment () precedes its Printing Class group assignment (). Printer2 is blocked because its Printing Class group assignment precedes its device assignment ().
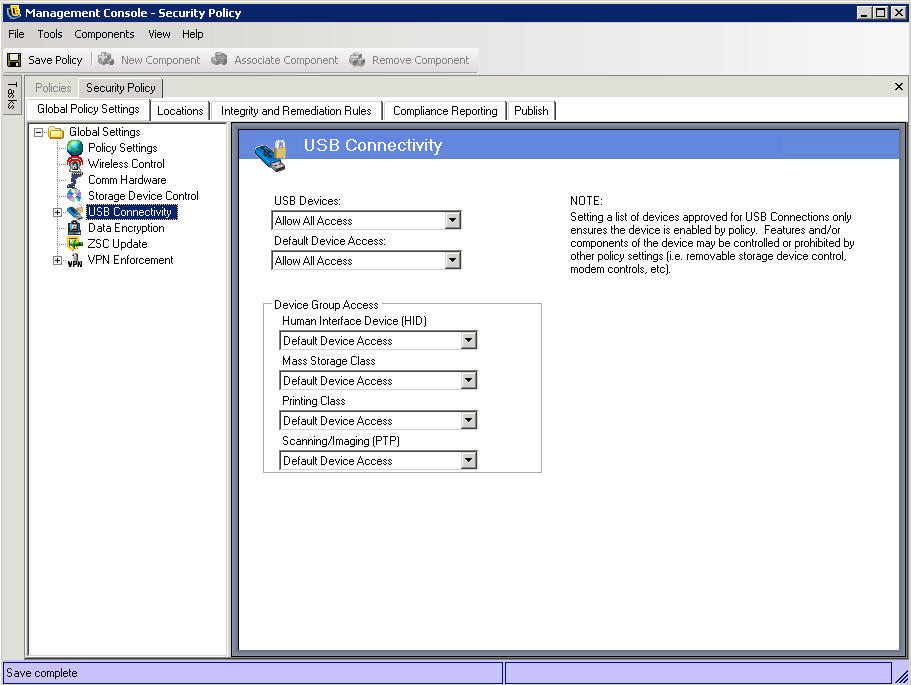
10.6.2 Configuring the USB Connectivity Settings
-
Make sure the policy you want to configure is open in the Management Console (see Section 10.1, Accessing the Global Settings).
-
On the tab, click .
-
Configure the settings as desired:
-
USB Devices: Device access is first evaluated based on whether the USB bus is active or not. If this setting is set to , the device is disabled and evaluation stops. If this setting is set to , the Security Client continues the evaluation based on the remaining settings.
-
Default Device Access: Select the default access ( or ) that will be assigned to USB devices in the following situations:
-
A USB device does not match one of the defined device groups or devices.
-
A USB device matches a defined device group or device whose access is set to .
-
-
Device Group Access: For each device group listed, select the access you want assigned to the group:
-
Always Block: Always block the device. This setting cannot be overridden.
-
Always Allow: Always allow access unless the device matches an filter.
-
Block: Block access unless the device matches an filter.
-
Allow: Allow access unless the device matches an or a filter.
-
Default Device Access: Give the device the same access level as if no other match is found.
The device groups are determined by the following classes. If a USB device’s class corresponds to one of the groups, it receives the group’s assigned access.
-
-
-
If you want to define individual devices, click the plus sign next to in the tree, then click . Otherwise, skip to Step 7.

In most situations, the four device groups listed on the USB Connectivity page (Human Interface Device, Mass Storage Class, Printing Class, and Scanning/Imaging) are sufficient to allow or deny access to most USB devices. If you have devices that do not register in one of these groups, you can configure settings on the USB Connectivity Advanced page. You can also use the settings on the Advanced page to provide whitelist access to certain devices even though they might be denied access because of the settings on the USB Connectivity page.
-
To add a device to the list, fill in the device fields.
The device fields create a filter against which detected devices are compared. The detected device’s attributes must match all device fields defined for the filter. For example, assume that you define a device using the following fields:
-
Manufacturer=Acme
-
Device Class=8
-
Serial Number=1234
To match the filter, a detected device must have a Manufacturer attribute that contains Acme (Manufacturer is a substring match field), a Device Class attribute that equals 8, and a Serial Number attribute that equals 1234.
If the detected device does not provide an attribute that is required by the filter, the match fails. For example, a detected device without a Serial Number equal to 1234 would not match.
Fill in the following fields to define the device filter and the access assigned to devices that match the filter:
-
Access: Select an access level:
-
Always Block: Always block the device. This setting cannot be overridden.
-
Always Allow: Always allow access unless the device matches an filter.
-
Block: Block access unless the device matches an filter.
-
Allow: Allow access unless the device matches an filter or a filter.
-
Default Device Access: Give the device the same access level as if no other match is found.
-
-
Manufacturer: Click the column, then type the name of the manufacturer, such as Canon. This is a substring match field, meaning that both C and Can would match Canon.
-
Product: Click the column, then type the name of the product. This is a substring match field, meaning that both C and Can would match Canon.
-
Friendly Name: Click the column then type the friendly name of the device. This is a substring match field, meaning that both C and Can would match Canon.
-
Serial Number: Click the column, then type the serial number of the device. Be aware that not all USB devices have unique serial numbers. To guarantee a unique match based on serial number, you must also use the , , , and fields. is an exact match field.
-
Comment: Click the column, then type a comment. This field is not used to match devices, so it can include any text you want.
-
-
If you want to use additional attributes to define the device, click .
This adds the following columns: , , and .
All fields are exact match fields. Current valid values for the USB version in decimal are 512 - USB 2.0, 272 - USB 1.1, 256 - USB 1.0.
-
Click to save your changes.