4.2 Managing Files on Removable Storage
Removable storage is defined as any storage device that is connected to a computer. This includes (but is not limited to) USB thumb drives, flash memory cards, and PCMCIA memory cards, along with traditional Zip, floppy, and external CDR drives, digital cameras with storage capacity, and MP3 players.
When you connect a removable storage device to your computer, the Security Client prompts you to encrypt the files on the device. This protects you from accidentally encrypting a device. After you initially encrypt the device, any files you add to the device (from a computer that has the Security Client installed) are automatically encrypted. If you then connect the storage device to a computer that does not have the Security Client installed, the files remain encrypted and cannot be decrypted.
The following sections contain more information:
4.2.1 Encrypting Files
When you connect an unencrypted removable storage device to your computer, the Security Client prompts you to encrypt the files on the device. Thereafter, as you add files to the removable storage device, the Security Client automatically encrypts the files.
In some cases, you might need to manually encrypt a file. For example, if you connect your removable storage device to a computer that does not have the Security Client installed, any files you add to the device are not encrypted (because the Security Client does the encrypting). To encrypt the files, you need to connect the removable storage device to a computer that has the Security Client installed and then manually encrypt them.
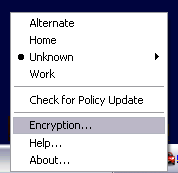
To manually encrypt added files on a removable storage device:
-
Plug the storage device into the appropriate port on a computer that has the Security Client installed.
-
Right-click the icon in the taskbar.
-
Select from the menu.
-
Click to use the current encryption key to encrypt all files on the removable storage device.

The amount of time needed to encrypt the files depends upon the amount of data stored on the device.
4.2.2 What If I Don’t Want the Device Encrypted?
When you insert a removable storage device, the Security Client prompts, asking if you want the drive encrypted, or if you prefer to remove it and not encrypt all files.
Figure 4-1 Encryption Warning when a New Device is Inserted
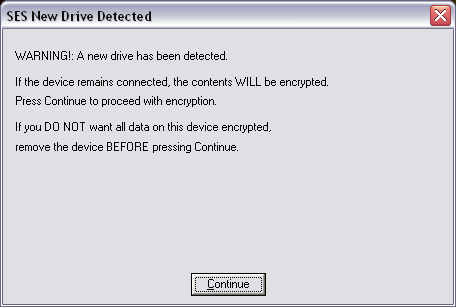
To prevent encryption, remove the drive before clicking . Click to either encrypt the drive or to close the window after removing the device.
4.2.3 Password Encrypting Files
Your administrator can enable the Security Client to create a Password Encrypted Files folder on any removable storage device that connects to your computer. This folder is named by your administrator; therefore, it might be named Password Encrypted Files or some other name.
When you add files to this folder, they are encrypted with a password that you supply. You can then access the files from any device that is not running the Security Client. To decrypt the files, you need the ZENworks File Decryption utility and the encryption password. You must get the utility from your administrator.
For example, assume that you are working on encrypted files at work. You want to take the files home to work on them, but your home computer does not have the Security Client installed. You copy the files to the Password Encrypted Files folder on your USB thumb drive, take the files home, then access them by using the ZENworks File Decryption utility you got from your administrator.
To use the Password Encrypted Files folder:
-
Move or save a file to the folder.
-
At the password prompt, enter a password and confirmation password.
-
Enter a hint for the password.
The Security Client remembers the password and applies it to any new files that you add to the folder until you reboot your computer. Any time your computer reboots, you are again prompted to supply a password the first time you add a file to the folder.
4.2.4 Changing the Password for the Password Encrypted Files Folder
After you enter a password for the Password Encrypted Files folder on your removable storage devices, the Security Client uses the same password until you reboot your computer. If you want to change the password without rebooting, you can do so manually. This does not change the password for existing files, just the password assigned to future files.
To change the password:
-
Plug the storage device into the appropriate port on your computer.
-
Right-click the icon in the taskbar.
-
Select from the menu.
-
Click .
-
Drag a file to the Password Encrypted Files folder and enter the new password and hint.
All new files added to the folder now require the new password for access.
4.2.5 Decrypting Password Encrypted Files
The File Decryption utility lets you decrypt files stored in the Password Encrypted Files folder on a removable storage device.
Your ZENworks Endpoint Security Management administrator must give you the File Decryption utility.
To use the File Decryption utility:
-
Plug the storage device into the appropriate port on your computer.
-
Open the File Decryption Utility (stdecrypt.exe).
-
Click the button.
-
In the Source panel, select .
-
In the Source panel, click , navigate to the storage device’s Password Encrypted Files directory, select the desired file, then click .
or
To decrypt the entire Password Encrypted Files directory rather than a single file, select , then browse to and select the appropriate directory.
-
In the Destination panel, click to select the folder on the local machine where you want to store the decrypted files.
-
Click .
-
Enter the password to decrypt the file.
If you selected the entire directory, all files might not have the same password. You are prompted each time the utility attempts to open a file that has a different password.
The transaction can be monitored by clicking the button.