

This section provides you the instructions to plan for installing ZfS Management and Monitoring Services.
We recommend that you install Management and Monitoring Services from the ZENworks for Servers 3 program CD. However, if you need to copy the CD structure to a hard drive, the path between the root of the hard drive and the first CD directory can contain only directory names that conform to the 8.3-character DOS file naming convention. If any long directory names exist in the path, the installation program will not work.
Before you install, review the system requirements and prerequisites listed in the following sections:
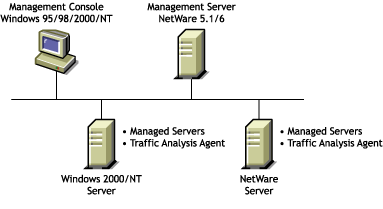
The following diagram illustrates where the ZfS components are installed.
Before you start installing the Management and Monitoring software, you must prepare the target Management server, Managed servers, the management console, and the Traffic Analysis agent. For details on preparing each of the systems, refer to the following sections:
Before you install the Management and Monitoring Services software, you must verify the following:
NOTE: Installing Management and Monitoring Services or Policy and Distribution Services to a server automatically starts Sybase. If you are installing Management and Monitoring Services to a server where you have already installed Policy and Distribution Services, you must stop the Policy and Distribution services and quit Sybase at the server before installing other ZfS services. To quit Sybase, go to the server console, and enter q on the Sybase screen.
Before you install the Management and Monitoring Services software, you must verify the following:
HINT: You do not need to map a drive to all the managed servers, but you need Admin or equivalent rights to the managed servers.
Before installing the ZfS agent, you must install and configure the Windows NT SNMP service. This is required to enable communication with the management server.
To install and configure SNMP on Windows NT:
Install the SNMP service.
Configure SNMP to start automatically.
Configure the SNMP Trap service to start automatically.
Specify the trap community name and trap destination address so that the agent sends traps to the management server.
In the Control Panel, double-click Network.
Click the Services tab > select SNMP Service.
Click Properties.
Click the Traps tab.
Select a name from the Community Names box > click Add.
The Add button is disabled if there are no Community Names available.
If the public community name is not present, type public.
Click Add.
Use the Trap Destinations box to add other DNS names and IP addresses in addition to the loopback IP address for the workstations or servers that should receive traps.
Click OK.
Set the SNMP security options trap community name so that SNMP packets from any host are accepted by the agent.
In the Control Panel, double-click Network.
Click the Services tab > select SNMP Service.
Click Properties.
Click the Security tab.
In the Accepted Community Names box, click Add.
In the Community Name box, type public.
The Accepted Community Names list displays the community names from which Windows NT will accept requests.
Click Add.
Select Accept SNMP Packets from Any Host > click OK.
Before installing the ZfS agent, you must install and configure the Windows 2000 SNMP service. This is required to enable communication with the management server.
To install and configure SNMP on Windows 2000:
Install the SNMP service.
In the Control Panel, select Administrative Tools > Configure Your Server.
In the Application Server option, select Terminal Services.
Click Start.
In the Windows Components Wizard, double-click Management and Monitoring Tools.
Select Simple Network Management Protocol.
Click OK.
Click Next.
SNMP is started automatically after installation.
Configure the SNMP Trap service to start automatically.
Specify the trap community name and trap destination address so that the agent sends traps to the management server.
In the Control Panel, select Administrative Tools > Services
Double-click SNMP Service.
Click Properties.
Click the Traps tab.
Select a name from the Community Names box > click Add.
The Add button is disabled if there are no Community Names available.
If the public community name is not present, type public.
Click Add.
Use the Trap Destinations box to add other DNS names and IP addresses in addition to the loopback IP address for the workstations or servers that should receive traps.
Click OK.
Set the SNMP security options trap community name so that SNMP packets from any host are accepted by the agent.
In the Control Panel, select Administrative Tools > Services.
Double-click SNMP Service.
Click Properties.
Click the Security tab.
In the Accepted Community Names box, click Add.
Select a name from the Community Name box, or type public.
The Accepted Community Names list displays the community names from which Windows 2000 will accept requests.
Click Add.
Select Accept SNMP Packets from Any Host > click OK.
IMPORTANT: After installing the SNMP services, you should re-install the service packs again.
Before you install the software, you must:
Before you install the software, you must:
Before you install the Management and Monitoring services software, you must update the Java files on your target management server.
To update the Java files on your target Management server:
Unload JAVA.NLM (at a server's console prompt, enter JAVA -EXIT) after ensuring that no other process is using Java.
Locate the JVM.EXE file in the \JAVA directory of the ZENworks for Servers 3 Companion CD and install it to the root of the SYS: volume.