12.2 Managing Registration Rules
Registration rules let you determine a device's assignments when it registers without using a key. The major difference between using the default registration rules versus using a registration key is that the default registration rules use a filter to determine which set of device assignments to apply, but a key corresponds directly to a specific set of assignments to apply.
By default, the list includes a default registration rule for servers and another one for workstations. These two rules cause all servers to be added to the /Servers folder and all workstations to the /Workstations folder. The device hostname is used for its name. You cannot delete these two default rules, but you can modify the naming scheme and the groups to which the servers and workstation are added.
The two server and workstation default rules are designed to ensure that no server or workstation registration fails. You can, however, define additional rules that enable you to filter devices as they register and add them to different folders and groups. If you establish folders for devices with similar configuration settings and groups for devices with similar bundle and policy assignments, newly registered devices automatically receive the configuration settings and assignments appropriate to them.
If you do not want to use registration rules, you can create registration keys. Using registration keys lets you define the keys that are used to register devices in the Management Zone. For more information, see Section 12.1, Managing Registration Keys.
The following sections contain additional information:
12.2.1 Creating Rules to Register Devices
-
In the ZENworks Control Center, click the tab.
-
In the Default Registration Rules section, click to launch the Create New Default Rule Wizard.
-
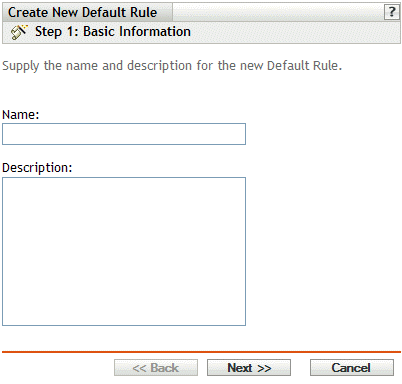
Fill in the fields:
Name: Provide a name for the registration rule.
For more information, see Section C.0, Naming Conventions in the ZENworks Control Center.
Description: Provide a description if desired. The description is displayed on the rule’s Details page. If you are creating several registration rules, you might want to use the description to detail each rule.
-
Click to display the Import Filters page.
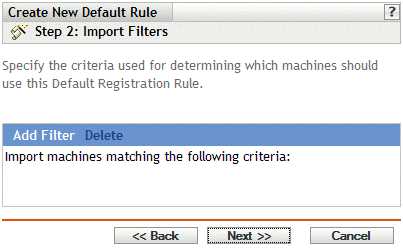
-
Click to specify the criteria used to determine which devices should use this Default Registration Rule.
-
Select an option from the drop-down list in the left field, select , , , or from the drop-down list in the center field, then type a value in the right field.
The options you can use are listed below, along with possible values. The format for all values, with the exception of Device Type, is free form string.
-
(Conditional) Click again to add an additional row of criteria and repeat Step 5.a and Step 5.b, as many times as necessary.
Be aware that the rows in the filter are separated by And. If you specify multiple rows in the filter, the criteria in all rows must be met for the rule to apply.
-
-
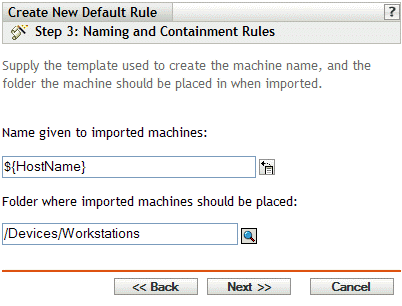
Click to display the Naming and Containment Rules page.
-
Fill in the fields:
Name given to imported machines: Provide a naming scheme for registering devices.
Avoid spaces in your naming scheme; these spaces must be escaped when using the command line utilities. For example, use ${HostName}-${OS} rather than ${HostName} ${OS}.
Folder where imported machines should be placed: Specify the folder where devices should be placed.
As a general rule, devices with similar configuration settings (refresh intervals, logging settings, remote management settings, and so forth) should be grouped in the same folder so that you can specify the configuration settings on the folder and have the devices in the folder inherit them. You should not use the same folder for devices that require different configuration settings; doing so would prohibit you from using the folder to define the settings and force you to define them on each individual device.
-
Click to display the Group Membership page.
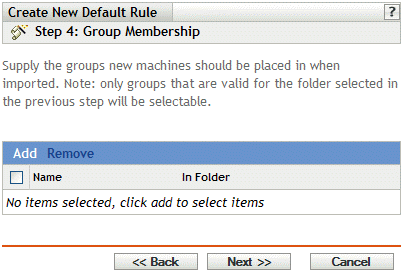
Adding groups causes devices to receive any assignments provided by membership in the groups. Assignments from group membership are additive, so if a device is assigned to both group A and group B, the device receives all assignments from both groups.
Click to add a group. You can only add groups that are valid for the type of device folder you specified on the previous page of the wizard. For example, if you specified the /Devices/Workstations folder, you can only choose workstation groups.
-
Click to display the Summary page.
-
Review the information on the Summary page, making any changes to the settings by using the button as necessary. Click to create the registration rule according to the settings on the Summary page.
12.2.2 Editing Existing Registration Rules
-
In the ZENworks Control Center, click the tab.
-
Click the underlined link for the registration rule that you want to edit.
NOTE:If you edit an existing registration rule, be aware that the changes you make apply only to newly registered devices. If the device is already registered, the original settings remain. For example, if you change the naming and folder containment settings, those devices already registered retain the previous naming convention and remain in the original folder they were placed in. You could, however, unregister the devices and then reregister them to ensure that the new naming convention and folder containment settings are applied to the previously registered devices. For more information, see Section 13.0, Unregistering and Reregistering Devices.
-
(Optional) In the section, make the desired changes:
Description: Edit the description for the rule. This description displays in the ZENworks Control Center, which is the administrative tool for ZENworks Linux Management.
-
(Optional) In the section, make the desired changes.
-
Select an option from the drop-down list in the left field, select , , , or from the drop-down list in the center field, then type a value in the right field.
The criteria options you can use are listed below, along with possible values. The format for all values, with the exception of Device Type, is free form string.
-
(Optional) Click again to add an additional row of criteria and repeat Step 4.a and Step 4.b, as many times as necessary.
Be aware that the rows in the filter are separated by And. If you specify multiple rows in the filter, the criteria in all rows must be met for the rule to apply.
-
-
(Optional) In the section, make the desired changes:
Name given to imported machines: Select one or more machine variables to provide a naming scheme for registering devices.
Avoid spaces in your naming scheme; these spaces must be escaped when using the command line utilities. For example, use ${HostName}-${OS} rather than ${HostName} ${OS}.
Folder where imported machines should be placed: Specify the folder where devices should be placed.
As a general rule, devices with similar configuration settings (refresh intervals, logging settings, remote management settings, and so forth) should be grouped in the same folder so that you can specify the configuration settings on the folder and have the devices in the folder inherit them. You should not use the same folder for devices that require different configuration settings; doing so would prohibit you from using the folder to define the settings and force you to define them on each individual device.
Group membership: Click to add a group. You can only add groups that are valid for the type of device folder you specified on the previous page of the wizard. For example, if you specified the /Devices/Workstations folder, you can only choose workstation groups. To remove a group, select the box next to the group's name, then click .
-
Click .
12.2.3 Renaming or Copying Registration Rules
-
In the ZENworks Control Center, click the tab.
-
In the section, click .
-
Select a registration rule by selecting the box next to its name, click , then click an option:
-
Rename: Click , type a new name for the registration rule, then click .
-
Copy: Click , type a new name for the registration rule, then click .
The copy option is useful to create a new registration rule that is similar to an existing rule. You can copy a key and then edit the new rule's settings.
If more than one check box is selected, the and options are not available from the menu.
-
12.2.4 Reordering Registration Rules
Rules are applied from the top down, and only the first matching rule is applied to a registering device. You should order the more restrictive rules first, then the more general rules, followed by the two default server and workstation rules (which always remain the last two rules).
To move a rule up or down in the list:
-
Select the rule by selecting the check box next to the rule.
-
Click or .
12.2.5 Deleting Registration Rules
-
In the ZENworks Control Center, click the tab.
-
Select the registration rule by selecting the check box next to the rule, then click .