30.5 Using Dell Configuration Bundles
When a server boots, the ZENworks Dell Configuration bundle is executed on the server before the operating system boots. The Dell Configuration bundle is used in server provisioning to do the following:
-
Use scripts and files to configure the BIOS, BMC, RAID, and DRAC
-
Install a Dell utility partition
-
Overwrite an existing Dell utility partition
-
Update the files in an existing Dell utility partition
-
Execute another Preboot bundle to install an operating system after updating the Dell device
For more information on the Dell OpenManage Deployment Toolkit (DTK), see the guides (dtk20cli.pdf and dtk20ug.pdf) contained in the DTK download.
In using Dell Configuration bundles, you should first create the Dell Configuration scripts and files, if they are needed, then create the Dell Configuration bundle:
IMPORTANT:If a newer version of the DTK is available from Dell, and you want to use it for your Dell Configuration bundle work, see Section G.0, Upgrading the Dell DTK for instructions on updating the DTK.
30.5.1 Creating Dell Configuration Scripts and Files
When you create a Dell Configuration bundle you might need specialized scripts or files to already exist, depending on which settings you employ in the bundle. Novell recommends that you follow the instructions in the Dell DTK documentation to create the necessary configuration files and scripts.
To help do this, ZENworks provides the Dell DTK (Maintenance Mode) option when booting a Preboot Services Imaging CD, which provides a complete DTK environment where configuration scripts and files can be created and tested. This environment is identical to the environment provided by booting the Dell DTK CD, but includes additional configuration information needed for placing files and scripts on the ZENworks servers.
After you create them, you need to copy all of the scripts and files to be used in the Dell Configuration bundle to the ZENworks TFTP server. You will need to do this before you reboot the device that you used to create the scripts and files, because the scripts and files are created in a RAM drive, which is replaced in rebooting.
The DTK environment provides a TFTP client utility that allows you to upload your configuration files directly to your ZENworks servers, because the Dell DTK (Maintenance Mode) also provides an environment variable ($TFTPIP) that always resolves to the IP address of the TFTP service on the ZENworks server.
IMPORTANT:In the following sections you are instructed to upload files to your ZENworks TFPT server. Because this is not enabled by default, you must first configure TFTP before attempting to upload those files.
To create the scripts and files that you might need when creating a Dell Configuration bundle:
Creating a BIOS/BMC/DRAC 5 Configuration File
This bundle option only configures the BIOS, BMC, or DRAC 5; it cannot be used to update them. Updates are done using a Dell Update Package.
-
Make sure the novell-proxydhcp daemon is running on a server in your network.
This service must be available so that the device’s PXE can access files from the ZENworks server, such as the Preboot Services Menu and Dell DTK (Maintenance Mode).
-
Boot a Dell device that is PXE-enabled and press the Ctrl-Alt keys during booting.
Press these keys when a string starting with “Novell ...” is displayed during the boot process.
IMPORTANT:Choose the correct device to boot for creating the BIOS, BMC, or DRAC 5 file. The devices to receive the update must be the same as the device you are using to configure the file. For example, if the boot device is a Dell 2950, then the configured file can only be used to update other Dell 2950 devices.
-
When the bash (#) prompt is displayed, auto-generate the file using the following command:
syscfg -o BIOS-BMC_filenamewhere BIOS-BMC_filename is the name of the BIOS or BMC file to be used. In Dell 9G devices, DRAC 5 is included in the BIOS, rather than a separate file.
WARNING:Do not reboot the device at this time, because the file you created is in a RAM drive. (You can safely reboot after you upload the file to the TFTP server.)
-
To upload the new configuration file to your ZENworks TFTP server, enter:
tftp -l local_BIOS-BMC_filename -r remote_BIOS-BMC_filename_and_path -p $TFTPIP
where local_BIOS-BMC_filename is the name of the configuration file that you are saving, and remote_BIOS-BMC_filename_and_path is both the name and the location for where you want the file on your ZENworks server.
The path on the ZENworks server for the remote filename should be relative to the TFTP server’s home path, because the remote file is placed in that location. The Dell Configuration bundle is designed to look for files relative to the TFTP server’s home path.
-
Continue with the appropriate section:
Creating a RAID Configuration Script
This bundle option only configures RAID; it cannot be used to update it. Updates are done using a Dell Update Package.
-
Make sure the novell-proxydhcp daemon is running on a server in your network.
This service must be available so that the device’s PXE can access files from the ZENworks server, such as the Preboot Services Menu and Dell DTK (Maintenance Mode).
-
Boot a Dell device that is PXE-enabled and press the Ctrl-Alt keys during booting.
Press these keys when a string starting with “Novell ...” is displayed during the boot process.
IMPORTANT:Choose the correct device to boot for creating the RAID script. The devices to receive the update must be the same as the device you are using to configure the script. For example, if the boot device is a Dell 2950, then the configured script can only be used to update other Dell 2950 devices.
-
When the bash (#) prompt is displayed, to edit the following sample script file, first make a copy of it where you have editing rights:
cp -a /opt/dell/toolkit/template/scripts /tmp
then to edit the copy:
vi /temp/scripts/raidcfg.sh
Modify the file as needed, then save the changes. You can save the file using any filename; however, the filename you save it as must be provided in the Dell Configuration bundle. Therefore, if you save to a different name, make a note of it.
WARNING:Do not reboot the device at this time, because the script you created is in a RAM drive. (You can safely reboot after you upload the script to the TFTP server.)
-
To upload the new configuration script to your ZENworks TFTP server, enter:
tftp -l local_RAID_filename -r remote_RAID_filename_and_path -p $TFTPIP
where local_RAID_filename is the name of the configuration script that you are saving, and remote_RAID_filename_and_path is both the name and the location for where you want the script on your ZENworks server.
The path on the ZENworks server for the remote filename should be relative to the TFTP server’s home path, because the remote script is placed in that location. The Dell Configuration bundle is designed to look for scripts relative to the TFTP server’s home path.
-
Continue with the appropriate section:
Creating a DRAC 4 or Earlier Configuration File
This bundle option only configures DRAC 4 or earlier; it cannot be used to update it. Updates are done using a Dell Update Package.
Do this only for Dell devices that are 8G or earlier.
-
Make sure the novell-proxydhcp daemon is running on a server in your network.
This service must be available so that the device’s PXE can access files from the ZENworks server, such as the Preboot Services Menu and Dell DTK (Maintenance Mode).
-
Boot a Dell device that is PXE-enabled and press the Ctrl-Alt keys during booting.
Press these keys when a string starting with “Novell ...” is displayed during the boot process.
IMPORTANT:Choose the correct device to boot for creating the DRAC 4 file. The devices to receive the update must be the same as the device you are using to configure the file. For example, if the boot device is a Dell 2950, then the configured file can only be used to update other Dell 2950 devices.
-
When the bash (#) prompt is displayed, execute the following script:
/opt/dell/toolkit/template/scripts/raccap.sh
-
While the script is running, provide a name for the DRAC 4 or earlier configuration file.
The DRAC configuration file is saved in your current directory.
WARNING:Do not reboot the device at this time, because the file you created is in a RAM drive. (You can safely reboot after you upload the file to the TFTP server.)
-
To upload the new configuration file to your ZENworks TFTP server, enter:
tftp -l local_DRAC_filename -r remote_DRAC_filename_and_path -p $TFTPIP
where local_DRAC_filename is the name of the configuration file that you are saving, and remote_DRAC_filename_and_path is both the name and the location for where you want the file on your ZENworks server.
However, the path on the ZENworks server for the remote filename should be relative to the TFTP server’s home path, because the remote file is placed in that location. The Dell Configuration bundle is designed to look for files relative to the TFTP server’s home path.
-
Continue with Section 30.5.2, Creating Dell Configuration Bundles.
30.5.2 Creating Dell Configuration Bundles
The Dell Configuration bundle allows you to configure certain Dell devices with specific BIOS/BMC/DRAC 5, RAID, DRAC 4 or earlier, and Dell utility partition configurations, and then have a Preboot bundle executed to image the device with an operating system.
To create a Dell Configuration bundle:
-
In the ZENworks Control Center, click the tab.

-
Click > to start the Create New Bundle Wizard:
-
In the Create New Bundle Wizard, select , then click .

-
On the Select Preboot Bundle Type page, select , then click to display the Set General Information page:
-
Fill in the fields:
Name: (Required) Although bundles can be identified in ZENworks Control Center by their type of icon, as well as the folder they are listed in, you should develop a naming scheme that differentiates the Dell Configuration bundles that are listed together in a folder.
For more information, see Section C.0, Naming Conventions in the ZENworks Control Center.
Folder: Browse for the location where you want the Dell Configuration bundle displayed in ZENworks Control Center. The folder must exist. You cannot specify a non-existent folder, because ZENworks does not create them from this wizard.
Description: Provide a description to help you later recognize the exact purpose of this Dell Configuration bundle.
-
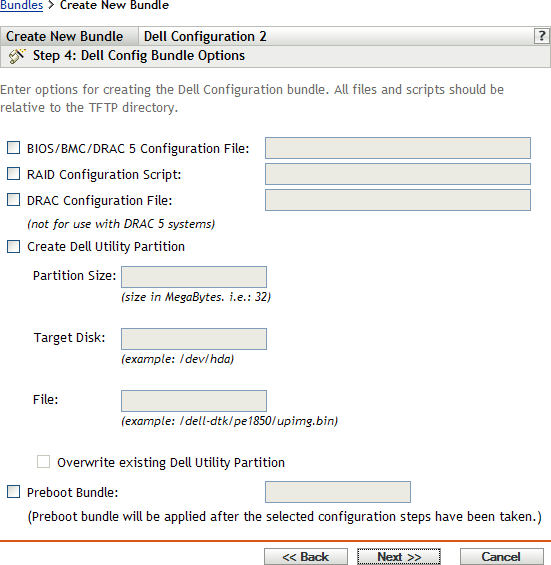
Click to display the Dell Configuration Bundle Options page:
-
Fill in the fields:
BIOS/BMC/DRAC 5 Configuration File: To configure the BIOS, BMS, or DRAC 5, specify the path and filename of the configuration file, relative to the TFTP server’s home path. Do not specify the TFTP location or any of the path that precedes it.
For information on creating this file, see Section 30.5.1, Creating Dell Configuration Scripts and Files.
RAID Configuration Script: To configure RAID, specify the path and filename of the configuration script, relative to the TFTP server’s home path. Do not specify the TFTP location or any of the path that precedes it.
For information on creating this script, see Section 30.5.1, Creating Dell Configuration Scripts and Files.
DRAC Configuration File: To configure DRAC 4 or earlier, specify the path and filename of the configuration file, relative to the TFTP server’s home path. Do not specify the TFTP location or any of the path that precedes it.
For information on creating this file, see Section 30.5.1, Creating Dell Configuration Scripts and Files.
Create Dell Utility Partition: To create a new Dell utility partition, select this check box, then fill in the fields:
WARNING:If you use this option, all existing partitions on the identified disk are replaced by the Dell utility partition. However, you can select the check box to update only an existing Dell utility partition. In that case, all existing partitions are kept and the Dell server diagnostics utility files are written to the existing Dell utility partition using the entry that you provide in the field.
-
Partition Size: This partition requires 32 MB for the Dell server diagnostics utilities. Use this field only when creating a new Dell utility partition.
-
Target Disk: This is the disk’s identifier, such as /dev/hda. This ID is used to determine the disk for creating the new partition, or for updating an existing partition.
-
File: Specify the path to the Dell utility partition file. The path must be relative to the TFTP server’s home path.
The file is written to the partition in the process of creating a new partition or when updating an existing partition.
Dell utility partition files are contained on the Dell Installation and Server Management CD. For example, for a PowerEdge 1850 system, the file is at d:\server_assistant\pe1850\upimg.bin. Copy the necessary files from the CD to a path relative to the TFTP server’s home path for use in this field.
-
Overwrite Existing Dell Utility Partition: If a Dell utility partition already exists on the selected target disk, select this check box to simply update the partition with the newer utility files, instead of replacing the partition.
You cannot use a ZENworks partition for the same purpose as the Dell utility partition. However, both a Dell utility partition and a ZENworks partition can exist on the same server, each being used for its own purposes.
IMPORTANT:The Dell utility partition relies on its version of the MBR (master boot record) to function correctly. Grub also uses the MBR for its boot loader. If you install the Dell utility partition, then installing the Linux operating system, the Dell version of the MBR is overwritten by the grub version. Do one of the following to resolve this issue:
-
Grub on the boot partition: When installing Linux, you can select to put grub on the boot partition, rather than in the MBR (the default). However, you must set this boot partition as . Then, when the Dell utility partition writes its MBR information, it does not conflict with grub, because its boot loader is not located in the same place.
-
Grub menu item for the Dell utility partition: If the devices are not using the Dell utility partition boot loader, you can use grub in the MBR (the default) and still provide an F10 menu option to the Dell utility partition. Edit the /boot/grub/menu.1st file and add the following lines:
title Dell Utility Partition
chainloader (hd0,0)+1
Preboot Bundle: This option allows Preboot Services to complete the above configurations, then immediately apply a destructive image or installation script from another Preboot bundle. Select this option, then browse for or specify the path and filename of the Preboot bundle.
-
-
Click to display the Summary page.
-
Review the configuration, then click one of the following:
Back: Allows you to make changes after reviewing the summary.
Next: Click to perform the following tasks before creating the bundle:
-
Specify device assignments for this bundle
-
Specify groups for this bundle
Continue with Section 30.6, Assigning Unassigned Preboot Bundles to assign the bundle and complete the wizard.
Finish: Creates the Dell Configuration bundle as configured per the settings listed on this Summary page.
-
This bundle is not assigned to any device or group after it is created, unless you click instead of to make that assignment.
When a device assigned to the Dell Configuration bundle boots, the bundle’s work is performed on the device before its operating system starts.
IMPORTANT:If this Preboot bundle has been created on a management device inside the firewall and you are assigning it to a device outside the firewall, port 8089 must be open both ways (PUBLIC -> PRIVATE, and PUBLIC <- PRIVATE).
For more information on the Dell DTK, see the Dell guides (dtk20cli.pdf and dtk20ug.pdf) contained in the DTK download.