2.3 Discovering Source Workloads and Migration Targets
For any conversion job, you must have a discovered source and a discovered target. A discovery operation populates the Portability Suite database with detailed inventory information about a machine. This information provides the data necessary to determine the machine’s use and to properly configure a conversion job.
-
Section 2.3.1, Prepopulating the Servers View with Windows Computers in the Network
-
Section 2.3.2, Discovering the Details of Source Workloads and Targets
-
Section 2.3.5, Resetting the Access Mechanism Used to Authenticate Access to ESX Hosts
-
Section 2.3.6, Discovering and Registering Target Physical Machines
-
Section 2.3.7, Discovering and Preparing a Windows VM for a Server Sync Job
2.3.1 Prepopulating the Servers View with Windows Computers in the Network
Portability Suite’s Network Discovery feature automatically populates Portability Suite Client with a list of Windows physical and virtual machines that are online. Unlike a full discovery, Network discovery creates a list of machines but does not retrieve detailed inventory information about each one, which is required for workload portability and protection jobs.
The Network Discovery feature is necessary to discover all machines of a Windows domain in a single job. See Discovering All Machines in a Windows Domain.
Portability Suite uses the standard Windows network browser function for the auto-discovery feature. Because Linux-based workloads and virtual machine servers do not advertise to the Windows network browser, these are not auto-discovered.
The Network Discovery feature is enabled by default. To disable the feature or toggle between its enabled/disabled modes, double-click in the bottom right corner of the Portability Suite Client window.
2.3.2 Discovering the Details of Source Workloads and Targets
You can discover an individual physical or virtual machine, multiple machines, an individual virtual machine server, or multiple virtual machine servers. You can also discover all VMware ESX hosts affiliated with a VMware vCenter Server.
Before starting discovery operations, make sure Portability Suite Server can communicate with your source workloads and targets. See Network Communication Prerequisites
in your Configuration Guide.
-
On the Portability Suite toolbar, click .
or
In the Servers view, right-click in a blank area, then select .
-
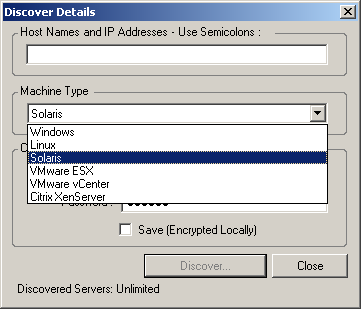
In the dialog box, type the hostname or IP address of the source or target. To discover multiple machines, specify multiple hostnames or IP addresses separated by semicolons.
To discover Linux workloads or VMware ESX Server 2.5 and 3.0.x systems that are using non-default SSH ports, specify the port number using the standard URL syntax (hostname:portnumber or IP_address:portnumber as applicable). Port numbers are not required for VMware ESX Server 3.5, ESXi 3.5, and ESX 4 systems.
-
Select the machine type and provide administrator credentials for the machine you are discovering. Use the following guidelines for selecting the machine type and specifying credentials:
To Discover
Machine Type Selection
Credentials
Remarks
All Windows workloads
MSVS VM hosts
Image Servers
Local or domain admin credentials.
For the username, use this syntax:
-
For domain member machines: authority\principal
-
For workgroup member machines: hostname\principal
All Linux workloads
Root-level username and password
Non-root accounts must be properly configured to use sudo. See Knowledge Base Article 20711.
VMware ESX hosts
Root-level username and password
VMware ESX hosts affiliated with a VMware vCenter Server
VMware vCenter Web service credentials (username and password)
All subsequent communications with ESX hosts take place through the vCenter Server. To reset the access mechanism to or back to , refresh the details of the required ESX host and select the required option. See Resetting the Access Mechanism Used to Authenticate Access to ESX Hosts.
Citrix XenServer VM hosts
username root along with the associated password
XenServer hosts currently do not support multiple root-level user accounts
Solaris workloads and zone servers
username and password
The user must be assigned a primary administrator profile through Solaris RBAC (role-based access control). See Knowledge Base Article 20711.
NOTE:Discovering hosts with Microsoft Hyper-V, Virtual Iron, and Xen Hypervisor virtualization software results in these systems being registered as Portability Suite source workloads (as opposed to VM host targets). To use these platforms as workload portability targets, see Semi-Automated Workload Virtualization through X2P.
-
-
(Optional) If you want to store these credentials for use during future jobs, enable the option.
-
Click and wait for the process to complete.
-
(Optional) If you want to monitor the progress of the job, switch to the Jobs view.
2.3.3 Discovering All Machines in a Windows Domain
-
Enable the automatic Network Discovery feature. See Prepopulating the Servers View with Windows Computers in the Network.
-
In Portability Suite Client, expand the domain listing containing the machines to be discovered.
-
Right-click the domain name, then select .
-
Specify domain-level administrator credentials.
-
Click and wait for the process to complete.
-
(Optional) If you want to monitor the progress of the job, switch to the Jobs view.
2.3.4 Refreshing Machine Details
You should routinely refresh your source workloads and targets before setting up a conversion job.
To refresh a source or a target machine:
-
In the Servers view, right-click the required item, then select .

-
Specify the credentials appropriate for the system being refreshed, then click .
Portability Suite starts a discovery job, which you can monitor in the Jobs view.
2.3.5 Resetting the Access Mechanism Used to Authenticate Access to ESX Hosts
If you discover ESX hosts through a vCenter Server, all subsequent communications with these VM hosts take place through the vCenter Server.
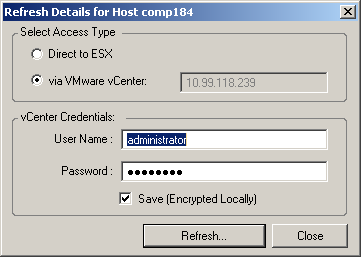
You can reset this access mechanism to or back to :
-
Refresh the required ESX host. See Refreshing Machine Details.
The system prompts you to select an access type:
-
Select the required option, then click .
Portability Suite rediscovers the required ESX host by using the specified access mechanism, which it uses for all subsequent communications with that host.
2.3.6 Discovering and Registering Target Physical Machines
To discover a physical target and inventory its hardware components, you must boot the target machine with a Physical Target Take Control ISO image on a CD or other media, from which your target can be booted. A similar process is used to migrate workloads to virtualization platforms that use the semi-automated virtualization process, whereby a target virtual machine on a virtual machine host is regarded as a physical target. See Semi-Automated Workload Virtualization through X2P.
To use an ISO image, download it from the Novell Customer Center. Use the image appropriate to your target machine:
Table 2-2 Take Control ISO Images for Target Physical Machines
|
Target Type |
Filename |
|
|---|---|---|
|
Windows machines with 384 MB RAM or more |
winperamdisk.iso |
|
|
Windows machines with 256 to 384 MB RAM |
winpe.iso |
|
|
Linux machines |
bootofxx2p.iso |
|
|
Windows VMs on Virtual Iron with 384 MB RAM or more or more |
winperamdisk_virtualiron.iso |
Regarded by Portability Suite Server as physical targets. See Semi-Automated Workload Virtualization through X2P. |
|
Windows VMs on Virtual Iron with 256 to 384 MB RAM |
winpe_virtualiron.iso |
|
|
Unisys* ES7000 machines regardless of memory size |
winperamdisk_es7000.iso |
|
Discovering and Registering Target Physical Machines (Windows)
Complete these steps to register your target with Portability Suite Server when you are using an unmodified Take Control ISO image. For information on how to modify the image for an unattended registration process, see Knowledge Base Article 20832.
All discovered and registered physical machines can be also used as Server Sync targets. See Synchronizing Workloads with Server Sync.
-
Burn the appropriate Physical Target Take Control ISO image on a CD or save it to the required media, from which your target can boot. See Table 2-2, Take Control ISO Images for Target Physical Machines.
-
Ensure that the network switch port connected to the target is set to Auto Full Duplex.
Because the Windows version of the boot CD image supports Auto Negotiate Full Duplex only, this ensures that there are no conflicts in the duplex settings.
-
Using the boot CD, boot the target physical machine and wait for the command prompt window to open.
-
When prompted, enter the Portability Suite Server URL, using the following syntax:
http:// server_host /PortabilitySuite
Replace server_host with the actual Portability Suite Server host’s name or IP address.
-
Enter administrator-level credentials for the Portability Suite Server, specifying an authority. Use this syntax:
domain\username or hostname\username
-
Enter the password for the provided credentials.
Available network cards are detected and displayed by their MAC addresses.
-
If DHCP is available on the NIC to be used, press the Enter key to continue. If DHCP is not available, select the desired NIC to configure with a static IP address.
-
Enter the IP address
-
Enter the subnet mask
-
Enter the gateway
-
-
Enter a hostname for the physical machine or press the Enter key to accept the default values.
-
Enter if you have enabled SSL on the Portability Suite Server; otherwise enter .
-
Enter the name of the Portability Suite Network that you want the discovered machine to be part of. If you are unsure, just press the Enter key. Portability Suite Server uses the Default Network.
After a few moments, Portability Suite displays the physical target in the Servers view.
Registering Physical Targets with Portability Suite Server (Linux)
Complete these steps to register your target with Portability Suite Server when you are using an unmodified Take Control ISO image. For information on how to modify the image for an unattended registration process, see Knowledge Base Article 20832.
-
Burn the appropriate Physical Target Take Control ISO image on a CD or save it to the required media, from which your target can boot. See Table 2-2, Take Control ISO Images for Target Physical Machines.
-
Boot the target machine, using the ISO Ramdisk image.
-
When prompted, enter the Portability Suite Server URL, using the following syntax:
http:// server_host /PortabilitySuite
Replace server_host with the actual Portability Suite Server host’s name or IP address.
-
Enter your credentials for the Portability Suite Server.
-
Specify a static IP address or indicate that the machine should dynamically obtain an IP address from a DHCP server.
-
Enter a name for the target host and specify an existing Portability Suite Network to work with.
After a few moments, Portability Suite displays the physical target in the Servers view.
Performing an Unattended Registration of a Target Physical Machine
Portability Suite provides a mechanism for automating a target physical machine’s registration with the Portability Suite Server. This involves updating the Take Control ISO image with specific registration information before booting the target.
For details, see Knowledge Base Article 20832.
2.3.7 Discovering and Preparing a Windows VM for a Server Sync Job
If you want to synchronize two Windows workloads, and if your synchronization target is a virtual machine, you must discover and register an appropriate virtual machine first. For information about the Server Sync feature, see Synchronizing Workloads with Server Sync.
-
On your virtual machine server, create a virtual machine with an operating system profile matching the intended source workload.
-
Discover the virtual machine host or refresh its details.
-
In the Servers view, right-click the newly created virtual machine underneath the virtual machine server, then select .
-
Specify administrator credentials for the virtual machine server.
-
(Optional) If you want to store these credentials for use during future jobs, enable the option.
-
(Optional) To configure the temporary Take Control network settings, such as choosing which virtual network to use from those available on the virtual machine server and configuring TCP/IP settings, click , then configure the network settings as required.
-
Click and wait for the job to complete.
On completion, the Servers view lists a new Server Sync target underneath the VM host:
