Running the Rebuild Utility Interactively
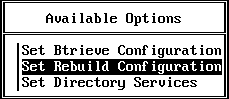
You can run the Rebuild utility interactively through the Set Rebuild Configuration option on the Setup utility's Available Options menu.
As the following sections explain, you can use the Set Rebuild Configuration option to perform the following tasks:
Complete the following steps to set the configuration options that apply to rebuilding your Btrieve files: After starting Btrieve 6.1x, load the Setup utility by entering the following command at the prompt: load bsetup When the Available Options menu appears, select Set Rebuild Configuration to run the Rebuild utility.
A warning, shown in Figure 9, appears, indicating you should back up your Btrieve data files before proceeding. Figure 9
NOTE: If you do not have current backups, press Esc three times. When the Exit Btrieve Setup? prompt appears, select Yes. Create backups and then return to this utility.
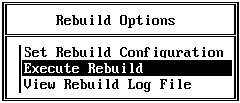
Provided you have current backups of your data files, press Esc to advance to the Rebuild Options menu.
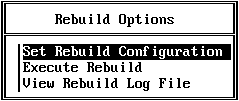
Figure 10
Select the files you want to rebuild, as follows: With your cursor at the Files To Be Converted entry, press Enter and then press Insert. When the list of available volumes appears, highlight the volume you want and press Enter. The utility displays the directories available on the selected volume. Highlight the directory you want and press Enter. Continue highlighting directories (that is, subdirectories) and pressing Enter until you have reached the one that contains the file or files you want to rebuild. Then press Esc. Choose the files you want to rebuild, as follows: For example, you might enter /*.* to specify all files in the selected directory, or you could enter /*.BTR to specify all files in that directory with the extension .BTR.
At Output Directory, specify the location you want to use for the rebuilt files, as described in the following steps. The default location is the directory you specified for the Files To Be Converted field. Press Enter. Either type the server or directory name manually and press Enter, or choose from the list of available directories on the current server by entering a valid path and pressing Insert. To select a directory name from the list, highlight the name and press Enter. If you want to store the rebuilt files on a different server, you must type the output server name, volume, and path manually. Then press Enter. Do not use wildcard characters in the pathname that specifies the location for the rebuilt files. NOTE: To store rebuilt files on a different server, Btrieve and the Message Router must be loaded on the server where the original data files reside, and the Btrieve and BSPXCOM NLMs must be loaded on the server that will contain the rebuilt files.
NOTE: Wherever you store the rebuilt files, you will need enough disk space for the rebuilt files and the temporary files that the utility creates. The utility deletes the temporary files at the end of the conversion process.
After specifying the output directory, use the Down-Arrow key to move to the Page Size field. At Page Size, type the size manually or choose from the list of valid page sizes. To list the available page sizes, press Enter. In this list, the AUTO option (the default) means the utility will choose the optimum page size for the files. The EXISTING option means the utility will use the same page size as that of the original files. To select a size from the list, highlight it and press Enter. NOTE: When you use the EXISTING option, the utility changes the page size if the original size will not work. For example, assume you have a Btrieve 5.x file with a page size of 1,024 and 24 keys. Since Btrieve 6.x supports only 23 keys for a file of that page size, the utility selects a new page size for the file and displays an informative message on the screen. At Key Number, specify a number between 0 and 23 on which to sort the records, or specify -1 to sort the records in physical order. Press Enter. IMPORTANT: If you are using Scalable SQL, you must specify a key number of 0 when rebuilding the VIEW.DDF file.
At Preserve TTS Setting, specify Y or N to indicate whether you want to preserve the Transaction Tracking System (TTS) bit during conversion. Press Enter. If you specify Y, the utility preserves the bit. If you specify N (the default), the utility clears the bit when creating Btrieve 6.x files. At Conversion Method, select the conversion method as follows: Press Enter. Highlight either PRIMARY (the default) or SECONDARY, and then press Enter. IMPORTANT: If you are using Scalable SQL, you must specify the SECONDARY method when rebuilding the VIEW.DDF file. Be aware that the SECONDARY method may create a 6.x file in which the records are in a different physical order than in the original 5.x file.
Since this method is faster and creates smaller files than the SECONDARY method, you should use this method whenever possible. However, if you are using Scalable SQL, you must not use this method when rebuilding the VIEW.DDF file.
At Continue On Error, specify either Y or N and press Enter. If you specify Y, the utility continues if it encounters an error. (The utility notifies you of non-Btrieve files or other errors but continues rebuilding Btrieve files.) If you specify N, the utility stops if it encounters an error and aborts the rebuild process. At Convert Supplemental Indexes, specify Y or N and press Enter. IMPORTANT: Do not use the Convert Supplemental Indexes option if you access your data files through Scalable SQL.
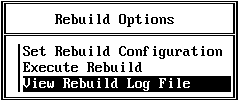
If you specify Y, the utility converts Btrieve 5.x supplemental indexes (which allow duplicates) to Btrieve 6.x indexes with linked-duplicatable keys. Btrieve 5.x supplemental indexes have, by default, repeating-duplicatable keys. If you specify N (the default), the utility does not convert the 5.x supplemental indexes but preserves them as repeating-duplicatable keys. Press Esc to leave the Rebuild Configuration Setup Form screen. When the utility asks whether to save your changes, select Yes to save them and return to the Rebuild Options menu or No to abandon the changes. IMPORTANT: The utility applies the Btrieve 5.x file's owner name and level to the Btrieve 6.x file. After configuring the Rebuild utility, you are ready to rebuild your files. After rebuilding your files, be sure to check the utility's log file to see if any errors occurred during the conversion process, as follows: Select View Rebuild Log File from the Rebuild Options menu.
The utility displays a log of any errors that occurred while the utility was executing. This log file, REBUILD.LOG, is similar to the example shown in Figure 11. Figure 11
When you finish viewing the log, press Esc to return to the Rebuild Options menu. To exit both the Rebuild utility and the Setup utility, press Esc twice more and specify Yes at the Exit Btrieve Setup? prompt. Before running the Rebuild utility from the command line, make sure you have unloaded your previous version of Btrieve (as described on Unloading an Earlier Version of NetWare Btrieve), started Btrieve 6.x (as described in Starting NetWare Btrieve 6.x), and backed up all your data files. Having a backup copy ensures against data loss if a power interruption occurs while you are running this utility. NOTE: After rebuilding your files, be sure to check the utility's log file to see if any errors occurred during the conversion. The log file (BREBUILD.LOG) that the Rebuild utility creates is an ASCII text file, which is placed in the SYS:SYSTEM directory. You can examine the log file using a text editor or by running the Rebuild utility interactively and selecting View Rebuild Log File from the Rebuild Options menu (as explained in Viewing the Rebuild Log File).
To run the Rebuild utility from the command line, enter one of the following commands at the prompt: LOAD BREBUILD [-
option ...]
file
or LOAD BREBUILD @
commandFile
Configuring the Rebuild Utility
Setup: Backup Warning for Rebuild Option
Setup: Rebuild Configuration Setup Form Screen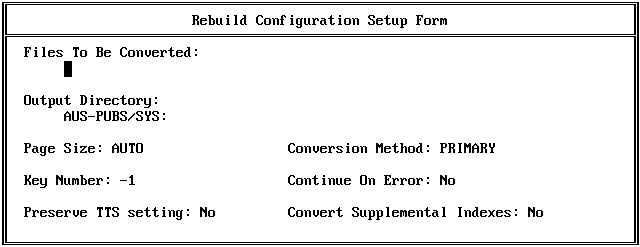
Executing the Rebuild Utility
Viewing the Rebuild Log File
Setup: Example Rebuild Log File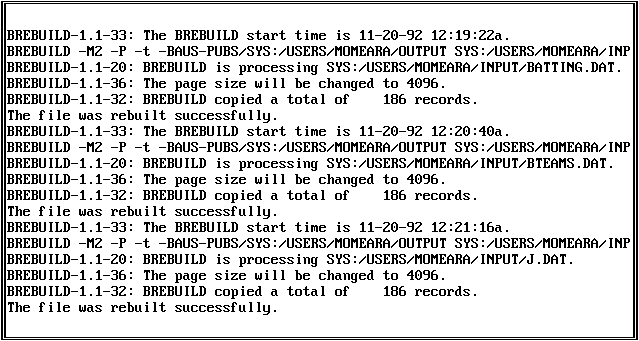
Running the Rebuild Utility from the Command Line