NetWare Btrieve Roll Forward Utility

The NetWare Btrieve Roll Forward utility is an interactive workstation utility that allows you to recover changes made to a Btrieve file between the time of the last backup and a system failure. The changes are stored in a log file.

If a system failure occurs, you can restore the backup copy of your Btrieve file and run the Roll Forward utility. The utility applies the changes stored in the log file to your backup copy.

This section discusses the following topics:


Using the Roll Forward Utility in Various Environments

Roll Forward utilities are available for DOS, OS/2, and MS Windows operating environments, as follows:


Overview of the Recovery Process

In general, use the steps in the following procedure first to enable the NetWare Btrieve logging feature and then, in the event of a system failure, to recover your Btrieve files.

  1. Back up your data files (and any current log files, if applicable), enable the logging feature using the Btrieve Setup utility, and create a log configuration file.

    For more information, see Setting Up Files for Logging and Backing Up Data Files, and Example of Restoring a Data File.

    WARNING:  You cannot take advantage of the Roll Forward utility unless you have enabled the logging feature and created a log file before a system failure.

  2. Ensure that your system meets the system requirements for running the Roll Forward utility and then start the utility.

    For more information, see Running the Roll Forward Utility in a DOS Environment and Running the Roll Forward Utility in an OS/2 or MS Windows Environment.

  3. Set the appropriate Roll Forward utility options in one of the following ways:

  4. Select the Btrieve file (or files) you want to recover by adding that item to the Roll Forward utility's queue.

    For more information, see Placing Items in the Queue.

  5. Run the Roll Forward utility, which applies the changes stored in the log file to your backup copy of the Btrieve file.

    For more information, see Rolling Forward Items in the Queue.

    NOTE:  For an example of the procedures used to handle data and log files in a roll-forward operation, see Example of Restoring a Data File.


Setting Up Files for Logging

To take advantage of NetWare Btrieve's logging feature and the Roll Forward utility, you must first set up your Btrieve files for logging, as described in the following procedure. Subsequent sections discuss each step in this process.

  1. Back up your data files before you activate the logging feature.

    For more information, see Backing Up Data Files.

  2. Activate Btrieve's logging configuration option using the Setup utility (BSETUP.NLM).

    For more information, see Activating the Btrieve Logging Option.

  3. Create the log configuration file, BLOG.CFG.

    For more information, see Creating the Log Configuration File.


Backing Up Data Files

Be sure to make a backup copy of your Btrieve files before logging begins.

When you activate logging for a given file, NetWare Btrieve uses the corresponding log file to record all the operations that change the specified file. Btrieve continues appending subsequent operations to the end of this log file until you delete the log file. Consequently, it is important to perform periodic maintenance to reduce the size of your log files.

IMPORTANT:  Every time you back up your Btrieve files, delete the associated log files before executing any further operations that could change those log files. Synchronizing the backup data files and the associated log files is critical to recovering operations successfully.

IMPORTANT:  Keep the original copy of the data files and their associated log files until you have successfully rolled the data files forward using the original logged information. Be aware that the Roll Forward operation modifies the log files after each roll forward attempt, so you cannot apply log entries twice to the same data files.

IMPORTANT:  Be aware also that once you have performed a Roll Forward operation, Btrieve does not retain the original logging information. Instead, if you have enabled the logging feature, Btrieve adds to the log file a record of all the operations that affect the specified file subsequent to the last Roll Forward operation.

IMPORTANT:  For an example of the procedures used to handle data and log files in a roll-forward operation, see Example of Restoring a Data File.


Activating the Btrieve Logging Option

You can activate NetWare Btrieve's logging feature by specifying Yes for the Logging of Selected Files configuration option in the Setup utility. The default setting for this option is No.

If you did not specify Yes for this option when you configured NetWare Btrieve, complete the following steps to activate the Btrieve logging feature:

  1. Run the Setup utility (BSETUP.NLM).

  2. When the Available Options menu appears, select Set Btrieve Configuration.

  3. When the Current Btrieve Configuration screen appears, specify Yes for the Logging of Selected Files option.

  4. Press Escape.

  5. When the Save Configuration Changes? window appears, select Yes.

  6. To have your changes take effect, unload Btrieve using the BSTOP command and then reload it using the BSTART command.

    Btrieve reloads with the logging feature activated.

For additional information about this procedure see Logging of Selected Files in Chapter 3, "Installing and Configuring NetWare Btrieve."


Creating the Log Configuration File

The name of the NetWare Btrieve log configuration files is BLOG.CFG. It specifies the names of all the Btrieve files for which you want to log changes on a given volume.

You should create a BLOG directory at the root of each volume containing Btrieve files for which you want to log changes. You can then create a BLOG.CFG file in each BLOG directory and place entries in it, as follows:

  1. Create an empty BLOG.CFG file.

    You can use any text editor to create the BLOG.CFG file. Remember that you must create a BLOG.CFG file in the BLOG directory of each volume on which you want to log files.

  2. Open the BLOG.CFG file.

  3. Create an entry in the BLOG.CFG file for each Btrieve file for which you want to log operations.

Use the following format to create the BLOG.CFG file entries:

\ directory1\ btrvFile[=\ directory2\ logFile]

directory1

The path to the Btrieve file to be logged.

Do not include server names, volume names, or DOS drive letters.

btrvFile

The name of the Btrieve file to be logged.

directory2

The path to the log file.

If the log file and the Btrieve file are on the same volume, you can omit the server and volume names. If they are on different volumes, you must include the server and volume names.

When including the server name, place a double backslash (\\) before it.

logFile

The name of the log file.

Although the log file and the Btrieve file can be on different volumes, they cannot be on different servers.

Make sure each entry fits completely on one line. (Each line can contain a maximum of 256 characters.) If you have room, you can place multiple entries on the same line, but you must separate each entry with at least one space.

NOTE:  A single log entry cannot contain any spaces, although you must separate multiple entries on the same line with at least one space.

If you do not provide a name for the log file, Btrieve assigns the original filename plus a .LOG extension to the file when you first open it.

For example, assume that you did not specify a name for log file associated with the Btrieve file TEST01.DAT located in the directory TEST. Btrieve would assign the full name \TEST\TEST01.LOG to the default log file, which in this case, shares the same directory as the Btrieve file.

The following three examples show sample entries in the file \BLOG\BLOG.CFG on the SYS: volume of the CORP server. Each entry produces the same result: activity in the file \DATA\B.BTR on the CORP server's SYS: volume is logged into the file \DATA\B.LOG on the CORP server's SYS: volume.

\data\b.btr

\data\b.btr=\data\b.log

\data\b.btr=\\corp\sys:\data\b.log

The next example (again, a sample entry in \BLOG\BLOG.CFG on the CORP server's SYS: volume) shows how to log activity to a volume other than the Btrieve data file's volume:

\data\b.btr=\\corp\vol1:\data\b.log

This entry directs Btrieve to log activity in the file \DATA\B.BTR on the CORP server's SYS: volume into the log file \DATA\B.LOG on the VOL1: volume of the CORP server. You can also use the following syntax to achieve the same result:

\data\b.btr=\\corp\vol1:data\b.log


Running the Roll Forward Utility in a DOS Environment

To run the Roll Forward utility in a DOS environment, enter the BROLLFWD command using the following format:

BROLLFWD < btrvFile | @listFile | /A> [/D: nn] [/T: nn] [/K: nn] [/H] [/V] [/L] [/O: ownerName]

The following list describes the BROLLFWD command syntax:

btrvFile

Specifies the name of a single Btrieve file to be recovered.

@listFile

Specifies the name of a text file that contains a list of Btrieve filenames separated by one or more spaces. Use a list file to recover multiple files.

/A

Specifies that you want to recover all the Btrieve files in the BLOG.CFG file.

/D:

Specifies the data buffer size (in kilobytes) that the Roll Forward utility allocates for Btrieve log operations. /D: is optional.

The default size is 8 KB, the minimum is 1 KB, and the maximum is 64 KB. You can specify the length in increments of 1 KB.

/T:

Specifies the length of the data (in bytes) that will be printed in the list file for each operation that is rolled forward. /T: is optional.

Valid data lengths range from 1 through the value of the data buffer size specified with the /D: option. The default value is 40 bytes.

/K:

Specifies the length of the key (in bytes) that will be printed in the list file for each operation that is rolled forward. /K: is optional.

Valid lengths for printing keys range from 1 through 255 bytes. The default value is 10 bytes.

/H

Specifies that the Btrieve operations in the list file will be printed in hexadecimal format. The default prints the data and key in decimal numbers. /H is optional.

/V

Specifies that for each logged file in the list file, the utility will add the time stamps of the Roll Forward operation and log file creation. /V is optional.

For each logged operation, it adds the name of the user who performed the operation, the internetwork address of the source workstation, the time stamp indicating when the operation was performed, and the record length and key number used in the operation.

/L

Specifies that you want only to list the logged operations. The logged operations will not be executed. The operations will be listed to the standard output device. /L is optional.

/O:

Specifies an owner name. If the backup copy of the Btrieve file you want to recover has a Btrieve owner name, you must provide this option. This protects the owned files from being changed inadvertently.


Typically, all owned files in an application have the same owner name. Therefore, the utility assumes that all Btrieve files listed in the file list have the same owner name. However, some Btrieve files in a file list may have different owners.


If a Btrieve file has an owner name, that file has only one owner name. In that case, the utility prompts you to enter the owner name.

Similarly, if you do not specify /O and the utility encounters a Btrieve file that requires an owner name, BROLLFWD prompts you for that owner name.

ownerName

Specifies the owner name of the Btrieve files to be accessed. When you use /O, you must specify an owner name.


Running the Roll Forward Utility in an OS/2 or MS Windows Environment

The following list shows a few ways you can run the Roll Forward utility:

From This Position Do This

OS/2 command line

Enter the following command:

pbroll

Presentation Manager

Select the Roll Forward icon by double-clicking on it.

MS Windows

Double-click on the Roll Forward icon, or choose Run from the File pulldown menu and enter the following command:

wbroll

NOTE:  The following information applies to both OS/2 and MS Windows operating environments, but the screen examples show MS Windows screens only.

To use the Roll Forward utility in the OS/2 and MS Windows environments, complete the following steps:

  1. Back up your data and log files.

    For more information, see Backing Up Data Files.

  2. Set the Roll Forward utility's program options.

    For more information, see Setting Options for the Roll Forward Utility.

  3. Place in the utility's queue all the items you intend to roll forward.

    For more information, see Placing Items in the Queue.

  4. Start rolling forward the items in the queue.

    For more information, see Rolling Forward Items in the Queue.

Following is a brief description of the Roll Forward utility's pulldown menus. Subsequent sections describe each step in the Roll Forward recovery procedure in detail.


Using the Roll Forward Pulldown Menus

After starting the Roll Forward utility, you can access two pulldown menus: Queue and Options.

HINT:  If you are not using a mouse, you can access the menus by pressing and holding the Alt key while typing the letter highlighted in the menu selection. For example, to select the Queue pulldown menu, hold down the Alt key and press Q. To move between fields in the dialog boxes, use the Tab key.


Queue Menu

When you select Queue from the main menu, a pulldown menu offers the following:

Add

Displays a dialog box in which you can specify items to be placed in the queue.

View

Displays a dialog box in which you can view the queued items. If no items are in the queue, this selection is disabled.

Start

Begins the process of rolling forward all items in the queue. Like the View selection, this selection is disabled if no items are in the queue.

Exit

Exits the utility. In the MS Windows and OS/2 environments, you can also press F3 to exit.


Options Menu

When you select Options from the main menu, a pulldown menu offers the following:

Options

Displays a dialog box that enables you to set the data buffer length and the list options.

About

Displays the version of the Roll Forward utility that you are currently running.


Setting Options for the Roll Forward Utility

Set the desired program options for the Roll Forward utility before using the utility to apply the logged changes to the specified Btrieve file or files. These options control the following:

Table 7, describes each option in detail. Subsequent sections describe the two methods you can use to set these options:


Setting Options from the Options Menu

To set Roll Forward options using the Options pulldown menu, complete the following steps:

  1. Select Options from the Roll Forward main menu.

  2. Select Options from the Options pulldown menu to display the Btrieve Roll Forward dialog box, shown in Figure 23.

    Figure 23
    Roll Forward Utility: Options Dialog Box

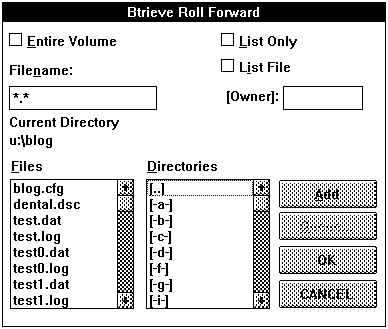
  3. Using the guidelines provided in Table 7, set the options you want to activate for logging your selected files.

  4. After setting the options, select one of the following buttons to execute your choice:

    • Save---Accepts and saves the changes you have made to the NOVDB.INI file.
    • OK---Accepts the changes but does not save them to the NOVDB.INI file.
    • CANCEL---Cancels the changes and returns to the previous screen.


Setting Options Manually in the MS Windows Initialization File

You can also change the setting of the Roll Forward utility's options by manually editing the MS Windows initialization file, NOVDB.INI. (You cannot edit the OS/2 initialization file).

These settings are specified under [wbroll] in NOVDB.INI. The following is an example specification for [wbroll]:

[wbroll] datalength=4 exclusive=no outputmode=ASCII listverbose=yes datalist=32 keylist=16

See Table 7, for an explanation of these options.


Placing Items in the Queue

The Roll Forward utility works on a queued-job basis. When you specify the Btrieve files that are to be rolled forward, the utility places them in the queue.

This section discusses the Roll Forward utility's queue and explains how to perform the following tasks:


Adding Items to the Queue

The queue can hold a maximum of 32 items. Any of the following represents one item:

To add items to the queue, complete the following steps:

  1. Select Add from the Queue pulldown menu.

    The Add dialog box, similar to that shown in Figure 24, appears:

    Figure 24
    Roll Forward Utility: Add File Dialog Box

  2. Select the Btrieve file or files to be rolled forward, as follows:

    • To select all the files from a specified volume, select the Entire Volume check box.

    • To select a particular file, scroll the Directories list box (the list box on the right) to find your directory or drive. Select the directory name and then choose the filename from the Files list box (the list box on the left).

      NOTE:  Setting show dots=on in your NET.CFG file makes the . and .. directory notation visible, allowing you to select the previous directory or root directory from the Directories list box. Refer to your NetWare documentation for details about modifying the NET.CFG file.

    • To select a text file containing a list of files, enter the filename in the Filename text box.

    • To select all available files with a certain extension, enter a wildcard character for the filename, followed by the extension, and press Enter.

  3. Specify the list option for the queue item you are adding, as follows:

    • List Only ---If you want only to list the Btrieve operations to be rolled forward without actually performing the procedure, select both the List Only and List File check boxes. Btrieve then lists the operations in the BROLL.LST file in the BLOG directory.
    • Roll Forward Only---If you do not want to list the operations that are rolled forward but you do want to perform the roll forward procedure itself, do not select either the List Only or List File check box; leave them both unchecked.
    • Both List and Roll Forward---If you want to list the operations in BROLL.LST and perform the roll forward procedure, select only the List File check box.

  4. If the Btrieve file has an owner name, specify the owner name in the optional [Owner] text box.

  5. Select the Add button to add the item to the queue.

    Notice that the Queue button, which has been dimmed until now, becomes available after you select the Add button.

  6. Repeat Steps 2 through 5 to add each additional item to the queue.

  7. To review the items you have placed in the queue, select the Queue button.

    The items selected appear on a screen similar to that shown in Figure 25.

    Figure 25
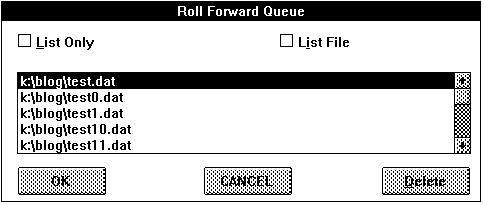
    Roll Forward Utility: Items in the Queue List

  8. When you are finished, click on the OK button.

    NOTE:  At any time, you can click on the CANCEL button to cancel your changes and return to the previous screen.


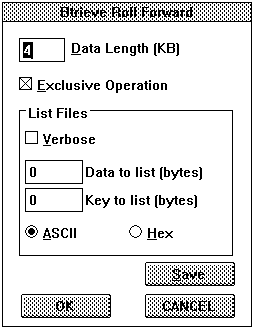
Deleting Items from the Queue

If you need to delete an item from the queue, complete the following steps:

  1. Select View from the Queue pulldown menu.

  2. Select the item you want to delete.

  3. Click on the Delete button to remove the item from the queue.

  4. Click on the OK button.

    NOTE:  If you change your mind and want to cancel your deletion, click on the CANCEL button instead of OK.


Changing List Options for a Queued Item

You can use either of the following methods to change the list options (that is, to change your choices regarding the List Only and List File check boxes) for a given queue item:


Viewing Items in the Queue

You can use either of the following methods to view items in the queue:


Rolling Forward Items in the Queue

Once the queue contains all the items for which you want to roll forward changes, you are ready to start the roll forward procedure. Before you begin, however, back up your data and log files, as explained in Backing Up Data Files.

  1. Select Start from the Queue pulldown menu.

    The Queue Menu, with the Start command highlighted, appears.

    Figure 26
    Roll Forward Utility: View Queue Contents Dialog Box

    NOTE:  The Roll Forward utility allows a maximum of 250 concurrent transactions per Btrieve file during the roll forward process.

  2. After you select Start, the utility lists each Btrieve file being rolled forward and specifies the number of logged entries for each file.

    The Roll Forward utility displays a screen similar to that shown in Figure 27. The number of logged entries is shown to the left of the filename.

    Figure 27
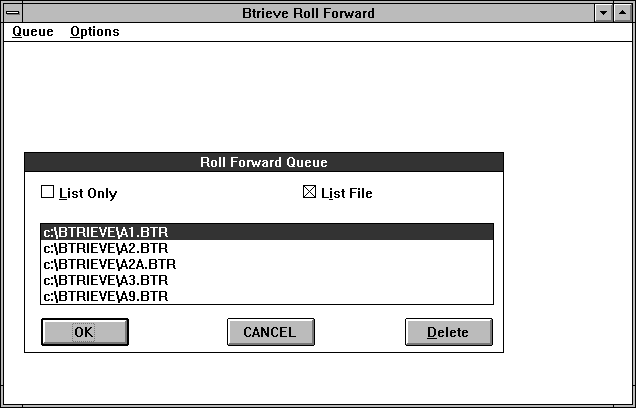
    Roll Forward Utility: Roll Forward List Screen


Special Considerations When Using Logging and the Roll Forward Utility

When using NetWare Btrieve's logging feature and the Roll Forward utility, consider the following:


Example of Restoring a Data File

This section includes instructions for handling data and log files so you can restore a lost or corrupted logged Btrieve file. It includes the following subsections:


Making a Backup Copy and Enabling Logging

The following procedure explains how to handle a Btrieve file called X.BTR to prepare it for logging.

  1. Make a copy of the Btrieve file X.BTR called (for example) X.BAK.

    For additional information about this process, see the section Backing Up Data Files.

  2. Turn on the logging feature.

    For additional information about this process, see the section Activating the Btrieve Logging Option.

After you have enabled logging and restarted Btrieve, Btrieve writes operations to both the data file (X.BTR) and to the log file, which is called X.LOG.

NOTE:  To keep X.LOG from becoming too large, you may periodically want to make a new backup copy of the logged Btrieve file. Then delete the existing X.LOG file because the new copy of X.BAK already contains all the changes to the X.BTR file that were logged in the existing copy of X.LOG. If logging is enabled, Btrieve will create a new copy of X.LOG when you next work with the X.BTR file.


Restoring a Logged File from a Backup Copy

If you lose a Btrieve file or if, for some reason, a data file becomes corrupted, follow this procedure to restore that file:

  1. Copy the backup file, X.BAK, to the Btrieve file (X.BTR).

  2. Copy the logging file, X.LOG, to a new file called (for example) X.LLL.

  3. Use the Roll Forward utility to apply the operations logged in X.LOG to X.BTR.

    For detailed information about this process, see the section Rolling Forward Items in the Queue.

    If the roll forward operation is successful, proceed to Step 4. If for some reason the first roll forward procedure does not complete successfully, proceed to Step 5.

    NOTE:  One reason the roll forward process might fail is that Btrieve is configured differently during a roll forward operation than it is during the original logged operations.

  4. If the roll forward operation completes successfully, follow these steps:

    1. Copy X.BTR to X.BAK to make a new backup copy of the restored Btrieve file.

    2. Delete X.LOG and X.LLL.

  5. If the roll forward operation did not complete successfully, follow these steps:

    1. Copy X.BAK to X.BTR.

    2. Copy X.LLL to X.LOG

    3. Perform the roll forward operation again.

    4. Make a new backup copy of the data file and delete the old log file and X.LLL.