4.1 Configuring the Drivers
Use iManager to configure the drivers by completing the following tasks:
4.1.1 Configuring the PIV Life Cycle Driver
After the driver is installed, it is configured through iManager (See Section 3.5.1, PIV Life Cycle Driver for instructions on how to install the driver). The PIV Life Cycle driver configuration file creates the policies that govern how the information is synchronized.
-
In iManager, select > .

-
Select .
For the PIV Life Cycle driver, you place the driver in a new driver set. For the remaining four drivers, you place the drivers in the driver set you create for the PIV Life Cycle driver.
-
Click .
-
Define the properties of the new driver set.
-
Specify the name of the driver set.
-
Browse to and select the context where the driver set will be created.
-
Browse to and select the server you want the driver set associated with.
-
Leave the option selected.
We recommend that you create a partition for the driver object. For Identity Manager to function, the server that is associated with the driver set must hold a real replica of the Identity Manager objects. If the server holds a Master or Read/Write replica of the context where the objects are to be created, then the partition is not required.
-
Click .
-
-
Select , browse to and select the IAS_PIVLifeCycle-IDM3_5_0-V1.xml driver configuration file, then click .
-
If the driver configuration file is not listed, select , then click .
-
Browse to and select the driver configuration file from IASMODULES_302:\IDMDriver\configs\IAS_PIVLifeCycle-IDM3_5_0-V2.xml from the IAS modules ISO, then click .
-
Click .
-
-
Configure the driver by filling in the configuration parameters:
-
Click .
-
Select .
-
Click , then browse to and select a user object that has the rights the driver needs to have on the server.
Many administrators use the Administrator User object in the Identity Vault for this task. However, you might want to create another object, such as a DriversUser, and assign sufficient rights to that user for the driver to function. Whatever rights the driver needs to have on the server, the DriversUser object must have the same rights.
-
Click twice.
-
-
Select
-
Click , browse to and select all objects that represent administrative roles, then exclude them from replication with the driver.
Exclude the User object in the Identity Vault (for example, DriversUser) that you specified in Step 9. If you delete the User object, you have removed the rights from the driver. Therefore, the driver can’t make changes to Identity Manager.
If there are objects that are currently excluded, they do not appear in the list unless you select .
-
Click twice.
-
-
Click .
-
View the summary, then click .
-
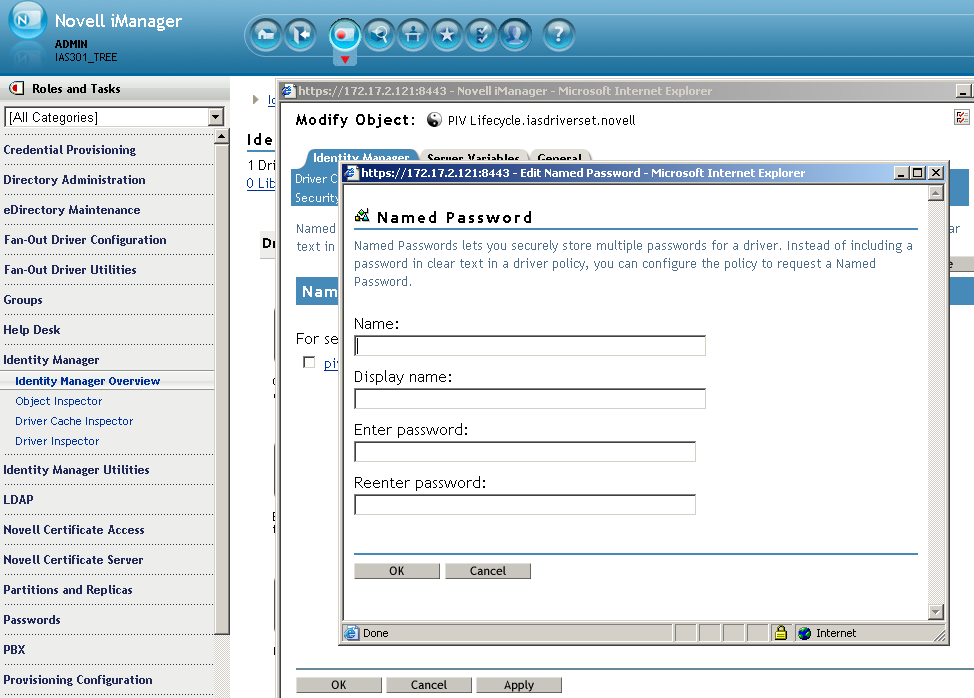
Select the PIV Life Cycle Driver and edit its properties:
-
Select

-
Add and > .
-
The password value for the Named Password is the password for the PIV Workflow User. This is the admin user who is specified in the field during the configuration of the User Application driver object. For information on the field, see User Application Admin DN. It is also the same user who is indicated in the Global Settings of the Driver Set under the name .
IMPORTANT:At this point, make sure you start the PIV Life Cycle driver in Identity Manager before proceeding. The remaining driver configurations rely on policies in the PIV Life Cycle driver.
4.1.2 Configuring the PIV Workflow Driver
After the driver is installed, it is configured through iManager. (See Section 3.5.2, PIV Workflow Driver for instructions on how to install the driver.) The PIV Life Cycle driver configuration file creates the policies that govern how the information is synchronized.
-
In iManager, select > .
-
Select .
-
Browse to and select the driver set you set up in Step 4, then click .
-
Browse to and select the server the driver is associated with, then click .
-
Select , browse to and select the IAS_PIVWorkflow-IDM3_5_0-V2.xml driver configuration file, then click .
-
If the driver configuration file is not listed, select , then click .
-
Browse to and select the driver configuration file from IASMODULES_302:\IDMDriver\configs\IAS_PIVWorkflow-IDM3_5_0-V2.xml from the IAS modules ISO, then click .
-
Click .
-
-
Configure the driver by filling in the configuration parameters:
Parameter
Description
Driver name
Specify the name of the driver.
User Application Admin DN
Specify the User Application Administrator's DN. The User Application Administrator is specified when you install the User Application. See Section 4.2.1, Installing User Application for Provisioning.
User App Server Protocol
Specify your User Application Server protocol. (Example: https).
User App Server Address
Specify your User Application Server address and port number. (Example: 137.65.159.42:8080).
User App Server Context
Specify your User Application Server context. (Example: IDM).
-
Click .
-
Select .
-
Click , then browse to and select a user object that has the rights the driver needs to have on the server.
Many administrators use the Administrator User object in the Identity Vault for this task. However, you might want to create another object, such as a DriversUser, and assign sufficient rights to that user for the driver to function. Whatever rights the driver needs to have on the server, the DriversUser object must have the same rights.
-
Click twice.
-
-
Select
-
Click , browse to and select all objects that represent administrative roles, then exclude them from replication with the driver.
Exclude the User object in the Identity Vault (for example, DriversUser) that you specified in Step 9. If you delete the User object, you have removed the rights from the driver. Therefore, the driver can’t make changes to Identity Manager.
If there are objects that are currently excluded, they do not appear in the list unless you select .
-
Click twice.
-
-
Click .
-
View the summary, then click .
4.1.3 Configuring the Enrollment Driver
After the driver is installed, it is configured through iManager. (See Section 3.5.3, Enrollment Driver for the Honeywell SmartPlus System for instructions on how to install the driver.) The Enrollment driver configuration file creates the policies that govern how the information is synchronized.
-
In iManager, select > .
-
Select .
-
Browse to and select the driver set you set up in Step 4, then click .
-
Browse to and select the server the driver is associated with, then click .
-
Select , browse to and select the IAS_IWBioEnrollment-IDM3_5_0-V1.xml driver configuration file, then click .
-
If the driver configuration file is not listed, select , then click .
-
Browse to and select the driver configuration file from IASMODULES_302:\IDMDriver\configs\IAS_IWBioEnrollment-IDM3_5_0-V1.xml from the IAS modules ISO, then click .
-
Click .
-
-
Configure the driver by filling in the configuration parameters:
Parameter
Description
Driver name
Specify the name of the driver.
Remote host name and port
Specify the hostname or IP address and port number where the Remote Loader Service has been installed for this driver. The default port is 8090.
Driver password
Specify the driver object password. It is the same password as specified in Step 8.
Authentication password
Specify the Remote Loader password. It is the same password as specified in Step 7.
KMO Name
Specify the name of the KMO object. See “Providing for Secure Data Transfer” for steps on how to create a KMO.
URL of the Biometric Enrollment Server
Specify the URL of the Honeywell SmartPlus Enrollment server.
Listening Hostname and Port
Specify the local host address and port that will listen to receive events from the Honeywell SmartPlus Enrollment server. See Installing Identity Manager 3.5.1 for Connected Systems on the Enrollment Biometric Capture System for more information.
-
Click .
-
Select .
-
Click , then browse to and select a user object that has the rights the driver needs to have on the server.
Many administrators use the Administrator User object in the Identity Vault for this task. However, you might want to create another object, such as a DriversUser, and assign sufficient rights to that user for the driver to function. Whatever rights the driver needs to have on the server, the DriversUser object must have the same rights.
-
Click twice.
-
-
Select
-
Click , browse to and select all objects that represent administrative roles, then exclude them from replication with the driver.
Exclude the User object in the Identity Vault (for example, DriversUser) that you specified in Step 9. If you delete the User object, you have removed the rights from the driver. Therefore, the driver can’t make changes to Identity Manager.
If there are objects that are currently excluded, they do not appear in the list unless you select .
-
Click twice.
-
-
Click .
-
View the summary, then click .
4.1.4 Configuring the Honeywell SmartPlus Enrollment System
The Enrollment/Biometric Capture driver runs on the Honeywell SmartPlus Enrollment system. (For installation instructions, see Section 3.1, Installing the User Enrollment Biometric Capture Station.) Use the following instructions in this section to modify the iws.cfg file to communicate with the Identity Manager server.
-
Locate the Tomcat directory where the Honeywell SmartPlus Enrollment Web service is running.
-
Open the tomcat_directory/webapps/PIV/WEB-INF/iws.cfg file in a text editor.
-
Add the following two lines at the bottom of this file:
-
IDMS=NOVELL
-
IDMS_NovellEnrollURL = http://127.0.0.1:Publisher_Port_Number
The Publisher port number is located in the properties of the Enrollment driver. It can be any port that is not in use on the connected system.
-
In iManager, click , then click to find the driver set objects in the Identity Vault.
-
Click the upper right corner of the driver, then select .
The Publisher port number is listed under .
-
-
Restart Tomcat.
4.1.5 Configuring the CMS Driver
After the driver is installed, it is configured through iManager. (See Section 3.5.4, CMS Driver for ActivIdentity ActivID for instructions on how to install the driver.) The CMS driver configuration file creates the policies that govern how the information is synchronized.
-
In iManager, select > .
-
Select .
-
Browse to and select the driver set you set up in Step 4, then click .
-
Browse to and select the server the driver is associated with, then click .
-
Select , browse to and select the IAS_AICMSDriver-IDM3_5_0-V1.xml driver configuration file, then click .
-
If the driver configuration file is not listed, select , then click .
-
Browse to and select the driver configuration file from IASMODULES_302:\IDMDriver\configs\IAS_AICMSDriver-IDM3_5_0-V1.xml from the IAS modules ISO, then click .
-
Click .
-
-
Configure the driver by filling in the configuration parameters:
Parameter
Description
Driver name
Specify the name of the driver.
Remote host name and port
Specify the hostname or IP address and port number where the Remote Loader Service has been installed for this driver. The default port is 8090.
Driver Password
Specify the driver password. It is the same password as specified in Step 8.
Remote Password
Specify the remote password. It is the same password as specified in Step 7.
KMO name
Specify the KMO name. See “Providing for Secure Data Transfer” for steps on how to create a KMO.
Client certificate
Specify the path to a client certificate that can be used to initiate an SSL connection with CMS. This is a client certificate signed by the CMS Certificate Authority (CA)
Client certificate password
Specify the password to unwrap the client certificate.
Trusted root certificate
Specify the path to a trusted root certificate. This is a trusted root certificate from the CMS Certificate Authority (CA).
Card Policy
Specify the name of the CMS policy that will be used to issue PIV cards.
“No Fingerprints” Card Policy
Specify the name of the CMS policy that will be used for issuing PIV cards without fingerprints.
CMS users parent AD context
Specify the name of the container in Active Directory where the driver will create CMS users.
-
Click .
-
Select .
-
Click , then browse to and select a user object that has the rights the driver needs to have on the server.
Many administrators use the Administrator User object in the Identity Vault for this task. However, you might want to create another object, such as a DriversUser, and assign sufficient rights to that user for the driver to function. Whatever rights the driver needs to have on the server, the DriversUser object must have the same rights.
-
Click twice.
-
-
Select
-
Click , browse to and select all objects that represent administrative roles, then exclude them from replication with the driver.
Exclude the User object in the Identity Vault (for example, DriversUser) that you specified in Step 9. If you delete the User object, you have removed the rights from the driver. Therefore, the driver can’t make changes to Identity Manager.
If there are objects that are currently excluded, they do not appear in the list unless you select .
-
Click twice.
-
-
Click .
-
View the summary, then click .
4.1.6 Configuring the PACS Integration Driver
After the driver is installed, it is configured through iManager. (See Section 3.5.5, PACS Integration Driver for the Honeywell SmartPlus System for instructions on how to install the driver.) The PACS Integration driver configuration file creates the policies that govern how the information is synchronized.
-
In iManager, select > .
-
Select .
-
Browse to and select the driver set you set up in Step 4, then click .
-
Browse to and select the server the driver is associated with, then click .
-
Select , browse to and select the IAS_HoneywellPACS-IDM3_5_0-V1.xml driver configuration file, then click .
-
If the driver configuration file is not listed, select , then click .
-
Browse to and select the driver configuration file from IASMODULES_302:\IDMDriver\configs\IAS_HoneywellPACS-IDM3_5_0-V1.xml from the IAS modules ISO, then click .
-
Click .
-
-
Configure the driver by filling in the configuration parameters:.
Parameter
Description
Driver name
Specify the name of the driver.
Remote host name and port
Specify the hostname or IP address and port number where the Remote Loader Service has been installed for this driver. The default port is 8090.
Driver password
Specify the driver object password. It is the same password as specified in Step 8.
Remote password
Specify the Remote Loader password. It is the same password as specified in Step 7.
KMO Name
Specify the name of the KMO object. See “Providing for Secure Data Transfer” for steps on how to create a KMO.
URL of the Honeywell SmartPlus PAC Server
Specify the URL of the Honeywell SmartPlus PACS Integration server.
Listening Hostname and Port
Specify the local host address and port that will listen to receive events from the Honeywell SmartPlus Enrollment server. See Installing Identity Manager 3.5.1 for Connected Systems on the Physical Access Control System for more information.
-
Click .
-
Select .
-
Click , then browse to and select a user object that has the rights the driver needs to have on the server.
Many administrators use the Administrator User object in the Identity Vault for this task. However, you might want to create another object, such as a DriversUser, and assign sufficient rights to that user for the driver to function. Whatever rights the driver needs to have on the server, the DriversUser object must have the same rights.
-
Click twice.
-
-
Select
-
Click , browse to and select all objects that represent administrative roles, then exclude them from replication with the driver.
Exclude the User object in the Identity Vault (for example, DriversUser) that you specified in Step 9. If you delete the User object, you have removed the rights from the driver. Therefore, the driver can’t make changes to Identity Manager.
If there are objects that are currently excluded, they do not appear in the list unless you select .
-
Click twice.
-
-
Click .
-
View the summary, then click .
4.1.7 (Optional) Using Designer to Customize Your Implementation
Designer is a powerful graphical toolset that you can use to customize, test, and document the drivers after you have configured them in iManager. You can import the driver set or drivers from the Identity Vault to create a project in Designer. After you customize, test, and document the drivers in Designer, you can deploy the changes using Designer.
NOTE:Using Designer to directly import the IAS drivers has not been tested and is not officially supported for this release.
Designer can be downloaded from the Novell Download Web site.
For more information on using Designer, see the Designer 1.2 for Identity Manager Documentation Web site.