IP Routing Information Filter Example
TCP/IP supports the following filters:
Refer to Novell Internet Access Server 4.1 Routing Concepts for more information.
NOTE: When you configure a filter for a primary WAN call, an equivalent filter is automatically generated for the backup call. If the primary call should fail, the backup call is automatically connected.
Before you begin, make sure that filtering support is enabled for IP in NIASCFG under the TCP/IP Protocol menu. Otherwise, filtering will not work.
To configure IP incoming (or outgoing) RIP filters, complete the following steps:
Load FILTCFG, then select the following parameter path:
Select Configure TCP/IP Filters > Incoming RIP Filters (or Outgoing RIP Filters)
Select Status and toggle the choice to read Enabled or Disabled.
Any configured filters immediately become active (enabled) or inactive (disabled).
Select Action and toggle the choice to permit or deny the routes in the filter list.
This specifies the action taken when an incoming (or outgoing) RIP packet matches a filter on the filter list.
If you select to permit the routes, the matching RIP routes are accepted (or advertised) by the router. If you select to deny the routes, the matching RIP routes are not accepted (or advertised) by the router.
Select Filters.
This lists the incoming (or outgoing) RIP filters that are permitted or denied, according to the Action parameter setting.
Modify the route list.
You can select a filter from the list and press Enter to modify the filter or Del to remove it. Press Ins to add a new filter.
If you are modifying an existing filter or adding a new filter, modify the following parameters from the Define Filter menu:
If you specified Interface for the Source (or Destination) Type parameter, select a specific interface on which you want to filter the service. You can select a LAN interface, a WAN interface, or all interfaces. The default is All Interfaces.
If you specified Interface Group for the Source (or Destination) Type parameter, select the specific interface group on which you want to filter the service.
If you selected Network for the Source (or Destination) Type parameter, type the TCP/IP address and the subnet mask.
Local Frame Relay DLCI # (for frame relay)---The DLCI circuit number used for calls.
Remote System ID (for PPP, X.25, or ATM)---The name of the remote system server or remote peer associated with this circuit.
Circuit Parameter Type (for X.25 or ATM)---The type of virtual circuit used to establish a connection.
Remote DTE Address (for X.25)---The X.121 DTE address assigned to the specific remote DTE.
Remote ATM Address (for ATM)---The address assigned to the specific remote ATM.
This option is enabled if the filter is configured to permit or advertise the route. If you leave this option blank, the TCP/IP routing table is consulted automatically for the required information. A value of 16 disables the route.
The header of packets that match the Filters or Exceptions definitions are logged as long as the global logging status and this logging status are both enabled. The logs are viewed using the NetWare Administrator utility.
Press Esc and save the filter information.
Select Exceptions.
This displays a list of exceptions to the configured filters. Depending on the Action parameter setting, packets that match a filter on this list are always or are never accepted (or advertised), even if another filter is configured to do the opposite.
NOTE: The Exceptions list filters always takes a higher priority than other filters.
Modify the exceptions list.
Select a filter from the list and press Enter to modify the filter or Del to remove it. Press Ins to add a new filter. Refer to Step 5 and Step 6 if you are adding or modifying a filter.
Press Esc to save the information and return to the Configure TCP/IP Filters menu.
IMPORTANT: No routes are accepted by EGP unless EGP filters are configured.
Before you begin, make sure that filtering support is enabled for IP in NIASCFG. Otherwise, filtering will not work.
To configure IP incoming (or outgoing) EGP filters, perform the following steps:
Load FILTCFG, then select the following parameter path:
Select Configure TCP/IP Filters > Incoming EGP Filters (or Outgoing EGP Filters)
Select Status and toggle the choice to read Enabled or Disabled.
Any configured filters immediately become active (enabled) or inactive (disabled).
Select Action and toggle the choice to permit or deny the routes in the filter list.
This specifies the action taken when an incoming (or outgoing) EGP packet matches a filter on the filter list. If you select to permit the routes, the matching EGP routes are accepted (or advertised) by the router. If you select to deny the routes, the matching EGP routes are not accepted (or advertised) by the router.
Select Filters.
This lists the incoming (or outgoing) EGP routes that are permitted or denied, according to the Action parameter setting.
Modify the route list.
You can select a filter from the list and press Enter to modify the filter or Del to remove it. Press Ins to add a new filter.
If you are modifying an existing filter or adding a new filter, modify the following parameters from the Define Filter menu:
Autonomous System---Press Enter, then type the autonomous system number (from 0 to 65535) from which the route is learned (source) or advertised (destination).
Host---Press Enter, then type the TCP/IP address in dotted decimal notation.
Interface---Press Enter, then select a specific interface on which you want to filter the service. You can select a LAN interface, a WAN interface, or all interfaces. The default is All Interfaces.
Interface Group---Press Enter, then select an interface group from the list.
Network---Press Enter, then type the TCP/IP address and subnet mask numbers in dotted decimal notation.
Local Frame Relay DLCI # (for frame relay)---The DLCI circuit number used for calls.
Remote System ID (for PPP, X.25, or ATM)---The name of the remote system server or remote peer associated with this circuit.
Circuit Parameter Type (for X.25 or ATM)---The type of virtual circuit used to establish a connection.
Remote DTE Address (for X.25)---The X.121 DTE address assigned to the specific remote DTE.
Remote ATM Address (for ATM)---The address assigned to the specific remote ATM.
This option is enabled only if the filter is configured to permit or advertise the route. If you leave this option blank, the TCP/IP routing table is consulted automatically for the required information.
The header of packets that match the Filters or Exceptions definitions are logged as long as the global logging status and this logging status are both enabled. The logs are viewed using the NetWare Administrator utility.
Press Esc and save the filter information.
Select Exceptions.
Lists the exceptions to the configured filters. Depending on the Action parameter setting, packets that match a filter on this list are always or are never advertised (or hidden), even if another filter is configured to do the opposite.
Modify the exceptions list.
Select a filter from the list and press Enter to modify the filter or Del to remove it. Press Ins to add a new filter. Refer to Step 5 and Step 6 if you are adding or modifying a filter.
Press Esc to save the information and return to the Configure TCP/IP Filters menu.
NOTE: OSPF external route filters apply only to routes learned from RIP, EGP, or static routes.
Before you begin, make sure that filtering support is enabled for IP in NIASCFG. Otherwise, filtering will not work.
To configure OSPF external route filters, complete the following steps:
Load FILTCFG, then select the following parameter path:
Select Configure TCP/IP Filters > OSPF External Route Filters
Select Status and toggle the choice to read Enabled or Disabled.
Any configured filters immediately become active (enabled) or inactive (disabled).
Select Action and toggle the choice to permit or deny the routes in the filter list.
If permitted, all matching routes are forwarded by the router. If denied, all matching routes are not forwarded by the router.
Select Filters.
This lists the routes that are permitted or denied, according to the Action parameter setting.
Modify the route list.
Select a filter from the list and press Enter to modify the filter or Del to remove it. Press Ins to add a new filter.
If you are modifying an existing filter or adding a new filter, modify the following parameters from the Define Filter menu:
This option is enabled only if the filter is configured to permit or advertise the route. If you leave this option blank, the TCP/IP routing table is consulted automatically for the required information.
The header of packets that match the Filters or Exceptions definitions are logged as long as the global logging status and this logging status are both enabled. The logs are viewed using the NetWare Administrator utility.
Press Esc and save the filter information.
Select Exceptions.
This lists the exceptions to the configured route filter list. Depending on the Action parameter setting, packets that match a filter on this list are always or are never permitted or denied, even if another filter is configured to do the opposite.
Modify the exceptions list.
Select a filter from the list and press Enter to modify the filter or Del to remove it. Press Ins to add a new filter. Refer to Step 5 and Step 6 if you are adding or modifying a filter.
Press Esc to save the information and return to the Configure TCP/IP Filters menu.
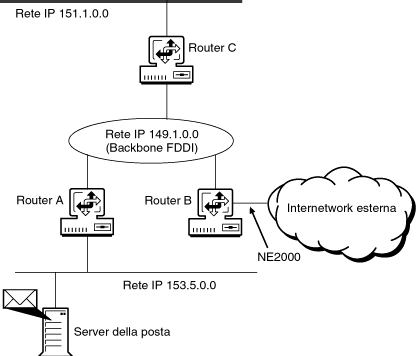
In this example, the Accounting department is connected to the FDDI backbone by Router C. One of the networks within Accounting is 151.1.0.0 (subnet mask of 255.255.255.0). Because access to this network from outside the Accounting department is not required, the administrator has selected not to propagate a route to this network outside the Accounting department.
To hide network 151.1.0.0 from the rest of the organization, an outgoing RIP filter is configured on Router C.
Because IP supports RIP, OSPF, and EGP, routing filters must always specify the routing protocol for which the filter applies. In this case, RIP is used by all routers in the organization, and a RIP routing information filter is configured. The route being hidden from the rest of the network is defined by the Accounting department network with IP network address 151.1.0.0. Router C's connection to the departments outside Accounting is through the FDDI backbone. The destination from which network 151.1.0.0 is hidden is most easily defined as the FDDI interface to the backbone. Figure 15-4 shows the internetwork topology.
Note that Router C has the route to network 151.1.0.0 in its routing table. If Router C receives a packet from the FDDI backbone that is destined for network 151.1.0.0, it forwards the packet.
Figure 15-4.
IP Routing Information Filter Example
When configuring this example, set the parameters as shown in Table 15-4.
Parameter |
Value |
|---|---|
Action |
Deny Routes |
Filters:
|
.
|
IP packet forwarding filters let the router filter packets selectively, according to their type, source, and destination.
Before you begin, make sure that filtering support is enabled for IP in NIASCFG. Otherwise, filtering will not work.
To configure IP packet forwarding filtering, complete the following steps:
Load FILTCFG, then select the following parameter path:
Select Configure TCP/IP Filters > Packet Forwarding Filters
Select Status and toggle the choice to read Enabled or Disabled.
Any configured filters immediately become active (enabled) or inactive (disabled).
Select Action and toggle the choice to permit or deny the packets in the filter list.
If denied, matching packets are not forwarded by the router. If permitted, matching packets are forwarded by the router.
Select Filters.
This lists the packets that are permitted or denied, according to the Action parameter setting.
Modify the packet list.
Select a filter from the list and press Enter to modify the filter or Del to remove it. Press Ins to add a new packet filter.
If you are modifying an existing filter or adding a new filter, specify the following parameters from the Define Filter menu:
NOTE: You cannot modify a predefined packet type.
If you specified Interface as the Source Interface Type, select a specific interface on which you want to filter the service. You can select a LAN interface, a WAN interface, or all interfaces. The default is All Interfaces.
If you specified Interface Group as the Source Interface Type, select the specific interface group on which you want to filter the service.
Local Frame Relay DLCI # (for frame relay)---The DLCI circuit number used for calls.
Remote System ID (for PPP, X.25, or ATM)---The name of the remote system server or remote peer associated with this circuit.
Circuit Parameter Type (for X.25 or ATM)---The type of virtual circuit used to establish a connection.
Remote DTE Address (for X.25)---The X.121 DTE address assigned to the specific remote DTE.
Remote ATM Address (for ATM)---The address assigned to the specific remote ATM.
If you specified Interface as the Destination Interface Type, select a specific interface on which you want to filter the service. You can select a LAN interface, a WAN interface, or all interfaces. The default is All Interfaces.
If you specified Interface Group as the Destination Interface Type, select the specific interface group on which you want to filter the service.
Local Frame Relay DLCI # (for frame relay)---The DLCI circuit number used for calls.
Remote System ID (for PPP, X.25, or ATM)---The name of the remote system server or remote peer associated with this circuit.
Circuit Parameter Type (for X.25 or ATM)---The type of virtual circuit used to establish a connection.
Remote DTE Address (for X.25)---The X.121 DTE address assigned to the specific remote DTE.
Remote ATM Address (for ATM)---The address assigned to the specific remote ATM.
The Protocol and Port(s) fields are automatically filled in, according to your packet type selection.
The header of packets that match the Filters or Exceptions definitions are logged as long as the global logging status and this logging status are both enabled. The logs are viewed using the NetWare Administrator utility.
Press Esc and save the filter information.
Select Exceptions to display a list of exceptions to the permitted or denied packets.
This lists the exceptions to the configured packet filter list. Depending on the Action parameter setting, packets that match a filter on this list are always or are never permitted or denied, even if another filter is configured to do the opposite.
Modify the exceptions list.
Select a filter from the list and press Enter to modify the filter or Del to remove it. Press Ins to add a new filter. Refer to Step 5 and Step 6 if you are adding or modifying a filter.
Press Esc to save the information and return to the Configure TCP/IP Filters menu.
In this example, an organization has an FDDI backbone connecting several departments within the organization and a link to external networks. Routers A and C connect the departmental networks to the backbone. Router B connects the external networks to the backbone. Within the organization, users can communicate freely across the internetwork. External access is limited to electronic mail. The internetwork topology is shown in Figure 15-5.
Figure 15-5.
IP Packet Forwarding Filter Example
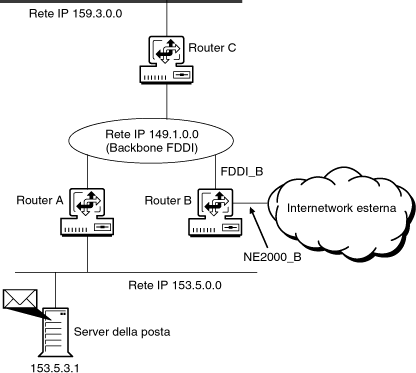
Because internal communication is not restricted, packet forwarding filters are not required on Routers A or C.
Two packet forwarding filters are required on Router B. The first filter ensures that any packet originating within the organization's internal networks are forwarded by Router B. The second filter provides access to the corporate mail server and allows external users to send and receive electronic mail to and from internal users.
To configure the first filter, the source identifies the packets that originate in the internal networks. The simplest way to do this on Router B is to identify all packets received from the FDDI backbone interface. Because internal users can use any service at any location, the remaining fields in the filter can be specified as "ANY."
The source of the second filter is all packets originating from external networks. Because the interface NE2000_B is the only connection that Router B has to the external networks, this can be used to specify the source field for this filter. SMTP (Simple Mail Transfer Protocol) is selected from the predefined services list. The allowable destinations are limited to the corporate mail servers. Host 153.5.3.1 is the only mail server defined.
When configuring this example, set the parameters as shown in Table 15-5.
Parameter |
Value |
|---|---|
Action |
Permit Packets |
Filters List Filter 1:
|
. .
|
Filters List Filter 2:
|
. .
|