3.2 Setting Access Controls
Using the access control feature, you can specify which participants can participate in causing an entry to transition from one state to another. Also, if the entry contains sensitive information at any time during the workflow process, you can restrict who can view the entry. This feature implements “per entry” access control, checking privileges for individual entries at each state in the workflow process.
The following sections describe how to set up access control in Novell Teaming as well as using various approaches with the workflow tools that set access control for one or more states:
3.2.1 What is Access Control?
When you create a workflow process using default settings, every user who can enter the discussion forum has access to view the entry and to participate in state changes. For almost all production-ready workflow systems, it is necessary to alter this default access control, so that:
-
Only members of the team assigned to the business process can participate in the workflow process.
-
Only designated responsible individuals participate in changing states.
NOTE:Access control is the term used to identify which users have the right to perform specific tasks at each state within the workflow process.
3.2.2 Planning Access Control
Before configuring access, identify the following:
-
States: You defined these in Section 3.1.2, Adding States to a Workflow.
-
Access rights: For each state, define who can view, modify or delete, respond to, and participate in state transitions.
-
Users or Groups: Map “participants” to usernames and group names within Novell Teaming.
Create a table to use for access-control planning as follows:
Table 3-1 Access Control Planning
Subsequent topics in this section describe how to implement this plan for access control.
3.2.3 Setting Access Rights
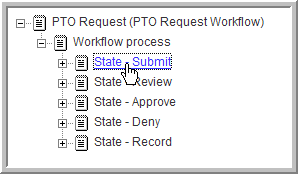
Entries in the state need to be viewable by the users who created the , but not by any of their peers. In addition, only a manager can transition an entry from to , and from to or . Human Resources needs to transition each entry from Approve to Record.
-
From the portlet on the initial Liferay portal window, click the plus sign (+) to the left of to expand this section and view the available designers. To add the portlet to the Liferay portal window, click the link in the upper right corner. This brings up a panel of portlets along the left margin. Expand the section to add more Novell Teaming features, such as the portlet.
-
Click .
-
Expand .
-
Click .
-
Expand .
-
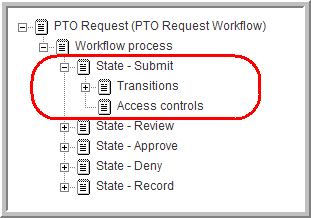
Add the to the workflow states:
-
Set the rights:
-
Under , click .
-
Click .
-
Click .
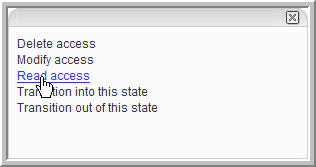
-
Deselect the option, select the option, add the group, then click .
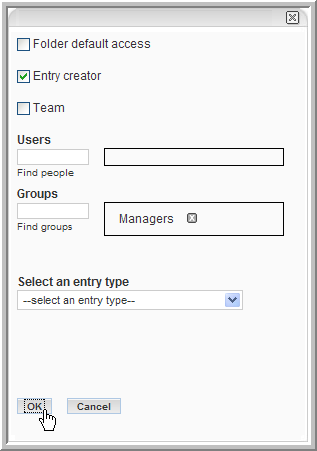
Now only the entry creator and managers can view these entries.
The drop-down list allows you to add any user lists that might be assigned to specific entry types.
-
Repeat Step 7.a through Step 7.d for each state to add the rights (make sure to give the group rights in the and states).
-
-
Set the access controls:
-
Set the access controls:
-
Under , click .
-
Click .
-
Click .
-
Deselect the option, add the group, then click .
Now only a Manager can transition the entry into the state.
-
Repeat Step 9.a through Step 9.d for the and states with the following rights:
-
: Managers group only
-
: Managers group only
-
: Human Resources group only
The access rights for this workflow are now set. You can log in as the members of the various groups to walk through the workflow and test it.
NOTE:To map the business process correctly, you must set the and the access rights correctly for all states in your workflow.
-
-
3.2.4 Summary
Access control is an important aspect of workflow, because it allows a workflow designer to set levels of security and access to each task within the workflow.
While developing a workflow process, you can use workflow tools to set access for one state at a time or to work with more than one state simultaneously. Access control is comprised of who can see, modify or delete, respond to (a workflow question), or transition into or out of a specified state. When defining access control, you can specify all users, entry creators, or specific users and groups.
When you consider granting workflow access to an individual, make a distinction between times when more than one individual can use the workflow and when a specific individual always uses the workflow. The individual applies to any Novell Teaming user who can create entries in that folder. However, there might be occasions when a specific user should be the only user who has certain access rights every time the workflow runs for an entry.