Planning for the Installation
Before you install and use the driver, you must plan a local or remote installation and define user accounts for GroupWise driver access.
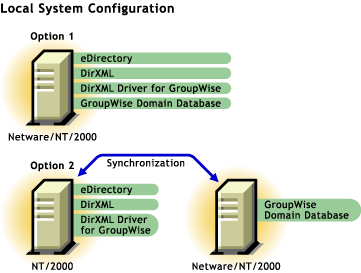
Understanding a Local Installation
A local installation installs the driver on the same Windows NT/2000 or NetWare computer where you installed DirXML and eDirectory. The GroupWise domain database can either be on the same computer or a different computer.
Understanding a Remote Installation
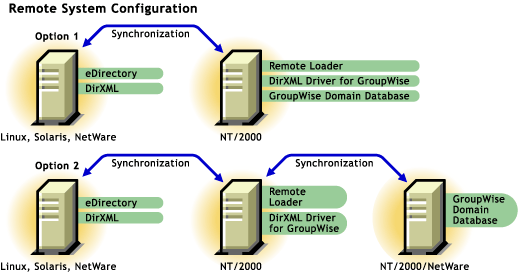
A remote installation installs the driver on a different computer than the one where DirXML and eDirectory are installed. You will want to use this configuration when DirXML and eDirectory are installed on a Linux* or Solaris* platform. In this case, the driver is installed with the DirXML Remote Loader on a Windows NT/2000 system. The GroupWise domain database can be on any of the systems or on a separate system.
GroupWise can be installed on a separate system, on the DirXML system, or on the driver system (two-system installation), or all components can be installed on a single Windows NT/2000 system.
Configuring Driver Authentication
In order for the driver to authenticate to the GroupWise domain, the driver must first authenticate to its local operating system, and then authenticate to the system holding the GroupWise domain. (If the driver is on the same computer as the domain database, you do not need to configure authentication.)
As part of configuring authentication, you will create the same username and password on each system, and assign the account administrative rights.
重要: To establish a connection between systems, you must create user accounts with the same username and password for each system.
In order to configure authentication you should:
- Create a User Account for the System Containing the Driver
- Create a User Account for the System Containing the GroupWise Domain
Create a User Account for the System Containing the Driver
As part of configuring authentication, you should create the same username and password on system containing the driver, and assign the account administrative rights.
重要: To establish a connection between the driver and the GroupWise domain system, you should create user accounts with the same username and password for each system.
After you have created the user account for the driver system, refer to Create a User Account for the System Containing the GroupWise Domain.
When the Driver is on Windows NT
-
From the Start Menu, select Programs, Administrative Tools (Common), then click User Manager.
-
Select User > New User, then enter a new user name.
The user name must be the same on both systems.
-
Enter a case-sensitive password.
The password must be the same on both systems.
-
Select Password Never Expires, then uncheck all other boxes.
-
Select Groups > Add Administrators to the "Member of", and click OK.
重要: This user should be part of the administrator group.
-
Click OK.
-
Select the user you just created.
-
Select Policies > User Rights.
-
Mark the Show Advanced User Rights check box.
-
Select Log on as a Service from the Rights drop-down list.
-
Click Add, then Show Users.
-
Select the user you just created.
-
Click Add, then click OK.
-
Click OK.
-
Close the User Manager window.
-
Restart the system.
When the Driver is on Windows 2000
To define a user account when the driver is on Windows 2000:
-
From the Start Menu, click Settings, Control Panel, Administrative Tools, then click Computer Management.
-
In the Tree view, open Local Users and Groups.
-
Click Users, Action, then click New User.
-
Enter a user name, and enter a case-sensitive password.
The user name and password must be the same on both systems.
-
Click Password Never Expires, click Create, then click Close.
-
Uncheck all other boxes.
-
In the Tree view, select Groups.
-
Double-click Administrators.
-
Click Add.
-
Select the user you just created by clicking Add, then click OK.
-
Click OK.
-
Close the Computer Management window.
-
Select Local Security Policy from the Administrative Tools window.
-
Open Local Policies in the Tree view.
-
Select User Rights Assignment.
-
Double-click Log On As a Service.
-
Make sure your user is displayed and has the "effective rights" box checked.
-
Select Add.
-
Enter the user you just created, click Add, then click OK.
-
Click OK.
-
Close the Local Security Settings window.
-
Close the Administrative Tools window.
-
Restart your computer.
When the Driver is on Windows 2000 AD Domain Controller
To define a user account when the driver is on the Windows 2000 AD domain controller:
-
From the Start Menu, click Settings, Control Panel, Administrative Tools, then click Active Directory Users and Computers.
-
In the Tree view, click Users, Action, New, then click User.
-
Enter the full name, then enter the user login name.
The user login name is used in the driver configuration. The user name must be the same on both systems.
-
Click Next.
-
Enter a case-sensitive password.
The password must be the same on both systems.
-
Select Password Never Expires.
-
Click Next, then click Finish.
-
In the Tree, select Builtin, then click Administrators, Members, then click Add.
-
Select the full name of the user you entered in step 3, click Add, then click OK.
-
Click OK.
-
Close the Active Directory Users and Computers window.
-
In the Administrative Tools window, select Domain Controller Security Policy.
-
In Tree, expand the Security Settings, click Local Policies, then User Rights Assignment.
-
Select Log On As a Service and check Define these policy settings. Click Add. > Add > Browse.
-
Browse to and select the user you created in step 3. Click Add, OK, then OK.
-
Click OK and close the Domain Controller Security Policy window.
-
In the Administrative Tools window, select Local Security Policy.
-
In Tree, expand Local Policies, then click User Rights Assignment.
-
Select Logon as a service, check Local Policy Settings for the user created in step 3, then click OK.
-
Close the Local Security Policy window.
-
Restart the system.
Create a User Account for the System Containing the GroupWise Domain
As part of configuring authentication, you should create a username and password on system containing the GroupWise domain and assign the account administrative rights.
重要: To establish a connection between the driver and the GroupWise domain system, you should create user accounts with the same username and password for each system.
If you have not created the user account for the driver system, refer to Create a User Account for the System Containing the Driver.
When the GroupWise Domain is on Windows NT
To define a user account the driver is on Windows NT:
-
From the Start Menu, select Programs > Administrative Tools (Common) > User Manager.
-
Select User > New User > enter a name.
The user name must be the same on both systems.
-
Enter a case-sensitive password.
The password must be the same on both systems.
-
Select Password Never Expires and uncheck all other boxes.
-
Select Groups > Add Administrators to the "Member of", and click OK.
-
Click OK.
-
Select the user you just created.
-
Select Policies, User Rights, then click the Show Advanced User Rights check box.
-
Select Log on as a Service from the Rights drop-down list.
-
Click Add, Show Users, then click the user you just created.
-
Click Add, then click Ok.
-
Click Ok and close the User Manager window.
-
Double-click the My Computer icon on the desktop.
-
Right-click the drive that contains the GroupWise Domain > Properties > Sharing.
-
Select New Share.
-
Enter a share name to be used by the drive.
-
Restart the system.
-
Select Permissions > Everyone > Remove.
-
Select Add.
-
Select the user you added above.
-
Click Add > OK.
-
Select Permissions: Full Control > then click OK three times.
-
Restart the system.
When the GroupWise Domain is on Windows 2000
To define a user account when the GroupWise domain is on Windows 2000:
-
From the Start Menu, click Settings > Control Panel > Administrative Tools > Computer Management.
-
In the Tree view, open Local Users and Groups > Users > Action > New User.
-
Enter a user name.
The user name must be the same on both systems.
-
Enter a case-sensitive password.
-
Select Password Never Expires, and then uncheck all other boxes.
-
Click Create > Close.
-
Close the Windows Manager window.
-
Double-click the My Computer icon on the desktop.
-
Right-click the drive that contains the GroupWise Domain > Properties > Sharing.
-
Select New Share.
-
Enter a share name to be used by the drive.
-
Restart the system.
-
Select Permissions > Everyone > Remove.
-
Select Add.
-
Select the user you added above.
-
Click Add > OK.
-
Select Permissions: Full Control > OK > OK > OK.
-
Restart the system.
When the GroupWise Domain is on NetWare
If the driver is running on Windows NT/2000 and the GroupWise domain is on NetWare, it's especially important to verify that this user has rights to the GroupWise primary domain database. If access is not granted to this user, changes will not replicate to the rest of the GroupWise system.
To define a user account when the GroupWise domain is on NetWare: