8.2 Provisioning Configuration
The Provisioning Configuration actions allow you to configure the Delegation and Proxy Service and the Digital Signature Service. In addition, they allow to define provisioning user interface settings, as well as settings for the Workflow Engine and clustering.
To access the Provisioning Configuration actions, you need to be a Configuration Administrator.
8.2.1 Configuring Delegation and Proxy Settings
This section includes information about:
Configuring the Delegation and Proxy Service
To configure the Delegation and Proxy Service:
-
Select the tab.
-
Select from the left navigation menu.
The user interface displays the Delegation and Proxy page. To configure the service, you need to make some changes in the Delegation and Proxy Service Settings box.

-
Check the option if you want to display the option in the Resource Search Criteria drop-down list for the Team Delegate Assignments action. When the option is available, a delegate assignment can be defined that applies to all resource categories.
-
Define the retention period for delegate, proxy, and availability assignments:
Field
Description
Specifies the number of minutes to retain delegate assignments in the directory after they have expired. The default is 0, which indicates that the assignments will be removed after the expiration time has been reached.
Specifies the number of minutes to retain proxy assignments in the directory after they have expired. The default is 0, which indicates that the assignments will be removed after the expiration time has been reached.
Specifies the number of minutes to retain availability settings in the directory after they have expired. The default is 0, which indicates that the assignments will be removed after the expiration time has been reached.
-
Select the e-mail templates you want to use for delegation, proxy, and availability notifications:
Field
Description
Specifies the language-independent name for the template to use for delegation e-mail notifications. After the template name has been specified, the notification engine can determine which language-specific template to use at runtime.
For details on creating and editing e-mail templates, see Section 17.4, Working with E-Mail Templates.
Specifies the language-independent name for the template to use for proxy e-mail notifications. After the template name has been specified, the notification engine can determine which language-specific template to use at runtime.
For details on creating and editing e-mail templates, see Section 17.4, Working with E-Mail Templates.
Specifies the language-independent name for the template to use for availability e-mail notifications. After the template name has been specified, the notification engine can determine which language-specific template to use at runtime.
For details on creating and editing e-mail templates, see Section 17.4, Working with E-Mail Templates.
Scheduling Synchronization and Cleanup
To configure the Synchronization and Cleanup Service:
-
Select the tab.
-
In the group of actions, select from the left navigation menu.
The user interface displays the Delegation and Proxy page. To schedule synchronization and cleanup, you need to make some changes in the Synchronization and Cleanup Service box.
-
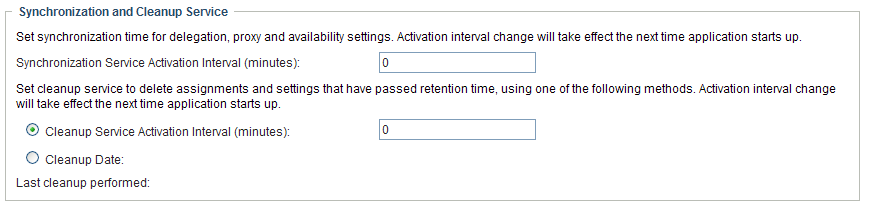
To specify how often you want to activate the synchronization service, type the activation interval (in minutes) in the field. The default value is 0, which means that the service is not activated.
When the synchronization service runs, any modifications (or deletions) made to delegate assignments are synchronized with the corresponding availability settings for the user.
-
To specify how often you want to activate the cleanup service, select , then type the activation interval (in minutes). Alternatively, select and use the calendar tool to specify the date when you want to activate the service. The default value is 0, which means that the service is not activated.
If no cleanup date is specified, the date is set to null. If no cleanup interval is specified, the interval is set to 0. When a cleanup date is specified, the interval is set to be 0. When an interval value other than 0 is specified, the date is set to null. If you check the cleanup interval option without putting in a number (the default is 0), the interface will show the original cleanup date after you submit the page, just as if you had not performed a submit.
When the cleanup service runs, all obsolete proxy and delegate assignments are removed from the system.
If the cleanup service has been activated, the field indicates when the last cleanup was performed.
8.2.2 Configuring the Digital Signature Service
This section provides details on configuring the Digital Signature Service.
To configure the Digital Signature Service:
-
Select the tab.
-
Select from the left navigation menu.
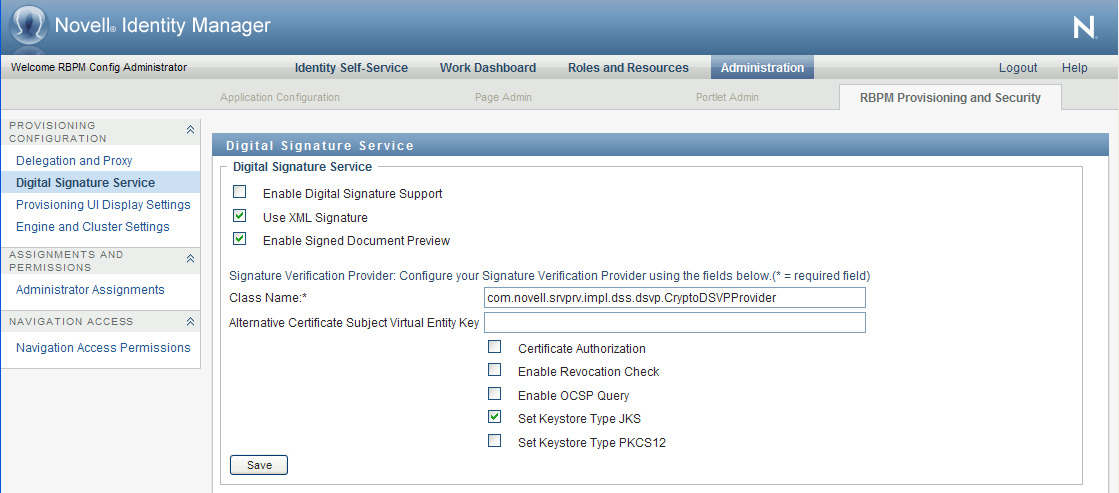
The user interface displays the Digital Signature Service panel:
-
Perform these steps to configure the Digital Signature Service:
-
Select the check box.
If this check box is not selected, users will see an error message when they try to access any provisioning resource that requires a digital signature.
Before enabling digital signature support, make sure all of the required JARs are present. If any of the JARs are missing, you will see an error message when you select the check box. For details on which JARs are required for digital signatures, see Section 2.4, Digital Signature Configuration.
-
Select the check box if you want to use an XML Signature.
-
Optionally select the to allow users to preview signed documents.
-
Type the name of the class for your digital signature service in the field.
-
Optionally specify an entity key in the field. The entity key maps to an entity defined in the data abstraction layer. The entity provides a calculated attribute that can be used instead of the LDAP common name to ensure that only authorized users can perform digital signing. In the Designer, you define the entity, giving the key any name you like. On the Digital Signature Service configuration panel, you specify the key for the entity you defined. The alternative subject is an optional feature that you can use to add an extra layer of protection.
-
Optionally select the check box to ensure that the authenticated user matches the user associated with the selected user certificate. When is enabled, the current user is not permitted to use a certificate on the smart card (or browser) that has been given to a different user.
-
Optionally select the check box to cause the application to check the certificate revocation list (CRL) before using a certificate to be sure that it is still valid. A certificate might be revoked for several reasons. For example, the certificate authority might determine that a particular certificate was improperly issued. Alternatively, the certificate might be revoked if the private key for the certificate has been lost or stolen.
-
Optionally select the check box to perform a query against an Online Certificate Status Protocol (OCSP) server before using a certificate. OCSP is an alternative to certificate revocation lists that addresses problems associated with using CRLs in a public key infrastructure (PKI). The OCSP access point for the server is specified in the User Application Configuration utility.
-
-
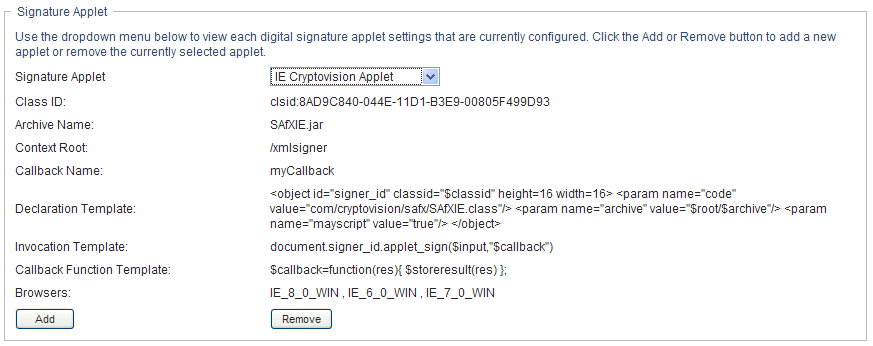
To view the settings for a previously configured applet, select the applet from the dropdown list.
-
Perform these steps to add a new signature applet configuration:
-
Click .
The user interface makes the fields in the Signature Applet panel editable.
-
Provide a name for this applet configuration in the field.
-
Specify the class ID for the applet in the field.
-
Specify the entry of the JAR that contains the applet in the field.
-
Specify <context root path> of the Web application that contains the applet archive for the . (If the context root points to a different application, always start it with a “/” character.)
-
Specify the callback name in the field.
-
Specify the XML declaration string in the field.
-
Specify the invocation string in the field.
-
Specify the callback function in the field.
-
Select the browser type (for example, IE 6.0) in the select list.
-
-
Click to save your settings.
8.2.3 Configuring the Provisioning UI Display Settings
This section provides instructions on configuring various user interface settings. Some of the settings control system-wide behavior within the User Application. Others are specific to the Work Dashboard.
To access the Provisioning UI Display Settings:
-
Select the tab.
-
Select the tab.
-
Select from the left navigation menu.
The user interface displays the Provisioning UI Display Settings page. To configure the display settings for the Work Dashboard, you can make changes in the Task Settings and Request Status Settings box, which appear after the General Display Settings.
Configuring the General Display Settings
For details on the general settings, see Section 2.10.5, Result Set and Pagination Settings.
Configuring the Task Settings
To configure the administrative settings for the Tasks list on the Work Dashboard:
-
Scroll down to the Task Settings box:

-
To specify whether you want the Task List to be displayed when users first open the dashboard, select either the or radio button for the option.
-
To set the default sort column for the task list, pick the column in the field. Indicate whether the sort order will be ascending or descending by selecting or deselecting the checkbox.
The default sort column is required in the task list display. When you select a default sort column, this column is automatically added to the list.
To allow the user to override the default sort column and sort order, click the the checkbox.
-
To include a column in the task list, select it in the list box, and drag them to the list box. To remove a column, select it in the list box and drag it to the list box. You can select multiple columns to include or exclude by using the Ctrl or Shift key while clicking on the columns.
To allow the user to override the column selections you’ve made, click the checkbox. When you click this checkbox, the user interface displays the list box. Any columns you add to the list box are included in the list that the user sees on the Work Dashboard. To allow the user to override the default column list, select and drag one or more columns to the list box from either the list box or the list box. When you add a column to the list box, that column is automatically removed from the list box from which you dragged it.
-
To specify how the task details should be displayed when the user clicks on a task, select one of the following options:
Option
Description
In line with list
Displays the details within the Task Notifications list, directly under the task selected.
This is the default.
In modal dialog
Displays the details in a separate dialog box that must appears on top of the Task Notifications list. After viewing the details for a task, the user needs to close the dialog to see the list again.
Configuring the Request Status Settings
To configure the administrative settings for the Request Status list on the Work Dashboard:
-
Scroll down to the Request Status Settings box:

-
To set the default sort column for the request status list, pick the column in the field. Indicate whether the sort order will be ascending or descending by selecting or deselecting the checkbox.
The default sort column is required in the request status list display. When you select a default sort column, this column is automatically added to the list.
To allow the user to override the default sort column and sort order, click the the checkbox.
-
To include a column in the request status list, select it in the list box, and drag them to the list box. To remove a column, select it in the list box and drag it to the list box. You can select multiple columns to include or exclude by using the Ctrl or Shift key while clicking on the columns.
To allow the user to override the column selections you’ve made, click the checkbox. When you click this checkbox, the user interface displays the list box. Any columns you add to the list box are included in the list that the user sees on the Work Dashboard. To allow the user to override the default column list, select and drag one or more columns to the list box from either the list box or the list box. When you add a column to the list box, that column is automatically removed from the list box from which you dragged it.
-
To specify how the request status details should be displayed when the user clicks on one of the items requested, select one of the following options:
Option
Description
In line with list
Displays the details within the Request Status list, directly under the request selected.
This is the default.
In modal dialog
Displays the details in a separate dialog box that must appears on top of the Task Notifications list. After viewing the details for a task, the user needs to close the dialog to see the list again.
8.2.4 Configuring the Workflow Engine and Cluster Settings
This section provides instructions on configuring the Workflow Engine and on configuring cluster settings. These settings apply to all engines in the cluster. When any of these settings are changed, other engines in the cluster will detect these changes in the database and use the new values. The engines check for changes to these settings at the same rate as specified by the pending process interval.
The process cache settings and heartbeat settings require a server restart to take effect.
Configuring the Workflow Engine
To configure the Workflow Engine settings:
-
Select the tab.
-
Select from the left navigation menu.
The user interface displays the Workflow Configuration Settings page. To configure the engine, you need to make some changes in the Workflow Engine box.

-
To change an engine setting, click the target field for the setting and type the new value. The engine settings are described below:
Engine Setting
Description
Enables or disables e-mail notifications for the entire workflow engine. Defaults to enabled.
Specifies the default Web Service activity timeout in minutes. The default is 50 minutes.
Specifies the default user activity timeout. The default is 0 days, which indicates no timeout.
Specifies the number of days that a completed process state is kept in the system. The default is 120 days.
Specifies how often the engine checks for and removes completed processes that have been in the system for longer than the completed process timeout. The default is 12 hours.
User activities that are executed on an engine which the process is not bound to are put into a pending state. This interval specifies how often to check for pending activities in order to continue their execution. The default is 30 seconds.
Activities that fail because of suspected database connectivity issues are put on a retry queue. This interval specifies how often the engine attempts to retry these activities. The default is 15 minutes.
The maximum number of threads that the engine uses to execute activities. The default is 20.
Minimum Thread Pool Size
The minimum number of threads that the engine uses to execute activities. When a thread is requested and fewer than the minimum are in the pool, a new thread will be created even if there are idle threads in the pool. The default is 10.
Number of prestarted threads in the pool when it is created. The default is 5.
If the pool is larger than the minimum size, excess threads that have been idle for more then the keep alive time will be destroyed. The default is 5 minutes.
The load factor specifies how full the cache is allowed to get before increasing its capacity. If the number of entries in the cache exceeds the product of the load factor multiplied by the current capacity, then the capacity is increased. The default is 0.75.
The process cache is backed by a hash map. The capacity is the number of buckets in the hash map. The initial capacity is the number of buckets at the time the cache is created. The default is 700.
Before adding a process to the cache, if the number of processes in the cache equals or exceeds the Process Cache Maximum Capacity, the cache attempts to remove the oldest inactive process from the cache. The maximum capacity is a soft limit, so the number of processes in the cache might exceed the Process Cache Maximum Capacity if there are no inactive processes (only active processes) in the cache.
A good value for this setting should be less than product of the Process Cache Initial Capacity and the Process Cache Load Factor. This gives the cache a chance to remove older inactive processes from the cache before having to increase its capacity.
Take the following example:
Process Cache Initial Capacity = 700;
Process Cache Load Factor =.75;
Process Cache Maximum Capacity = 500;
Number of processes in cache = 500;
In this case, the number of processes in the cache that will trigger the cache to grow its capacity and perform a rehash would be 525, because the Initial capacity multiplied by the load factor is equal to 525.In this example, when there are 500 processes in the cache, the cache is approaching the point where it must increase its size and perform a rehash, which is at 525 processes. When another process is added to the cache, the engine attempts to remove the least recently used inactive process instead of letting the cache get closer to 525 processes.
The default is 500.
The engine attempts to shutdown gracefully. When shutting down it stops queuing new activities for execution and attempts to complete any activities already queued. This timeout specifies the maximum time that the engine waits for all queued activities and threads executing activities to complete. If this time is exceeded, the engine halts processing of queued activities and attempts to stop all threads executing activities. The default is 1 minute.
Configuring the Workflow Cluster
To configure the Workflow Cluster settings:
-
Select the tab.
-
Select from the left navigation menu.
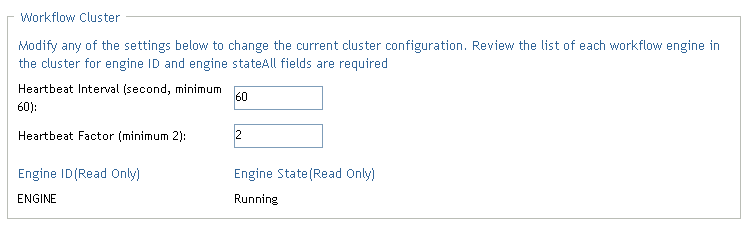
The user interface displays the Workflow Configuration Settings page. To configure cluster settings, you need to make some changes in the Workflow Cluster box.
-
To change a cluster setting, click the target field for the setting and type the new value. The cluster settings are described below:
Cluster Setting
Description
Specifies the interval at which the workflow engine’s heartbeat is updated.
When the workflow engine starts up, it detects if its engine ID is already being used by another node in the cluster and refuses to start if the ID is in use. The User Application database maintains a list of engine IDs and engine states. If an engine crashes and is restarted, its last state in the database indicates that it is still running. The workflow engine therefore uses a heartbeat timer, which writes heartbeats at the specified interval, to determine if an engine with its ID is still running in the cluster. If it’s already running, it refuses to start.
The minimum value for the heartbeat interval is 60 seconds.
Specifies the factor that is multiplied with the hearbeat interval to arrive at the heartbeat timeout.
The timeout is the maximum elapsed time permitted between heartbeats before an engine will be considered timed out.
The minimum value for the heartbeat factor is 2.