3.13 Working with PlateSpin Recon Snapshots
PlateSpin Recon snapshots (*.prs files) contain data about machines, raters, report templates, generated reports, projects, scenarios, and server templates exported by other instances of PlateSpin Recon, or from the current instance as a backup.
You can also import snapshots exported from previous versions of PlateSpin Recon. In this case, a snapshot upgrade is performed before the data is brought into PlateSpin Recon. There are some things to watch for:
-
Importing a large snapshot, for instance if the snapshot was compressed before export, requires two to five times the size of the old snapshot in disk space.
-
Snapshots exported from PlateSpin Recon 3.0 and later are supported.
-
Snapshots from PlateSpin Recon 3.1 are only supported if all hot fixes were applied to PlateSpin Recon before the snapshot was exported.
You can import a snapshot either into the default Local site, or into a new local site.
3.13.1 Exporting a PlateSpin Recon Snapshot
-
Right-click in the Data Center Explorer and select > .
The Export Site Snapshot dialog box is displayed.
-
Select export objects to include in the snapshot by enabling the check box next to the objects.
When a report template is included in the snapshot, its generated reports can also be included. Similarly, if a project is included in the snapshot, its scenarios can be included.
-
Click .
If you selected to export as part of the snapshot, the Step 1b dialog box is displayed.
Figure 3-11 Export Site Snapshot: Step 1b Dialog Box

Otherwise, proceed to Step 2.
-
Select summary options for the data to be exported, such as a data range time frame and whether to include Logs and/or Credentials.
-
Click .
The Step 2 dialog box is displayed.
Figure 3-12 Export Site Snapshot: Step 2 Dialog Box

-
Enter the UNC (\\<server>\<path>\<filename>) or file path (C:\<folder>\<filename>) where you want to save the snapshot. You can also click to select a location.
-
Select or create the appropriate credentials to access the location where you want to save the exported snapshot. You need write permission to this location.
-
Choose whether to or the file. For an encrypted snapshot file, specify and confirm a password for decryption.
-
Click .
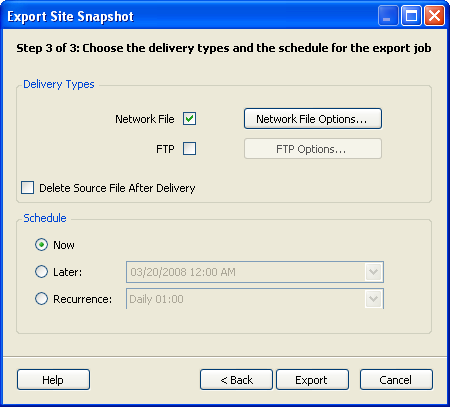
The Step 3 dialog box is displayed.
Figure 3-13 Export Site Snapshot: Step 3 Dialog Box
-
If you want the snapshot delivered to a network and/or FTP location after it is exported, select a Delivery Type. To configure the delivery method options, click the option button next to the selected delivery method. If you are unsure of the delivery configurations, check with your System Administrator.
The file path must be accessible to the PlateSpin Recon Server.
You can specify whether to delete the source snapshot after it is delivered by enabling the check box.
You can also specify whether you want the snapshot delivered now, later, or on a recurring schedule.
-
Click .
The data snapshot is ready for importing into another instance of PlateSpin Recon.
3.13.2 Importing a PlateSpin Recon Snapshot
-
Determine the type of local site (the default local site or a new local site) you want to import the required snapshot into. To import into a new local site, you need to create the site before importing the snapshot.
-
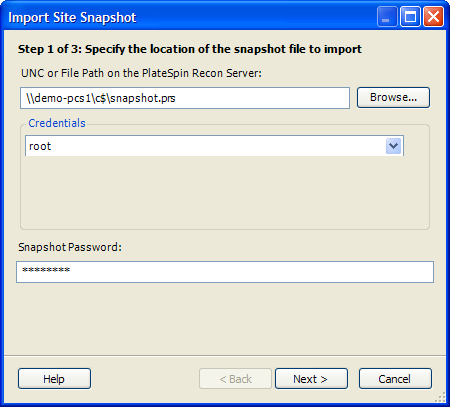
In the Data Center Explorer, right-click the target local site and select .
The Import Site Snapshot dialog box is displayed.
Figure 3-14 Import Site Snapshot Dialog Box
-
Type the of where the snapshot you want to import is located, or click to find it.
-
Select or add the needed to access the location.
-
If the file was encrypted on export, type the to decrypt it.
-
Click .
The Step 2 dialog box is displayed.
Figure 3-15 Import Site Snapshot: Step 2 Dialog Box

-
Enable the check boxes next to the you want to import.
-
Click .
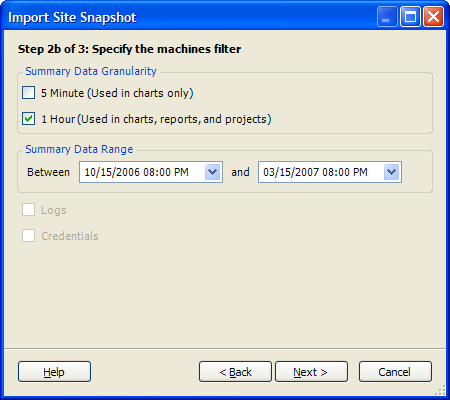
If the imported objects include with monitoring data, the Step 2b dialog box is displayed. Otherwise, proceed to Step 2.
Figure 3-16 Import Site Snapshot: Step 2b Dialog Box
-
Specify the data options for the machines filter.
-
Click .
The Step 3 dialog box is displayed.
-
Use the drop-down list to select the target site for the imported data.
-
Click .
After the data is imported, work with it using the Data Center Explorer under the node.