15.4 Solution Designer
You can use the Solution Designer to package and export different contents for example, Correlation Rule with associated Actions and Dynamic lists and Crystal Reports Server. These contents can be selected and packaged with their respective configuration to a zip file. You can then view or select the content of the zip file using Solution Manager. For more information on Solution Manager, see Section 15.2, Solution Manager.
To use the Solution Designer, a user must be assigned Solution Designer permissions under Solution Pack. For more information, see Section 15.1.2, Permissions for Using Solution Packs.
15.4.1 Solution Designer Interface
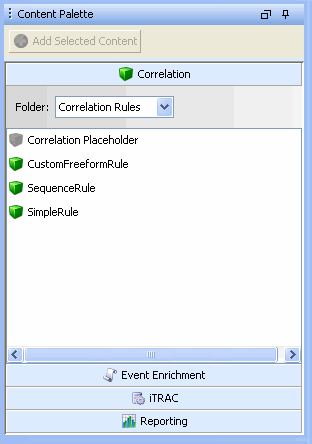
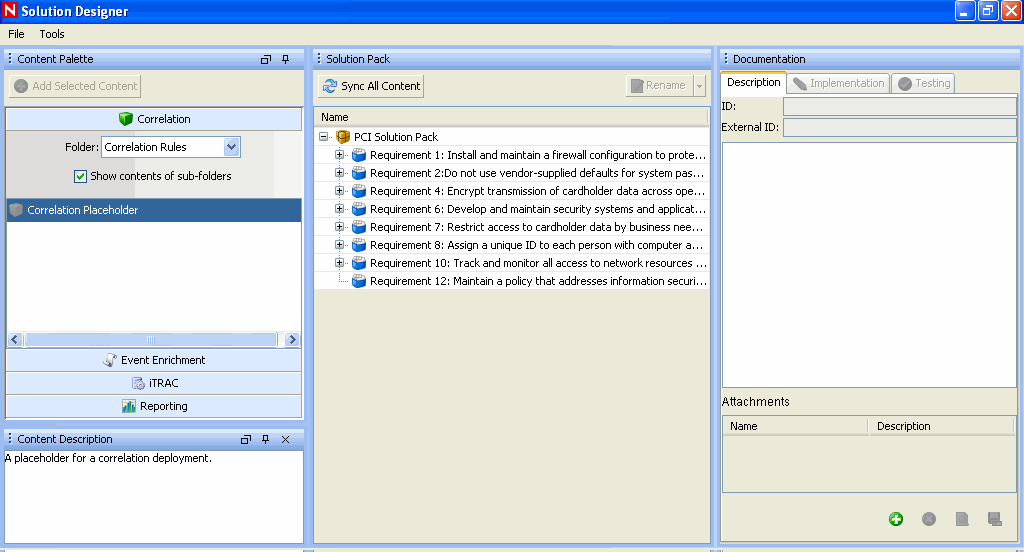
The Solution Designer is divided into several frames: Content Palette, Content Description, Solution Pack, and Documentation. The Content Palette includes several sections that can be expanded, including Correlation Deployment, Event Enrichment, Workflow Templates and Reports. The displayed contents are populated from the Sentinel Server and can be exported into a Solution Pack.


15.4.2 Connection Modes
Solution Packs can be created or edited in Solution Designer in connected or offline modes.
In offline mode, there is no connection to an active Sentinel Server or its content (such as iTRAC workflows, event enrichment, or correlation rules). However, you can perform the following actions:
-
Define the structure of the Solution Pack (including Categories, Controls, and content placeholders).
-
Write implementation documentation.
-
Write testing documentation.
-
Add reports (.rpt files) available in your local system or published on a connected Crystal Reports Server.
-
Add attachments to any node of the Solution Pack.
In connected mode, all content in the Sentinel system is available. In addition to all of the actions that are available in offline mode, you can also perform the following actions:
-
Add Sentinel content (such as Correlation Rules, Maps, iTRAC workflows).
-
Replace placeholders with Sentinel content.
To open Sentinel Designer in offline mode:
-
In Windows, use the Sentinel Solution Designer shortcut on the desktop, or start Solution Designer by executing one of the following commands:
solution_designer.bat (in %ESEC_HOME%\bin on Windows)
solution_designer.sh (in $ESEC_HOME/bin on Solaris/Linux)
The Sentinel Solution Designer login window displays.
-
Provide your login credentials. Check Work Offline checkbox if desired, then click Login. The Solution Designer displays.
-
Open or create a Solution Pack.
15.4.3 Creating a Solution Pack
Using Solution Designer, you can create a Solution Pack using existing content objects (for example, Correlation Rules, Dynamic Lists, or iTRAC workflow templates) from Sentinel. The Solution Designer will analyze the dependencies for a content object and include all necessary components in the Solution Pack. For example, a correlation rule deployment includes a correlation rule definition and can also include one or more actions and the ability to create an incident using a workflow. The Solution Designer will include the correlation rule, the associated correlation actions, the iTRAC template, and the roles associated with the iTRAC template in the Solution Pack.
NOTE:To add a content object to a Solution Pack, it must already exist in Sentinel. Content objects cannot be created using Solution Designer.
To create a new Solution Pack:
-
Open the Solution Designer in either connected or offline mode.
-
Click File > New. An empty Solution Pack displays in the Solution Pack frame.
-
Add Categories, Controls, Content Groups, and content placeholders using the proper procedures for each.
-
Add file attachments to the hierarchy nodes as desired.
-
Select File > Save. The Save window displays. Provide a name and click Save. The Solution Pack is saved in a .zip format.
NOTE:Although you can save a Solution Pack with empty placeholders, you cannot install Controls in Solution Manager unless all placeholders have been filled with content.
15.4.4 Managing Content Hierarchy Nodes
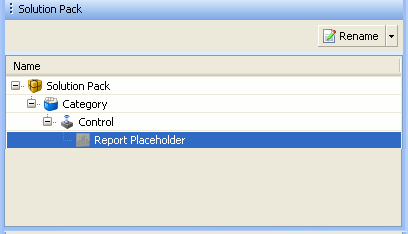
All content in a Solution Pack is hierarchically organized into Categories, Controls, and Content Groups in those groups. These nodes in the hierarchy can be added, deleted, renamed, or reordered.
Table 15-5 Adding, Deleting, Renaming and Reordering Content hierarchy
15.4.5 Adding Content to a Solution Pack
A vital part of creating a Solution Pack is adding content to the controls. Each control can have one or more types of content associated with it.
Sentinel Content
The same general procedure is used to add all types of Sentinel content to a Solution Pack. The Sentinel content options include the following:
-
Correlation Rule Deployments, including their deployment status (enabled or disabled) and associated Correlation Rules, Correlation Actions, and Dynamic Lists
-
Reports
-
iTRAC Workflows, including associated Roles
-
Event enrichment, including map definitions and event metatag configuration
-
Other associated files added when the Solution Pack is created, such as documentation, example report PDFs, or sample map files.
The general steps for Sentinel content are described below. The steps for reports, which are Crystal content, are slightly different. For more information, see Crystal Reports Server.
NOTE:Because dynamic list elements and map data are often highly dependent on the system environment, this data is not included as part of the dynamic list or map definition in the Solution Pack. However, this data can be attached to the Solution Pack as a .csv file.
To add Sentinel content to a control:
-
Log into Solution Designer in connected mode.
-
Open or create a Solution Pack.
-
Click the appropriate panel to display the available Reports from the Content Palette-Solution Pack, Category, Control, Control Group and Contents.
-
Select the specific Content Group you want to add.
-
Select the appropriate Control or placeholder and click Add Selected Content. Alternatively, drag and drop the selected Content Group to the appropriate Control or placeholder in the Solution Pack frame.
NOTE:If you try to add pre-existing content in Solution Designer by drag and drop, the existing content is highlighted. After you drop the content, a message prompt displays stating existence of similar content.
Crystal Reports Server
You can add a Crystal Report (.rpt file) from the SentinelReports folder on a Crystal Reports Server or from a local file system. Adding a Crystal report is similar to adding other types of content, but it requires an extra step to log into the Crystal Reports Server.
Crystal reports must be deleted in the same way they were added. It is strongly recommended that the Description be edited to indicate whether the report was added to the local file system or to the Crystal Reports Server.
To add a report from a Crystal Reports Server:
-
Log into Solution Designer in connected mode or offline mode and open or create a Solution Pack.
-
Click Report panel in the Content Palette. The Report Panel will expand.

-
Click Connect. The Login to Crystal Reports Server window displays. Specify the Server Name, User Name and Password in their respective fields.
NOTE:In a default Crystal installation, the User Name is “Administrator” and the password is blank.
Click Login.
-
All the report folders will be available as a dropdown. Select the folder to view all corresponding reports.

-
Select a report, drag and drop the report in the Solution Pack frame. The report can now be exported using the Save option in the File menu.
NOTE:Only reports from the SentinelReports folder and its subfolders are available. The folder hierarchy is preserved when the reports are added to a target Sentinel system. (Reports must be in the SentinelReports folder to be viewed on the Analysis tab of the Sentinel Control Center.
To add a report from the local file system:
-
Log into Solution Designer (in connected or offline mode) on the machine where the .rpt files reside.
-
Open or create a Solution Pack.
-
Click Report panel in the Content Palette. The Report Panel will expand.

-
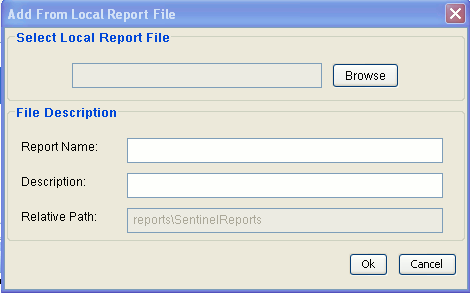
Select a control in the Content tree. Select a Local Report File… in Content Palette and click Add Selected Content button on the top left corner.
-
The Add From Local Report File window displays. Browse to the location on your local drive where the report is located.
-
Select the file and click Open. The file description is displayed.
-
Click OK.
Placeholders
If the user is working in offline mode or is not ready to associate content with a control, an empty placeholder can be used instead.
To add a placeholder:
-
Click a button in the Content Palette to open the panel for the type of placeholder you want to add: Correlation, Event Enrichment, iTRAC workflow or Report.
-
Drag and drop the placeholder to the appropriate Control in the Solution Pack frame.
-
Rename if desired.
To replace a placeholder with content:
-
Click a button in the Content Palette to open the panel for the type of placeholder you want to replace: Correlation, Event Enrichment, iTRAC workflow or Report.
-
Drag and drop the appropriate Content Group from the Content Palette to the placeholder in the Solution Pack frame.
File Attachments
You can attach a file or files to any node in the hierarchy, and they will be included in the Solution Pack. These files can include anything useful for a user who must deploy the Solution Kit, such as a PDF view of a report, sample map data for event enrichment, or a script for an Execute Command Correlation Action. These files can be added, deleted, viewed, renamed, or saved to the local machine.
Table 15-6 File Attachment


15.4.6 Documenting a Solution Pack
Implementation Steps
Add the steps required to implement the content in the target Sentinel system to the Implementation tab of the Documentation frame. The steps might include instructions for the following types of implementation actions:
-
Populating a .csv file that is used by the mapping service for event enrichment.
-
Scheduling automatic report execution in the Crystal Reports Server.
-
Enabling auditing on source devices.
-
Copying an attached script for an Execute Command Correlation Action to the appropriate location on the correlation engine(s).
After the content implementation, the content should be tested to verify that it is working as expected. Testing might require steps such as the following:
Testing Steps
Add the steps required to test the content in the target Sentinel system to the Testing tab of the Documentation frame. The steps can include instructions for the following types of testing activities:
-
Run a report and verify that data is returned.
-
Generate a failed login in a critical server and verify that a correlated event is created and assigned to an iTRAC workflow.
15.4.7 Editing a Solution Pack
A saved Solution Pack can be edited using Solution Designer. For information about deploying the changes into an existing system, see Section 15.5, Deploying an Edited Solution Pack.
When an existing Solution Pack is saved, the user has several options:
-
Save: Saves an updated version of the original Solution Pack. If the Solution Pack is re-imported into a Sentinel system, it replaces the old version.
-
Save As: Saves a renamed version of the original Solution Pack. If the Solution Pack is re-imported into a Sentinel system, it replaces the old version.
-
Save As New: Saves a Solution Pack with a new unique identifier. If the Solution Pack is imported into a Sentinel system, it does not impact any previously imported Solution Packs.
To edit a Solution Pack:
-
In Windows, use the Sentinel Solution Designer shortcut on the desktop, or start Solution Designer by executing one of the following commands:
solution_designer.bat (in %ESEC_HOME%\bin on Windows)
solution_designer.sh (in $ESEC_HOME/bin on Solaris/Linux)
The Sentinel Solution Designer login window displays.
-
Provide your login credentials. Check Work Offline checkbox if desired, then click Login. The Solution Designer displays.

-
To edit a Solution Pack, click File > Open. Browse and select the existing Solution Pack zip file. Click Open.
-
To update the Solution Pack with modified content from the source Sentinel system, drag and drop the content from the Content Palette to the appropriate Control.
-
Add or delete Controls as necessary.
-
Click File > Save, Save As, or Save As New.
-
If you selected Save or Save As and some of the content is out of sync, you will be prompted to synchronize.
Out of Sync Content
If the content in the source system is modified, the content in the source system and the content in the original Solution Pack can be out of sync.
-
You can drag and drop the content from the Content Palette onto the control.
-
For simple content with no dependencies, the modified content is immediately updated. For example, a report has no dependencies.
-
For content with dependencies, the dependencies are checked and updates are made when you click Sync All Content or when you save the Solution Pack.
NOTE:In the special case in which an action uses the Send Email action that is included in all 6.1 systems by default, the Send Email action will always appear as Out of Sync. This is expected and will not cause an error.