2.3 Configuring File System Mirroring
Several different methods and scenarios exist for mirroring data between geographically separate sites. Each method has its own strengths and weaknesses. For a Business Continuity Clustering system, you need to choose either host-based mirroring or SAN-based mirroring (also called array-based mirroring) and whether you want the mirroring to be synchronous or asynchronous.
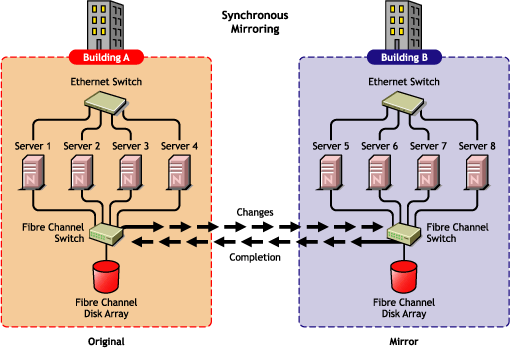
SAN-based synchronous mirroring is preferred and is provided by SAN hardware manufacturers. Host-based synchronous mirroring functionality is included with the NSS file system (NSS mirroring) that is part of NetWare 6.5.
NOTE:The Business Continuity Clustering product does not perform data mirroring. You must separately configure either SAN-based mirroring or host-based mirroring.
NSS mirroring is a checkpoint-based synchronous mirroring solution. Data blocks are written synchronously to multiple storage devices. It is an alternative to SAN array-based synchronous replication options.
IMPORTANT:NSS pool snapshot technology does not work in a business continuity cluster.
Figure 2-2 Synchronous Mirroring
The following sections contain information about configuring the mirroring options:
2.3.1 Configuring NSS Mirroring
NSS partitions must be mirrored after they are created. If you have an existing partition that you want to mirror, you can either create another partition of equal size on another device to mirror the first partition to, or let the mirroring software automatically create another partition of equal size on another device.
When you create a Novell Cluster Services system that utilizes shared storage space (a Storage Area Network or SAN), it is important to remember that all servers attached to the shared device, whether in the cluster or not, have access to all of the volumes on the shared storage space unless you specifically prevent such access. Novell Cluster Services arbitrates access to shared volumes for all cluster nodes, but cannot protect shared volumes from being corrupted by non-cluster servers.
NOTE:Software included with your SAN can be used to mask LUNs or provide zoning capabilities to prevent shared volumes from being corrupted by non-cluster servers.
Creating and Mirroring NSS Partitions on Shared Storage
Prior to creating and mirroring NSS partitions on shared storage, ensure that you have the following:
-
All servers in the cluster connected to a shared storage system
-
One or more drive arrays configured on the shared storage system
-
The drives on the shared storage system marked as shared.
To create and mirror NSS partitions:
-
Start NSSMU by entering NSSMU at the server console of a cluster server.
-
Select from the NSSMU main menu.
-
Press the Insert key and select the device on your shared storage system where you want to create a partition.
With a device marked as sharable for clustering, all partitions on that device are automatically sharable.
Device names are not changeable and might be labeled something like 0x2 or 0x1.
-
Select as the partition type, then specify the partition size and, if desired, an NSS pool name and label.
If you specify a pool name, a pool by that name is automatically created on the partition. If no pool name is specified, you need to create a pool on the partition later.
-
If you chose to create a pool, choose whether you want the pool to be activated and cluster-enabled when it is created.
The option is enabled by default. This causes the pool to be activated as soon as it is created. If you choose not to activate the pool, you need to manually activate it later before it can be used.
The option is also enabled by default. If you want to cluster-enable the pool at the same time it is created, accept the default entry () and continue with Step 4.b. If you want to cluster-enable the pool at a later date, see the NW6.5 SP8: Novell Cluster Services 1.8.5 Administration Guide for more information.
-
Specify the , , and, if necessary, the .
When you cluster-enable a pool, a virtual Server object is automatically created and given the name of the Cluster object plus the cluster-enabled pool. For example, if the cluster name is cluster1 and the cluster-enabled pool name is pool1, then the default virtual server name will be cluster1_pool1_server. You can edit the field to change the default virtual server name.
Each cluster-enabled NSS pool requires its own IP address. The IP address is used to provide access and failover capability to the cluster-enabled pool (virtual server). The IP address you assign to the pool remains assigned to the pool regardless of which server in the cluster is hosting the pool.
You can select one or all of the advertising protocols. NCP™ is the protocol used by Novell clients, CIFS is the protocol used by Microsoft* clients, and AFP is the protocol used by Macintosh* clients. Selecting any of the protocols causes lines to be added to the pool resource load and unload scripts to activate the selected protocols on the cluster. This lets you ensure that the cluster-enabled pool you just created is highly available to all your clients.
If you select CIFS as one of the protocols, a is also required. This is the server name CIFS clients see when they browse the network. A default server name is listed, but you can change the server name by editing the text in the field.
-
Select to create and cluster-enable the pool.
-
-
Select the partition you want to mirror (this might be the partition you just created) and press the F3 key.
-
Select the device with free space or the partition you want to mirror to, then select to mirror the partition.
To ensure disaster recovery, the device you select to mirror should be in another storage array in the other data center.
Creating an NSS Pool and Volumes
After an NSS partition has been created and mirrored, if you have not already done so, you must create an NSS pool and volume on that partition. To do this, follow the instructions in Creating Shared NSS Pools
in the Installation and Setup
section of the Novell Cluster Services 1.8.2 Administration Guide for NetWare.
Novell Cluster Services Configuration and Setup
After configuring NSS mirroring and creating a pool and volume on the mirrored NSS partition, if you did not cluster-enable the NSS pool on the mirrored partition when you created it, do so by following the instructions in the Installation and Setup
section of the Novell Cluster Services 1.8.2 Administration Guide for NetWare.
When you cluster-enable a shared disk pool, the commands to start and stop the pool resource are automatically added to the resource load and unload scripts.
Checking NSS Volume Mirror Status
After you have configured NSS mirroring with Novell Cluster Services, you should check to ensure that it is working properly in a cluster environment.
-
Ensure that the volumes on the cluster-enabled pool are mounted on the assigned server by entering volumes at the server console.
-
Check the mirror status of the mirrored partition by entering mirror status at the server console of the server where the NSS pool on the mirrored partition is active.
After entering mirror status, you should see a message indicating that mirror status is 100 percent or a message indicating that the mirrored object is fully synchronized.
-
Migrate the pool to another server in the cluster, and check again to ensure that the volumes on the pool are mounted by entering volumes at the server console.
-
Check the mirror status of the partition again by entering mirror status at the server console.
IMPORTANT:If you create or delete a pool or partition on shared storage that is part of a business continuity cluster, you must run the cluster scan for new devices command on a server in each of the other clusters that belong to the business continuity cluster.
2.3.2 Configuring SAN-Based Mirroring
Consult your SAN vendor or SAN vendor documentation for instructions on configuring SAN-based mirroring.
2.3.3 LUN Masking
We recommend that you implement LUN masking in your business continuity cluster for data protection. LUN masking is provided by your SAN vendor.
LUN masking is the ability to exclusively assign each LUN to one or more host connections. With it you can assign appropriately sized pieces of storage from a common storage pool to various servers. See your SAN vendor documentation for more information on configuring LUN masking.