2.2 Installing Novell Business Continuity Clustering Software
It is necessary to run the Novell Business Continuity Clustering installation program when you want to:
-
Install the Business Continuity Clustering engine software on cluster nodes for the clusters that will be part of a business continuity cluster.
The Business Continuity Clustering installation installs to only one cluster at a time. You must run the installation program again for each NetWare cluster that you want to be part of a business continuity cluster.
-
Install the BCC-specifi Identity Manager templates for iManager snap-ins on either a NetWare 6.5 SP5 or SP6 server (same as OES 1 SP2 NetWare) or a Windows* server.
The templates add functionality to iManager so you can manage your business continuity cluster. You must have previously installed iManager on the server where you plan to install the templates.
IMPORTANT:Before you begin, make sure your setup meets the requirements specified in Section 2.1, Requirements.
2.2.1 Business Continuity Cluster Component Locations
Figure 2-1 illustrates where the various components needed for a business continuity cluster are installed. For information about the required components, see Section 2.1, Requirements.
Figure 2-1 Business Continuity Cluster Component Locations
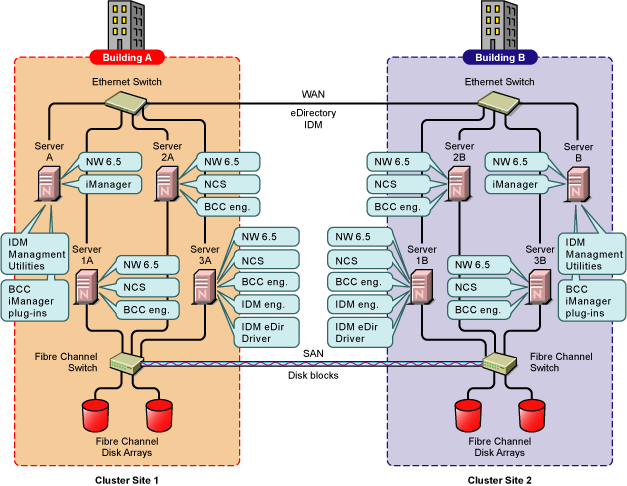
Figure 2-1 uses the following abbreviations:
- BCC eng.: Novell Business Continuity Clustering engine
- NCS: Novell Cluster Services for NetWare
- IDM eng.: Identity Manager engine
- IDM eDir Driver: Identity Manager eDirectory driver
- eDir: Novell eDirectory
- NW 6.5: NetWare 6.5 SP5 or SP6 (the same as Novell Open Enterprise Server 1 Support Pack 2 for NetWare)
2.2.2 Downloading the Business Continuity Clustering Software
Before you install Novell Business Continuity Clustering, download and copy the software to a directory on your Windows workstation. To download Novell Business Continuity Clustering 1.1 with SP1, go to The Novell Business Continuity Clustering download site.
2.2.3 Configuring a BCC Administrator User
The BCC Administrator user is a trustee of each of the member Cluster objects in the business continuity cluster. During the install, you specify an existing user to be the BCC Administrator user. This user should have at least Read and Write rights to the All Attribute Rights property on the Cluster object of the remote cluster. The user should also have rights to the sys:/tmp directory.
Creating the BCC Administrator User
The BCC Administrator user will be a trustee of each of the member Cluster objects in the business continuity cluster. Identify an existing user, or create a new user, who you want to use as the BCC Administrator user.
Assigning Trustee Rights for the BCC Administrator User to the Cluster Objects
Assign trustee rights to the BCC Administrator user for each cluster that you plan to add to the business continuity cluster.
-
Start your Internet browser and enter the URL for iManager.
The URL is http://server_ip_address/nps/iManager.html. Replace server_ip_address with the IP address or DNS name of the NetWare server or Windows server where you have installed iManager and the Identity Manager preconfigured templates for iManager.
-
Specify your username and password, specify the tree where you want to log in, then click .
-
In the column, click , then click the link.
-
Specify the Cluster object name, or browse and select it, then click OK.
-
If the BCC Administrator user is not listed as a trustee, click the button, browse and select the User object, then click .
-
Click for the BCC Administrator user, and then ensure the and check boxes are selected for the property.
-
Click to save your changes.
-
Repeat Step 3 through Step 7 for the other clusters in your business continuity cluster.
Assigning Trustee Rights for the BCC Administrator User to the _ADMIN Volume
You must also ensure that the BCC Administrator user has file system rights to the _ADMIN:\Novell\Cluster directory of each of the nodes in your BCC. This is necessary because the _ADMIN volume is virtual, and is created each time the server starts. For this reason, you cannot assign eDirectory trustee rights to the _ADMIN volume.
To assign BCC Administrator user file system rights to the _ADMIN:\Novell\Cluster directory:
-
Open the sys:\etc\trustrees.xml file
-
Add a trustee entry for the BCC Administrator user that assigns Read, Write, Modify, and File Scan (RWMF) rights to the _ADMIN:\Novell\Cluster directory.
-
Repeat this process on all NetWare nodes that are part or your BCC.
The trustee entry could be similar to the following entry:
<addTrustee>
<name>BCCAdmin.users.lab.acme_tree</name><fileName>_ADMIN:\Novell\Cluster</fileName><rights><read/><write/><fileScan/><modify/></rights></addTrustee>
Note the following items with this example:
-
The <name> element is the BCC Administrator user. The tree name is required.
-
The <filename> element must be _ADMIN:\Novell\Cluster
-
The rights must be RWMF.
-
You must add the trustee entry to all the NetWare nodes in your BCC.
The following is an example of a complete trustees.xml file. Note the multiple trustee entries. For this reason you should edit this file and add the BCC entry rather than copy the file from server to server.
<specialTrustees>
<addTrustee><name>BCCAdmin.users.lab.acme_tree</name><fileName>_ADMIN:\Novell\Cluster</fileName><rights><read/><write/><fileScan/><modify/></rights></addTrustee><addTrustee><context /><name>[public]</name><fileName>_admin:manage_nss\files.cmd</fileName><rights><read /><write /><fileScan /></rights><background /></addTrustee></specialTrustees>
After the trustees.xml file has been modified on all NetWare nodes, the NetWare nodes must be rebooted. This can be done in a rolling fashion. You should start with the node that has the highest IP address first and work down in IP address order. This speeds the rate at which the Novell Cluster Services master node acquires the change.
-
Assigning Trustee Rights for the BCC Administrator User to the sys:\tmp Directory
You must also ensure that the BCC Administrator user is a trustee with Read, Write, Create, Erase, Modify, and File Scan access rights to the sys:\tmp directory on every node in your NetWare clusters.
IMPORTANT:If you are concerned about denial of service attacks with the BCC Administrator user, you can set a quota of 5 MB for that user. This can prevent the BCC Administrator user from filling the sys: volume by copying an excessive number of files to the sys:\tmp directory.
To assign BCC Administrator user file system rights to the sys:\tmp directory:
-
Open the sys:\etc\trustrees.xml file
-
Add a trustee entry for the BCC Administrator user that assigns Read, Write, Create, Erase, Modify, and File Scan (RWCEMF) rights to the sys:\tmp directory.
-
Repeat this process on all NetWare nodes that are part or your BCC.
The trustee entry could be similar to the following entry:
<addTrustee>
<name>BCCAdmin.users.lab.acme_tree</name><fileName>sys:\tmp</fileName><rights><read/><write/><create/><erase/><fileScan/><modify/></rights></addTrustee>
Note the following items with this example:
-
The <name> element is the BCC Administrator user. The tree name is required.
-
The <filename> element must be sys:\tmp
-
The rights must be RWCEMF.
-
You must add the trustee entry to all the NetWare nodes in your BCC.
IMPORTANT:Make sure that you edit each trustees.xml file on each cluster node to add the BCC entry rather than copy the file from server to server.
After the trustees.xml file has been modified on all NetWare nodes, the NetWare nodes must be rebooted. This can be done in a rolling fashion. You should start with the node that has the highest IP address first and work down in IP address order. This speeds the rate at which the Novell Cluster Services master node acquires the change.
-
2.2.4 Installing the Business Continuity Clustering Engine
You must install the Business Continuity Clustering engine software on each cluster node for the clusters that will be part of a business continuity cluster. You install the software on the nodes of one cluster at a time.
To install and configure Business Continuity Clustering, complete the following steps:
-
From the directory on your Windows workstation where you copied the Business Continuity Clustering software, run install.exe.
For download information, see Section 2.2.2, Downloading the Business Continuity Clustering Software.
-
Continue through the installation wizard until you get to the page that prompts you to select the components to install.
-
Select one of the installation options, select the component, then click .
The templates add functionality to iManager so you can manage your business continuity cluster. You must have previously installed iManager on the server where you plan to install the templates.
: Installs the templates on a NetWare iManager server. You will be asked to specify the NetWare server where the templates will be installed later in the installation.
: Installs the templates on the local Windows iManager server. You will be asked to specify the path to Tomcat (a default path is provided) on the Windows server later in the installation.
Installs the core Business Continuity Clustering engine files. This core software must be installed on all nodes in each Novell Cluster Services cluster that will be part of a business continuity cluster.
-
Do one of the following:
-
NetWare iManager Server: If you chose to install the Identity Manager iManager templates on a NetWare server, specify the name of the eDirectory tree and the fully distinguished name for the server where you want to install the templates. Then click .
If you don’t know the fully distinguished name for the server, you can browse and select it.
-
Windows iManager Server: If you chose to install the Identity Manager iManager templates on a Windows server, specify the path to Tomcat (a default path is provided) on the server. Then click .
-
-
Continue through the Upgrade Reminder page, then specify the name of the eDirectory tree and the fully distinguished name for the cluster where you want to install the core software files.
If you don’t know the fully distinguished name for the cluster, you can browse and select it.
-
Select the servers in the cluster where you want to install the core software files for the Business Continuity Clustering product.
All servers currently in the cluster you specified are listed and are selected by default.
You can choose to automatically start Business Continuity Clustering software on each selected node after the installation is complete. If Business Continuity Clustering software is not started automatically after the installation, you can start it manually later by rebooting the cluster server or by entering LDBCC at the server console.
-
Enter the name and password of an eDirectory user (or browse and select one) with sufficient rights to manage your BCC. This name should be entered in eDirectory dot format. For example, admin.servers.novell.
This user should have at least Read and Write rights to the All Attribute Rights property on the Cluster object of the remote cluster. For information, see Section 2.2.3, Configuring a BCC Administrator User.
-
Continue through the final installation page, then restart the cluster nodes where Identity Manager is running and where you have upgraded libc.nlm.
Restarting the cluster nodes can be performed in a rolling fashion in which one server is restarted while the other servers in the cluster continue running. Then another server is restarted, and then another, until all servers in the cluster have been restarted.
This lets you keep your cluster up and running and lets your users continue to access the network while cluster nodes are being restarted.
-
Repeat the above steps for each Novell Cluster Services cluster that will be part of the business continuity cluster.
2.2.5 Installing the Identity Manager Templates for Business Continuity Clustering
After the install, you can use the Business Continuity Clustering install program to install the Identity Manager templates on additional iManager servers in the same tree as the business continuity cluster.
-
From the directory on your Windows workstation where you copied the Business Continuity Clustering software, run install.exe.
For download information, see Section 2.2.2, Downloading the Business Continuity Clustering Software.
-
Continue through the installation wizard until you get to the page that prompts you to select the components to install.
-
Select one of the installation options, deselect the component, then click .
The templates add functionality to iManager so you can manage your business continuity cluster. You must have previously installed iManager on the server where you plan to install the templates.
: Installs the templates on a NetWare iManager server. You will be asked to specify the NetWare server where the templates will be installed later in the installation.
: Installs the templates on the local Windows iManager server. You will be asked to specify the path to Tomcat (a default path is provided) on the Windows server later in the installation.
-
Do one of the following:
-
NetWare iManager Server: If you chose to install the Identity Manager iManager templates on a NetWare server, specify the name of the eDirectory tree and the fully distinguished name for the server where you want to install the templates. Then click .
If you don’t know the fully distinguished name for the server, you can browse and select it.
-
Windows iManager Server: If you chose to install the Identity Manager iManager templates on a Windows server, specify the path to Tomcat (a default path is provided) on the server. Then click .
-
-
Continue through to the final installation page.