5250 Connect User's Guide
CHAPTER 4
An action is similar to a programming statement in that it takes input in the form of parameters and performs specific tasks. Please see the chapters in the Composer User's Guide devoted to Actions.
Within the 5250 Component Editor, a set of instructions for processing XML documents or communicating with non-XML data sources is created as part of an Action Model. The Action Model performs all data mapping, data transformation, data transfer between AS/400s and XML documents, and data transfer within components and services.
An Action Model is made up of a list of actions. All actions within an Action Model work together. As an example, one Action Model might read invoice data from a disk, retrieve data from a AS/400 inventory transaction, map the result to a temporary XML document, make a conversion, and map the converted data to an output XML document.
The Action Model mentioned above would be composed of several actions. These actions would:
Open an invoice document and perform a 5250 command to retrieve inventory data from a AS/400 transaction.
Convert a numeric code using a Code Table and map the result to an Output XML document.
The 5250 Connect includes several actions that are specific to the 5250 and are not a part of the core exteNd Composer product.
In addition to showing where in the Action Model a specific transaction screen appears, the Map Screen action is also used for error checking. When a screen is first recorded, Composer saves a count of how many fields are in the screen. This count is compared later during execution for error checking to ensure the actions recorded will return the proper information. The Map Screen action appears in the Action Model as shown.
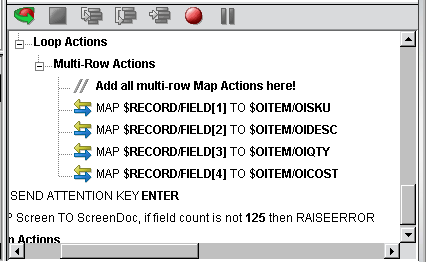
The Multi Row action can be used to input data from an XML document to a 5250 screen, or to output data from a 5250 screen to an XML document. This action essentially creates repeat loops within the Action Model that map multiple rows of data automatically from one document or screen to another. The Multi Row action is discussed in detail in "The 5250 Multi Row Wizard" on page -103.
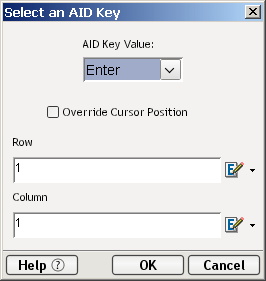
Each time you select one of the AID keys displayed in the native environment tool bar, or its corresponding keyboard key, or keys, (See "About 5250 Keyboard Support" on page 29) a Send Attention Key action is mapped in the Action Model.

Double-clicking the Send Attention Key action in the Action Model displays a dialog box that allows you to edit the key. Select from the dropdown list box the Value Key. Click on the checkbox to override the cursor position. Edit the row and column if needed or click on the expression builder icon to add a calculation.

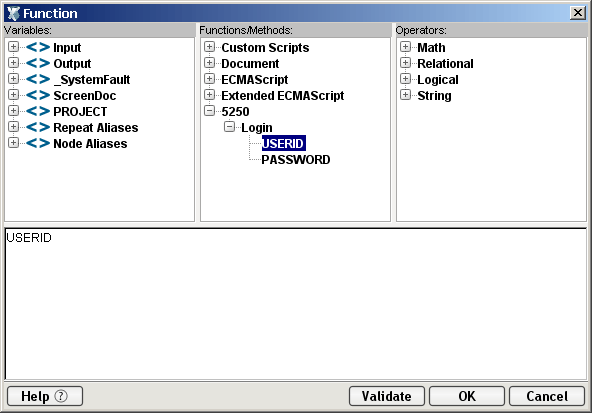
TN5250 Connection Resources have two items that are accessible from Action Expression Builder dialogs: the UserID and Password. These are for the UserID and Password fields that appear in the initial Composer screen when a connection is established. The user can map these variables into the screen, which eliminates the need for typing them into a map action that puts them into the screen.
A user may create a map action where the source expression is defined as $5250/LOGIN/PASSWORD and the Target XPath is defined as $SCREENDOC/FIELD(5).
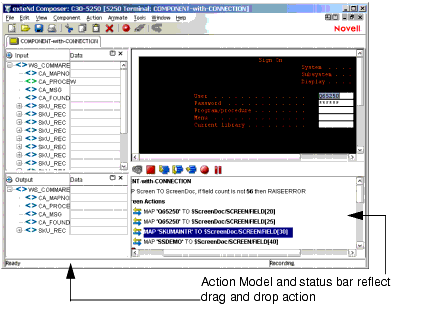
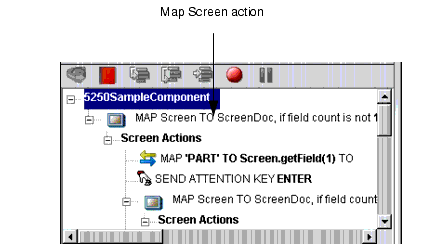
The 5250 component, like all UI components, differs from other components because a major portion of the Action Model is built for you automatically. This happens by interacting with a live session from the host in the Native Environment pane and Composer recording your activity as a set of actions in the Action Model. In other components, you must manually create actions in the Action Model, which then perform mapping, transformation, and transferring tasks. When you create a 5250 component, you essentially record the requests and responses to and from the AS/400, which generate actions in the Action Model pane specifying the keystrokes and screen navigation required to build a component. For example, when you select the Enter button in the 5250 Native Environment pane, the Action Model records the action as shown in the graphic below. In addition, you can add actions to the Action Model just the same as other components.
NOTE: You should be familiar with 5250 commands and the application you are interfacing into your XML integration project in order to successfully build a 5250 component.
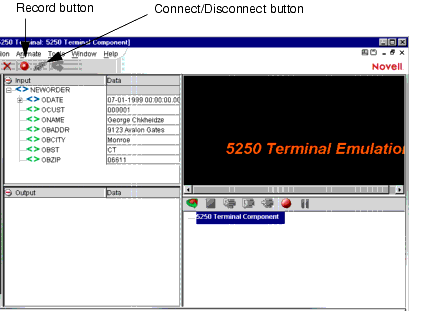
Create a 5250 component per the instructions in "Before Creating a 5250 Component" on page 23. Once created, the new 5250 component appears in the 5250 Component Editor window.
NOTE: In addition to the buttons found on the XML Map Component Editor tool bar, the 5250 Component Editor includes a Record and Connect/Disconnect button as shown above.
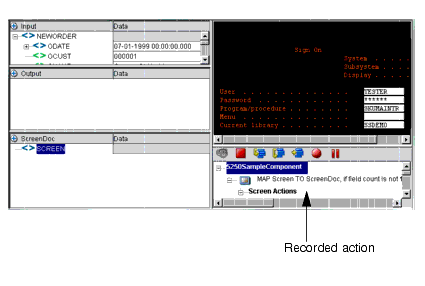
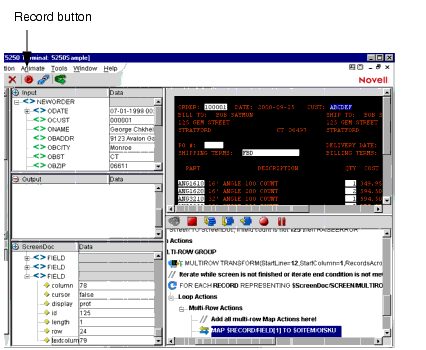
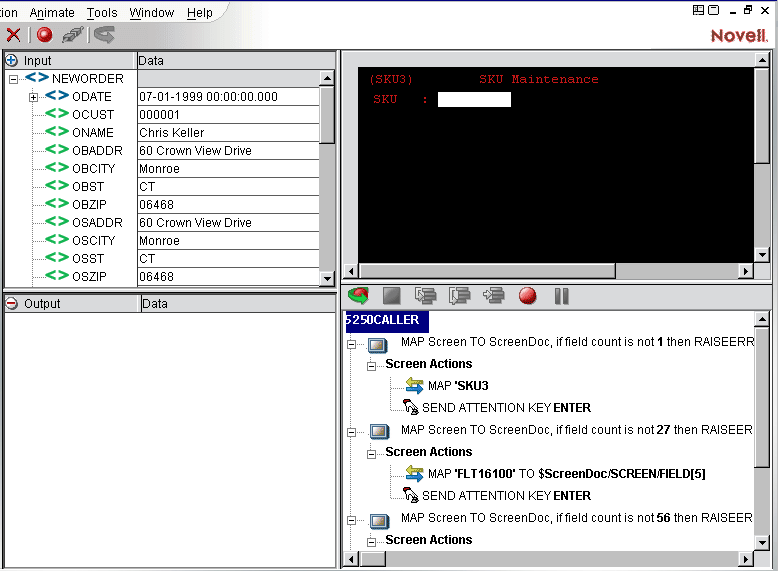
Click the Record button. An input screen appears in the Native Environment pane and a "Map Screen" action is recorded in the Action Model pane.
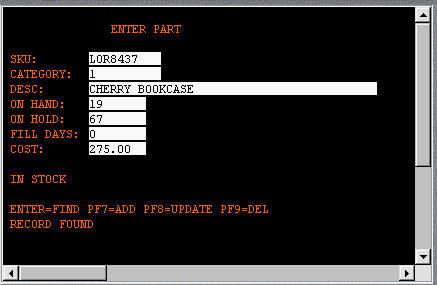
Type in a UserID, Password, and any other requisite information. For the example shown, a UserID, Password, Program/Procedure entry, and Current Library entry are required.
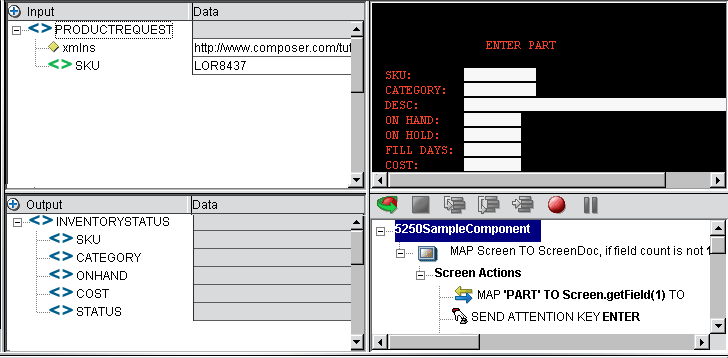
Press the Enter key on the keyboard, or if you have the Toolbar visible (View>Keypad Toolbar), click the Enter button. In this example, an ENTER PART screen appears in the 5250 pane.
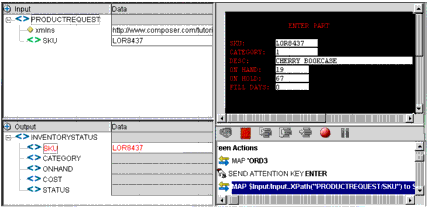
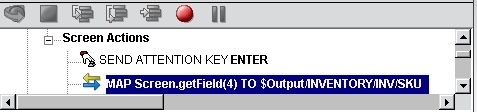
Drag the SKU data from the Input DOM to the SKU field in the 5250 ENTER PART screen. The action is recorded in the Action Model pane and appears in the status bar.
NOTE: You can also use the Map Action to map the Input SKU to the ENTER PART screen SKU field; however, dragging and dropping is much quicker and easier. For more information on the Map Action feature, see the exteNd Composer User's Guide.
Click the Enter button in the 5250 pane. The 5250 ENTER PART screen is populated with the SKU's associated data.
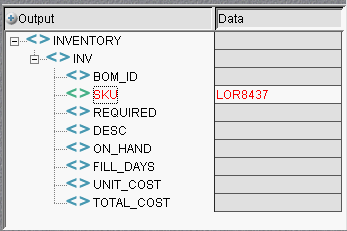
Drag and drop an element from the ENTER PART screen to the Output DOM, for example, the SKU number. The data you drag and drop appears in red in the Output DOM.
Continue to drag and drop data elements from the ENTER PART screen to the desired field in the Output Part until complete. Each time an element is dragged from the ENTER PART screen to the Output Part an action is recorded in the Action Model pane.
You will undoubtedly encounter times when you need to edit a previously recorded action model. Unlike editing other components, editing a 5250 component requires extra attention. When a 5250 component executes, it plays back a sequence of actions that expect certain screens and data to appear in order to work properly. So when editing a component you must be careful not to make the action model sequence inconsistent with the host transaction execution sequence you recorded earlier.
In general, to ensure successful edits, the following recommendations apply:
Do not cut or copy "Map Screen" action blocks and paste them into other locations in your action model.
Carefully check and edit individual Map actions that interact with the screen after copying and pasting them within an action model.
Use Composer's drag and drop features to add new Map actions that interact with the screen. Animate to the line of interest in your Action Model, pause animation, and turn on Record mode. This will prevent your Action Model from getting out of sync with the proper ScreenDoc DOM and /or fields within a specific ScreenDoc DOM.
Don't delete any Multi-Row related lines (or any actions for that matter) in your Action Model during animation. This may prevent your component from functioning properly.
The following procedure will explain how to change an existing action in a previously recorded session.
 To Change an existing action in a previously recorded Action Model:
Open the component that includes the previously recorded Action Model that you'd like to edit. The component appears in the 5250 Component Editor window.
Navigate to the action in the Action Model where you'd like to make your edit and highlight the action.
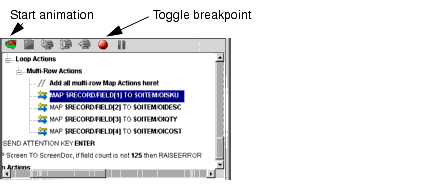
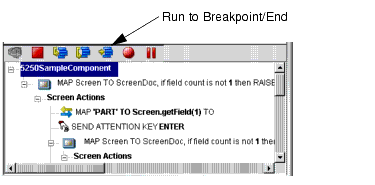
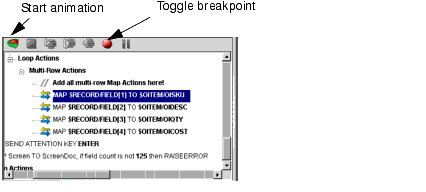
Click the Toggle Breakpoint button. The highlighted action becomes red.
Click the Start Animation button. The animation tools become active.
Click the Step to Breakpoint/End button. The Action Model executes all of the actions from the beginning to the breakpoint you set in step 3 above and appears as shown.
Execute any additional actions that you'd like to make to the Action Model.
Select File, then Save, or click the Save button on the Component Editor tool bar.
Follow the instructions in "Using the Animation Tools" on page 54 to test your component.
Whenever you press Enter on the keyboard or click one of the many attention keys in the 5250 Native Environment pane while recording a session, an action is recorded in the Action Model. An example of this is shown below.

These actions, like any other, can be deleted, moved, or copied, however, remember that these actions perform navigation and will affect the running of your component. You may also double click an Attention Key action and edit it from a dialog box.
The following procedure explains how to add a new action in a previously recorded session.
To Add an Action to a previously recorded Action Model:
Open the component that includes the previously recorded Action Model into which you'd like to add an action. The component appears in the 5250 Component Editor window.
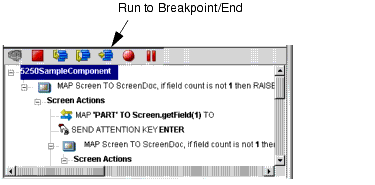
Navigate to the action in the Action Model after which you'd like to add the action and highlight the action.
Click the Toggle Breakpoint button. The highlighted action becomes red.
Click the Start Animation button. The animation tools become active.
Click the Run to Breakpoint/End button. The Action Model executes all of the actions from the beginning to the breakpoint you set in step 3 above and appears as shown.
Use Composer's drag and drop features to add new Map actions that interact with the screen. The new action will be added directly under the highlighted line.
Select File, then Save, or click the Save button on the Component Editor tool bar.
Follow the instructions in "Using the Animation Tools" on page 54 to test your component.
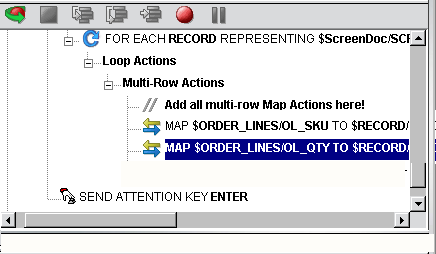
If you are adding Map Actions in a loop that will be using an alias, perform the following steps:
To Add an Alias Action to a previously recorded Action Model:
From the Action menu, select New Action, then Map. The Map Action dialog box displays.
Select the Xpath and from the drop-down list for Source, Order_Lines is selected from the dropdown list.
Either type in the information, or click the Expression Builder button and create a new expression.
Create an XPath to be represented by the alias. Click from the dropdown list for the alias
The new action is inserted below the line you select. (New line is highlighted in the screen below to show it was inserted.
The following procedure explains how to delete an action in a previously recorded session
To Delete an Action to a previously recorded Action Model:
Click the right mouse button and select Delete from the menu. You may also highlight the line and press the Delete button on your keyboard.
Composer includes animation tools that allow you to test your component. On the 5250 Component Editor tool bar you'll find the Execute button, which allows you to execute the entire Action Model and verify that your component works as you intend.
Open a 5250 component. The 5250 Component Editor window appears.
Select the Execute button. The actions in the Action Model execute and, when complete, a message appears.
From the View menu, select Expand XML Documents. This expands all of the parents, children, data elements, etc. of the XML Documents, which allows you to see the results of the executed component. If you do not expand the XML Documents, you won't see if the data you wanted to move from the 5250 environment made it to the Output DOM.
In the Action Model, you'll find animation tools that allow you to test a particular section of the Action Model by setting one or more breakpoints. This way, you can run through the actions that work properly, stop at the actions that are giving you trouble, and then troubleshoot the problem actions one at a time.
NOTE: The following procedure is a brief example of the functionality of the animation tools. For a complete description of all the animation tools and their functionality, please refer to the exteNd Composer User's Guide.
Open a 5250 Component. The component appears in the 5250 Component Editor window.
NOTE: Animation and Recording are mutually exclusive modes in the component. In order to record during animation, you must either pause, or stop animation and then turn on record mode.
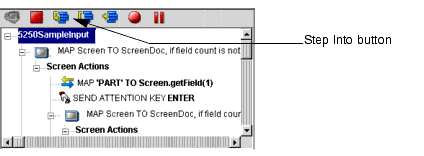
Click the Start Animation button in the Action Model tool bar, or press F5 on the keyboard. All of the tools on the tool bar become active.
Click the Step Into button. The first Map Screen action becomes highlighted.
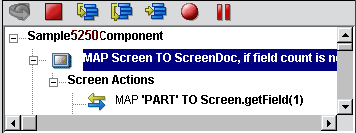
Click the Step Into button again. The instruction that enters the command "PART" into the input field of the Native Environment pane becomes highlighted.
Click the Step Into button again. The word "PART" appears in the input line of the Native Environment pane.
Click the Step Into button again. The ENTER PART screen appears in the Native Environment pane.
Click the Step Into button again. In the Action Model, the instruction for dragging and dropping the SKU from the Input DOM to the SKU field of the ENTER PART screen field becomes highlighted.
Click the Step Into button again. The SKU data from the Input DOM appears in the SKU field of the ENTER PART screen.
Click the Step Into button again. The ENTER PART screen becomes populated with the data associated with the SKU number.
Click the Step Into button again. In the Action Model, the instruction to drag the SKU data from the ENTER PART screen to the Output DOM becomes highlighted.
Click the Step Into button again. The SKU data from the ENTER PART screen appears in the SKU field of the Output DOM.
Continue to click the Step Into button until all the data elements from the ENTER PART fields appear in the Output DOM, as shown.
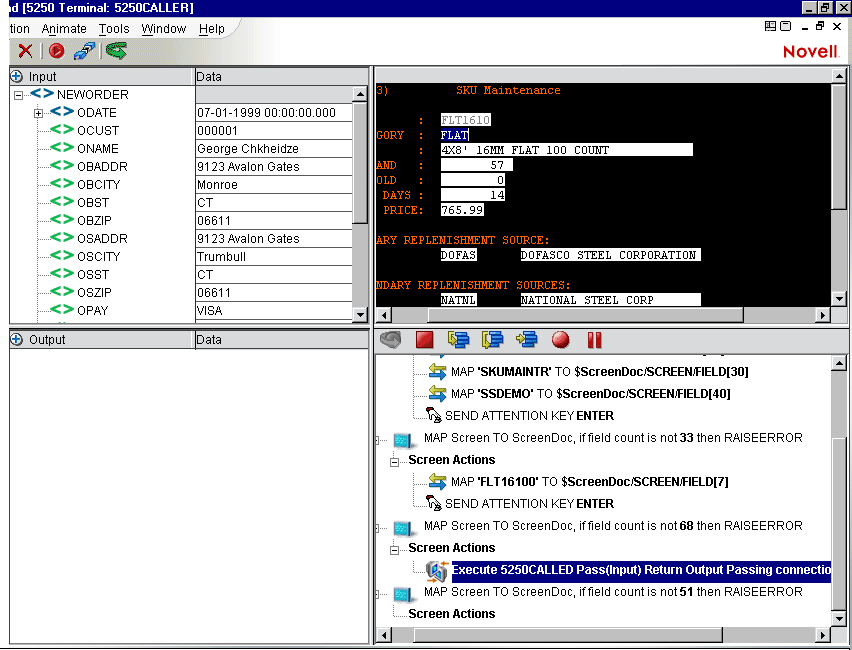
The Component with Connection Action is unique because it lets your 5250 component call another component which will share the same connection. The action allows you to break up a large component into a main 5250 component and any number of sub-components so it is easier to maintain the Action Model. The ability to have the main component share with the sub-component the connection greatly reduces the amount of connection overhead and transaction navigation at run time. Before you begin, determine how many sub-components you will require and then build and save the shells (containing no recorded actions) for when you are ready to begin recording.
To use the Component with Connect Action
Create and record the basic structure of the main component to the point where you are ready to call a sub-component. For this example, the main component will be entitled "5250 Caller."
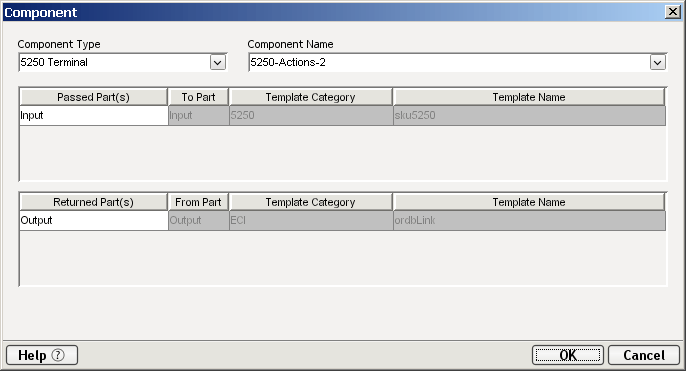
From the Main menu, or by clicking the RMB, select New Action>Component/w connection. The following dialog appears.
From the Component Type pull down list, select the name of the component type. From the Component Name pull down list, select the name of the Component.
Select the passed ID if you need to change it from the pull down list. Select the returned ID if you need to change it from the pull down list. Click OK.
Animate the Main component and step into the Component with Connection action, the sub-component will now open. See how the screen changed to the component entitled "5250Called."
Click on the Pause button on the Animation tool bar to enable the Record button.
Click on Record button and record the sub-component actions. 
The 5250 Called window will now switch back to the 5250 Caller window. 
The Style Sheet feature of the 5250 Component Editor provides you with options as to how you want to view the Native Environment pane.
To apply a Style Sheet to the Native Environment pane:
From the Component menu on the 5250 Component Editor window, select Style Sheets. The Style Sheet Editor dialog appears.
Choose a Style Sheet from the Style Sheet drop down list. For detailed information on using the Style Sheet editor, see "Creating a Style Sheet Resource" on page -19.
In addition to the Map Screen and Multi Row action, you have all the standard Basic and Advanced Composer actions at your disposal as well. The complete listing of Basic Composer Actions can be found in Chapter 7 of the Composer User's Guide. Chapter 8 contains a listing of the more Advanced Actions available to you.
This section describes common errors you may see while executing the animation tools.
This error occurs during animation or execution of certain transactions. One condition that can cause this is when a transaction sends one or more screens to the terminal that do not require a response from the user (i.e., pressing an AID key) and then sends a screen that does require a response. For instance, some transactions are designed to display a message screen (e.g., "Please wait...") and then display the actual transaction screen that the user wants. The user cannot respond to the message screen, since its display is under the control of the transaction. The problem with transactions behaving this way occurs during animation. As you step from action to action, Composer's Map Screen actions count how many fields each screen has and compares this number with the original field count when you recorded the component. Since the transaction can send a second screen before you have stepped to its corresponding Map Screen action, the field counts get out of sync.
To correct this error, you must determine why the field count has changed and then try one of the following remedial actions.
Double-click the Map Screen action that failed in the Action Model and change the field count variable to the correct number of fields.
Double-click the Map Screen action, disable field count checking (see illustration below), and wrap the whole Map Screen action block within a Try/OnError action that will allow you to conditionally process a field count error instead of an exception being thrown, which halts component execution.
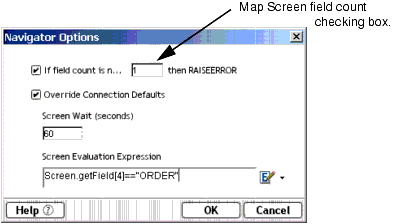
The Navigator Options Dialog allows you to:
Enter the field count (number) for checking purposes. If the field count is not correct at runtime, an error will occur. Your Try/OnError action (applied in the previous step) will trap this error.
You MUST remember to re-select this check box before deployment.
Override connection defaults by clicking in the checkbox to allow an override based on the seconds entered in the Screen Wait field for one navigation action.
Set an expression that is checked each time a packet is received and processed
Return to the next step (which may include Screen Field Count check) if the Screen Evaluation Expression is true.
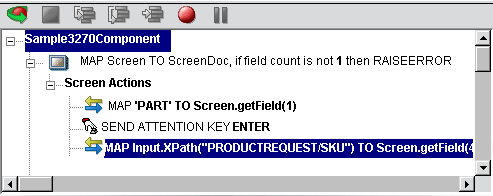
Disable the Map Screen field count checking and add your own action to check the field count. You can do this by creating a Throw Fault action that checks the field count (e.g., ScreenDoc.XPath("count(SCREEN/FIELD)")>68) needed for your application. An example is shown below.
There are additional circumstances where field counts can get out of sync. For example:
A spooler message from a print job arrives unexpectedly. To remedy this, the user would delete the errant Map Screen action from the Action Model.
Applications that send the same screen but with a variable number of fields.
Copyright © 2003 Novell, Inc. All rights reserved. Copyright © 1997, 1998, 1999, 2000, 2001, 2002, 2003 SilverStream Software, LLC. All rights reserved. more ...