HTML Connect User's Guide
CHAPTER 4
An action is similar to a programming statement in that it takes input in the form of parameters and performs specific tasks. Please see the chapters in the Composer User's Guide devoted to Actions.
Within the HTML Component Editor, a set of instructions for processing XML documents or communicating with non-XML data sources is created as part of an Action Model. The Action Model performs all data mapping, data transformation, data transfer between the Web site screen and XML documents, and data transfer within components and services.
The HTML Connect has two HTML-related actions: HTML Action and Set Frame. The HTML action accesses a URI and encodes parameters for the URI Actions. HTML Actions include HTTP Get and HTTP Post. These action types are referred to as methods that request data. HTTP Get is a method that gets the file with a query consisting of the specified form-data. The data is urlencoded, turned into a string, appended to the end of the URL, and then sent as a query string.
There can be multiple frames on a Web page and each frame has its own document. In order to set the context of the frame, the Set Frame Action, which is automatically generated, allows you to set the context of the selected frame, so that the DOM reflects the contents of that frame.
HTTP Post is a request type that posts data to the specified URI using specific headers. HTTP Post sends larger amounts of information to the server to process. Of course, this is dependent upon the embedded form on the Web page. The data is first URIencoded and then turned into a string of the form used. The response to an action can be a redirect. A redirect is automatically handled and requires no interaction from the user.
When Composer receives an HTTP content stream consisting of HTML, it will render it at design time in the Native Environment Pane. Using a checkbox in the HTML Action dialog, you can turn JavaScript support on or off. If you turn it on, you will be able to interact with scripted pages, including forms that use JavaScript event handlers. (This is subject to certain limitations. See "JavaScript versus ECMAScript" and "User Agent Info" later in this chapter.)
The HTML Component differs from other components because a major portion of the Action Model is built for you automatically. This happens as you interact with a remote site in a live HTTP session in Composer, while you are using Composer's "recording" capability to capture your activities as a set of actions in the Action Model. In other components, you must manually create actions in the Action Model, which then perform mapping, transformation, and other tasks. When you create an HTML Component, you essentially record the requests and responses to and from the website, which are captured as a combination of HTML Actions, Map Actions, and Function Actions in the Action Model pane.
 To record a simple HTML session:
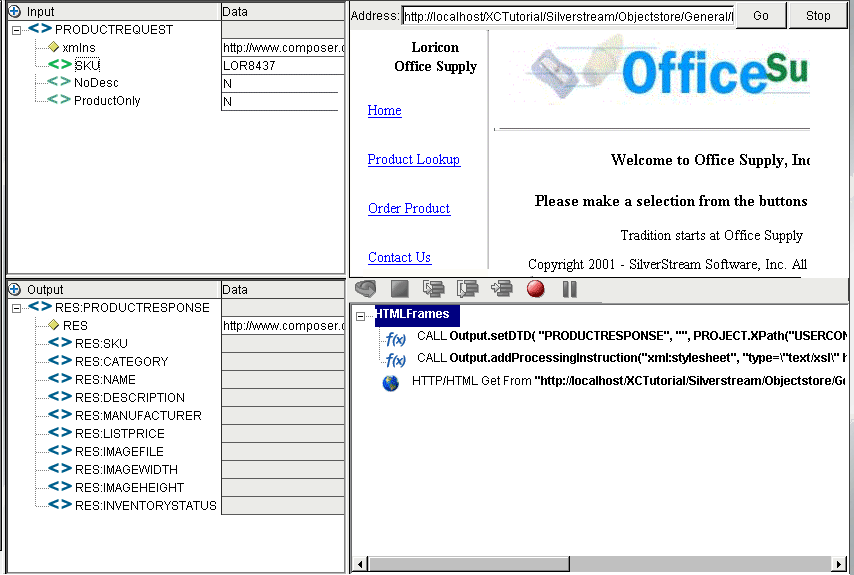
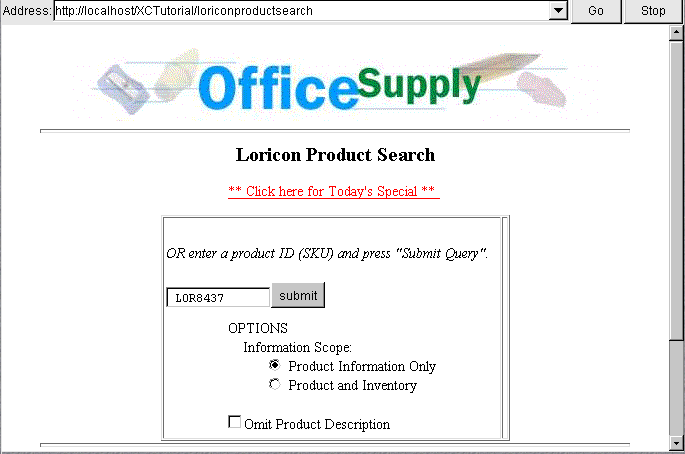
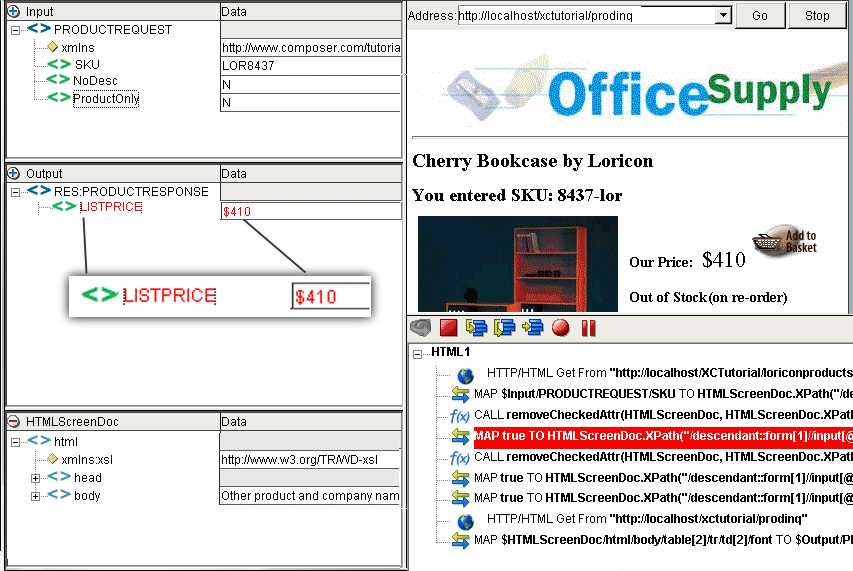
Create an HTML Component per the instructions in "How to Create an HTML Component" in Chapter 3 of this Guide. In creating the HTML Component shown in this example, the Office Supply Product Request and Product Response templates were selected for Input and Output respectively. Once created, the new HTML Component appears in the HTML Component Editor window.
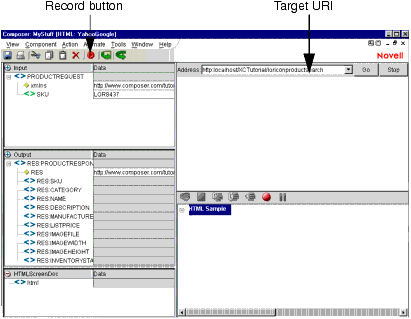
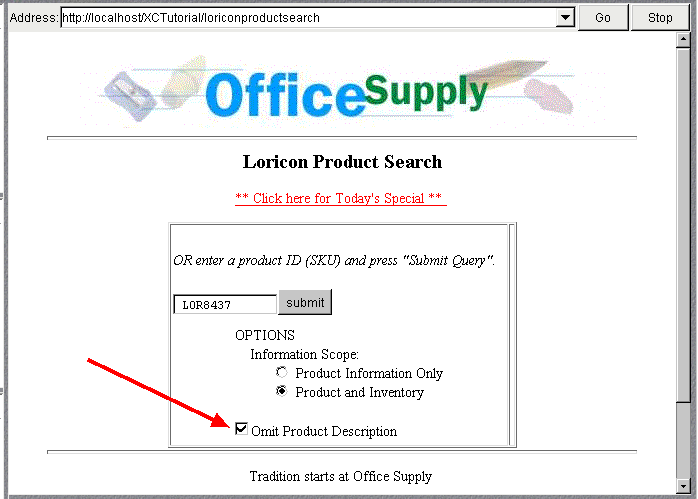
Enter an address in the URI field. In the example, the address used is: http://localhost/XCTutorial/loriconproductsearch. Click on the GO button or press the Enter key on your keyboard.
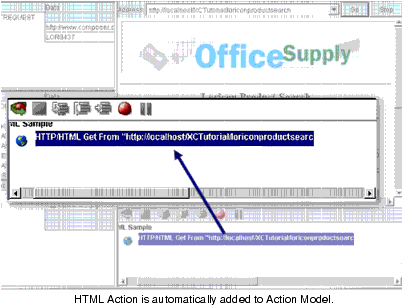
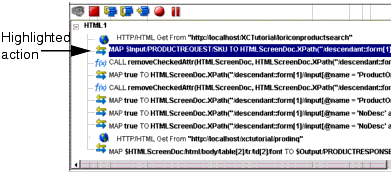
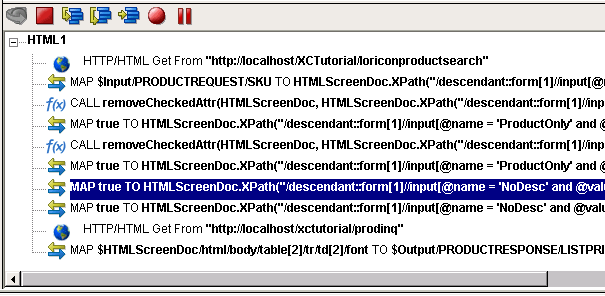
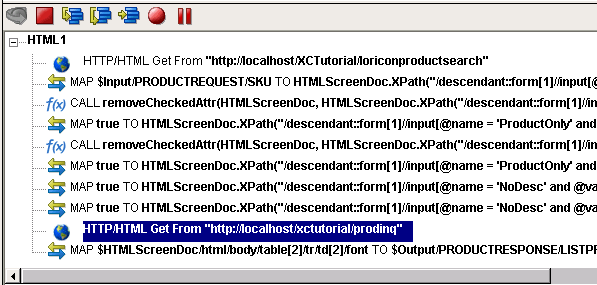
Click the Record button and the current Web page is captured as an HTML Action in the Action Model (see below).
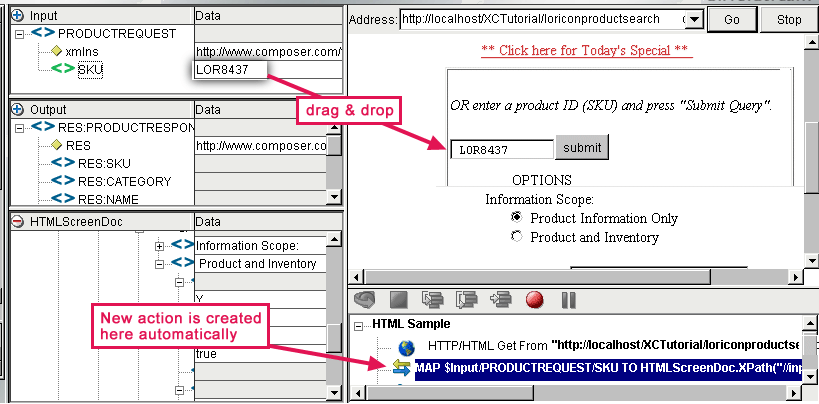
Drag the SKU information "LOR8437" from the Input DOM into the entry field on the form displayed in the Native Environment Pane and drop it into the field. A Map Action will be created in the Action Pane.
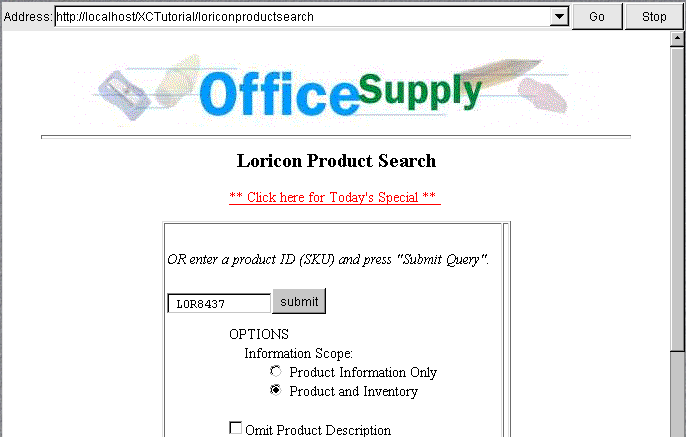
In the Native Environment Pane, after entering the SKU, deselect the default option and click on the radio button for Product and Inventory.
NOTE: A Map Action is automatically created in the Action Pane when a new selection is made when interacting with the form in the Native Environment pane. A Function Action is created in the Action Pane when you deselect a previous selection within the form. For example, in this sample, you deselected the default radio button and selected the Product and Inventory and clicked on that radio button. In this case, both types of Actions, Function and Map, are created in the Action Pane. Please refer to Appendix D for a complete listing of actions created as a result of interacting with the HTML visual controls.
Click on the checkbox to Omit Product Description.
NOTE: New actions will be created in the Action Model as you interact with form controls in the Native Environment Pane. In this example, you clicked in the checkbox and selected Omit Product Description.
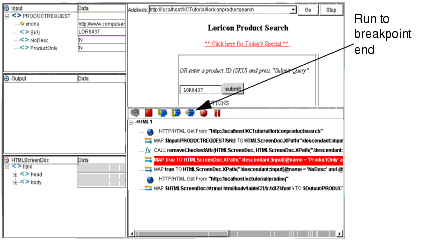
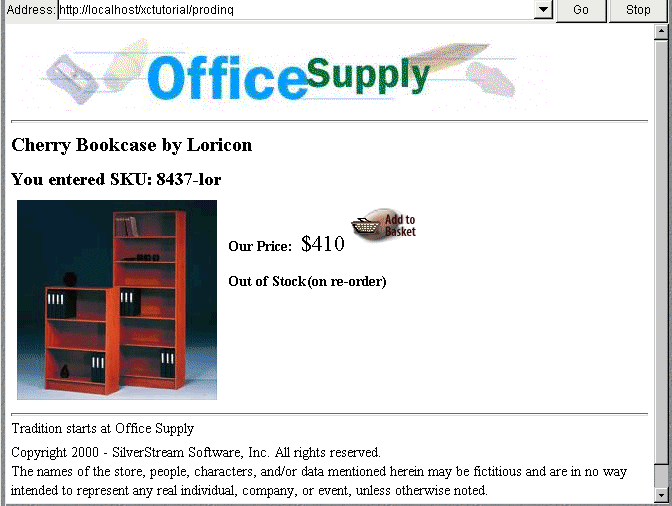
Click on the Submit button. The new Web page appears with the search information that was requested.
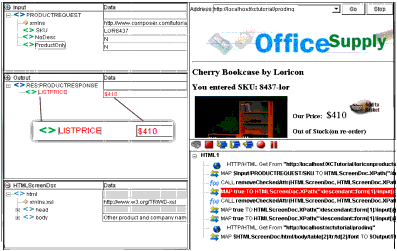
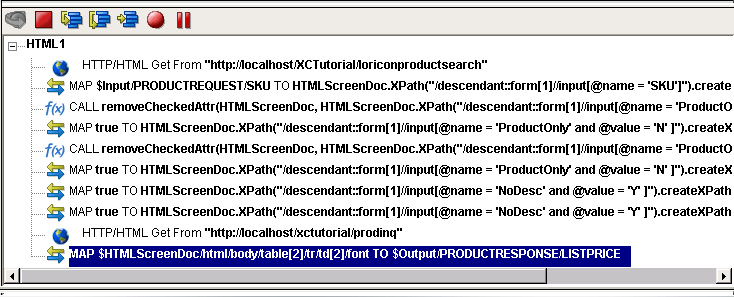
Drag and drop an element from the search results screen to the Ouput DOM: For example, drag "$410" into the LISTPRICE field in the Output DOM. The data you drag and drop appears in red.
If you wish, you can continue to drag and drop data elements from the search results screen to the desired field in the Output DOM until complete. Each time an element is dragged from the search results page to the Output DOM an action is recorded in the Action Model pane.
NOTE: Notice that the HTML ScreenDoc DOM, which mirrors the Web page in the Native environment, is being updated as each action occurs. You can see more details by expanding the HTMLScreenDoc tree.
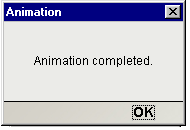
Start animation by clicking on the Animate icon and stepping through the actions in the Action Pane by repeatedly clicking the Step Into icon. (See below.)
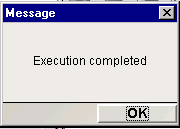
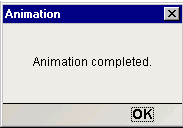
When the process is complete, a small dialog appears. Click OK.
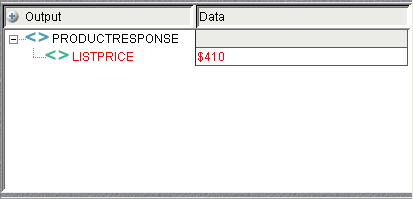
On the following screen, notice that the Output DOM contains only the "$410" that was requested from the Web page.
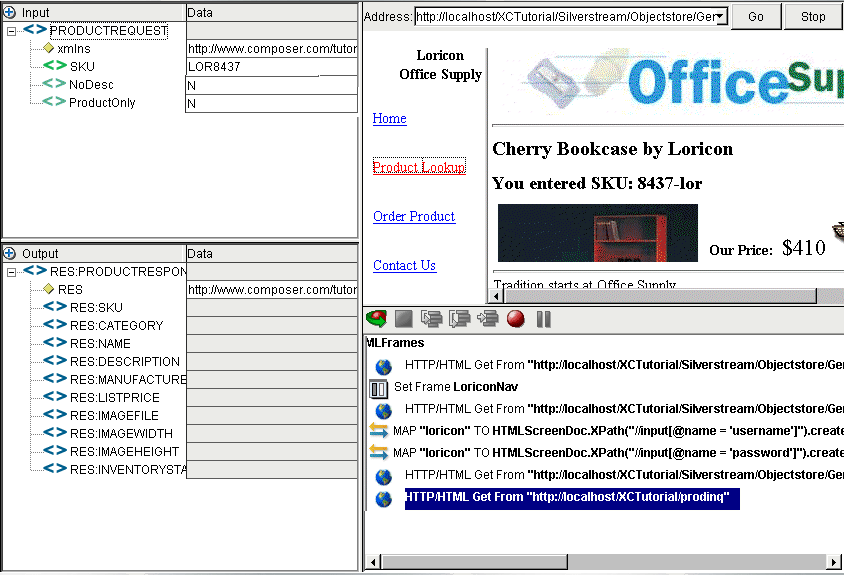
If the Web page you are using contains multiple frames, HTML Connect will create and record a Set Frame Action in the Map Screen when you click from frame to frame or drag and drop data into a DOM. The HTML Screen Doc will show a DOM for this frame.
To record a HTML Session using Pages Containing Frames
Create an HTML Component per the instructions in How to Create an HTML Component in Chapter 3 of this Guide. In creating the HTML Component shown in this example, simple templates are used for Input and Output respectively. Once created, the new HTML Component appears in the HTML Component Editor window.
Enter an address in the URI field. In this example, the address used is: http://localhost/XCTutorial/Silverstream/Objectstore/General/LoriconHome.html
Click on the GO button or press the Enter key on your keyboard.
Click the Record button and the current Web page is captured as an HTML Action in the Action Model.
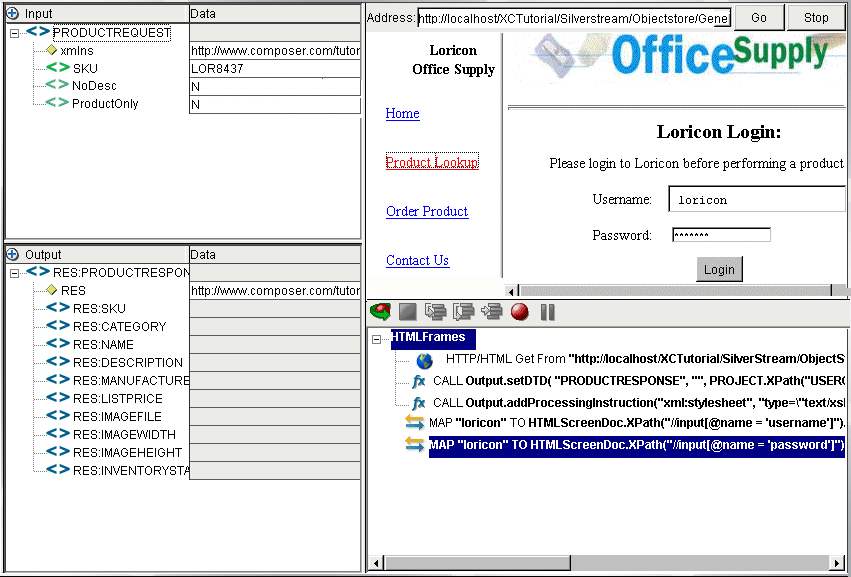
In this example, click on Product Lookup. In the Map Action Pane, you can see that a Set Frame action was created to show that you now entered a different frame. The actions following are then recorded. 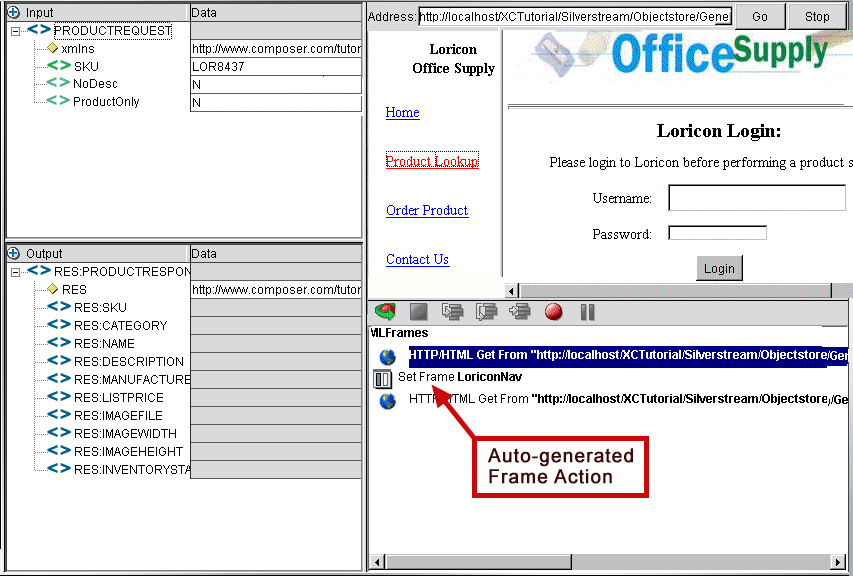
After making your selection, a Login Screen appears requesting Username and Password.
Enter your Username and Password. In this example, both the Username and Password is loricon. Click on the Login button. Notice the actions created in the Map Action pane.
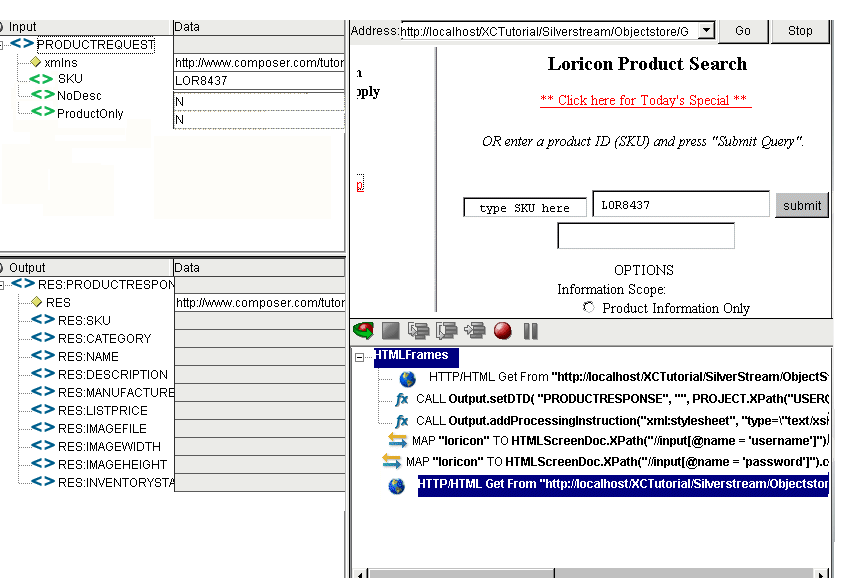
Enter the SKU, which for our example is LOR8437 and click on the Submit button.
Once you click the Submit button, your response to your request will appear in the Navigation Pane (see below).
Once an HTML Action has been created (in Record mode), you can edit various parameters associated with it. See below.
To edit links and parameters in the HTML Action
Doubleclick an existing HTML Action in the Action Model. The HTML Action dialog appears, as shown below.
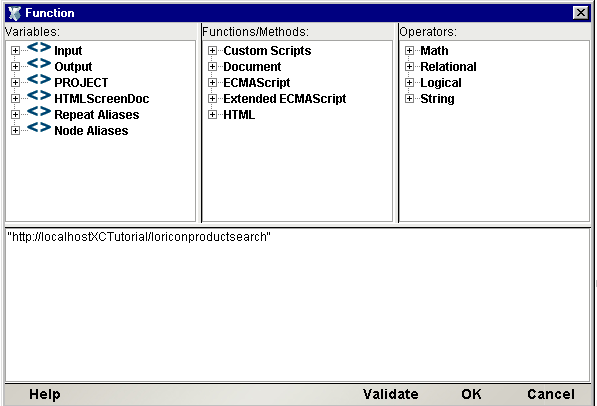
Enter an address of a Web site screen you want to navigate to in the URL field. You can either type the string or click on the Expression icon and create an ECMAScript expression that specifies the URL of interest. The URL can also be obtained via XPath. (Use the radio button provided.)
NOTE: If you enter the URL directly (as shown above), in ECMAScript mode, be sure to surround it with double quotes.
Select the Method type by click on the radio button for GET or POST. You will most often choose GET.
Optionally select an HTTP Connection Resource from the pulldown list. This list is prepopulated with the names of any HTTP Connection Resources that exist in the current project.
NOTE: You would normally specify an HTTP Resource only when using a secure connection or a connection on which you wish to set a timeout value.
Click the Follow Redirects checkbox if you want your HTML Action to honor redirections at runtime by default.
Optionally check the Enable JavaScript checkbox if the site you are going to requires a JavaScript-enabled browser.
NOTE: Composer does not implement every JavaScript extension supported by every browser type. Hence, you may run into situation where a particular site uses scripts that are problematic in Composer. This can only be uncovered by testing.
The Parameters section contains three radio buttons: None, Form and Manual. Select one of the radio buttons.
Form allows you to select a form by name from the pulldown list. The list will show every form embedded in the HTML page. Selecting a form will cause the fields contained in that form to show up (by Name, Type, and Value) in the table at the bottom of the dialog.
Manual allows you to add a Name, Type, and Value for a new form field for any form. It also allows you to remove any field from the selected form. (These changes cause the ScreenDoc DOM to update appropriately.) After selecting the ADD button, enter information for Name, Type, and Value for the new field. The DELETE button allows you to delete a field from the list if you wish to do so. When you click in the Value area, the Expression icon appears. Click on the icon and the Expression Builder dialog appears, which allows you to easily create your expression using picklist items.
NOTE: Because this is an ECMAScript string, it must be enclosed in double-quotes.

You will undoubtedly encounter times when you need to edit a previously recorded action model. Unlike editing other components, editing an HTML Component requires extra attention. When an HTML Component executes, it plays back a sequence of actions that expect certain Web pages and data to appear in order to work properly. So when editing a component you must be careful not to make the action model sequence inconsistent with the Web page execution sequence you recorded earlier.
In general, to ensure successful edits, the following recommendations apply:
Do not cut or copy HTML Actions and paste them into other locations in your action model.
Carefully check and edit individual Map actions that interact with the HTMLScreenDoc DOM after copying and pasting any Map actions.
Use Composer's drag-and-drop features to add new Map actions that interact with the screen.
The safest procedure when editing or adding actions is to Animate to the line of interest in your Action Model, pause animation, and turn on Record mode. This will prevent your Action Model from getting out of sync with the proper ScreenDoc DOM and /or fields within a specific ScreenDoc DOM.
The following procedure will explain how to change an existing action in a previously recorded session.
To Change an existing action in a previously recorded Action Model:
Open the component that includes the previously recorded Action Model that you'd like to edit. The component appears in the HTML Component Editor window.
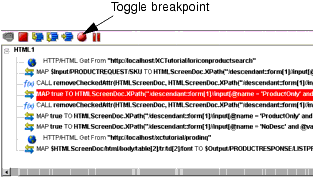
Locate the action in the Action Model where you'd like to make your edit and highlight the action.
Click the Toggle Breakpoint button (or press F2). The highlighted action becomes red.
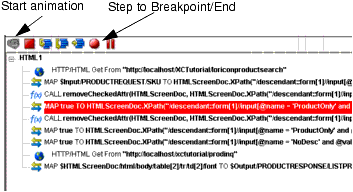
Click the Start Animation button. The animation tools become active.
Click the Run to Breakpoint/End button. The Action Model executes all of the actions from the beginning to the breakpoint you set in step 3 above and appears as shown.
Execute any additional actions that you'd like to make to the Action Model.
Click the Record button a second time to turn off the recording mode.
Select File, then Save, or click the Save button on the Component Editor tool bar.
Follow the instructions in "Using Animation Tools" to test your component.
The following procedure explains how to add a new action in a previously recorded session.
To Add a Action to a previously recorded Action Model:
Open the component that includes the previously recorded Action Model that you'd like to add an action in. The component appears in the HTML Component Editor window.
Locate the action in the Action Model where you'd like to make your addition and highlight the action.
Click the Toggle Breakpoint button (or press F2). The highlighted action becomes red.
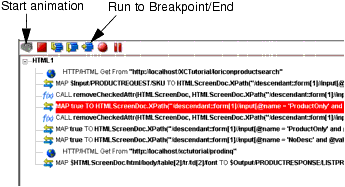
Click the Start Animation button. The animation tools become active.
Click the Run to Breakpoint/End button. The Action Model executes all of the actions from the beginning to the breakpoint you set in step 3 above and appears as shown.
Highlight the action line and RMB on Action > New Action > Html Action. (Or just doubleclick the line.) The HTML Action dialog appears.
After entering completing the required fields on the screen, click the OK button. The new action will be added directly under the one highlighted.
Click the Record button a second time to turn off the recording mode.
Select File, then Save, or click the Save button on the Component Editor tool bar.
Follow the instructions in "Using Animation Tools" to test your component.
The action will be added directly after the highlighted line.
The following procedure explains how to delete an action in a previously recorded session.
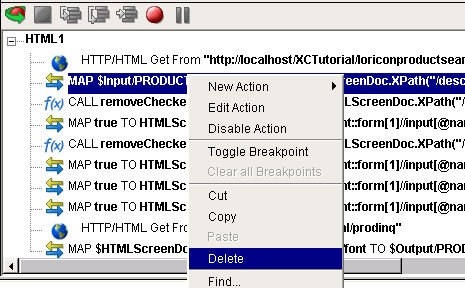
To Delete an Action to a previously recorded Action Model:
Highlight the action line that you want to delete and click on the RMB and select Delete from the menu. You may also highlight the line and press the Delete button on your keyboard.
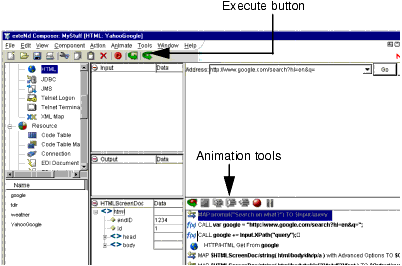
Composer includes animation tools that allow you to test your component. On the HTML Component Editor tool bar you'll find the Execute button, which allows you to execute the entire Action Model and verify that your component works as you intend.
Open an HTML Component. The HTML Component Editor window appears.
Select the Execute button. The actions in the Action Model execute and, when complete, a message appears.
From the View menu, select Expand XML Documents. This expands all of the parents, children, data elements, etc. of the XML Documents, which allows you to see the results of the executed component. If you do not expand the XML Documents, you won't see if the data you wanted to move from the HTML environment made it to the Output DOM.
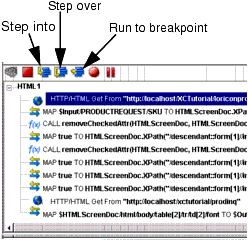
In the Action Model, you'll find animation tools that allow you to test a particular section of the Action Model by setting one or more breakpoints. This way, you can run through the actions that work properly, stop at the actions that are giving you trouble, and then troubleshoot the problem actions one at a time.
NOTE: The following procedure is a brief example of the functionality of the animation tools. For a complete description of all the animation tools and their functionality, please refer to the exteNd Composer User's Guide.
Open an HTML Component. The component appears in the HTML Component Editor window. 
NOTE: Animation and Recording are mutually exclusive modes in the component. In order to record during animation, you must either pause or stop animation and then turn on Record mode.
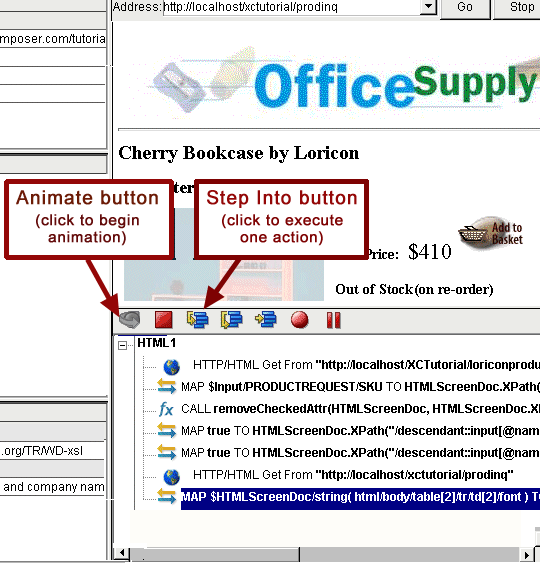
Click the Start Animation button in the Action Model tool bar, or press F5 on the keyboard. All of the tools on the tool bar become active.
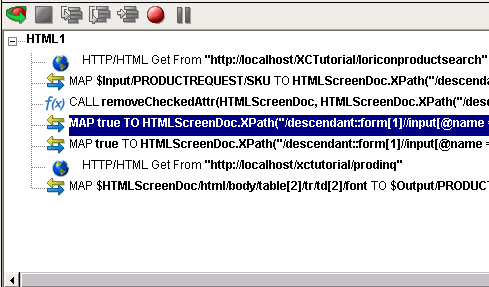
Click the Step Into button. The HTML Action will become highlighted. Click the Step Into button again. The first Map Screen action becomes highlighted.
Click the Step Into button again. Notice in the Native Environment Pane that the SKU is filled in.
Click on the Step Into button again. Then click on the Step again and into you reach the Map Action.
Notice that in the Native Environment pane the radio buttons changed.
Notice the Native Environment Pane now displays the checkmark selection in the Omit Product Description.
Click the Step Into button again. In the Action Model, the highlighted action is an HTML action.
Click the Step Into button again. After stepping into the next action the Native Environment Pane will reflect the next Web page screen.
Click OK. Notice the Output DOM; it now contains the drag and drop information, "$410," in the ListPrice field. See below.
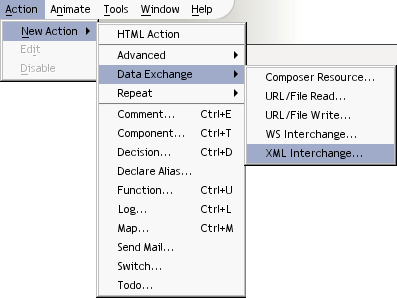
In addition to the Map Action, you have all the standard Basic and Advanced Composer actions at your disposal as well. The complete listing of Basic Composer Actions can be found in Chapter 7 of the Composer User's Guide. Chapter 8 contains a listing of the more Advanced Actions available to you. The XML Interchange Advanced Data Exchange action is particularly relevant to the HTML connect, so it is discussed in detail below.
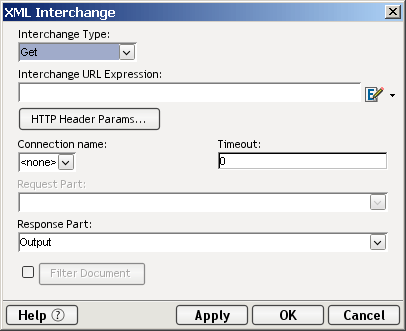
The XML Interchange Action allows you to read or write an external XML document into a DOM into the component from a specific URI.
To use the XML Interchange Action:
Create a new XML Map component and choose from the main Menu bar, Action>New Action> Data Exchange>XML Interchange.
From the dropdown list, select the Interchange Type. You can select Get, Put, Post or Post with response.
Enter the Interchange URL Expression or click on the source expression icon.
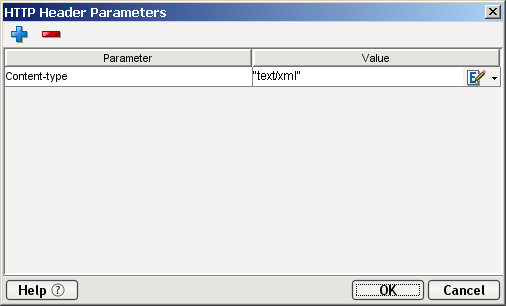
If you want to add or delete a parameter and value to the Header, click on the HTTP Header Params button and the following dialog appears.
Click on the plus sign icon (+) to add a row or click on the minus (-) to delete a row. Click on the Source Expression icon to enter a header value expression.
Click OK and return to the HTTP Header Parameters dialog, click OK again and return to the XML Interchange dialog.
Specify a Connection Timeout value (in seconds), or leave as zero. Whatever value you place here will override any value specified in your connection resource.
Document Handle field will default to Output. The name of this Document Handle will change according to the selection you made in the Interchange Type field.
Response Part Document Handle is active only when you select Post with Response from the Interchange Type dropdown list.
Click OK and a map action is then created dependent upon your selections.
XPath evaluations can take a significant amount of time when a DOM representation of an HTML page is large and complex. The amount of time spent in XPath evaluation can vary a great deal depending not only on page complexity, but the XPath processor used. The Xalan processor, which is the default XPath engine used by the exteNd Composer HTML Connect, employs a depth-first node-walking algorithm, which gives good performance on small to medium-sized HTML pages of low complexity. The Jaxen Xpath processor, on the other hand, uses a breadth-first algorithm, which gives better performance on large and/or complex DOMs.
The exteNd Composer HTML Connect allows you to choose the XPath engine you want to use. To change the processor, call the setXPathProcessor() method on the DOM object in question (usually HTMLScreenDoc), supplying a string argument of "xalan" (default) or "jaxen." For example, create a new Function action and enter an expression as follows in the Function dialog::

When you are doing load testing or performance tuning, you should try each XPath processor to see which is better for your particular application.
NOTE: If your application has bugs when running under one XPath processor but not with the other, it is most likely because your application depends on DOM nodes being returned (from XPath expressions) in a given order. Always remember, when using any XPath expression that returns a node list, that the ordering of nodes in the node list is not predictable. This is standard XPath behavior across all processors. Your application should not depend on node objects being returned in any particular order.
ECMAScript is the standards-body-blessed "core language" underlying JavaScript. (Consult ECMA Standard Number 262, published by Ecma International, formerly the European Computer Manufacturers Association. For details, go to http://www.ecma-international.org/.) JavaScript is a superset of ECMAScript: It is ECMAScript plus the various browser extensions objects and methods supported by the browser-makers, plus HTML DOM extensions. The HTML Connect "understands" the most common JavaScript browser extensions, including many Netscape and Mozilla objects, but not JScript-specific or Internet Explorer-specific methods.
HTTP clients can identify themselves to a web server by a User-Agent request-header field. The server can use this information in a variety of ways. (For instance, it can tailor outgoing content to suit a particular browser type, perhaps redirecting a Mozilla user to pages containing Mozilla-specific markup, or Internet Explorer users to pages containing IE-specific scripts or markup.) Since user-agent info is also available as a JavaScript property, web-page authors often use JavaScript to learn which kind of browser the page is running in.
Composer's HTML Connect uses the following User-Agent string:
Mozilla/5.0 (Windows; U; Windows NT 5.1; en-US; rv:1.0.2) Gecko/20030208 Netscape/7.02
(This represents one continuous string. Linewrapping is unintentional.)
Web page scripts can inspect this property by means of:
browserType = navigator.userAgent;
The "navigator" object is a standard browser-JavaScript construct, supported by Composer.
In essence, any components you build using the HTML Connect for Composer will "appear to be" a Mozilla browser to any servers or scripts that check the user-agent property.
In the event a Get operation is not successful, the HTTP status code will be available via ECMAScript in the HTMLStatusCode property. Also, a property called HTMLStatusMsg will contain a string with information about the error condition. The contents of these properties can be captured in log messages using Log Actions. (See the Section on "The Log Action" of the Composer User's Guide for more information about Log Actions.)
NOTE: Refer to Appendix C for a complete listing of HTTP Status Codes.
If a script inside an HTML page that uses JavaScript is not understood by Composer, you may see this message in the logs or Output tab:
java.lang.RuntimeException: com.novell.mozilla.javascript.PropertyException: Constructor for "TypeError" not found.
(Linewrap is unintentional.)
Bear in mind that some web pages assume Internet Explorer compatability or use IE JavaScript/JScript objects that are not supported by Mozilla clients. (For all intents, Composer's HTML Connect is a Mozilla client. See "User Agent Info" above.) This can be a possible source of trouble. If your component is "scraping" a page intended for Microsoft IE clients, and or if you are going against a page that uses MSIE-dependent scripting constructs, your component may not work as expected. There is little you can do at this point, unless the site in question offers non-scripted pages for use by clients that lack script support or that have JavaScript turned off.
Copyright © 2003 Novell, Inc. All rights reserved. Copyright © 1997, 1998, 1999, 2000, 2001, 2002, 2003 SilverStream Software, LLC. All rights reserved. more ...