JMS Connect User's Guide
CHAPTER 2
As with other exteNd Connects, creating a usable JMS Component actually begins with creating a JMS Connection resource, via which communication can occur with a message queue or topic. You will also want to prepare any XML template documents (XML skeletons, DTDs, and/or XSL stylesheets) with which your component will work. Getting these items ready is the subject of this chapter.
Before you can make use of a JMS Component, you must create a Connection Resource to access the queue or topic your component will be sending messages to or receiving messages from.
Every Connect, including the JMS Connect, uses its own Connection Resource type. The different Connection Resources (for JDBC, JMS, ECI, etc.) require varying numbers and types of parameters, appropriate to the external data source in question. The setup wizard changes appearance dynamically to reflect this.
Once you create a Connection Resource, you can reuse it for various JMS components that you create, rather than creating a new connection each time. Also, a Connection Resource, once created, can to some degree be self-configuring in that its data fields can be linked to ECMAScript expressions that control the parameter values associated with the connection (see below).

The "Create a New Connection Resource" wizard will let you specify connection parameters in two ways: as Constants or as Expressions. By default, the wizard's parameter-entry fields are constant-based, which means that the value you enter for any given parameter is utilized, unchanged, every time the connection is used. An expression-based parameter, by contrast, gets its value programmatically, at runtime, via an ECMAScript expression which you supply in the wizard at design time. The value of an expression-driven parameter, therefore, can be different each time a connection is used, depending on the conditions prevailing at runtime.
For example, one very simple use of an expression-driven parameter in a JMS Connection would be to define the Connection User name as a PROJECT Variable. (From Composer's main menubar, choose Tools, then Configuration, then select the Project Variables tab.) Then you could assign the value of the PROJECT Variable to the Connection User parameter. This way, when you deploy the project, you use the "Project Variable Remapping Panel" feature of the Deployment Wizard to update the Connection User name to a value appropriate for the final production environment.
As another example, suppose Queue1 in your MOM environment is scheduled for maintenance on the 15th day of every month, in which case Queue2 should be used instead. You could assign an expression to the Queue Name parameter of the connection:
(new Date).getDate() == 15 ? "Queue1" : "Queue2"
You can also use an ECMAScript expression to read information from a file on disk, call a Java object in the Application Server, etc. Thus, the use of expressions to provide parameter information brings great flexibility and power.
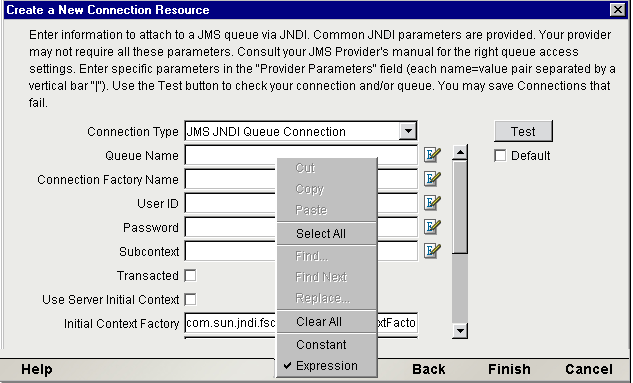
 To switch a parameter to Expression-driven mode
Position the cursor in the field that you want to attach an expression to. (Note that this does not apply to the Connection Type field nor to checkboxes.)
Select Expression from the menu. A blue Expression Editor icon appears to the right of the parameter field.
Type an ECMAScript expression into the field, or click the Expression Editor button and use the pick lists in the Expression Editor to build an expression that evaluates to a valid parameter value at runtime.
In Message Oriented Middleware systems, queues are administered resources that JMS gains access to via its own administered objects. JMS administered objects encapsulate information about destinations and connections in such a way that client apps can use these objects through interfaces that remain portable.
JMS requires that administered objects (ConnectionFactories and Destinations) be placed in a JNDI namespace. Therefore, the connection resources needed by an application can always be obtained via JNDI. But if the name(s) of the provider's ConnectionFactory objects are known to a given Java application, that application can create its own connection(s) without going through JNDI.
exteNd offers a connection-via-JNDI facility by default (since JNDI access to administered objects is guaranteed to be available in every JMS MOM). But in the case of IBM's MQSeries, exteNd also offers the option of obtaining queue connections directly using MQSeries classes (which is to say, without going through JNDI). This offers the user easier setup options, with a more vendor-tailored user interface.
NOTE: If a vendor-specific "direct connection" facility is available, it will be listed as a pulldown-menu choice in exteNd Composer's "Create a New Connection Resource" Wizard. You can also verify the availability of provider-specific connection facilities by checking the contents of <PROVIDERS> under the JMS <COMPONENT_FACTORY> node of your xconfig.xml file. (The xconfig.xml file is located in your Composer/bin directory).
To create a JMS Queue Connection
Resource Using JNDI
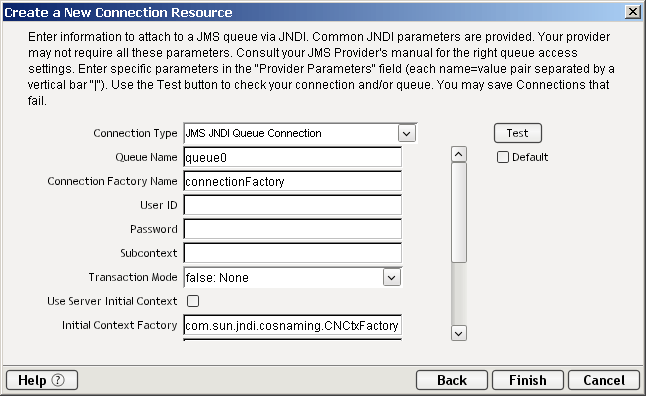
NOTE: The settings in the following graphics are typical for a JNDI connection to a JBrokerMQ destination.
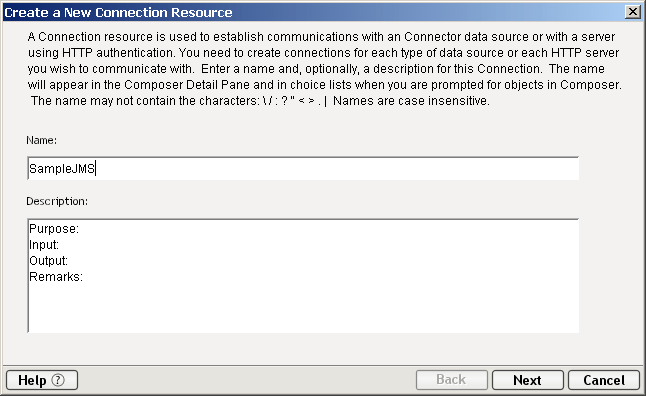
Select File>New>xObject, then open the Resource tab and select Connection. The "Create a New Connection Resource" Wizard appears.
Using the Connection Type pulldown menu, select JMS JNDI Queue Connection (for Point-to-Point messaging). The contents of the pane will update to reflect the setup information needed for the particular connection type you've chosen.
Enter the name of the queue you want to use in the first field (called Queue Name).
In the Connection Factory Name field, enter the QueueConnectionFactory if you are creating a queue connection, or TopicConnectionFactory if you are creating a topic connection.
Enter Connection User and Connection Password info, as applicable. (Optional)
Under Transaction Mode, enter False: None, True: Local or XA: Server if you intend to issue session-level Commit or Rollback commands in your JMS Component.
NOTE: Issuing JMS Commit or Rollback statements in a JMS Component's action model without the proper Transaction Mode selected will result in exceptions being thrown.
Check the Use Server Initial Context box if you would like your service, once deployed, to obtain a ConnectionFactory locally, on the server, at runtime. This means you do not have to carry out steps 15 to 19 below in order for the deployed service to obtain a queue or topic connection. However, if you intend to send and receive live messages over the connection at design time, you should also complete all applicable steps below, because Composer needs to be able to find the ConnectionFactory objects it needs on the remote host. The following settings are aimed at helping Composer establish connections remotely.
Using the vertical scrollbar to the right of the text fields, scroll down to expose the remaining fields in the dialog. See below.
In the Initial Context Factory field, enter the name of your system's JNDI context factory, such as com.sun.jndi.fscontext.RefFSContextFactory. (Contact your administrator to obtain this information.)
In the Provider URI field, enter the URI representing the location of the JMS provider's (or MOM vendor's) JNDI context resources. For example, this may look something like iiop://localhost:3506 or file:///D/MQSeries/java/fscontext.
(Optional) In the JNDI Authentication field, enter any required JNDI Authentication string (as provided by your administrator).
(Optional) In the Security Principal field, enter any required JNDI Security Principal's name (as provided by your administrator).
(Optional) In the Security Credentials field, enter any required JNDI Security Credential string (as provided by your administrator).
(Optional) In the Provider Parameters field, enter any provider-specific name/value pairs that are necessary for the MOM environment in which you are operating. Separate name/value pairs by a pipe character (|). For example, parameters for an LDAP provider could be:
java.naming.security.authentication = value | java.naming.security.credentials = value | java.naming.security.principal = value
NOTE: Spaces are shown here for clarity. Do not use spaces in your provider-param string.
Check the Default checkbox (which is normally unchecked) if you would like this Connection Resource to appear in setup dialogs by default when you create JMS Components.
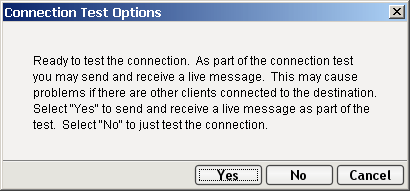
Click Test to see if your connection is successful. The Test Options dialog appears.
The Test Options dialog asks if you want to send a live message as part of the test of the connection's integrity. Clicking the Yes button causes Composer to send a live message (of type TextMessage, with a unique CorrelationID) to the queue or topic for which you're establishing a connection.
NOTE: Use care not to send this test message in a production environment (i.e., using a live queue, with potentially many listeners) unless you are reasonably certain that any existing applications in that environment won't be adversely affected.
Click No if you wish to create the necessary connection objects but not send any test message.
Click Finish. The newly-created connection resource xObject appears in Composer's Connection Resource detail pane.
To create an MQSeries
Queue Connection Resource
Select File>New>xObject, then open the Resource tab and select Connection. The "Create a New Connection Resource" Wizard appears.
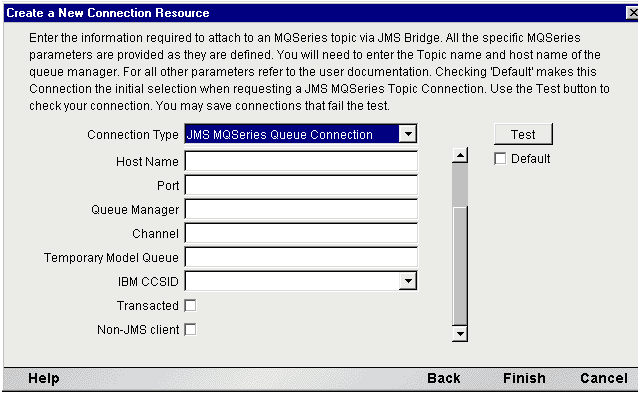
Using the Connection Type pulldown menu, choose JMS MQSeries Queue (for Point-to-Point messaging). The contents of the pane will update to reflect the setup information needed for the particular connection type you've chosen.
Enter the name of the queue you want to use in the first field (called Queue Name).
Optionally enter your password in the Connection Password field.
In the Host Name field, enter the name of your system's MQSeries Host Machine Name. (Contact your administrator, if need be, for this information.)
In the Port field, enter the MQSeries Host Machine Port Number. (Contact your administrator, if need be, for this information.)
In the Queue Manager field, enter the MQSeries Queue Manager name for this queue (as provided by your administrator).
In the Channel field, enter the MQSeries Host Machine Channel Name (as provided by your administrator).
If you want to specify a temporary model queue, do so in the Temporary Model Queue field.
Using the vertical scrollbar provided, scroll down to expose the remaining fields of the dialog. (In this case, two checkboxes are exposed.) See below.
Under Transaction Mode, enter False: None, True: Local or XA: Server if you intend to issue session-level Commit or Rollback commands in your JMS Component.
NOTE: Issuing JMS Commit or Rollback statements in a JMS Component's action model without the proper Transaction Mode selected will result in exceptions being thrown.
Check the Non-JMS Client checkbox if you wish the connection to be set up using MOM-native facilities. (In this case, this means that MQSeries objects will be obtained directly, using vendor-proprietary calls.)
Check the Default checkbox (which is normally unchecked) if you would like this Connection Resource to appear in setup dialogs by default when you create JMS Components.
Click Test to see if your connection is successful. The Test Options dialog appears.
The Test Options dialog asks if you want to send a live message as part of the test of the connection's integrity. Clicking the Yes button causes Composer to send a live message (of type TextMessage, with a unique CorrelationID) to the queue or topic for which you're establishing a connection.
NOTE: Use care not to send this test message in a production environment (i.e., using a live queue, with potentially many listeners) unless you are reasonably certain that any existing applications in that environment won't be adversely affected.
Click No if you wish to create the necessary connection objects but not send any test message.
Click Finish. The newly-created connection resource xObject appears in Composer's Connection Resource detail pane.
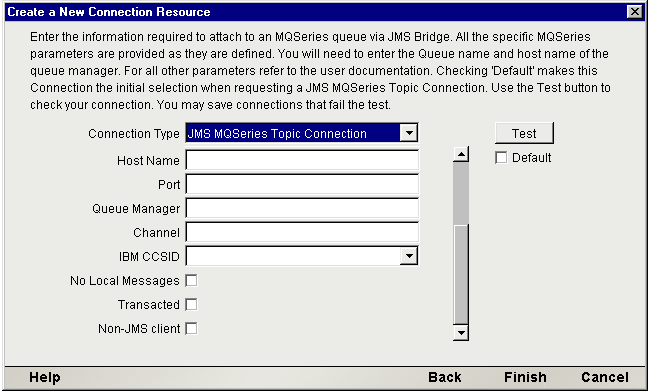
When a queue is used in a Publish/Subscribe context (see "What Is Publish/Subscribe Messaging?"), it is called a topic. The differences between queues and topics are primarily administrative rather than functional. Therefore, all of the comments regarding Queue Connections in the preceding section apply equally to Topic Connections as well, except for the fact that in a Publish/Subscribe context, browsing is not defined. If you need to use a Browse action, you must connect to a queue, not a topic.
To create a JNDI Topic Connection Resource
Select File>New>xObject, then open the Resource tab and select Connection. The "Create a New Connection Resource" Wizard appears.
Follow Steps 2, 3, and 4 for filling out the first panel in the wizard as described further above under "To create a JMS Queue Connection Resource Using JNDI" (page 26).
Click Finish on the first panel of the wizard. A new panel appears:
Using the Connection Type pulldown menu, select JMS JNDI Topic Connection (for Pub/Sub messaging). The contents of the pane will update to reflect the setup information needed for this connection type.
Enter the name of the Topic in the first field (called Topic Name).
In the Connection Factory Name field, enter the TopicConnectionFactory name.
Enter Connection User and Connection Password info, as applicable. (Optional)
Check the No Local Messages checkbox if you want to keep your component or service from receiving messages that it may be sending to a topic that it is listening on. (In other words, check this box if you want to keep a component from receiving its own messages.)
Scroll down to expose the rest of the panel's fields. See below.
Under Transaction Mode, enter False: None, True: Local or XA: Server if you intend to issue session-level Commit or Rollback commands in your JMS Component.
NOTE: Issuing JMS Commit or Rollback statements in a JMS Component's action model without the proper Transaction Mode selected will result in exceptions being thrown.
Check the Use Server Initial Context box if you would like your service, once deployed, to obtain a ConnectionFactory locally, on the server, at runtime. This means you do not have to carry out steps 15 to 19 below in order for the deployed service to obtain a queue or topic connection. However, if you intend to send and receive live messages over the connection at design time, you should complete all applicable steps below, because Composer needs to be able to find the ConnectionFactory objects it needs on the remote host. The following settings are aimed at helping Composer establish connections remotely.
In the Initial Context Factory field, enter the name of your system's JNDI context factory, such as com.sun.jndi.fscontext.RefFSContextFactory. (Contact your administrator to obtain this information.)
In the Provider URI field, enter the URI representing the location of the JMS provider's (or MOM vendor's) JNDI context resources. For example, this may look something like iiop://localhost:3506 or file:///D/MQSeries/java/fscontext.
(Optional) In the JNDI Authentication field, enter any required JNDI Authentication string (as provided by your administrator).
(Optional) In the Security Principal field, enter any required JNDI Security Principal's name (as provided by your administrator).
(Optional) In the Security Credentials field, enter any required JNDI Security Credential string (as provided by your administrator).
(Optional) In the Provider Parameters field, enter any provider-specific name/value pairs that are necessary for the MOM environment in which you are operating. Separate name/value pairs by a pipe character (|). For example, parameters for an LDAP provider could be:
java.naming.security.authentication = value | java.naming.security.credentials = value | java.naming.security.principal = value
NOTE: Spaces are shown here for clarity. Do not use spaces in your provider-param string.
Check the Default checkbox (which is normally unchecked) if you would like this Connection Resource to appear in setup dialogs by default when you create JMS Components.
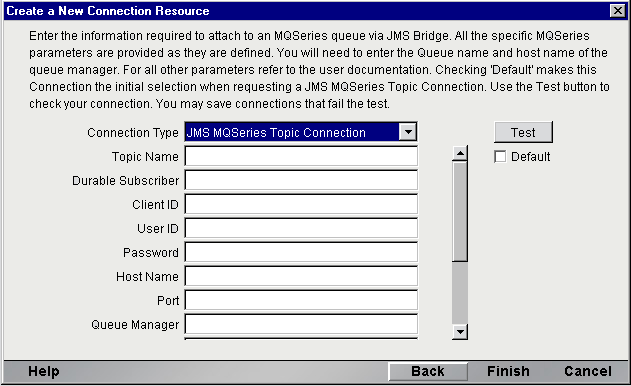
To create an MQSeries Topic Connection Resource
Select File>New>xObject then open the Resource tab and select Connection. The "Create a New Connection Resource" Wizard appears.
Follow Steps 2, 3, and 4 for filling out the first panel in the wizard as described further above under "To create a JMS Queue Connection Resource Using JNDI".
Click Finish on the first panel of the wizard. A new panel appears:
Enter the name of the Topic in the first field (called Topic Name).
Enter the MQSeries Queue Manager name, if you want to specify one. (See your MQSeries documentation for advice on when and when not to enforce queue-manager associations.)
Scroll down to expose the rest of the fields in this panel of the wizard. See below.
Check the No Local Messages checkbox if you want to keep your component or service from receiving messages that it may be sending to a topic that it is listening on. (In other words, check this box if you want to keep a component from receiving its own messages.)
Check the Transacted checkbox (which is unchecked by default) if you intend to issue session-level Commit or Rollback commands in your JMS Component.
NOTE: Issuing JMS Commit or Rollback statements in a JMS Component's action model without the Transacted checkbox being checked will result in exceptions being thrown.
Check the Non-JMS Client checkbox if you will be using provider-native message delivery on this topic (ignoring JMS header information). This option would be of interest if your component were sending messages intended for a receiver that was using only MQSeries-native (non-JMS-aware) messaging features.
Check the Default checkbox (which is normally unchecked) if you would like this Connection Resource to appear in setup dialogs by default when you create JMS Components.
In addition to a connection resource, a JMS Component may also use XML stub documents, associated DTDs, and/or XSL stylesheets to aid in the mapping of message information. If you intend to use such documents, you should add them to an XML Template resource at this time so that you have sample documents for designing your component. (See Chapter 5, Creating XML Templates, in the exteNd Composer User's Guide for more information. )
Also, if your component design calls for any other xObject resources such as custom scripts or code table maps, it is best to create these before creating the JMS Component. For more information, see Creating Custom Scripts in the Composer User's Guide.
Copyright © 2003 Novell, Inc. All rights reserved. Copyright © 1997, 1998, 1999, 2000, 2001, 2002, 2003 SilverStream Software, LLC. All rights reserved. more ...