Content Management Guide
CHAPTER 17
This chapter describes how to check documents in and out and administer version control. It has these sections:
In organizations responsible for developing and maintaining exteNd Director applications, CM is a dynamic process that often involves multiple users interacting concurrently with a shared set of files within a common infrastructure.
To preserve the integrity of data in this type of environment, the CMS Administration Console provides a number of safeguards for effectively administering content:
Here is a workflow that illustrates the recommended order of operations for administering content in the CMS Administration Console:

To prevent concurrent access to documents in a multiuser environment, the CMS Administration Console provides checkin and checkout capability to users with READ, WRITE, and LIST permissions—typically the users who are content developers and administrators.
Authorized users must check out documents before they can make any changes to the content, including:
These rules also apply to XSL style sheets, which when uploaded to the CMS Administration Console are managed in the same way as documents that are created in the CMS Administration Console.
This section describes what happens during checkin and checkout and explains how to perform the following tasks:

Checking out a document locks it, preventing other users from modifying the content. Users with READ permission can view the currently published content of checked-out documents.
The CMS Administration Console marks checked-out documents for easy identification with a checkmark icon and displays the name of the user who has locked the content. In the following example, the document PSAT3 has been checked out by user administrator:
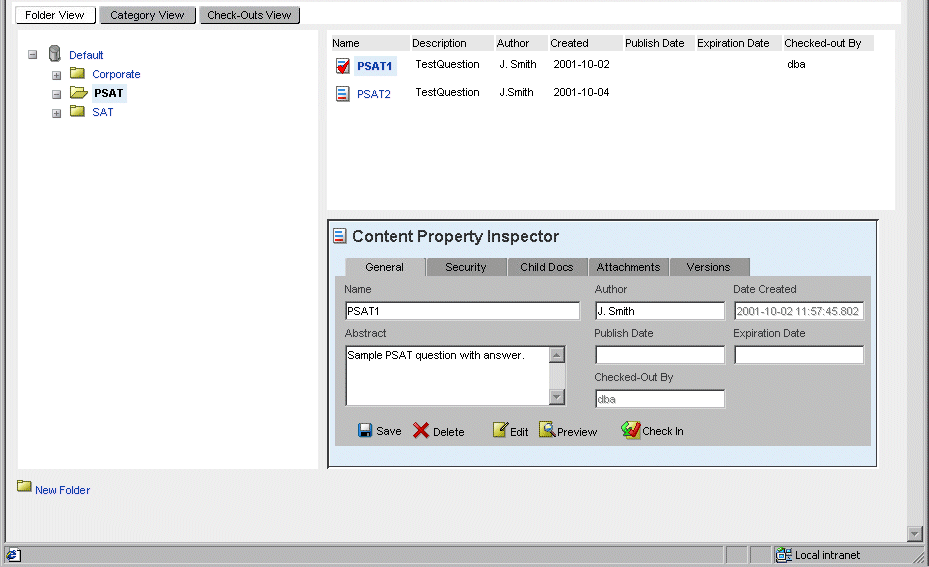
In this example, the user dba now becomes the owner of the document and the only user with authorization to save, delete, edit, and check in the document. If other users try to access PSAT3, they will not see the Save, Delete, Edit, or Check In buttons on the Property Inspector—even if they have WRITE permission for PSAT3—and they will see only the Preview button if they have READ permission for PSAT3.
When a document is checked out, the latest version is locked for editing by the owner. The only way to modify an earlier version of a document is to roll back to that version, as described in Administering version control.
Using the check-outs view The Content tab contains a check-outs view that displays checkouts for either the current user or other users. Here is a sample check-outs view display, with a single file checked out to the current user:
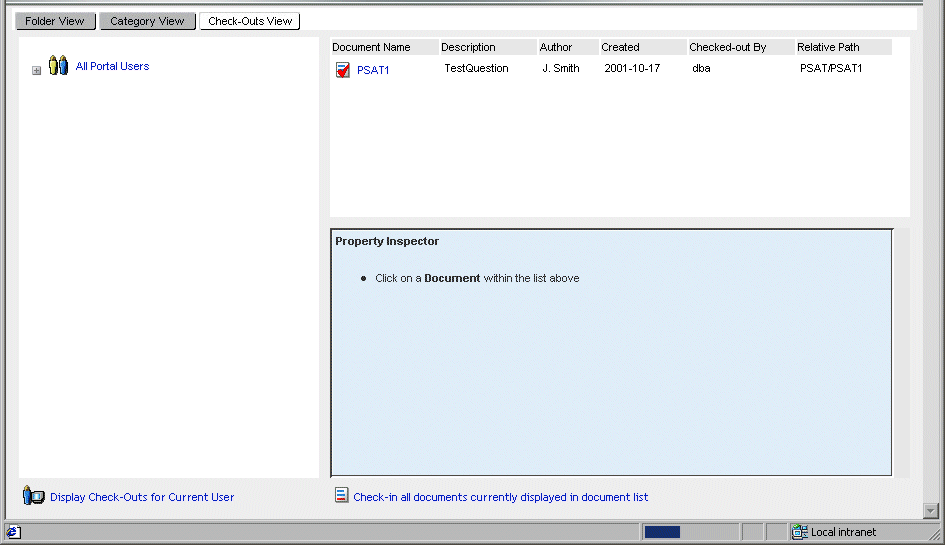
Using the check-outs view, you can:
View checkouts for the current user or for other exteNd Director users
View the Property Inspector for the checked-out document by selecting it in the list
When a document is checked in by its owner, any content modifications are saved as a new version, accessible from the Versions tab in the document's property sheet. Other authorized users are then free to check out the document for editing and will get the most up-to-date version of the content.
Content administrators can implement an automatic checkin feature when they create document types. When this feature is enabled, the CMS Administration Console automatically checks in any document of the specified type after it is edited.
Enter content mode by clicking the Content button in the toolbar.
Your folders appear in the content tree view. You may need to expand some of these containers to see the complete view.
Navigate to the document of interest and select it to open its Property Inspector.
In the Property Inspector, select the General tab and click Check-Out.
The CMS Administration Console checks out the latest version of the document, indicating who has locked the content and changing the document icon to the checked-out icon:
Enter content mode by clicking the Content button in the toolbar.
Your folders appear in the content tree view. You may need to expand some of these containers to see the complete view.
Navigate to the checked-out document of interest and select it to open its Property Inspector.
In the Property Inspector, select the General tab and click Check-In.
The CMS Administration Console checks in the document, making the most current version of the content available for other users to edit.
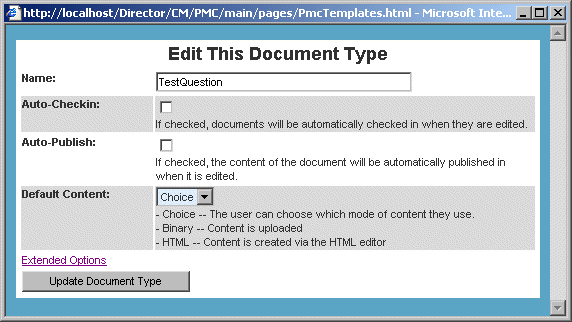
 To enable automatic checkin for an existing document type:
This option is available only to administrators.
NOTE: You can also set this parameter when you create a new document type, as described in Creating document types.
Enter templates mode by clicking the Templates button in the toolbar.
A panel appears listing all document types that have been defined.
Select the document type for which you want to set automatic check-in, then click Edit.
Check the Auto-Checkin check box and click Update Document Type.
When you edit a document of this type, the CMS Administration Console automatically checks in your modifications.
The CMS Administration Console provides version control to systematically maintain a history of changes to documents and ensure that the correct content is published.
Administrator tasks The version control system allows administrators with PUBLISH permissions to perform the following tasks:
What version you see By default, you receive the latest version of content when you check out and edit a document in the CMS Administration Console. If you want to revert to and modify earlier content, you can roll back to a previous version. Rolling back deletes all later versions of content and sets the target version as the most current.
You must check out a document before you can publish, unpublish, or roll back versions of that document. If you have not checked the document out, you can only preview versions of the content.
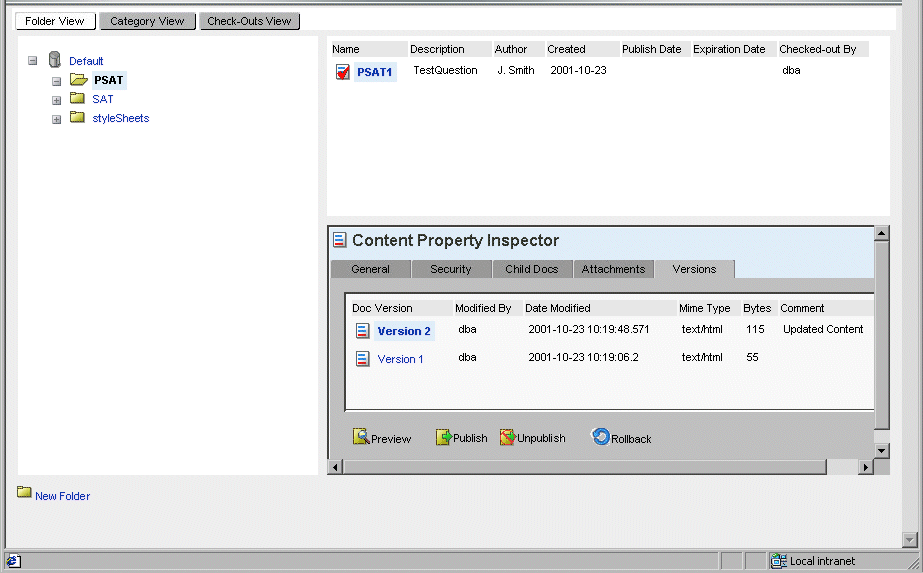
Any user who opens a document will see a Versions tab in the document's Property Inspector. Here is an example of what the Versions panel looks like:
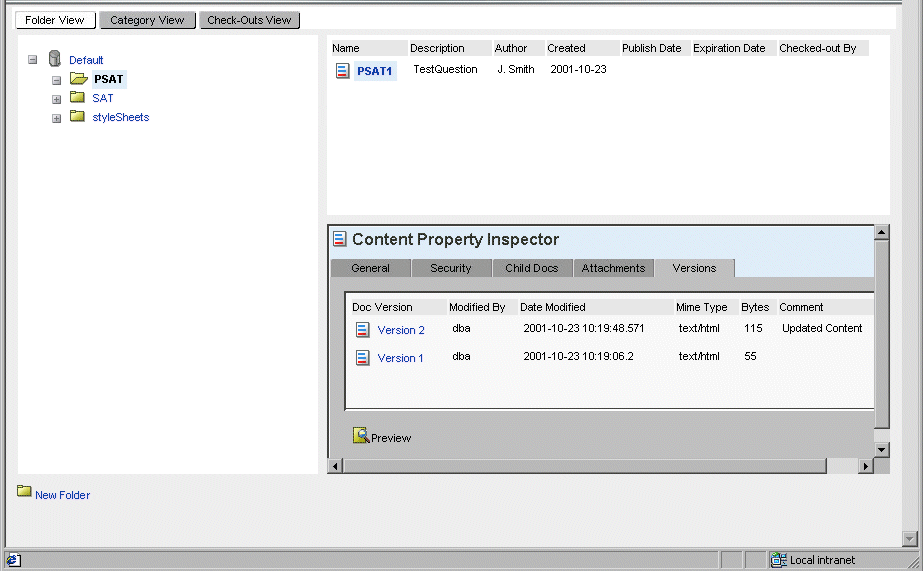
In this example, any user who selects the document PSAT1 can preview its two versions.
Publish features Users with PUBLISH permission can check out PSAT1 and gain the ability to publish, unpublish, and roll back versions, as shown in the refreshed Property Inspector:
Content administrators can also implement an automatic publish feature when they create document types. When this feature is enabled, the CMS Administration Console automatically publishes the content of any document of the specified type if that content is changed.
What's in this section This section explains how to perform the following version control tasks:
You can publish any version, even if it is not the latest. The CMS Administration Console allows only one version of a document to be published at any given time.
Enter content mode by clicking the Content button in the toolbar.
Your folders appear in the content tree view. You may need to expand some of these containers to see the complete view.
Navigate to the document of interest and select it to open its Property Inspector.
In the Property Inspector, select the General tab and click Check-Out.
The CMS Administration Console checks out the latest version of the document.
Select the Versions tab, then select the document version you want to publish.
The CMS Administration Console publishes the version you selected, marking it with the published-version icon:
Return to the General tab and click Check-In.
The published version cannot be edited, even when the document is checked out.
Enter content mode by clicking the Content button in the toolbar.
Your folders appear in the content tree view. You may need to expand some of these containers to see the complete view.
Navigate to the document of interest and select it to open its Property Inspector.
In the Property Inspector, select the General tab and click Check-Out.
The CMS Administration Console checks out the latest version of the document.
Select the Versions tab, then select the published version you want to unpublish.
The CMS Administration Console unpublishes the version you selected, marking it with the default document icon:
To roll back to a previous version:
Enter content mode by clicking the Content button in the toolbar.
Your folders appear in the content tree view. You may need to expand some of these containers to see the complete view.
Navigate to the document of interest and select it to open its Property Inspector.
In the Property Inspector, select the General tab and click Check-Out.
The CMS Administration Console checks out the latest version of the document.
Select the Versions tab, select the version you want to roll back to, then click Rollback.
When a confirmation window opens, click OK.
The CMS Administration Console deletes all versions created after the selected version—even if one of these later versions was already published. The selected version becomes the latest version.
Only users with administrative permissions can implement this feature. Enabling automatic publish produces the following effects:
Whenever you edit the dynamic content of a document, the CMS Administration Console automatically publishes a new version of the document.
If you edit only the metadata and field portions of a document, the CMS Administration Console automatically updates and publishes the latest version of the document.
Enter templates mode by clicking the Templates button in the toolbar.
A panel appears listing the document types that have been defined.
Select the document type for which you want to set automatic checkin, and click Edit.
Check the Auto-Publish check box and click Update Document Type.
When you edit and save a document of this type, the CMS Administration Console automatically publishes your modifications as a new version of the content. This latest version becomes the published version, regardless of whether an earlier version was already published or no earlier versions were published.
NOTE: You can also enable automatic publish when you create a new document type, as described in Creating document types.
The CMS Administration Console does not automatically set publish dates, although content administrators with WRITE permission can set publish dates manually anytime to mark documents for publication. After that, developers can write scheduled business objects that publish documents based on these dates.
Enter Content mode by clicking the Content button in the toolbar.
Your existing folders appear in the content tree view. You may need to expand some of these containers to see the complete view.
Navigate to the document of interest and select it to open its Property Inspector.
In the Property Inspector, select the General tab and click Check-Out.
The CMS Administration Console checks out the latest version of the document.
In the Publish Date field, enter a publish date of the form:
YYYY-MM-DD HH:MM:SS
Copyright © 2003 Novell, Inc. All rights reserved. Copyright © 1997, 1998, 1999, 2000, 2001, 2002, 2003 SilverStream Software, LLC. All rights reserved. more ...