Utility Tools
CHAPTER 3
The Novell exteNd Director development environment provides two sets of editors, one set based on open-source NetBeans editors and the other set native to the development environment:
This chapter describes the basic functionality of these editors:
Specialized features Other chapters in this guide cover the specialized features of the following editors:
This section describes features common to all of the editors:

All of the editors provide these text-editing features:
|
To perform this function |
Use this menu item |
|---|---|
|
Cut, copy, and paste |
Under Edit: |
|
Undo and redo |
Under Edit: |
|
Select all text |
Under Edit: |
|
Toggle the display of line numbers |
Under View: |
|
Find and replace |
Under Edit: NOTE: You can also search several files at once. See Searching across multiple files. NOTE: The native editors provide support for regular expression search. See Regular expressions for text searches. |
|
Move cursor to a line |
Under Edit: |
Much of the editor display and behavior can be configured in the Editing tab of the Preferences dialog, which you can access using Tools>Preferences. This tab contains settings such as font size displayed in the editors, spaces per tab character, whether to show line numbers, and so on.
 For details, see Editing preferences.
You can define abbreviations that can be expanded to one or more lines of text. For example, you can specify that a word can expand to a predefined language construct. The abbreviation main might be defined to expand to this code in a Java file:
  public static void main(String args[])
  {

  }
The abbreviations defined in the exteNd Director development environment appear on the Editing tab of the Preferences dialog (Tools>Preferences). From this dialog you can define new abbreviations and change or delete existing abbreviations. For details, see Abbreviation preferences.
Once you have defined an abbreviation, you can replace its name with the associated expanded text by pressing Ctrl+U (or by right-clicking and selecting Text Tools>Complete Abbreviation).
You can easily change the case of text.
|
To perform this function |
Do this |
|---|---|
|
Change case of word containing insertion point |
Right-click and select: |
You can manipulate spaces, tabs, and indentation in text.
You can search across multiple files at once. You can search through:
 To search across multiple files:
Select Tools>Find in Files or press Ctrl+Shift+F.
The multiple-search Find dialog displays.
NOTE: You can also access the multiple-search feature from the standard Find dialog in the native editors by clicking the Find in Files button.
|
Field |
Description |
|---|---|
|
Search for |
The text to search for. You can select previously searched text. |
|
Search in |
The set of files you want to search through. |
|
Direction |
Whether to search forward or backward. |
|
Match case |
Whether the found text must match the case of the search text. |
|
Match whole word |
Whether the found text must be complete words. |
|
Regular expression |
Regular expression to search for. For details, see Regular expressions for text searches below. |
exteNd Director searches through the specified files. All lines of text containing matching text are listed in the Find tab of the Output Pane.
To display the found text, double-click the line of text in the Output Pane. You can view each instance of found text in its corresponding source file:
Sometimes searching for a literal string is too limiting. For example, you may want to search for a word starting at the beginning of a line or two words separated by any number of spaces. The text-based editors in the exteNd Director development environment support the use of regular expressions—patterns for describing string matching—to augment the usual search capabilities. Regular-expression search is available in the Tools>Find in Files dialog and in the Find dialog invoked from a native editor.
This section provides the following information:
In addition to allowing you to type regular-expression syntax directly into the Search for text box, the Find dialog has a regular expression helper menu you can use in constructing regular-expression searches.
Selecting a helper menu item appends to the expression one or more characters that make up a syntactical building block. For most regular-expression searches, you will need to use several of these syntactical building blocks in combination with text you type directly into the Search for text box.
For more information on the regular expression helper menu items, see the Regular-expression reference.
NOTE: When doing regular-expression searches, you will not be able to use all the Find dialog search options. For example, the Match whole word option becomes meaningless, since this choice is made within the regular expression itself.
To use regular expressions in a search operation:
Select Tools>Find in Files or select Edit>Find in a native editor.
Select the Regular Expression check box.
Click the right arrow to the right of the Search for text box and make a selection from the regular expression helper menu.
Type a regular expression in the Search for text box, or use a combination of literal text and selections from the regular expression helper menu to construct your regular expression.
|
To match |
Enter |
|---|---|
|
getText or setText |
[gs]etText |
|
void followed by main, with any amount of white space between the two words |
void\s+main |
Text matching the search criteria appears highlighted in the editor.
The tables in this section explain the syntactical building blocks of regular expressions supported in the exteNd Director development environment. Many of these building blocks are available on the regular expression helper menu.
There are several categories of building blocks for regular expressions:
|
Syntax |
Description |
|---|---|
|
[abc] |
Simple character class |
|
[a-zA-Z] |
Character class with ranges |
|
[^abc] |
Negated character class |
|
Syntax |
Description |
|---|---|
|
[:javastart:] |
Start of a Java identifier |
|
[:javapart:] |
Part of a Java identifier |
|
Syntax |
Description |
|---|---|
|
^ |
Matches only at the beginning of a line |
|
$ |
Matches only at the end of a line |
|
\b |
Matches only at a word boundary |
|
\B |
Matches only at a nonword boundary |
All closure operators (+, *, ?, {m,n}) are by default greedy, meaning that they match as many elements of the string as possible without causing the overall match to fail.
You can refer to the contents of a parenthesized expression within a regular expression itself using a backreference. The first backreference in a regular expression is denoted by \1, the second by \2, and so on. For example, the expression:
([0-9]+)=\1
will match any string of the form n=n (like 0=0 or 2=2).
The core editors in the exteNd Director development environment are based on NetBeans, an open-source Java-based framework and set of editors. These editors are:
XML-related editors and CSS Editor (these editors have some different features than the other NetBeans-based editors; see XML Editors, XSL Editor, CSS Editor, and WSDL Editor)
NOTE: Previous releases of the exteNd Director development environment used native versions of the Java, JSP, and HTML editors. The native versions are still provided and you can configure the development environment to use them instead of the NetBeans versions. See Using the native Java, JSP, or HTML editor.
The following sections describe the NetBeans-based editors:
The NetBeans-based Java, JSP, and HTML editors color-code syntactic elements to make it easy for you to read your code.
The Java Editor uses special colors for these elements:
|
Syntactic element |
Color |
|---|---|
|
Java keyword |
Blue |
|
Method call |
Bold black |
|
String literal |
Red |
|
Numeric literal |
Gray |
|
Matching brace |
Magenta |
|
Comment |
Green italics |
The HTML Editor uses colors for these elements:
|
Syntactic element |
Color |
|---|---|
|
Tag |
Blue |
|
Tag attribute |
Green |
|
Attribute value |
Red |
|
Character reference |
Red |
|
SGML declaration |
Orange |
|
Matching brace |
Magenta |
|
Comment |
Gray italics |
The JSP Editor uses the same colors for Java components as the Java Editor and the same colors for HTML components as the HTML Editor, plus:
|
Syntactic element |
Color |
|---|---|
|
Block of Java |
Orange background |
|
JSP tag/directive |
Bold blue with gray background |
|
JSP tag attribute |
Green |
|
JSP tag attribute value |
Magenta |
|
JSP comment |
Bold gray |
As you code Java in the Java Editor (or on a JSP page in the JSP Editor), you can use the code completion feature. As you type, you can display a list of possible classes, methods, variables, and so on that can be used to complete the Java expression.
The elements displayed in the Java code completion box are defined by parser database files. The exteNd Director development environment ships with predefined parser files that include the following classes:
You can create your own parser database files to make your own classes available for code completion. For details, see Creating parser database files.
To complete a Java expression:
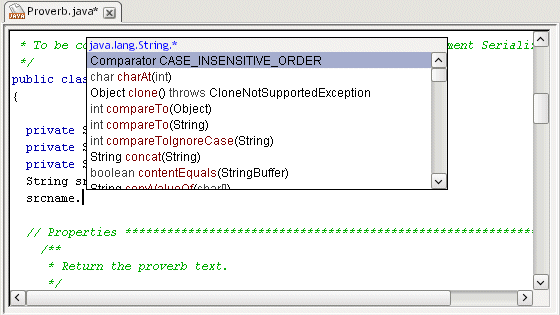
In the Java Editor or in a block of Java code in the JSP Editor, type the first few characters of the expression, such as:
  String srcname;
  srcname.
Press Ctrl+Space or Ctrl+\, or pause after typing a period, a comma, or the keyword new or import (followed by a space).
The code completion box is displayed, providing a scrolling list of possible classes, methods, variables, and so on that can complete your expression.
In the preceding screen, the box lists methods and fields available for strings.
For methods and fields, the code completion box displays only static or only nonstatic options, depending on the context of your code. The options are color-coded:
While the code completion box is displayed, you can do the following:
Inserting methods If you select a method with arguments, the method is inserted up to the point of the first argument. If you specify that argument and type a comma, the completion box opens again so you can insert in the next argument, and so on.
The code completion box displays the data type of the entered arguments in its title; it displays a question mark if it can't recognize the type. If you enter an argument that does not match any of the recognized argument lists for the method name, all the recognized methods are displayed (along with their argument list), and an asterisk (*) appears for the unrecognized argument(s) in the title of the code completion box.
The items displayed in the code completion box are defined by parser database files. You can have the exteNd Director development environment create database files of your own classes so that they are listed in the code completion box when appropriate.
To create the parser database files:
Select the Editing tab and expand the Code Completion section.
To add your parser files to the same database (directory) as the predefined files, select the directory in the Java Completion Directories box. To put the files in a different database (directory), click Add, specify the directory, and select it.
Specify the following information:
If you later make changes to your project and want the changes to be reflected in the code completion lists, you must recreate the parser database files.
By default, the exteNd Director development environment is configured to edit .java, .jsp, and .html files with the NetBeans-based editors. You can specify additional file types to edit with these editors. For example, you might have .htm files that you want to edit with the NetBeans-based HTML Editor. You would add .htm as a file type for the HTML Editor.
To edit additional file types with NetBeans-based editors:
Select the Editing tab and expand the Editor Associations section.
This lists the NetBeans kits that are installed and allows you to specify which you want to use.
The list at the bottom maps file extensions to a NetBeans kit.
Specify the file extension (wild cards are not supported) and the appropriate NetBeans editor kit.
The additional file type is listed in the Extension mappings table. When you open a file with the specified extension, it will open in the associated NetBeans-based editor.
NOTE: You can also specify that you do not want to use a NetBeans-based editor to edit .java, .jsp, or .html files (in which case you get the corresponding native editor). For details, see Using the native Java, JSP, or HTML editor.
The NetBeans-based editors also provide the following special editing features.
|
Keys |
Description |
|---|---|
|
Ctrl+E |
Deletes the current line |
|
Ctrl+H |
Deletes the character preceding the insertion point |
|
Ctrl+W |
Deletes the current word or the word preceding the insertion point |
|
Keys |
Description |
|---|---|
|
Ctrl+T |
Shifts text in line containing the insertion point to the right |
|
Ctrl+D |
Shifts text in line containing the insertion point to the left |
|
Keys |
Description |
|---|---|
|
Ctrl+F2 |
Sets or unsets a bookmark at current line |
|
F2 |
Goes to next bookmark |
The core editors in the exteNd Director development environment are based on NetBeans and have the features described above. The following editors are native to the development environment and have a different feature set:
The following sections describe the native editors.
You can right-click in the editor and select:
Text Tools>Convert to UNIX Line Endings to convert all DOS-style line ending characters to UNIX-style line ending characters
Text Tools>Convert to DOS Line Endings to convert all UNIX-style line ending characters to DOS-style line ending characters
NOTE: Changing line endings causes no visual change in the editor.
You can copy or move multiple instances of text. The editor keeps track of your most recently used clipboards. Copying and cutting multiple times creates a clipboard with multiple listings. When you press Control+Shift+V, the editor lets you select which text to paste.
When you open a file in a native editor, the bottom-right corner of the exteNd Director development environment displays whether the file has read-only (RO) or read-write (RW) permission. If a file is in RO mode, you cannot make changes to it in the editor. You can switch between RO and RW mode by clicking on this indicator.
Switching from RO to RW mode enables you to make changes in the editor. However, the ability to write to the file (for example, using File>Save) is still controlled by the file system permissions for that file. You cannot save changes to a file unless the file is marked writable by the file system.
By default, the exteNd Director development environment uses NetBeans-based Java, JSP, and HTML editors (see The NetBeans-based editors). If you want, you can use the native versions of these editors in order to get the functionality described above for the native editors (plus, with the native JSP Editor, you can use the Custom Tag Wizard; see Inserting custom tags in a JSP page).
To use the native Java, JSP, or HTML editors:
Select the Editing tab and expand the Editor Associations section.
This lists the NetBeans kits that are installed and allows you to specify which you want to use.
The list at the bottom maps file extensions to a NetBeans kit.
If you do not want to use the NetBeans-based editor for a file type (and instead want to use the native editor), select the file type in the Extension mapping table and click Remove.
File types no longer in the list will use the corresponding native editor, providing the features described for the native editors.
In JSP pages, custom tags enable you to extend the functionality provided by standard JSP tags, either by writing your own tag library or by using a tag library provided by a third party, such as the Jakarta project. Tag libraries consist of the Java classes that provide functionality for the tags and a tag library descriptor file, an XML document that describes the tag library.
You import a tag library into a JSP page using a taglib directive that specifies the location of the tag library descriptor file and declares an identifier that you can use as a prefix to reference the various tags in that library. For example:
<%@ taglib uri="/WEB-INF/tlds/app.tld" prefix="apptags" %>
references a tag library called app.tld, located in the /WEB-INF/tlds directory in the archive. You can refer to tags in the library using the apptags prefix. For example, if the tag library contains a tag called AskUserName, you could create an instance of that tag in the JSP page using this line:
<apptags:AskUserName></apptags:AskUserName>
The native JSP Editor provides a Custom Tag Wizard that enables you to easily insert custom tags into a JSP page.
To insert JSP custom tags using the Custom Tag Wizard:
Create the classes and descriptor files for your tag library.
Add the classes and descriptor files to your project. A typical location for class files is a WEB-INF/classes directory; for descriptor files, it is typically WEB-INF/tlds.
Edit the JSP file in which you want to use the custom tags, adding a taglib directive to import the tag library.
Position the cursor at the point in the JSP file where you want to insert a custom tag.
Select Edit>Insert Custom Tag>Custom Tag Wizard.
NOTE: You must be using the native JSP Editor to access this wizard. See Using the native Java, JSP, or HTML editor.
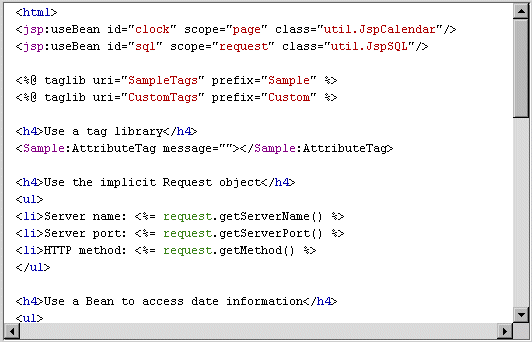
If the page has more than one taglib directive, a list of all tag libraries specified on the page displays. For example:
If the wizard cannot find the tag library specified, it prompts you to locate that tag library on your file system.
Once you have specified the tag library, a list of all tags contained in that library displays. For example:
Select the tag you want to insert and click Finish. The custom tag code appears in the JSP file. For example:
In this example, the following lines were added manually in Step 3:
  <%@ taglib uri="SampleTags" prefix="Sample" %>
  <%@ taglib uri="CustomTags" prefix="Custom" %>
The wizard added this line to instantiate the custom tag:
<Sample:AttributeTag message=""></Sample:AttributeTag>
If necessary, modify the code inserted by the wizard to complete the tag specification. For example, in the tag in the preceding example you would specify a value for the message attribute.
Copyright © 2003 Novell, Inc. All rights reserved. Copyright © 1997, 1998, 1999, 2000, 2001, 2002, 2003 SilverStream Software, LLC. All rights reserved. more ...