
Workflow Guide
CHAPTER 8
This chapter describes how to run the installed Content Life Cycle workflow application and how to access the application sources. It has these sections:
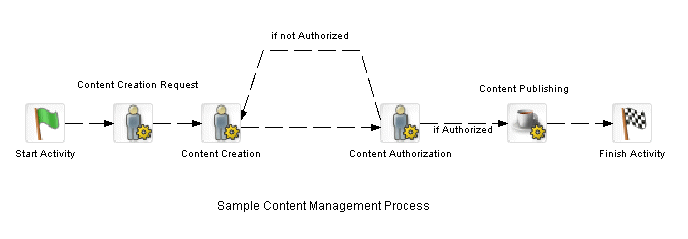
Content Life Cycle is a workflow portlet application that allows different users to complete activities representing the life cycle of a document. Here is what the process looks like in the Workflow Modeler:
Each of the User activities is associated with a different user. Let's assume the following users:
Here's how the application works:
The user sample creates a new process and completes a form that requests the creation of a document. Sample then forwards the workitem.
Sample2 creates a document and adds it to the Content Management subsystem. Sample2 then forwards the workitem.
Sample3 reviews the document and indicates whether the document is authorized for publication, and forwards the workitem to the next activity:
The two links from the Content Authorization activity use the Flow scoped path to test the value of a workitem document property called authorized. If the value is true the link to the Content Publishing Java activity is followed. If it is false the link back to the Content Creation activity is followed.
When the content is authorized, the Content Publishing activity (a Java activity) publishes the document using the CM subsystem APIs.
The Java activity uses a scoped path to point to the executable Java class in the project resource set.
Before running the Content Life Cycle application, you need add some sample users to your server directory realm.
Use your application server tools or the Director Administration Console (DAC) to add the following sample users:
This is the user specified in the workflow process descriptor. The other two can have any name you want, for example:
 To run the Content Life Cycle application:
In three separate browsers log in to exteNd Director MyPortal using each sample user.
For the sample user create a personal page called workflow and add these installed portlets to the content:
Repeat steps 1 and 2 for the other two users, but just add the WorkflowQueue portlet to the personal pages.
Run the portal personal page in each browser. In the sample user browser go to the Workflow Start Process, select the process from the dropdown list, and click Start.
This creates a workitem in the WorkflowQueue portlet.
NOTE: You can create as many instances as you want.
Select the workitem and click View Item. This displays a workitem form for assigning a document.
Complete the form, specify one of your workflow users as an addressee, and choose Forward.
Follow the process through content creation, approval, and publish:

The Content Life Cycle application allows users to specify the addressee for the next activity at runtime. In the process definition, the addressee field for the User activity uses the Flow scoped path to scope to a workflow property called target_addressee.
The value of this property is set by the portlet source for the User activity. Whatever the value is at the time the activity gets forwarded determines the addressee. When the portlet sets a new addressee, it sets a workitem property on the EbiWorkitemDelegate:
  EbiProperty addrProp = new EboProperty( WORKITEM_ADDRESSEE,
    m_addressee, EboConstants.ATT_STRING, false );
  delegate.setProperty( addrProp, WFcontext );
TIP: You can also use the Set Workitem Value action in the Rules subsystem to dynamically set workitem properties. For more information, see the chapter on installed actions in the Rules Guide.
The application source files and artifacts are contained in JAR files at:
install_dir/Director/templates/Director/TemplateResources/
Here is a summary:
Copyright © 2003 Novell, Inc. All rights reserved. Copyright © 1997, 1998, 1999, 2000, 2001, 2002, 2003 SilverStream Software, LLC. All rights reserved. more ...