Administrator's Guide
CHAPTER 12
This chapter describes how the Novell exteNd Application Server uses server clustering to implement load balancing and failover. It explains how to set up and maintain a clustered environment. The chapter contains the following sections:
In order to accommodate high processing loads, the application server implements load balancing using server clustering.
A server cluster is a set of servers running on different hosts that share the processing load. In the application server environment, a cluster is a group of independent systems working together as a single system connected to the same SilverMaster database. In this configuration, clients interact with a cluster as though that cluster were a single high-performance, highly reliable application server.
NOTE: A cluster of servers can handle demand over time more efficiently than one large machine can, because the sum of the bandwidth and resources of multiple machines is greater (and less expensive) than that of a single large machine.
Server clustering provides the following benefits:
|
Benefit |
Description |
|---|---|
|
Scalability and better performance |
You can increase the number of requests that get processed over a period of time. When the overall load exceeds the capabilities of the systems in the cluster, additional systems can easily be added to the cluster. |
|
Cache management |
If a change is made to an application, cache management ensures that the change is propagated to each server in the cluster. |
|
Load management |
Client requests are distributed to servers in order to optimize overall performance. You can also use a third-party load manager. |
|
Failover |
Failover capability is provided for each component of the server cluster. Specific system failover capabilities are described in Managing component failover. |
An application server cluster includes these components.
The cluster components are configured as follows:

Cluster requirements A cluster configuration must meet these general requirements:
Each server in the cluster must communicate with the same SilverMaster catalog.
Each component in the cluster must be able to communicate over TCP/IP.
A client machine capable of running the SMC must be available to create and configure the cluster.
Cluster options You have the following options within the cluster configuration:

Each application server has an intelligent caching mechanism for storing commonly accessed data in memory (such as security information). Reading this information from the database for each request would be very inefficient, so the application server maintains this information in cache memory. Whenever the information is updated on the server (for example, a new security permission is applied or a J2EE archive is deployed), the application server's cache is updated as well.
Maintaining this cache across multiple servers in a cluster is important for application and data consistency. In a clustered environment, multiple servers can simultaneously change the same data in the application server's system tables, and this situation might leave data cached in memory in a corrupted or inconsistent state. The Cache Manager is responsible for preventing such conflicts by ensuring that other servers in the cluster are notified when any server invalidates cache objects. All servers then discard their invalid cache entries and get an updated version of the resource the next time the object is needed.
The Cache Manager can run on a separate machine or on any machine in the server cluster. The Cache Manager must be up and running before any servers in a cluster start. At startup, the application server reads the clustering information about the setup from the SilverMaster catalog and initiates contact with the Cache Manager. The Cache Manager registers the server's existence and identifies it as a member of the cluster:
If a server modifies an existing object, it notifies the Cache Manager that the specific object must be invalidated on other servers. Since all objects in the application server environment can be denoted by an URL, the server calls the Cache Manager to invalidate the specified URL for all servers. The Cache Manager calls each registered server (except the one that initiated the invalidation) and tells it to invalidate the object identified by the URL.
The Load Manager is a program that can run as a service or regular process on any machine in the same network as the cluster. The Load Manager's role is to keep track of each active server and its relative processing load (or weight, as explained in Distribution mapping below) in the cluster. Based on this information, the Load Manager generates a distribution map, which it transmits to the Dispatcher in the configuration.
The Load Manager must be up and running before any servers in a cluster start. At startup, the server reads the clustering information about the setup from SilverMaster and initiates contact with the Load Manager to register the server's existence. The Load Manager first registers that the server is up, then determines how to contact the server and factors the server into the distribution map. At Load Manager startup, the Load Manager reads the Dispatcher information about the setup from its property file and initiates contact with the Dispatcher so that it can transmit the distribution map in the future.
The figure below shows the Load Manager:
The distribution map, which is dynamically generated by the Load Manager, determines the processing load for each server in the cluster. The distribution weight for each server is represented by an integer between 1 and 10.
By default, a round-robin system is used to distribute the load, which means that all servers in the cluster get an equal number of hits over time and have the same weight.
You can modify this distribution. For example, if you set server 1 at 8, server 2 at 4, and server 3 at 2, over a period of time server 1 would get twice as many hits as server 2, and server 2 would get twice as many hits as server 3. The table that follows shows other examples of weight settings:
 For information on modifying the distribution, see Specifying a server's relative load weight.
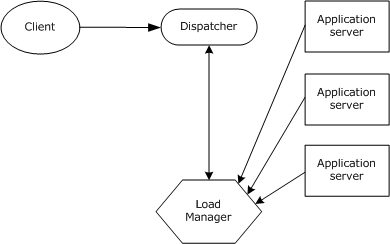
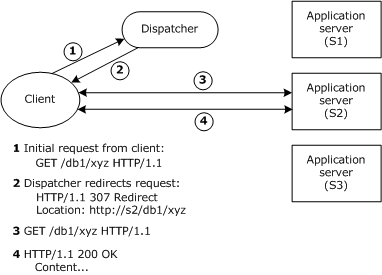
The Dispatcher serves as the entry point for Web clients into a server cluster: clients initially access the cluster through the Dispatcher's URL.
The Dispatcher is a lightweight HTTP/HTTPS-supported program that communicates with other cluster components to dispatch client requests to servers according to the distribution map the Load Manager provides. The Dispatcher can be run as a service or as a regular process on any machine in the same network as the cluster servers. The Dispatcher and Load Manager can run on separate machines and on separate platforms, and do not need access to the SilverMaster database.
The first time the Dispatcher is called from the client, it finds the best server for the request, based on the distribution map it receives from the Load Manager. Then, using a standard process called HTTP redirect, it redirects the request back to the client. The client then sends the request directly to the designated server.
Once a session has gone through a Dispatcher to a particular server, all client communication is sent directly to the server, not through the Dispatcher; and the redirection is not masked (meaning that in the browser the user sees the URL for the server, not the URL for the Dispatcher).
The following figure shows the sequence in the HTTP redirect process:
The Dispatcher supports HTTPS (as well as both HTTP 1.0 and HTTP 1.1). This means you can install server certificates after you set up a cluster. See Administering a server cluster.
While the application server's software Dispatcher is an excellent solution for many load-balancing and failover needs, you may require functionality that it does not provide.
You may want to use a third-party dispatching solution for the following reasons:
In situations like these, you may want to substitute a third-party dispatching solution for the Load Manager and Dispatcher. You would still use the application server's Cache Manager to maintain a consistent cache and would still use the SMC to manage the server.
Any standard HTTP server load-balancing solution should work with the application server.
The application server provides system failover and recovery in the event of transient failure and persistent failure. If any component in a cluster fails, the failure is detected by a background program called SilverMonitor.
SilverMonitor observes the state of the daemons, processes, and services running on the system. SilverMonitor monitors each component of the server cluster; if any component fails, SilverMonitor detects the failure and attempts to restart the component.
SilverMonitor usually ensures that failed components recover quickly. If a failure is persistent (due, for example, to a hardware failure), SilverMonitor gives up after a predefined number of attempts in order to conserve system resources.
NOTE: SilverMonitor runs in each cluster by default. It is also provided as a server startup option through which you can define certain program parameters. For more information, see Using SilverMonitor.
When a server in a cluster goes down and is not restarted promptly, the following sequence occurs:
The Load Manager detects the failure and removes the server from the distribution map.
The Load Manager sends an updated map to the Dispatcher so that new clients are not redirected to the failed server.
When the server is restarted, the following sequence occurs:
When a server fails, connected clients lose their connections. They need to either restart or send another request from the browser to the Dispatcher.
If restarting a server takes a significant amount of time, the cluster components force a reconfiguration of the cluster so that incoming client requests can be serviced as efficiently as possible. During a persistent failure, the active components respond as follows:
The application server's clustering components (Cache Manager, Load Manager, and Dispatcher) are available with certain editions of the application server.
Install the first server and create the SilverMaster. If you have already completed the installation, make sure the SilverMaster setup is appropriate for the cluster.
For information about installing the application server and configuring the SilverMaster database, see Installing Novell exteNd.
Add any deployment databases or connection pools your system needs.
Using the installation program, install the clustering components on one or more machines. You can use a combination of platforms (UNIX, NetWare, and Windows).
For more information, see Installing Novell exteNd.
Start the clustering components.
For more information, see Starting the clustering components next.
If you installed the components as daemons or services, you can stop and restart them in this mode.
Using the installation program, install each of the additional servers that are part of the cluster.
For more information, see Installing cluster servers.
Start the SMC and create the cluster.
For more information, see Creating the cluster.
After creating the cluster, restart all servers and components to activate the cluster.
For more information, see Restarting the clustered servers.
If the load-balancing software is not currently running as a service on your network, you need to run the programs manually on the resident machine(s). If you are using the application server's Load Manager, execute the commands in the order shown in the procedure that follows.
 To start the cluster components:
In Windows and UNIX, the programs specified in the steps below are in the server's \bin directory. In NetWare, enter the command from the System Console.
Start the Cache Manager program.
|
Operating system |
Command |
|---|---|
|
NetWare |
SilverCacheMgr |
|
UNIX |
/bin/SilverCacheMgr |
|
Windows |
\bin\SilverCacheMgr.exe |
|
Operating system |
Command |
|---|---|
|
NetWare |
SilverDispatcher |
|
UNIX |
/bin/SilverDispatcher |
|
Windows |
\bin\SilverDispatcher.exe |
Start the Load Manager program.
|
Operating system |
Command |
|---|---|
|
NetWare |
SilverLoadMgr |
|
UNIX |
/bin/SilverLoadmgr |
|
Windows |
\bin\SilverLoadMgr.exe |
You can specify the JVM to start with each of these executables. For more information, see Specifying the JVM to use.
Using startup parameters with the Dispatcher You can start the Dispatcher with the parameters described below:
|
Parameter |
Description |
|---|---|
|
-p propfile |
The name and location of an alternate Dispatcher.ddl file. The Dispatcher.DDL file is created by the SMC at cluster configuration time. It specifies the default ports for RMI, HTTP, and HTTPS for the Dispatcher and is located in the server's \Resources directory. Using an alternate Dispatcher.ddl file—or editing this file outside the SMC—is not recommended. |
|
-c upload-certificate |
Run the Dispatcher in upload-certificate mode.
|
|
-h host |
The host name specified here is converted to an IP address via: InetAddress.getByName(host_name); When specified, the Dispatcher will open a server socket that is listening on this IP address only. If not specified, the socket will listen on all IP addresses of the local machine. |
|
+cp:p path |
Prepends specified path to the classpath. Don't use this debugging option without first contacting Novell exteNd Technical Support. Instead, use AGCLASSPATH to make additional Java classes available to applications.
|
|
+cp:a path |
Appends specified path to the classpath. This option makes additional Java classes available to applications by appending the specified path to the classpath. NOTE: Use the AGCLASSPATH environment variable to extend Java classes.
|
After you have installed the server that will contain the cluster's SilverMaster database, use the installation program to install additional servers. When installing additional servers, you need to point them to the first server you installed (which contains the SilverMaster database), since all servers in a cluster need to use the same SilverMaster.
This section provides some installation tips. For more detailed information, see Installing Novell exteNd.
One step in setting up a cluster is installing the application server on each host machine that will participate in the cluster. During these installs, you'll need to follow the guidelines below to properly fill in the Database Information screen.
Installing the first application server in the cluster In a cluster, only the first application server has a SilverMaster database. When you install that server, fill in the Database Information screen as usual. For example (installing on machine HostA):
Installing the other application servers in the cluster The other application servers in a cluster use the SilverMaster database of the first server. When you install these other servers, fill in the Database Information screen to point to that database and uncheck the Execute SilverMasterInit setting (to prevent reinitializing the SilverMaster system tables in that database). For example (installing on machine HostB):
After adding each server to the cluster, you can use the SMC to create the cluster, as described in Creating the cluster below.
Run the application server install on the machine you want to add to the cluster. Note that:
When you enter the SilverMaster name and other database information, you must specify the SilverMaster used by the first server you installed for the cluster.
Each machine in the cluster must be a mirror copy of the other. This means that:
You must have the identical ODBC names for the SilverMaster and any additional databases that your SilverMaster references on all servers in a cluster.
Any necessary DBMS client software that is required must be installed on all systems.
JDBC drivers must reside on all servers participating in the cluster.
Your ability to include a UNIX server in a cluster with Windows servers may be affected by the availability of database drivers.
To bypass rerunning SilverMasterInit, you should choose not to configure your application server.
If you have already added this server to your cluster using the SMC, the port value you specify must match the value you entered when you added the server to the cluster.
If an error displays, you probably misentered information about the existing SilverMaster database. You'll need to respecify that information.
After adding each server to the cluster, you can use the SMC to create the cluster, as described in Creating the cluster below.
Run the application server install on the machine you want to add to the cluster. Note that:
When you enter the SilverMaster name and other database information, you must specify the SilverMaster used by the first server you installed for the cluster.
Each machine in the cluster must be a copy of the other. This means that:
You must have the identical ODBC names for the SilverMaster and any additional databases that your SilverMaster references on all servers in a cluster.
Any necessary DBMS client software that is required must be installed on all systems.
JDBC drivers must reside on all servers participating in the cluster.
To bypass rerunning SilverMasterInit, you should choose not to configure your application server.
If you have already added this server to your cluster using the SMC, the port value you specify must match the value you entered when you added the server to the cluster.
If an error displays, you probably misentered information about the existing SilverMaster database. You'll need to respecify that information.
After adding each server to the cluster, you can use the SMC to create the cluster, as described in Creating the cluster below.
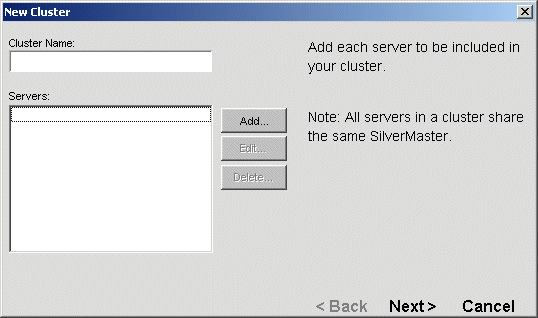
Once you have multiple servers pointing to a single SilverMaster, you can create and configure the cluster. An application server can be included in only one cluster.
You must use an HTTP port (not an HTTPS port) to create a cluster. If you have configured an administration port, that must be the port you use.
For more information, see Using separate ports with your firewall.
Make sure the Cache Manager, Dispatcher (if used), and Load Manager (if used) are running.
For more information, see Starting the clustering components.
Click New (cluster) from the toolbar.
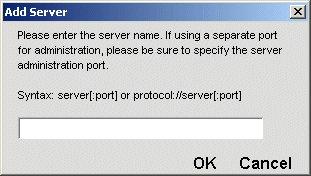
Enter an appropriately qualified name followed by a port number and then click OK. (The server name and the way you qualify it should match what the server is listening on. Specify the name as echoed on the server console.) For example:
agserver.myco.com:50001
Be sure the first server you add is the one containing the SilverMaster. All subsequent servers you add must be configured to use the same SilverMaster.
If your port(s) are set to 80, you don't need to specify a port number. However, if you have defined an administration port, be sure to specify that port number. If the application server is not your primary Web server, you must change the port to a number above 5000. For instructions on changing ports, see Specifying general server properties.
Click Add again and enter the server name for as many servers as you intend to add to the cluster. Each server is listed in the New Cluster form as you add it to the cluster.
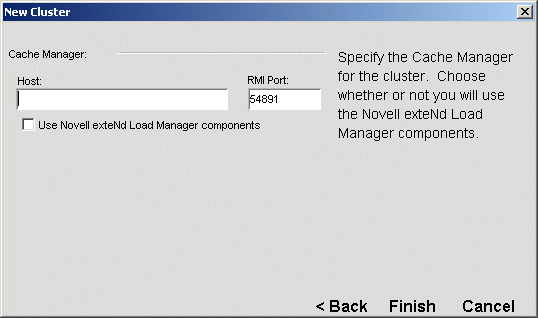
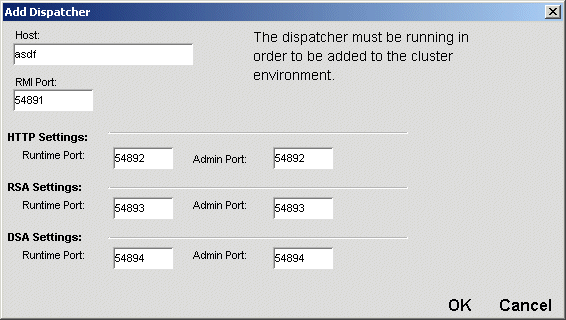
Enter the host name of the Cache Manager. The default RMI port number for the Cache Manager is 54891. When initially creating the cluster, you should specify the default port, but you can later change the port if necessary.
For information about changing the default ports, see Changing the clustering components' properties.
If you plan to use the application server's Load Manager, select the Use Novell exteNd Load Manager components check box and go to the next step.
If you do not plan to use the Load Manager at this time, click Finish and go to Restarting the clustered servers.
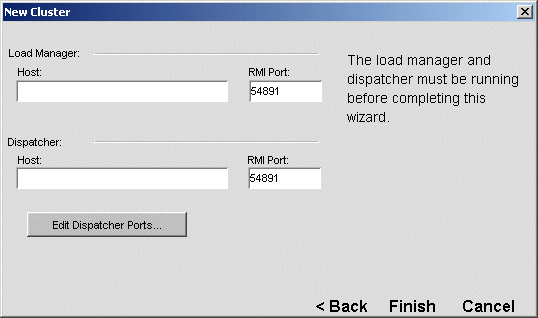
Enter the host name of the Load Manager. The default RMI port is 54891. When initially creating the cluster, you should specify the default port, but you can later change the port if necessary.
For information about changing the default ports, see Changing the clustering components' properties.
Specify port settings for any or all of the ports in each protocol type you want the Dispatcher to listen on.
The Dispatcher listens on all configured port types: HTTP, RSA, and DSA for any of the following unique server ports that you have already configured and enabled:
You can disable HTTP port(s) and use HTTPS or RMI client communications. For more information, see Turning off HTTP communications.
For information about default port settings for each security protocol, see Port types.
The following table describes the port settings that appear in the panel. When initially creating the cluster, you should specify the default ports for each. You can change the ports later if necessary.
For information about changing the default ports, see Changing the clustering components' properties.
After creating the cluster, you must restart each server. If you are running the Load Manager, you must also restart the Load Manager and Dispatcher.
For more information about restarting servers, see Restarting the application server.
To restart the Load Manager and the Dispatcher:
After creating a cluster, the SMC displays options specific to a clustered environment.
In a clustered environment, there are three types of properties:
|
Property type |
Description |
|---|---|
|
Server local properties |
Properties that are specific to an individual server and stored in the server's httpd.props file (and not the SilverMaster). These are properties that are needed by a server in order to start, so they are stored externally and are available at server start.
|
|
Server stored properties |
Properties that are specific to an individual server and stored in the SilverMaster database (in the AgProperties table). For a listing of these properties, select a server in a cluster in the SMC and look at the properties listed in the panels. The listed properties include the server stored properties as well as the server local properties that are configurable in the SMC. All server stored properties are configurable in the SMC. |
|
Cluster shared properties |
Properties shared by all servers in the cluster. These properties are stored in the SilverMaster database (in the AgProperties table). These are cluster-level properties: all servers in the cluster share the same values for the cluster shared properties. Most of the security properties are cluster shared properties. For a listing of these properties, select a cluster in the SMC and look at the properties listed in the panels. All cluster shared properties are configurable in the SMC. |
When a cluster is created, any server in the cluster retains its server local and server stored properties from when it was originally configured as a standalone server. You can choose to retain these settings or change them at the server level.
For more information, see Setting server-level properties in a cluster.
However, a server included in a cluster does not retain the values for properties that are defined as cluster shared properties. Because individual servers in the cluster may not have the same cluster shared property values as they did when they were standalone servers, you must reconfigure the cluster shared properties at the cluster level.
Accordingly, when you create a new cluster, all the cluster shared values are set to the default values. You can keep these settings or change them at the cluster level. Once you change a cluster-level property, the new value is applied to all the servers in the cluster. When a cluster is dissolved, all servers in the cluster become standalone servers.
For more information, see Setting cluster-level properties next.
As mentioned above, when you are working in a clustered environment, some properties exist at the cluster level and some exist at the server level. If you select the cluster at the left-hand side of the SMC, you see the cluster-level properties. Most cluster properties are the same as those set for standalone servers. The following table provides cross-references to the documentation for the cluster-level properties.
The cluster-level configuration properties are grouped in several SMC panels:
|
Panel |
Description |
|---|---|
|
General |
RMI/ORB and SSL for remote object properties for the cluster.
|
|
Advanced |
Performance, Cache Manager, and Load Manager properties:
|
|
Managers |
Cache Manager, Load Manager, and Dispatcher properties. These are the properties you specified when you created the cluster. You can edit these properties after creating a cluster.
|
|
Servers |
Lets you add servers to and remove servers from the existing cluster and change a server's load weight. |
The cluster-level security properties are grouped in the following SMC panels:
|
Panel |
Description |
|---|---|
|
General |
Specify general security settings for the cluster.
|
|
Advanced |
Specify client certificate levels and trusted clients list for the cluster.
|
|
Permissions |
Read cluster configuration, modify cluster configuration, and set permissions for the cluster.
|
|
Users & Groups |
Manage Silver Security and certificate users and groups for the cluster.
|
|
Certificates |
View certificates that have been installed on the server and recognized Certificate Authorities (CAs).
|
|
Security Providers |
Configure external security providers, including Windows directory services, LDAP, NIS+, and certificate issuers.
|
The cluster-level monitor properties are a subset of the properties for standalone servers.
For more information about the monitor properties, see Monitoring server activity.
When a standalone server is added to a cluster, many of its server-level properties become cluster-level properties.
If you select a server in a cluster at the left-hand side of the SMC, you see the properties for a server in a cluster. Most properties for servers in a cluster are the same as those set for standalone servers.
This section provides cross-references to the documentation for the properties of servers in clusters. The configuration properties of a server in a cluster are grouped in the following SMC panels.
|
Panel |
Description |
|---|---|
|
General |
General settings for the server.
|
|
Advanced |
Debug, Performance, Cache, Transactions, Cache Manager, and Load Manager properties.
|
|
Pools |
Connector and JDBC connection pools.
|
|
Connections |
Client connection properties.
|
|
Databases |
Information about the deployment databases in the cluster (databases known to the cluster's SilverMaster). You can modify the minimum and maximum number of database connections for each server in the cluster.
|
The accelerator settings for a server in a cluster are administered at the server level.
For more information about accelerator settings, see Using Cryptographic Hardware Integration.
The monitor properties in a cluster are the same as the properties for standalone servers.
For more information about the monitor properties, see Monitoring server activity.
You can specify the relative processing weight for each server in a cluster. The Load Manager uses that information to generate a distribution map that determines the processing load for each server at runtime.
For a description of how weighting works, see Distribution mapping.
To specify a server's relative load weight:
Select the Configuration icon from the toolbar, then select Servers.
Select a server from the list and specify an integer in the Server Load Weight field.
Select the other servers and specify appropriate relative values.
To activate the new server weight settings, click the Restart (server) button for the servers.
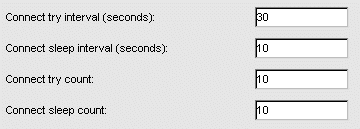
The SMC provides access to properties that control how the Cache Manager and Load Manager respond in the event of a system failure. Normally you do not need to edit these properties.
The Cache Manager and Load Manager properties exist at both the cluster and server levels. You can set the properties at the cluster level, which sets the values for each of the servers in the cluster. You can then override the values for any of the servers in the cluster. But note that if you later change any of the properties at the cluster level, it will override settings you made at the server level.
The Cache Manager properties determine how the Cache Manager will respond when its connection with a server fails.
To set Cache Manager properties:
Select the cluster to set properties at the cluster level, or select a server within a cluster to set properties at the server level.
To activate the new properties, click the Restart (server) button.
The Load Manager properties determine how the Load Manager will respond if its communication with a server fails.
To set Load Manager properties:
Select the cluster to set properties at the cluster level, or select a server within a cluster to set properties at the server level.
To activate the new properties, click the Restart (server) button.
You can dissolve a cluster, which does the following:
You can change which hosts are running the clustering components: Load Manager, Dispatcher, and Cache Manager. You can also change which ports the clustering components will use.
After creating a cluster, you may decide to run the clustering components on different hosts.
By default, all clustering components use port 54891 for their RMI port. In addition, the Dispatcher uses ports 54892, 54893, and 54894 for its HTTP, RSA, and DSA ports respectively. Normally, you don't change these port values.
But if you need to, you can change ports for the Cache Manager, Load Manager, and Dispatcher after you create the cluster.
NOTE: All clustering components must use the same RMI port.
To change Cache Manager, Load Manager, and Dispatcher ports:
Stop and restart each server and each clustering component in the cluster.
If you changed the port for the Cache Manager, you must start it with the following command line:
SilverCacheMgr -p portNumber
Changing the administration port of a server in a cluster If the server is in a cluster, and you need to change the administration port, you must:
For a cluster to listen and serve on the HTTPS port, you must install a server certificate in each server in the cluster. If you are using the application server's software Dispatcher (SilverDispatcher), you also need to install a certificate for it.
For more information about certificates and HTTPS/SSL, see Using certificates.
If you are using the application server's software Dispatcher for the cluster, each application server must have a server certificate with the DNS name matching the server's host name.
If you are using a third-party hardware dispatcher (such as Cisco LocalDirector) that does URL masking—that is, masks all URLs such that the browser hitting any of the servers in the cluster sees the dispatcher's host name—then every application server must have a server certificate with the DNS name matching the dispatcher's host name.
For example, say you have a cluster with:
If you are using the application server's Dispatcher, you need to create four server certificates: one for the Dispatcher's machine (with the DNS name www.myhost.com) and one for each of the servers (with DNS names server1.myhost.com, server2.myhost.com, and server3.myhost.com).
If you are using a third-party URL-masking dispatcher, you need to create only one server certificate (with the DNS name www.myhost.com) and upload it to each of the servers.
The following procedures describe what to do.
To generate server certificates:
Use the SMC to generate an RSA or DSA certificate.
If you are using the application server's software Dispatcher, generate a separate certificate for each server used in the cluster and for the Dispatcher.
If you are using a third-party dispatcher, generate one certificate with the dispatcher's DNS name, as described above.
For more information, see About certificates.
To install certificates if you are using the software Dispatcher:
Use the SMC to install the certificates on the server.
For more information, see Creating and installing server certificates using the SMC.
After the certificate has been installed, restart the server.
The server is now listening on its HTTPS port (default: 443 for RSA and DSA certificates).
To install the certificate on the Dispatcher, start the Dispatcher using the -c startup option. This puts the Dispatcher in the mode in which it can upload a certificate.
For more information, see Starting the clustering components.
Invoke AgDigitalIDStep2 to install the certificate on the machine containing the Dispatcher.
For more information, see Using AgDigitalIDStep2.
When prompted, specify the machine containing the application server's Dispatcher and specify the HTTP port that the Dispatcher is listening on (default: 54892).
After the certificate has been installed, stop the Dispatcher and then restart it as normal (without the -c startup option).
The Dispatcher is now listening on its HTTPS port (default: 54893 for RSA certificates and 54894 for DSA certificates).
To install certificates if you are using a third-party dispatcher:
Invoke AgDigitalIDStep2 to install on a server the certificate that references the dispatcher's DNS name.
For more information, see Using AgDigitalIDStep2.
When prompted, specify the server and the HTTP port that the server is listening on (default: 83 in NetWare, 80 in NT, 8080 in UNIX).
Add the following line to the server's httpd.props file (in the server's \Resources directory):
http-server.com.sssw.srv.https.cert.hostname=DispatcherName
where DispatcherName is the DNS name of the dispatcher.
For more information about httpd.props, see Appendix A, "The httpd.props File".
The server is now listening on its HTTPS port (default: 443 for RSA and DSA certificates).
Copyright © 2004 Novell, Inc. All rights reserved. Copyright © 1997, 1998, 1999, 2000, 2001, 2002, 2003 SilverStream Software, LLC. All rights reserved. more ...