JDBC Connect User's Guide
CHAPTER 4
An action is similar to a programming statement in that it takes input in the form of parameters and performs specific tasks. Please see the chapters in the Composer User's Guide devoted to Actions.
Within the JDBC Component Editor, a set of instructions for processing XML documents or communicating with non-XML data sources is created as part of an Action Model. The Action Model performs all data mapping, data transformation, data transfer between SQL databases and XML documents, and data transfer within components and services.
An Action Model is made up of a list of actions. All actions within an Action Model work together. As an example, one Action Model might contain individual actions that read invoice data from a disk, retrieve data from an inventory database, map the result to a temporary XML document, make a conversion, and map the converted data to an output XML document.
The Action Model mentioned above would be composed of several discrete actions. These actions would:
Open an invoice document and perform an SQL command to retrieve invoice data from a database
Convert a numeric code using a Code Table and map the result to an Output XML document
Two of the actions available in Composer are specific to JDBC Components. These are the SQL Statement Action and the SQL Batch Action.
These actions are described below.
The SQL Statement action is most commonly used to query an existing database and then map the result to an XML document. However, the full set of SQL Data Manipulation Language (DML) statements can be utilized (including database inserts, deletes, and updates).
There are two ways to use the SQL Statement Action. The first is to create your SQL statement using the wizard. The second is to create a custom SQL statement either by typing it in directly or by selecting command statements from the ECMAScript Expression Builder. In either case, you should be familiar with SQL database commands and with the structure of the database(s) you are querying in order to create valid statements with the SQL Statement action.

When you obtain binary data from a database that supports binary types (such as MySQL, which supports CHAR BINARY, VARCHAR BINARY, TINYBLOB, BLOB, MEDIUMBLOB, and LONGBLOB binaries), you are dealing with data that potentially contains characters and/or character combinations that are illegal in XML.
NOTE: Merely mapping such data into a CDATA section is not a satisfactory solution, because some characters (such as "angle brackets") are illegal in CDATA. Also, the character-combo "]]>" is not allowed within CDATA, since it signals the end of a CDATA section.
One satisfactory way to handle binary data is to use Base64 encoding, which essentially turns arbitrary byte streams into XML-safe ASCII streams. Composer's default behavior is to automatically Base64-encode binary data whenever possible, such as when binary data are returned from a database during a SELECT or other "read" operation. Conversely, Composer will automatically Base64-decode binary data before INSERTing or otherwise pushing it into a database. You do not have to take any special action to make this happen.
If you want to take direct control over encoding or decoding of data, you can do so with the Composer-defined ECMAScript extension methods base64Encode() and base64Decode(). The former takes a byte[ ] array argument and returns a String. The latter takes a String and returns a byte[ ] array.
The JDBC Connect has the ability to prepare (or precompile) SQL commands and cache them in memory so that when the same command executes over and over again (for example, in a loop), the cached statement can be reused, with new argument values inserted as need be. This can be a significant performance optimization in cases where statements execute many times.
You can designate any SQL statement as a "prepared statement," whether it was created manually or via the wizard, by using the "Execute as prepared" checkbox. This checkbox is located on the first dialog of the wizard, and also provided just above the SQL edit box for manually created SQL Statements:

By default, this checkbox is unchecked. For SQL Statement actions that are executed only once in the course of a service's lifetime, it is recommended that you leave the checkbox disabled. For statements inside loops, the checkbox can be checked.
NOTE: You may want to do some benchmarking to determine whether and to what degree using the Execute as Prepared checkbox is beneficial in a given application.
The SQL Creation wizard leads you through the process of creating an SQL query. Composer offers you the ability to create SQL statements using the SELECT, DELETE, INSERT and UPDATE commands. Of course, the userid with which you access the database must have the privileges required to perform these actions for your JDBC component to work correctly. Most userids will be able to SELECT from tables by default, but often you must have special permission to perform DELETE, INSERT and UPDATE actions on tables. Check with your Database Administrator if you are in doubt.
The SQL Select Statement is used to select and return data from a table. For examples on how to use the SQL Select statement, refer to http://www.w3schools.com/sql/sql_select.asp. Depending on the size and structure of your table, a simple SELECT statement may return a lot of data. For this reason, SELECT statements are often filtered using a WHERE clause.
 To create an SQL SELECT Statement action using the wizard:
Highlight a line in the Action Model where you want to place the SQL Statement action. The new action will be inserted below the line you highlight.
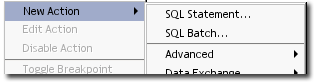
From the Action menu, select New Action, then SQL Statement.
Indicate that you wish to Create a SQL statement using the wizard.
Click Next to display the dialog which allows you to choose a table from which to select your data.
Select the table and columns used for the SELECT statement by checking the radio button check boxes associated with the required columns of the table you wish to use. You will notice that if you hover your cursor over a column, descriptive information about that column, such as its TYPE and whether or not it can be a NULL field appears.
NOTE: You can select or deselect all the columns in a table by checking or unchecking the box at the table level.
Click Next to bring up another dialog, which allows you to select columns to use in your WHERE statement to filter the results of the SELECT statement.
Click Next to move to the final dialog, in which you specify the Target Message Part and XPath placement for the results of your SQL Statement.
You can either specify an XPath, or select Expression to go to the ECMAScript Expression Builder and
Click Finish to create the action and return to the JDBC Component Editor.
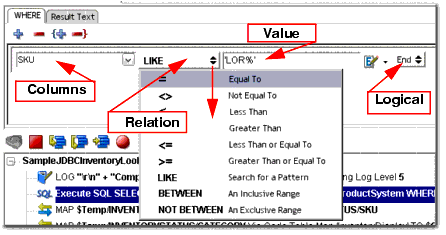
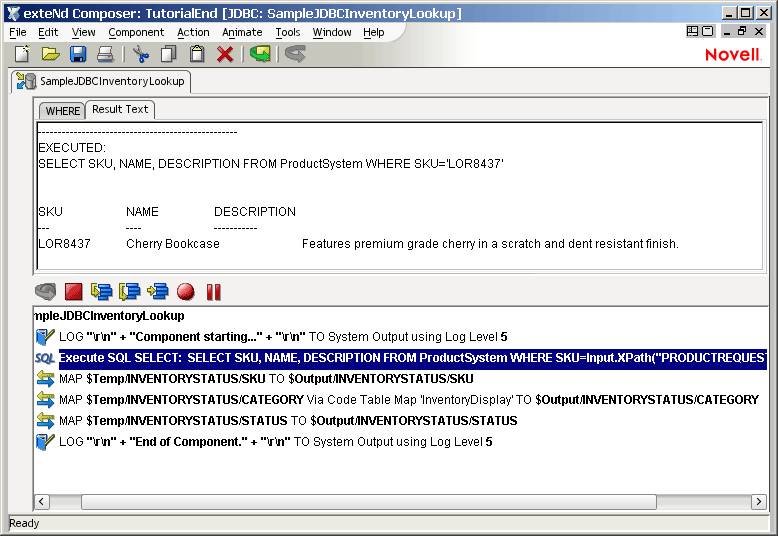
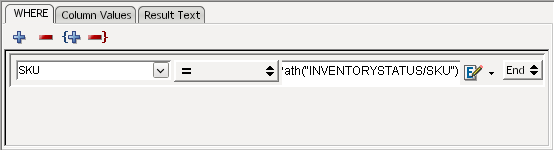
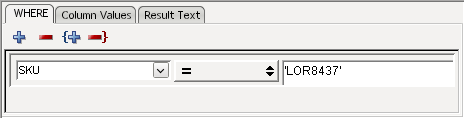
The execute SQL SELECT statement is now displayed and highlighted in the Action Model. When focus is on this new action, the Native Environment Pane displays a two-tabbed dialog which includes a WHERE tab and a Result Text tab. WHERE will be visible by default. This tab will be used to filter the result set.
Filtering the resultset using the WHERE tab:
Select the Columns you wish to filter using the dropdown menu. This list is populated according to the columns you chose in step three of the wizard. You may select one or more columns with which to filter the list. To add a column to the filter for the result set, click on the + icon. To delete a column, click the - icon. Columns can also be selected by group. To add a group, click the {+ icon. To delete a group, click the -} icon.
Select a Relation from the dropdown list. Examples for all these relational operators can be found at http://www.w3schools.com/sql/sql_where.asp.
When using the LIKE operator, the % symbol can be used as a wildcard character representing any number of missing characters at the beginning or ending of your matching pattern. Text values should be surrounded by single quotes, though most databases will also accept double quotes.
It is important to note that the BETWEEN...AND operator can be interpreted differently by different databases. With some, "between" is literal and only values in between your test cases will be selected. Some databases will include the test cases in your result set also. Some include the first case but not the last, and vice versa. In general, with SQL, you should follow the advice of that famous television lawyer and "Never ask a question you don't already know the answer to."
For Value, either a constant or an expression can be entered. You may also drag and drop fields from your XML Message Parts to create an expression.
The Logical dropdown menu allows you to create more complex WHERE clauses using And/Or logic. Or, you may complete the clause by selecting End.
Once you have adjusted your WHERE clause to filter your results appropriately, you will see the completed SQL statement in the Action Model.
If you open the Result Text tab, you will be able to see the text of the SQL and the results produced by running the query.
Delete statements in SQL are used to delete entire rows from tables. If you wish to delete, null out or otherwise modify individual column values within rows in a table, you should use the MODIFY command (described below). The steps to follow to create an SQL DELETE statement are fairly similar to those for creating an SQL SELECT statement.
To create an SQL DELETE Statement action using the wizard:
Highlight a line in the Action Model where you want to place the SQL Statement action. The new action will be inserted below the line you highlight.
From the Action menu, select New Action, then SQL Statement.
Indicate that you wish to Create a SQL statement using the wizard.
Click Next to select the table from which rows will be deleted using the DELETE statement.
Only one table can be checked at a time. In the case of DELETE, you will not be able to select individual columns at this point in the wizard. This screen is for table selection only, and the columns are all selected and grayed out, indicating that they will all be available for selection in the next dialog of the wizard.
Click Next to open the next dialog, from which you will select the column(s) which will be used by the DELETE statement's WHERE clause to filter the records which will be deleted.
Click Finish to create the new action and display it in the Action Model. As described above in the SELECT statement, the WHERE tab will be displayed. Use the WHERE filtering (described in "WHERE Clauses" above) to complete your SQL Delete statement. The Result Text tab shows the text of the SQL and the results produced by running the statement.
Insert statements in SQL are used to insert entire rows into tables. If you wish to insert or otherwise modify individual column values within rows in a table, you should use the MODIFY command (described below). The steps to follow to create an SQL INSERT statement are also fairly similar to those for creating an SQL SELECT statement.
To create an SQL INSERT Statement action using the wizard:
Highlight a line in the Action Model where you want to place the SQL Statement action. The new action will be inserted below the line you highlight.
From the Action menu, select New Action, then SQL Statement.
Indicate that you wish to Create a SQL statement using the wizard.
Click Next to select the table(s) into which rows will be inserted by the INSERT statement. At the same time, select the columns which will be provided with new data by the statement.
Click Finish to insert the new SQL Insert Statement into your Action Model and return to the Component Editor.
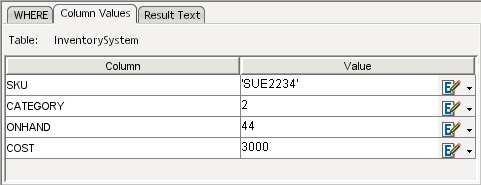
The Native Environment Pane displays two tabs: Column Values and Result Text. Column Values will be displayed by default.

The Column Values pane displays a table with two columns. The first presents a list of the columns selected during the final step of the SQL Insert wizard. In the second column, you will define the values for the columns of the row to be inserted. You also have the ability to drag and drop data from a Message Part to the Value column, as shown in the SKU example above.
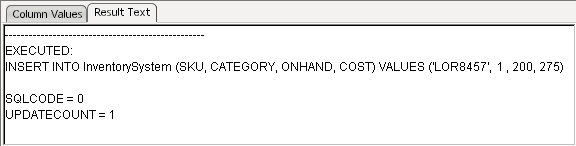
As always, the Result Text tab shows the text of the SQL and the results produced by running the statement. You will notice that Composer automatically surrounds non-numeric data with single quotes.
Update statements in SQL are used to modify data within the rows and/or columns of a table. The steps to follow to create an SQL UPDATE statement are also fairly similar to those for creating an SQL SELECT statement.
To create an SQL UPDATE Statement action using the wizard:
Highlight a line in the Action Model where you want to place the SQL Statement action. The new action will be inserted below the line you highlight.
From the Action menu, select New Action, then SQL Statement.
Indicate that you wish to Create a SQL statement using the wizard.
Click Next to select the table(s) and columns to modify with the SQL statement.
Click Next to bring up the final dialog, which allows you to select which columns will be used by the WHERE clause of the Update statement.
Select the appropriate columns and click Finish to complete the action and add it to the Action Model.
Just as with the SELECT and DELETE commands, the Native Environment Pane will display a Where tab and a Result Text Tab. In this case, though, it will also display a Column Values tab as seen with the Insert command.
Use the Where tab to filter the record set to be updated as demonstrated in "WHERE Clauses" on page -27 above. You may select the columns and define the criteria for those columns in order to update only the desired records.
Tab to Column Values to provide the values for each of the columns to be updated. Updating Column Values is demonstrated in "Specifying Column Values" above.
As always, the Result Text Tab shows the text of the SQL and the results produced by running the statement. You will notice that Composer automatically surrounds non-numeric data with single quotes.

Once you have created your SQL statement, you may find that you need to edit it. This is a two part process. Begin by double-clicking on the EXECUTE SQL action in the Action Model. This will bring up a tabbed dialog, as shown below.
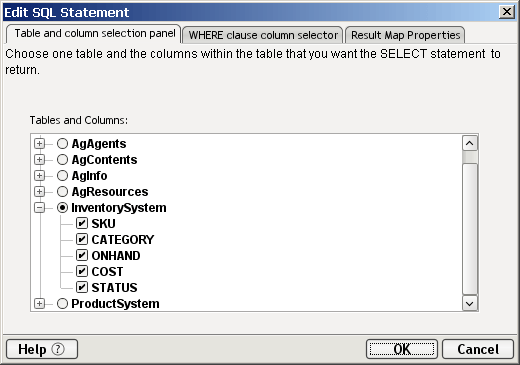
These tabs allow you modify the basic Table, Column and Target selections for the SQL Query. The number of tabs will vary according to the type of SQL Statement you are editing.
The Table and column selection panel tab is available for all SQL statement types. It allows you to modify the tables and/or columns you had chosen to use in your SQL query.
The WHERE clause column selector tab is available for the SELECT, DELETE and UPDATE statement types. Use this tab to modify the columns you had chosen to use for your Where clause.
The Result Map Properties is available only for SQL SELECT actions created using the Wizard. Here you can modify the Target location for the results of your query.
Once you have edited the information in these tabs, you may need to further modify the SQL Statement using the additional tabs available when the item in the Action Model is clicked on a single time, or after you have clicked on OK in the Edit SQL Statement tabs, described above.
Back in the Native Environment Pane, you will see a screen that resembles the following.
Again, the number of tabs shown will vary according to the type of SQL Statement.
The WHERE tab is available for all SELECT, DELETE and Update SQL Statements prepared using the wizard. Here you can modify the filter chosen to limit your query.
The Column Values tab is available for INSERT and UPDATE queries. Use this tab to modify the values you originally designated as being inserted or changed as a result of your SQL statement.
The Result Text tab is available for all SQL Statements. It shows the query that was executed and the results it produced.
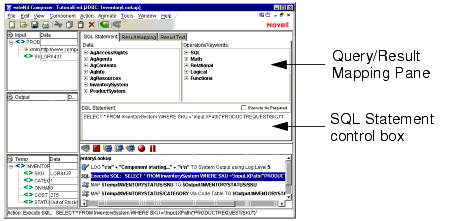
The manual creation of SQL statements for use in JDBC Components is done inside the Query/Result Mapping Pane.
If you are editing a previously created action model that already contains SQL Statement actions, you can make the Query/Result Mapping Pane come into view simply by selecting (clicking on) any existing SQL Statement action. Otherwise, you will create an SQL Statement action.
To manually create an SQL Statement action:
Highlight a line in the Action Model where you want to place the SQL Statement action. The new action will be inserted below the line you highlight.
From the Action menu, select New Action, then SQL Statement.
Indicate that you wish to Create a Custom SQL Statement. The Query/Result Mapping pane appears in the Native Environment pane of the JDBC Component Editor window, as shown above.
Building an SQL Statement manually involves bringing together data, operators, and keywords.
Place the cursor in the SQL Statement control box in the Query/Result Mapping pane.
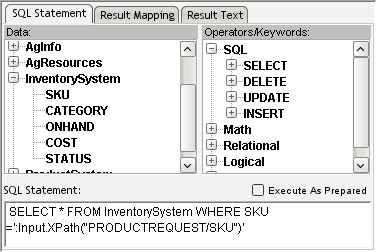
Expand the Data columns and/or the Operator/Keywords by clicking the plus signs. The illustration below shows Data and Operator/Keywords trees look like with several parent nodes expanded.
Double-click each Data column and/or Operator/Keyword that you would like to add to the SQL Statement box. When you double-click an item, it automatically appears in the SQL Statement box at the insertion point.
Optionally, you may drag elements from an open DOM tree (e.g., the Input DOM pane) into the SQL Statement box.
Optionally check the Execute as Prepared checkbox. (See discussion further above, under "Prepared Statements".)
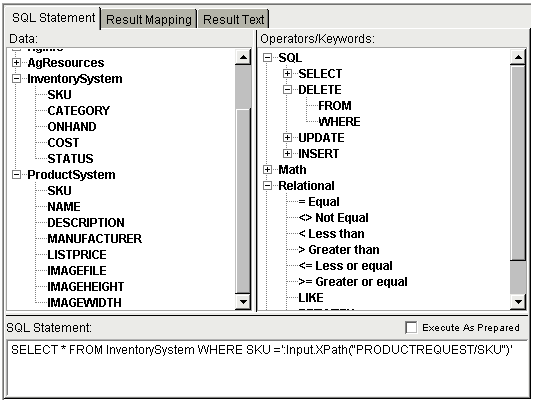
Here is an example SQL statement:
SELECT * FROM ProductSystem WHERE SKU = ':Input.XPath("PRODUCTREQUEST/SKU")';
In order to build this statement, the component must satisfy the following:
The component must be able to use a (previously defined) connection resource to connect to the database
The database must have a table called ProductSystem that has a column called SKU
The component must have a template containing a sample XML document with a root element, PRODUCTREQUEST, that has a child element named SKU
This example statement, in plain English, means:
"Select all columns from the database's ProductSystem table where a record's value in column SKU is equal to the content of the Input DOM's PRODUCTREQUEST/SKU element."
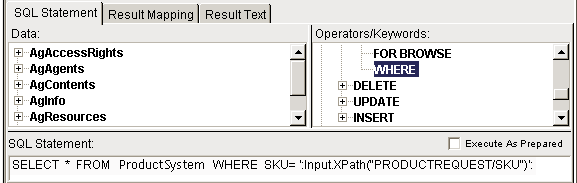
To build the example statement:
Expand the SQL tree in the Expression builder and double-click SELECT.
Select SKU in the Input DOM and drag it into the SQL Statement control.
Optionally type a semicolon ( ; ) at the end of the SQL Statement.
Select File>Save. The Query/Result Pane should look like this:
When you have created your SQL Statement manually, you must use the Result Mapping pane to select where to place the rows and columns of your results into the XML Document tree.
Select the Result Mapping tab in the Query/Results Mapping pane. The Results Mapping pane appears.
Under Result Row Placement, select the destination Part to which you would like the result of the SQL query mapped.
Next, select the Part element under which you'd like each result row to appear. If an appropriate Part is not listed, you may add another XML template using the File>Properties>Messages dialog from the menu. If a Part is not visible, go to View>XML Documents>Show/Hide.
Default Result Mapping: Choose the first radio button for standard Column/Row/Group mapping:
Create elements if column is null. This creates XML elements with empty content if the column returned has no data.
Include data type info in element attribute. This creates an attribute for each element indicating the data type of the result column.
Custom Result Mapping: Choose the second radio button, Custom Column/Row/Group, to perform custom column, row, or group mapping (see Chapter 5).
Stored Procedure Mapping: Choose Stored Procedure mapping to map data returned from stored procedures. (see Chapter 6).
To edit a SQL statement once you have created it manually, simply click on the EXECUTE SQL action in the Action Model.
Use the SQL Statement Tab to edit the Text of your SQL statement manually or use the methods above to change your selections of Data, Operators and Keywords.
Use the Result Mapping Tab to modify the target placement for the returned data.
Use the Result Text Tab to show the query that was executed and the results of the query.
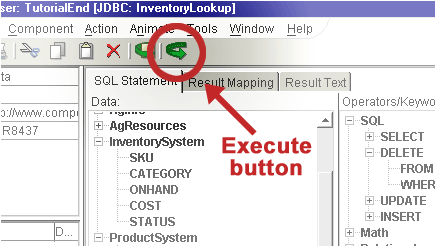
After you have built the SQL Statement, either manually or using the wizard, click the Execute button to run it.
You can check the results of your SQL statement by looking at the data retrieved in the familiar row and column format. To do so, click the Result Text tab. This tab is available for all SQL Statements, whether created manually or using the wizard.
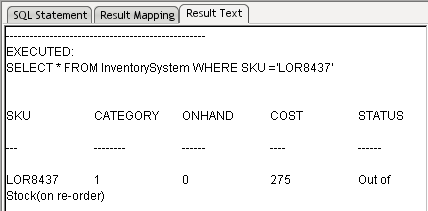
If the query result returned by the SQL statement looks correct, you can continue designing your component's Action Model. Otherwise, you can return to the SQL Statement tab and debug your SQL as necessary.
Many RDBMS vendors provide the ability to execute procedural code stored in the RDBMS system. Using these stored procedures allows for high-performance interfaces that are independent of the underlying table implementations.
Using stored procedures can be helpful in controlling access to data. User access to data can be limited to the scope of the stored procedure. Limiting access to data with stored procedures preserves data integrity by insuring data is entered in a consistent manner. Stored procedures also improve efficiency. They're memory resident, which speeds execution. Their use decreases network traffic. Productivity is improved via their use since stored procedures only need to be written and debugged once but can be reused by many.
While often used interchangeably, for the sake of discussion we'll differentiate between the terms Procedures and Functions. A Procedure is a subroutine that doesn't necessarily return any data but may via the call's parameters or as external result sets. A Function, on the other hand, always returns something. Both Procedures and Functions can pass Parameters.
Novell exteNd Composer allows you to map parameters to stored procedures and functions, execute stored procedures and functions and map returned data to DOM/node combinations.
In order to package the Procedure or Function call correctly, exteNd Composer requires certain formatting conventions be followed. For example:
{ – indicates that a call to a Function or Procedure follows
} – indicates the end of a call to a Function or Procedure
The syntax for procedures and functions support parameters which may be Expressions, Placeholders or Constants.
Expression: Expressions may be used to pass variable input data to a procedure or function. Expressions used as parameters in procedure and function calls are preceded with a colon (:) and enclosed in single quotes. (e.g. `:<variablename>').
Question Mark: Question Marks ( ? ) may be used as parameters and serve as placeholders to which the procedure returns data. A question mark is also used for the result in a function.
Constant: Constants are used to pass input data in procedures and functions but, unlike expressions or placeholders cannot be used to accept returned data. Literal values are enclosed in single quotes.
Stored procedures may have Input Parameters, Input/Output parameters and Output Parameters.
Input Parameters: Input Parameters pass data to stored procedures. Input Parameters may be Constants or Expressions.
Input/Output Parameters: Input/Output Parameters pass data to stored procedures and accept data returned from stored procedures. Input/Output parameters must be Expressions.
Output Parameters: Output Parameters accept data returned from stored procedures. Output parameters may be either an Expression or a Question Mark as a placeholder.
For all the examples below the following steps should be executed.
· Add a new SQL action
· Execute as Prepared is set to true (check the checkbox; see "Prepared Statements" on page 19).
NOTE: For mapping the results of stored procedures, see Chapter 6.
Procedures that do not return a value:
{ call [<packagename>.]<procedurename>[([param1, param2...,paramn])]}
Example:
{ call composerDemoPackage.sp1_withParams(`12345','George') }
Procedures that return a result set:
{ call [<packagename>.]<procedurename>[([param1, param2...?.....paramn])]}
where ? is a parameter to which the result set is returned. A result set may also be returned to other parameters which contain Expressions.
Example:
{ call composerDemoPackage.sp_withParams('93324', `:FirstName', ?)}
In this example `93324' is a constant, `:FirstName' is an Expression and ? is a placeholder.
NOTE: Only Oracle returns result sets as parameters. Non-Oracle RDBMSs may return result sets but, not as parameters.
Backward Compatibility for Oracle Procedures that return a result set:
Prior to version 4.0, exteNd Composer provided support for Oracle Procedures that return result sets as parameters. To do so, exteNd Composer (prior to version 4.0) required the user to specify the Oracle Cursor Position within the procedure call. The pre-Composer 4.0 syntax included ocp:n – where ocp stands for Oracle Cursor Position and :n indicates which parameter contains the cursor. This syntax was used in pre-4.0 versions of exteNd Composer and is maintained in version 4.0 and greater for backward compatibility.
{ call [<packagename>.]<procedurename>[([param1, param2...ocp:x.....paramn])]}
Example:
{ call composerDemoPackage.sp_withParams('93324', `Melissa', ocp:3)}
NOTE: The contents of the result set will be returned in the same manner as a standard SELECT statement. The results will be automatically be mapped to the selected XML Document. The defaults are Output as the Document and RESULTINFO/ROW as the XPath location.
Functions that return a result set:
{ ? = [<packagename>].<functionName>[([param1, param2...,paramn])]}
Example:
{ ? = call composerDemoPackage.fn_justOneReturn( ) }
Backward Compatibility for Oracle Functions that return a result set:
To provide backward compatibility with pre-4.0 versions of exteNd Composer, the following syntax will continue to be supported in exteNd Composer 4.0 and greater.
{ ocp:1 = [<packagename>].<functionName>[([param1, param2...,paramn])]}
Example:
{ ocp:1 = call composerDemoPackage.fn_justOneReturn( ) }
Other Methods of Calling Functions for Specific Tasks
You may call any function that does not update the database from within a select statement.
Example:
select fn_addMin(4,6) "Sum" from dual
To use a function that does not return a result set but updates the database, call it from within a function that does return a result set – see the example fn_callAddMin
Example:
{ ? = call composerDemoPackage.fn_callAddMin(22,44 ) }
Colons are special characters in SQL Statements, because exteNd Composer treats colons as markers indicating the presence of ECMAScript immediately to the right. In the above action, the SQL Statement includes the string
`:Input.XPath("PRODUCTREQUEST/SKU")'
which contains a colon followed by an ECMAScript expression involving the XPath() method. Without the colon, the string would be evaluated as a string-literal. With the colon, it is evaluated as an ECMAScript expression.
NOTE: If you need to use colons as literal values inside SQL Statements, escape every occurrence of a literal colon with a backslash. Otherwise, you may see errors.
Most database drivers allow batch execution of SQL statements in order to minimize demand on connection resources. For example, a user may want to insert data into a table in one database and delete data from a table in another database, all in one round trip. This is possible with the SQL Batch action.
SQL Batch actions allow you to specify that a particular group of SQL Statement actions should be accumulated into a single batch and transmitted to the database as a unit.
NOTE: SELECT operations may not be used in batches. Use only INSERT, DELETE, and UPDATE statements.
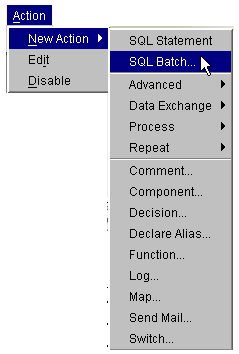
To access the SQL Batch action, right-click inside the action pane and choose New Action > SQL Batch as shown below.
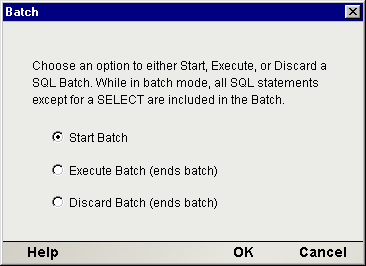
There are three SQL Batch commands, each of which places a new action in the action model: Start Batch, Execute Batch, and Discard Batch.
You must tell Composer where the beginning of a batch occurs, by placing a Start Batch statement before the first SQL Statement in a series of statements that you want to group. This command sets a checkpoint for rollback purposes (in case the batch does not finish normally).
From the first occurrence of this command until the next occurrence of an Execute Batch command (see below), SQL Statements are merely accumulated, rather than executed. Execution of a batch does not occur until an Execute Batch command is reached.
Regular (non-SQL) actions, such as Map and Function actions, are not affected by Batch operations. If you place Map actions, Function actions, or any other non-SQL actions within or after a group of batched SQL Statement actions, those actions will execute before the SQL Statements in your batch, because the batch cannot execute until an Execute Batch is reached.
An Execute Batch command causes all SQL Statements in a batch to be sent, as a unit, to the database. (If no Execute Batch command is issued, none of the SQL Statements in the preceding batch will get executed.)
An Execute Batch statement can be placed immediately after a batch of SQL Statement actions, or it can be placed at some point downstream of the batched actions (possibly in one branch of a Decision action). In other words, you can create a batch in one location and execute it, conditionally, from another location in your action model.
The Discard Batch command is a memory-de-allocating command that causes the previously held batch to go out of scope. It frees the memory held by the preceding batch.
Ordinarily, when an SQL batch executes without error, the batch is discarded automatically after it executes and there is no need to issue an explicit discard. You would use Discard Batch when you have an action model that contains two or more sequential SQL batches (each with its own Execute Batch command) wrapped in Try/On Fault statements. The need for the Discard Batch arises when one of the upstream batches executes abnormally (generating an exception). In order to continue to another batch, you need to purge the previous batch from memory (with a Discard Batch in the On Error branch of the "Try" action). Failure to use Discard Batch under these conditions would cause the next Start Batch to throw an exception. This scenario is shown in the illustration below.
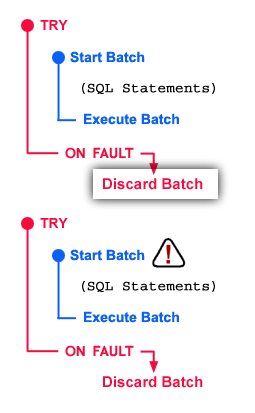
In the case depicted above, where there are two SQL batches (each enclosed in a Try/On Error action), failure to include a Discard Batch action in the error branch of the first Try will cause the next Start Batch to throw an exception (assuming the first batch fails).
In summary: When two or more batches will execute sequentially, wrap each in a Try/On Error action and include a Discard Batch command in the On Error branch of each.
For action models in which there is only a single SQL batch, Discard Batch is not necessary. After normal execution of a (single) batch, memory allocated to the batch is released automatically; and if the batch returns an error, the batch will go out of scope (and be garbage-collected) when the component itself goes out of scope.
Batch actions are created using the SQL Batch menu command (available from Action > New Action > SQL Batch in the JDBC Component Editor main menu, or via New Action > SQL Batch in the contextual menu).
Place the cursor in a line preceding the group of SQL Statements that you want to batch. Then press the right mouse button and select New Action > SQL Batch. The Batch setup dialog appears.
Choose the Start Batch radio button to insert a Start Batch command in your action model. Otherwise, choose Execute Batch or Discard Batch, as appropriate.
Click OK to dismiss the dialog. A new action appears in your action model.
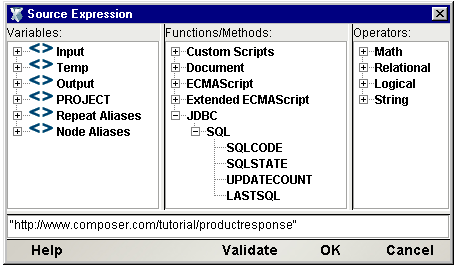
SQL queries can result in certain status and/or error values being returned (for example, the number of records that were changed by an Update). Often, it is useful to be able to reference these values in ECMAScript expressions. The Expression Builder pick list (in the top portion of the Expression Editor window) contains properties that are specific to JDBC Actions involving SQL: namely, SQLSTATE, SQLCODE, and UPDATECOUNT. (See panel below.)
In addition to the SQL Statement action, you have all the standard Basic and Advanced Composer actions at your disposal as well. The complete listing of Basic Composer Actions can be found in Chapter 7 of the Composer User's Guide. Chapter 8 contains a listing of the more Advanced Actions available to you.
SQL returns certain coded values when errors occur (i.e., no record was found in a Query) or as a report on the result of certain actions (i.e., how many records were changed by an Update). These results appear on the Result Text tab as three special variables labeled:
These variables are available to ECMAScript functions you may write and can be used for error handling within your JDBC component. For instance, you can create a Decision action to process after an SQL statement. Based on the value returned in the UPDATECOUNT variable, you can choose one or the other set of actions in the two branches of the Decision action. Likewise, error information contained in SQLSTATE or SQLCODE (which are standard SQL status variables) can be used to branch to appropriate recovery logic in case of error.
The LASTSQL variable is an exteNd-defined string variable which contains the last SQL statement to actually execute in the component in question. Logging the value of this variable can be useful for troubleshooting.
Copyright © 2004 Novell, Inc. All rights reserved. Copyright © 1997, 1998, 1999, 2000, 2001, 2002, 2003 SilverStream Software, LLC. All rights reserved. more ...