Connect for PeopleSoft User's Guide
CHAPTER 2
This chapter discusses software setup and configuration issues relevant to using the Composer Connect for PeopleSoft®, as well as the steps needed to create a Composer Connection Resource for a PeopleSoft® Component.
A number of steps must be taken before you can use the Composer Connect for PeopleSoft®. You must, at a minimum:
Put copies of the PeopleSoft Java Object Adapter (psjoa.jar) on design-time and runtime (application server) machines. See Putting psjoa.jar in the Classpath.
Deploy the supplied remote interfaces (Component Interfaces). See Deploying the PeopleSoft Component Interface Files.
Generate PeopleSoft Component Interface API classes, package them in a JAR, and put the JAR on design-time and runtime machines. See Building PeopleSoft Component Interface API Classes.
Update classpath entries in xconfig.xml (design environment) as well as on the server, to reflect addition of new JARs. See (again) PeopleSoft Java Object Adapter.
Update the license for your Composer Connect for PeopleSoft® installation, as needed. See "Updating and/or Activating Your License(s)" below.
Create new component interfaces for PeopleSoft services that you wish to expose. See How to Create a New Component Interface in Appendix B of this guide.
The steps necessary to accomplish these requirements are discussed in detail in the following sections.

Before attempting to use the Composer Connect for PeopleSoft® (which is installed automatically as part of the default exteNd suite installation process), you must complete the installation by obtaining and installing the psjoa.jar file, which comes from PeopleSoft®. This file is proprietary to PeopleSoft® and is not shipped by Novell nor installed as part of the Novell exteNd Suite.
The psjoa.jar file may already exist on your PeopleSoft Application Server under the PS_HOME/Web/psjoa directory. If not, contact your PeopleSoft representative to obtain a copy of this file.
When you have located the psjoa.jar file, you must add it to your design-time classpath as well as your runtime-environment classpath (typically the application server classpath). The procedures for doing this are given below.
The PeopleSoft Java Object Adapter (psjoa.jar) must be added to your design-time and runtime environments before you can use the Composer Connect for PeopleSoft®.
 To add psjoa.jar to your design-time configuration
Determine the version number of your existing PeopleSoft system. It should conform to version 8.1 or 8.4. These are the only versions currently supported by Novell exteNd Composer.
Obtain psjoa.jar from PeopleSoft® if it is not already included in your preexisting PeopleSoft installation®.
Copy psjoa.jar to the /Common/lib folder of the exteNd installation directory on your design-time machine.
Ensure that the JAR files are on your design-time CLASSPATH. To do this: Locate your xconfig.xml file under /Composer/Designer/bin and open it in a text editor. Scroll to the bottom. Within the <RUNTIME> element, you should see many <JAR> entries. Add an additional <JAR> element as follows:
<JAR>..\..\..\Common\lib\psjoa.jar;..\..\..\Common\lib\iwpeoplesoft.jar;..\..\..\Common\lib\psGenComp.jar;..\..\..\Common\lib\pstools.properties</JAR>
This entry essentially tells the classloader where it can find four files:
psjoa.jar—This is PeopleSoft's own Java Object Adapter jar (which ships with PeopleSoft)
pstools.properties—This file is not an absolute requirement but will prevent certain exceptions from being thrown in the background.
psGenComp.jar —You will need to generate this JAR yourself according to the procedure described at Compiling the Component Interface Files further below.
In xconfig.xml, verify that a <JAR> entry exists, referring to iwpsci81.jar if you are using PeopleSoft 8.1, or iwpsci84.jar if you are using PeopleSoft 8.4. (These files are installed as part of the Novell exteNd suite installation.)
CAUTION: Only one of these JARs should be on the classpath. Do not allow both JARs to be referenced in xconfig.xml, as this will cause unpredictable behavior.
To add psjoa.jar to your Novell application server environment
Obtain psjoa.jar from PeopleSoft® if not already included in your preexisting PeopleSoft installation®.
Copy psjoa.jar to a suitable location on your application server. The exact location doesn't matter as long as you create a CLASSPATH entry pointing to it, as described in the next step.
Update the application server CLASSPATH. For the Novell exteNd application server, locate the AgJars.conf file under the AppServer/bin directory. Under "MODULE COMMON" create a new pair of entries:
  $SS_LIB ../../Common/lib/psjoa.jar
  $SS_LIB ../../Common/lib/psGenComp.jar
(This example assumes that you have placed the JAR files under /Common/lib. Edit as necessary to reflect the actual target directory.)
NOTE: For application servers other than Novell exteNd, follow the application server vendor's instructions for updating the classpath.
Also verify that an entry exists for iwpsci81.jar or iwpsci84.jar (as appropriate to the version of PeopleSoft you are using). Do not allow both JARs to have entries, as this will cause unpredictable behavior. These files are installed as part of the Novell exteNd suite installation. You do not need to obtain them from a third party.
Before you can use the Component Interface APIs discussed in Building PeopleSoft Component Interface API Classes, you must expose the supplied component interface files to your PeopleSoft system. This is not done by the exteNd installer program (because the location of your PeopleSoft system and the file-write permissions in that system are not known at install time, and in any case this step requires manipulation of the files using PeopleSoft's Application Designer). The files that you need to deploy are contained in a zip archive called iwpsci84.zip (if you are using PeopleSoft 8.4) or iwpsci81.zip (if you are using PeopleSoft 8.1), which are included in the Composer install in the <install directory>\Novell\exteNd5\Composer\Designer\lib directory. The discussion that follows applies to PeopleSoft 8.4.
You will need to deploy the files in this archive to PeopleSoft (not to the application server) in order to enable introspection of the PeopleSoft Component Interfaces by the middle-layer adapters that Composer relies on to support interaction with PeopleSoft. The following procedure describes how to do this.
To import and build the Component Interface files
Copy the iwpsci84.zip or iwpsci81.zip from <install directory>\Novell\exteNd5\Composer\Designer\lib to an empty directory of your choice (e.g., C:\temp\PSProjects), then expand the zip file. This creates a sub-folder called IWY_CI_84 (which contains 2 files) or IWY_CI_81 (which contains 21 files).
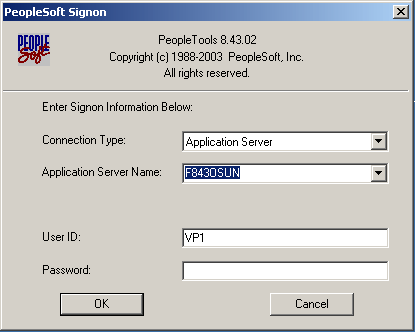
Launch the PeopleSoft Application Designer in two-tier mode.
From the PeopleSoft Login Screen, select the Connection Type dropdown and select the appropriate database for your system (e.g., Oracle).
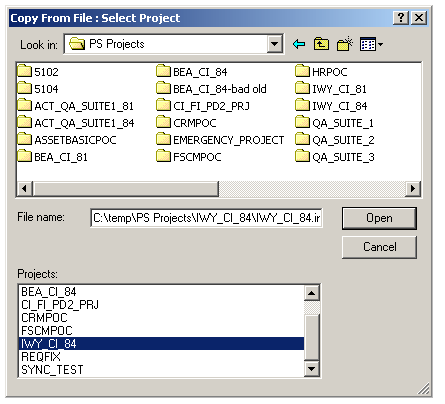
In the file-browsing dialog that appears (see the following illustration), navigate to your unzipped project directory and select IWY_CI_84 or IWY_CI_81.
Click the Open button. The project appears in the Project Workspace and there is output in the Output Window. Make sure that all the objects listed under Object Types are highlighted, and then click Copy.
The Application Designer displays an "Upgrade Copy ended" message in the Output Window to indicate successful completion.
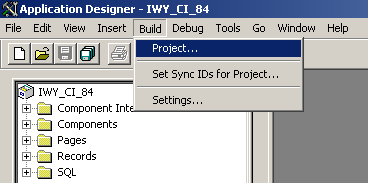
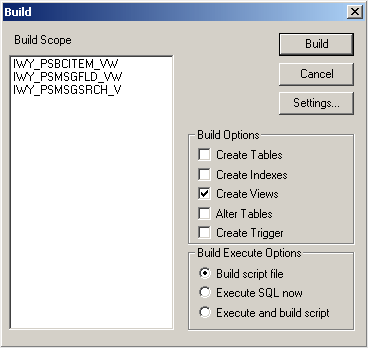
Next, we will build the views in the project by choosing Build > Project from the main menu.
Check the Create Views checkbox from Build Options. (See the following illustration.) Under Rule Execute Options, select the Build Script File radio button.
You may want to click on the Settings... button to verify that "Recreate view if it already exists" is checked, then return to the Build dialogue box.
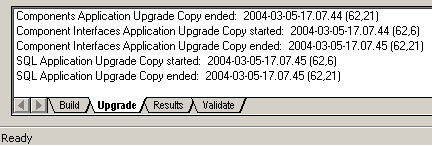 Verify in the Upgrade tab (at the bottom of the main window) that the view built correctly.
NOTE: If the view has not been generated correctly, close the dialog and double-click the SQL Build log.
You must ensure that all Application Explorer users have access to the Component Interfaces that you deployed and built in the previous sections. As with all PeopleSoft objects, security is assigned at the Permission List level. Review your site security requirements to determine which users are going to work with Composer, and then set Component Interface security for each distinct Permission List belonging to those users.
NOTE: These Component Interfaces have only Get and Find access and cannot be used to update your PeopleSoft database. This minimizes any possible security exposure.
In PeopleSoft release 8.1, you may set security in 2, 3, or 4-tier mode; in release 8.4 and higher, you may set security 4-tier mode only.
The following procedure describes how to configure security for all supported releases of PeopleSoft in all supported modes. The figures shown in the steps are from PeopleSoft release 8.4 in 4-tier mode.
To configure security for each Component Interface:
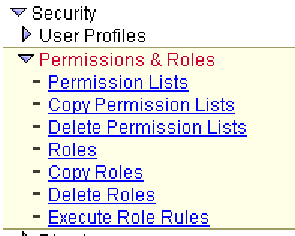
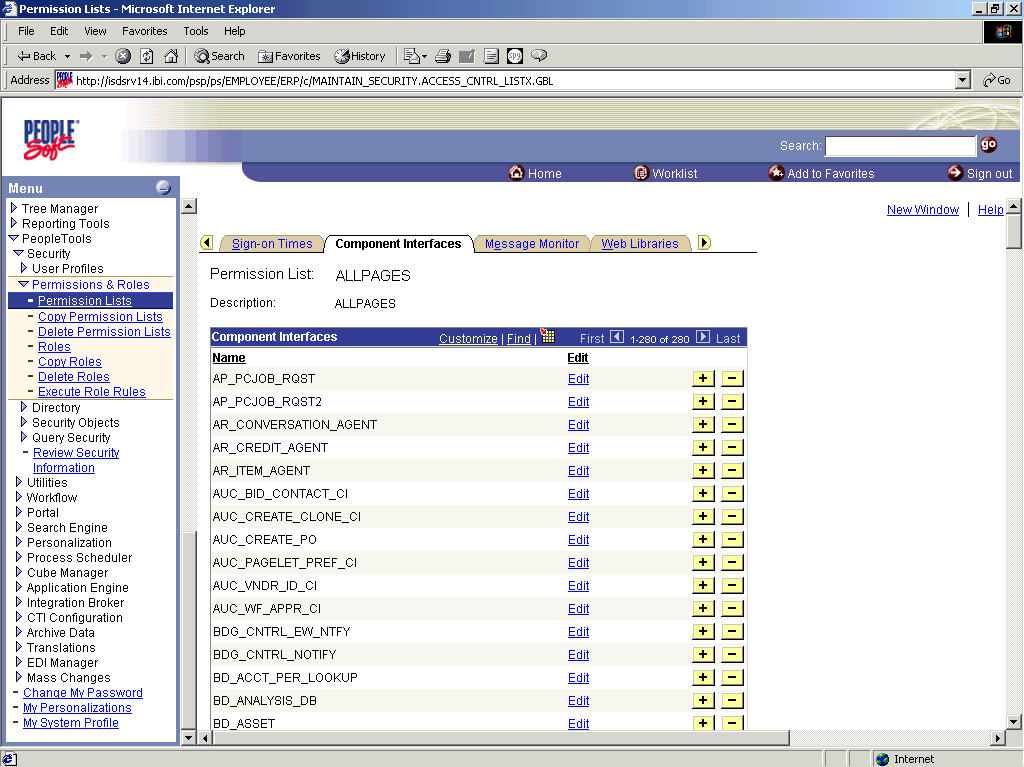
Choose PeopleTools, Security, User Profiles, Permissions & Roles, and then Permission Lists.
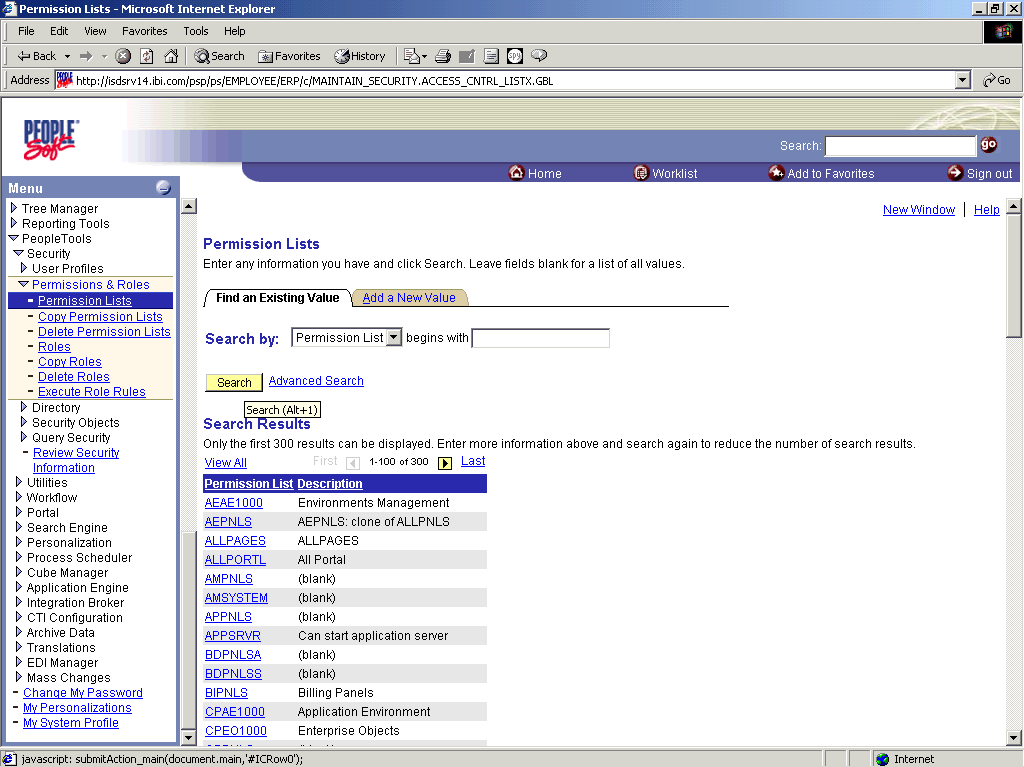
Select Search and select the relevant Permission List. The Permission List pane opens on the right.
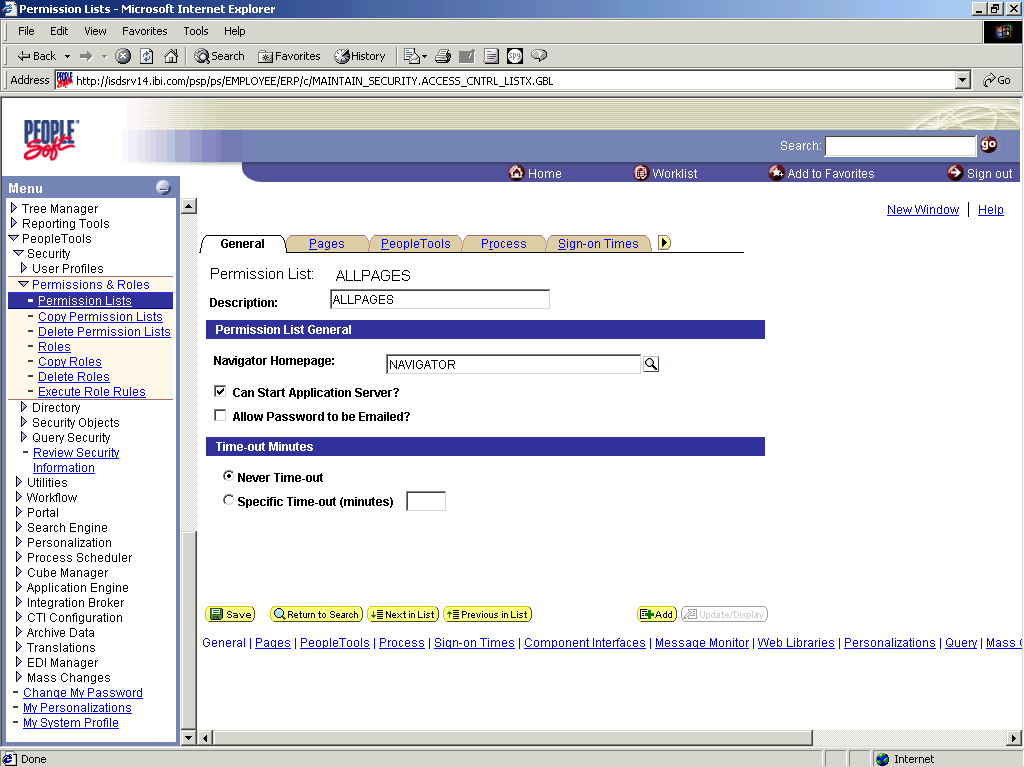
Click the right arrow next to the Sign-on Times tab to display the Component Interfaces tab.
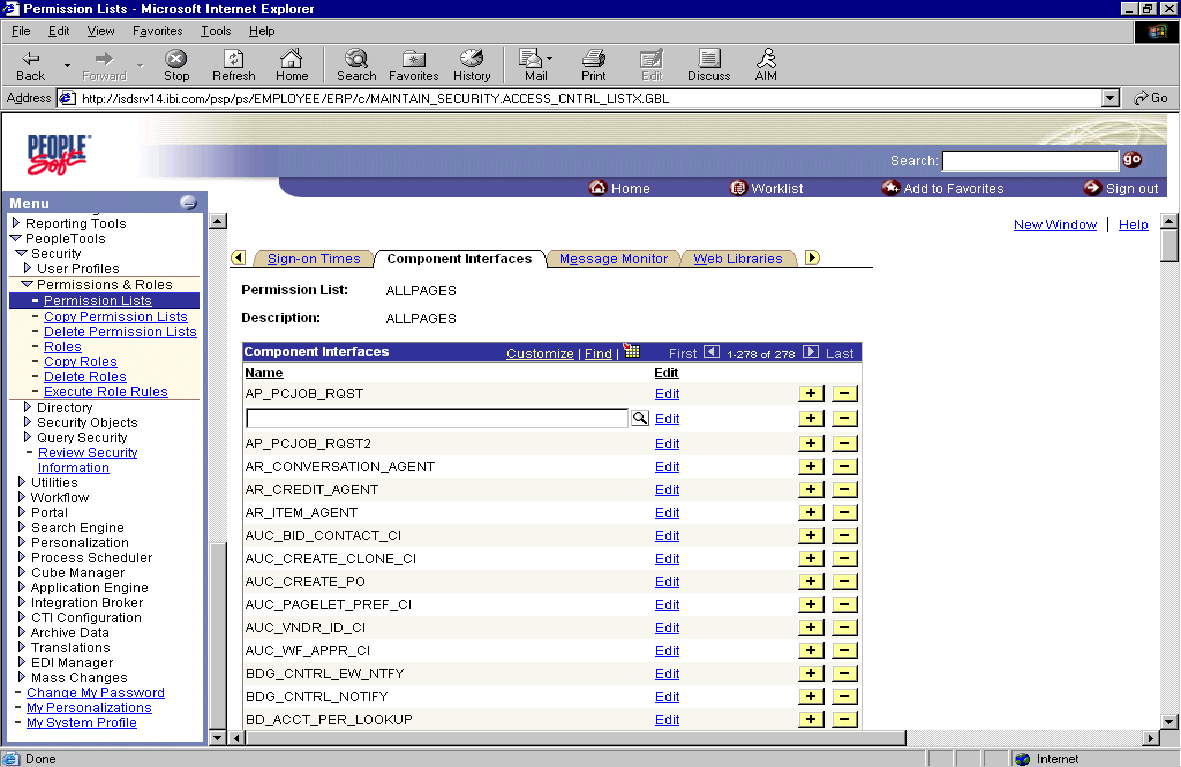
To add a new row to the Component Interfaces list, select the plus sign (+).
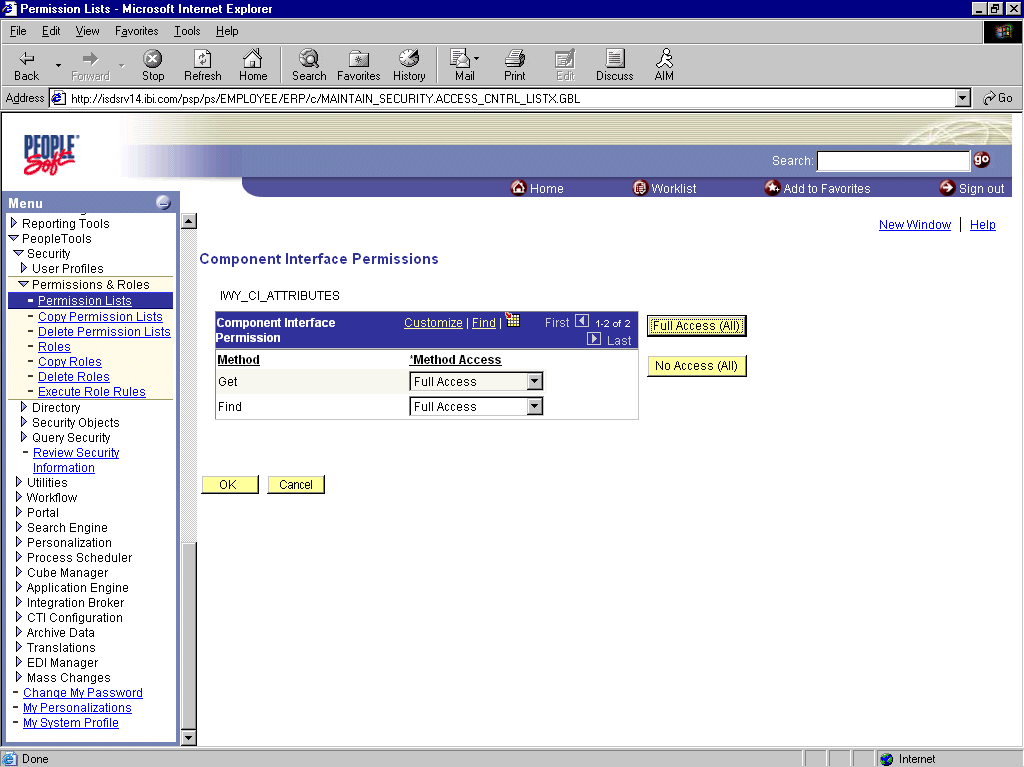
Enter or select the IWY_CI_ATTRIBUTES Component Interface and select Edit.
To set the Get and Find methods to Full Access, select Full Access (All).
Repeat steps 5 through 8 for the IWY_CI_MESSAGES Component Interface.
Scroll down to the bottom of the Component Interfaces window and click Save.
You have finished configuring security for the Component Interfaces delivered with Composer. To test these Component Interfaces, see Testing the Component Interfaces.
You must test each of the Component Interfaces that were created and secured in the previous sections before using them.
To test the Component Interfaces:
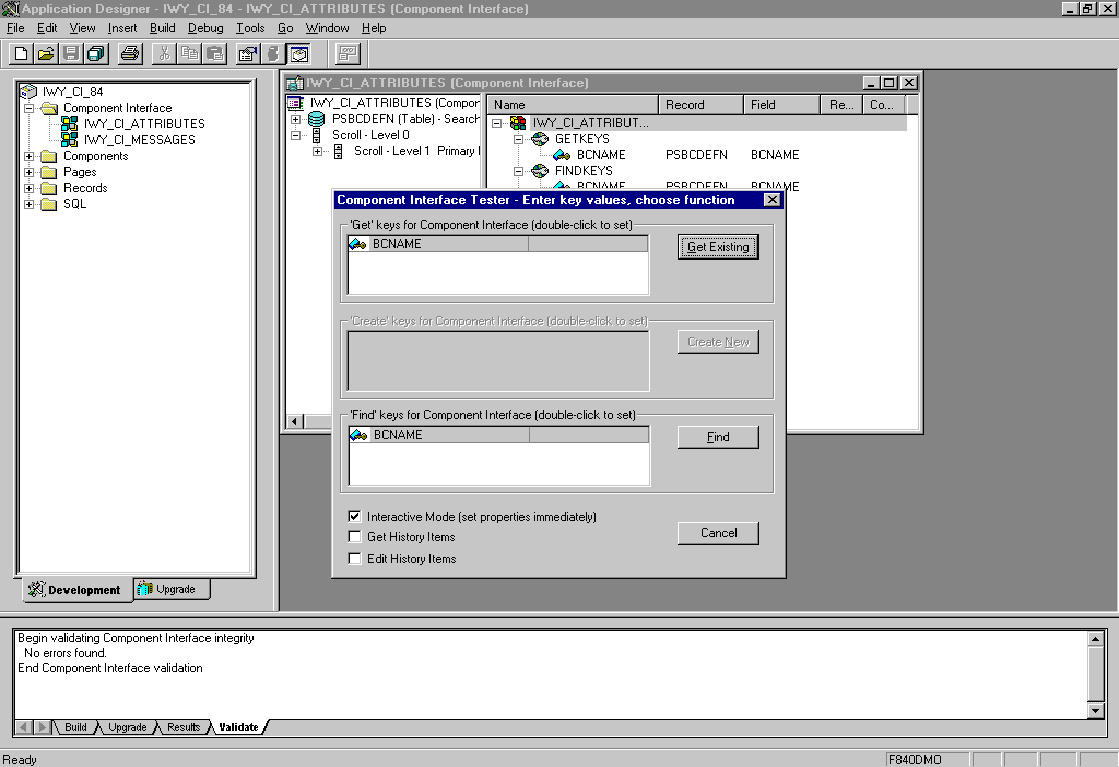
In PeopleSoft Application Designer, open the IWY_CI_ATTRIBUTES Component Interface.
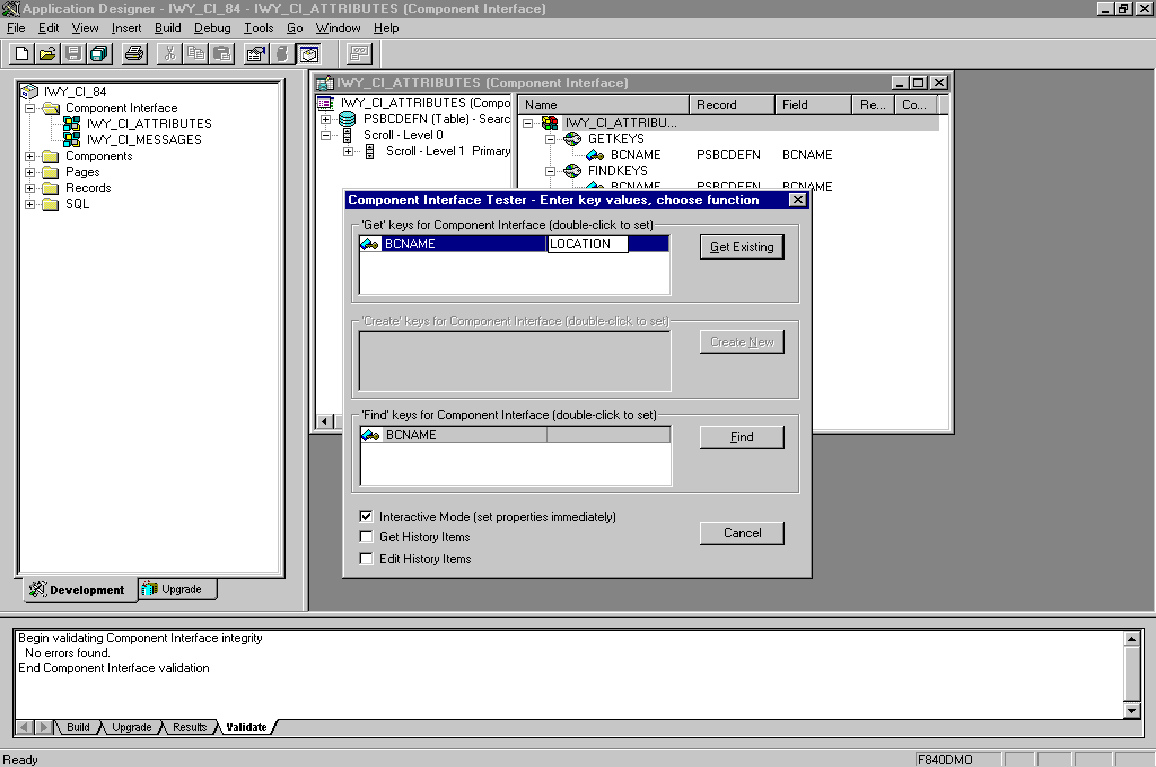
Select Tools, and then Test Component Interface. The Component Interface Tester dialog box is displayed.
NOTE: The Create New option is disabled because the Add method is not applicable to this Component Interface.
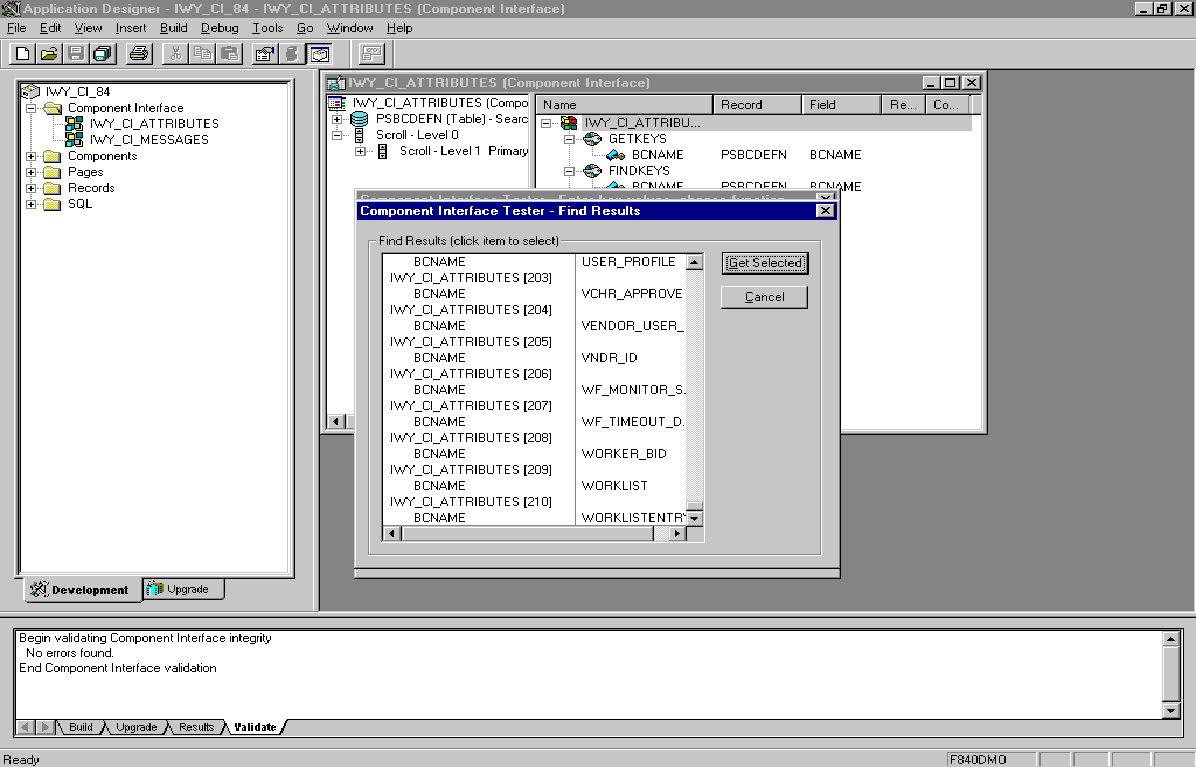
Click Find. Entries for the underlying component are displayed.
NOTE: A message may appear stating that display is limited to a certain number of entries; this is not a problem.
Highlight one of the lines with its corresponding key in the Find Results window and click Get Selected. The relevant data for the selected key is displayed.
If this window is displayed, the Component Interface has been successfully tested for the Find method.
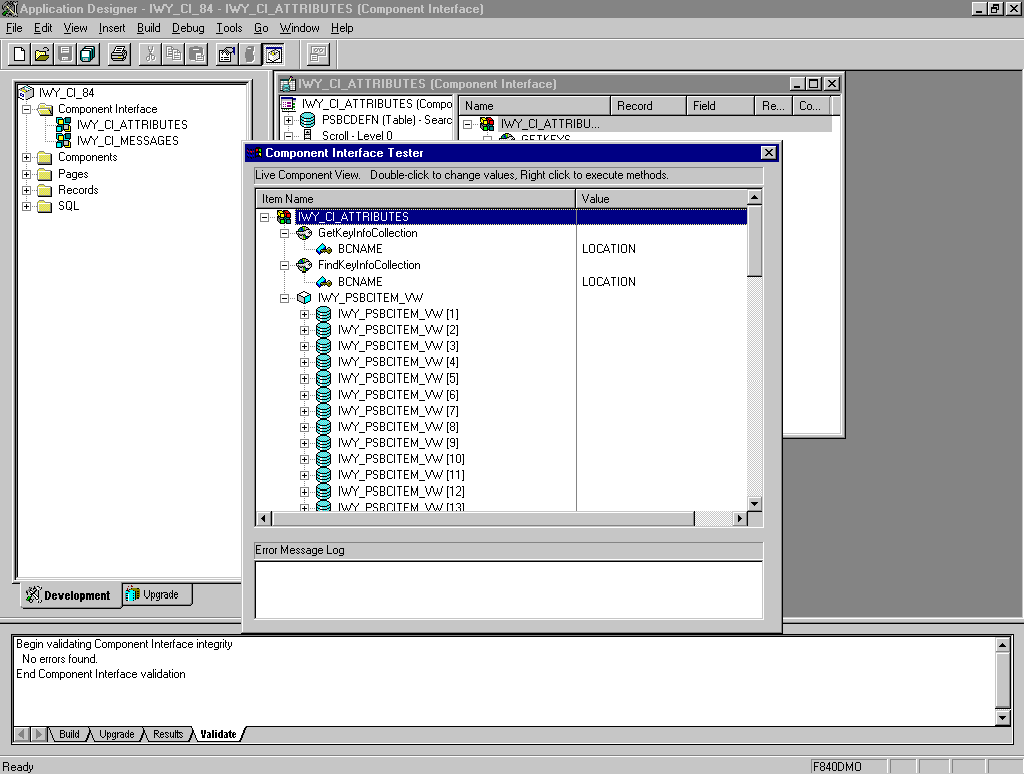
Click the Get button. For the Get method, an existing key must be entered.
The exposed properties for the key that is entered are returned.
If this window is displayed, the Component Interface has been successfully tested for the Get method.
Repeat this process for the IWY_CI_MESSAGES Component Interface.
You must create a PeopleSoft API to enable communications with the PeopleSoft application. The API is a collection of Java class files that reside on the client machine and mediate between the client application layer and PeopleSoft. You also must apply security to the component interface and test the component interface (see Securing a Component Interface and Testing a Component Interface).
Before you can build working integration applications with the Composer Connect for PeopleSoft®, you must create Java classes for the particular PeopleSoft services you wish to utilize, and make these classes available to Composer (at design time as well as runtime). These classes serve as the API bindings that allow your Composer components to perform Add, Update, and other operations on the target PeopleSoft system.
To create the necessary Java classes, you will:
Determine which PeopleSoft services (methods) you wish to call from Composer.
Create a Component Interface for each service using the PeopleSoft Application Designer.
Use the Application Designer to generate Java source files representing the API bindings for the particular Component Interface(s) you want to use (which could be just a few, or potentially many).
Use javac.exe (in your JDK) to compile the generated Java sources into class files.
Use jar.exe (from the JDK) to assemble the class files into a Java archive (JAR).
Put the JAR on your design-time and runtime machines and make appropriate classpath updates.
The detailed procedure is as follows.
To create Component Interface Classes (and JAR)
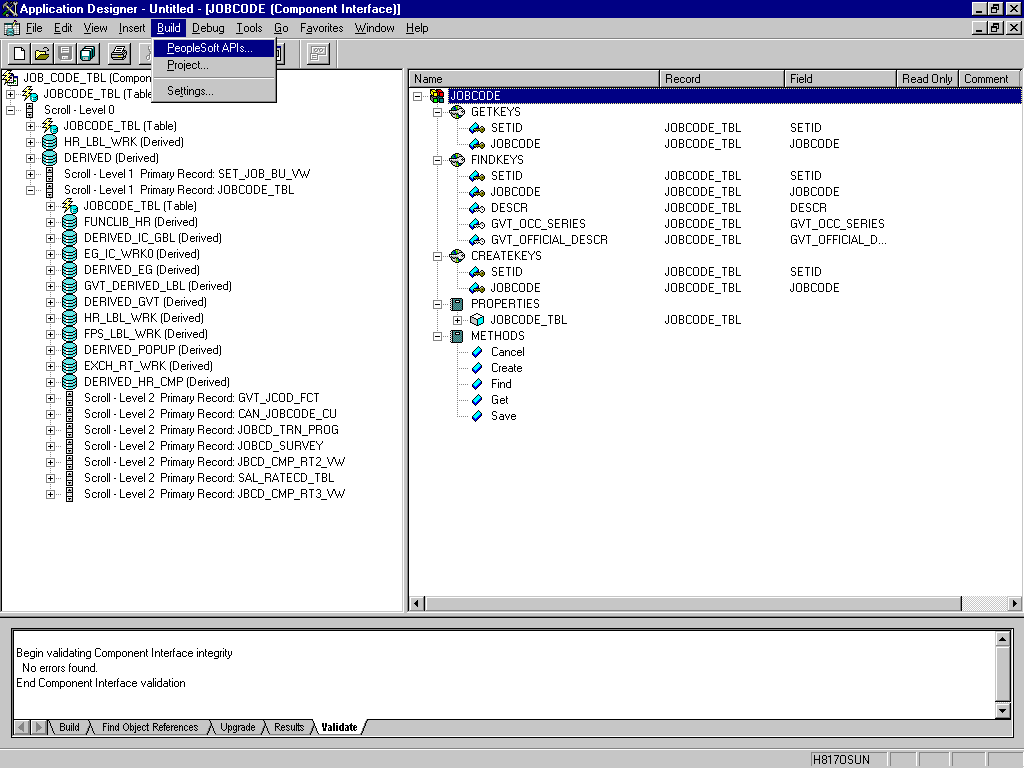
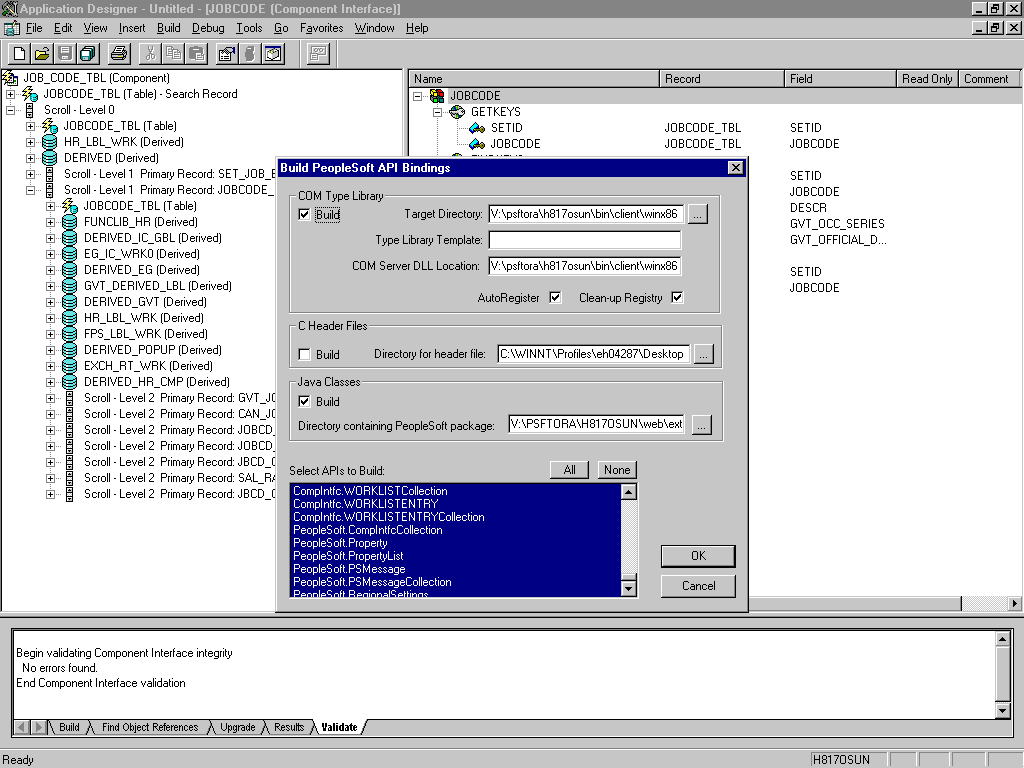
From the PeopleSoft Application Designer, open a component interface.
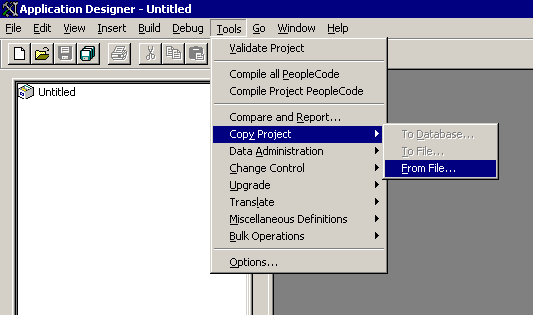
Click the right-hand pane to give it focus. Then select PeopleSoft APIs from the Build menu. (See the previous illustration.)
The Build PeopleSoft API Bindings dialog box opens and prompts you for the types of bindings to create.
Ensure that Java Classes Build is selected (deselect "COM Type Library Build" if necessary), then select a directory on your local machine where the generated Java files are to be placed.
Select the APIs for which you wish to generate Java source files. (Click the None button first, to clear any selections.)
NOTE: In addition to the APIs for the selected component interface, you also must generate the API files for the following generic component interface properties:
Click OK. PeopleSoft generates the files. This may take from a few seconds to several minutes, depending on how many selections you made. After the process is complete, a message appears in the PeopleSoft Application Designer output window.
The files you generated in the previous steps must be compiled into classes, and the classes packaged into a JAR, before you can use them.
Note that PeopleSoft places the Java sources to be compiled in the directory called
[targetFolder]\PeopleSoft\Generated\CompIntfc
where targetFolder is the directory you specified during the build process.
There are two Java files for every API file that you selected when you generated the source files.
Before you compile the Java sources, you should confirm that you have a copy of the PeopleSoft Java Object Adapter (the psjoa.jar file that resides on your PeopleSoft Application Server under the PS_HOME\Web\psjoa directory). Note its location.
How to Compile the generated PeopleSoft API Java sources
NOTE: Before beginning, ensure that you have a copy of Sun's JDK (1.4.x or later) on your machine.
If you are compiling on a machine that does not have a local copy of the psjoa.jar file, bring a copy onto the local machine. You will need to have this JAR in the classpath in order for compilation to occur without errors.
Compile the files. To do this, first open an operating-system console and navigate to the target folder you specified in the Java Target Build step (step 4) of the previous procedure. From there, run a batch file or shell script that invokes the javac.exe program in your JDK to compile the sources. A typical Windows batch file that does this might look like:
  @echo off
  set JAVA_HOME=<my-java-home>
  set PATH=%JAVA_HOME%\bin;%PATH%
  set CLASSPATH=%JAVA_HOME%\lib\tools.jar;psjoa.jar;%CLASSPATH%
  javac -classpath %CLASSPATH% .\PeopleSoft\Generated\CompIntfc\*.java
is the fully qualified path name of your Java home directory.
Compress the class files into a JAR file. Again, start from the target directory you specified in the Java Target Build step of the previous section's procedure. A Windows batch file similar to the following will create a JAR file named psGenComp.jar:
  @echo off
  set JAVA_HOME= my-java-home
  set PATH=%JAVA_HOME%\bin;%PATH%
  set CLASSPATH=%JAVA_HOME%\lib\tools.jar;%CLASSPATH%
  jar cvf psGenComp.jar .\PeopleSoft\Generated\CompIntfc\*.class
Substitute the appropriate path for my-java-home. (e.g., c:/jdk142.)
NOTE: Java is case-sensitive. Be sure to use the correct case when creating the JAR file since the Java classloader mechanism depends on this.
Place the resulting JAR file (in this example, psGenComp.jar) into your exteNd installation's Common/lib directory. This applies to both design-time and runtime machines, if they are different.
You will need to activate your design-time and runtime copies of the Novell exteNd Composer Connect for PeopleSoft® before using them. Follow the procedure outlined below.
To update the license on your design-time software
Obtain a valid license string from your Novell representative.
NOTE: The same license string will be used to activate both the design-time and runtime versions of the software.
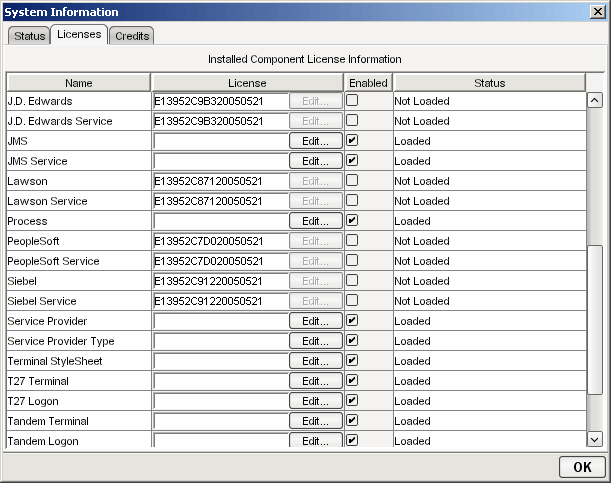
Use the About Composer command on the Help menu, on Composer's main menu. An "About" screen appears.
At the bottom of the "About" dialog, click the System button. A System Information dialog appears.
Near the top of the System Information dialog, click the Licenses tab to bring it forward.
Scroll down until you see the table row for PeopleSoft.
NOTE: The Connect ships with an Evaluation license string which may be used for 90 days.
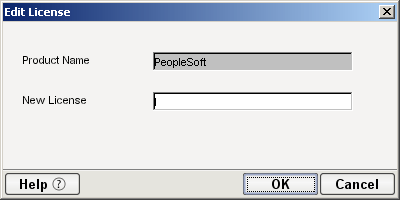
To use the evaluation license string, select the check box in the Enabled column and skip to Step 10. To enter a different license string, select the check box in the Enabled column. The Edit button in the Siebel row is enabled.
Select Edit in the PeopleSoft row. The Edit License dialog box is displayed.
Type the license string for the Composer Connect for PeopleSoft in the New License field.
Repeat Step 7 through Step 9 for the PeopleSoft Service row.
Start the application server if it is not already running. (Novell exteNd Composer Enterprise Server should already be installed. It will start when the application server starts.)
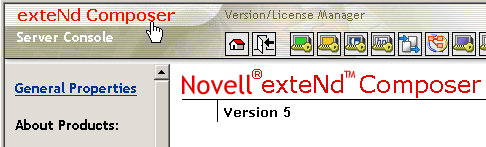
Open a browser window and navigate to the Novell exteNd Composer main administrative console. Typically, this is at:
http://localhost/exteNdComposer
In the upper left corner of the console window, click the exteNd Composer logo immediately above the words "Server Console." See the following illustration.
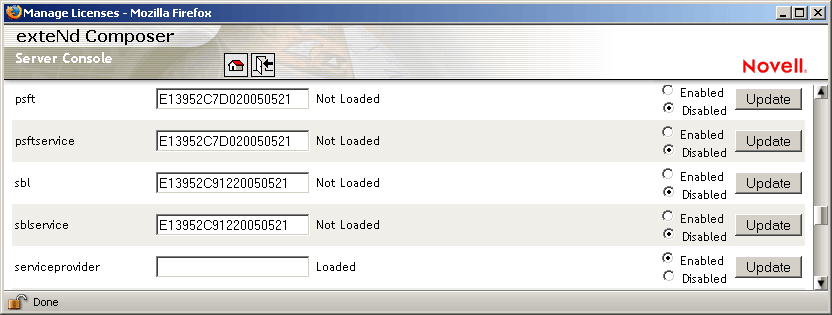
In the content area of the main frame, near the bottom, click the Licenses button. A new window will open, showing the license status of every Composer Connect. See the following illustration.
Scroll down to the entry labeled "psft".
NOTE: The Connect ships with Evaluation license strings which may be used for 90 days.
Type a license string in the text field in the "psft" row; then select Enabled in the "psft" row. To use the evaluation license string, just select Enabled.
Type a license string in the text field in the "psftservice" row; then select Enabled in the "psftservice" row. To use the evaluation license string, just select Enabled.
Select Update in the "psftservice" row.
Copyright © 2004-2005 Novell, Inc. All rights reserved. Copyright © 1997, 1998, 1999, 2000, 2001, 2002, 2003 SilverStream Software, LLC. All rights reserved. more ...