UTS Connect User's Guide
CHAPTER 4
An action is similar to a programming statement in that it takes input in the form of parameters and performs specific tasks. Please see the chapters in the Composer User's Guide devoted to Actions.
Within the UTS Component Editor, a set of instructions for processing XML documents or communicating with non-XML data sources is created as part of an Action Model. The Action Model performs all data mapping, data transformation, data transfer between hosts and XML documents, and data transfer within components and services.
An Action Model is made up of a list of actions that work together. As an example, you might design an Action Model that would read some invoice data from a file and then transform the data in some way before placing it in an output XML document.
The Action Model mentioned above would be composed of several actions. These actions would:
Use an XML document containing a sku number as input to perform a UTS transaction which retrieves the invoice data for that sku from an inventory database that resides on your Unisys host
As mentioned in the previous chapter, the UTS Connect includes three actions that are specific to the UTS environment: Set Screen Text, Send Key and Check Screen.
The purpose of these actions is to allow the UTS component (running in a deployed service) to replicate, at runtime, the terminal/host interactions that occur in a UTS session. The usage and meanings of these actions are described in further detail below.

The Set Screen Text action encapsulates "keystroke data" (whether actually obtained from keystrokes, or through a drag-and-drop mapping, or via an ECMAScript expression built with the Expression Builder) that will be sent to the host in a single transmission at component execution time. When the Set Screen Text action executes, the data will appear on the host system screen. The data will not, however, be sent to the host until an attention key of some sort is sent using the Send Key Action..
The Set Screen Text action can be created in several ways:
In Record mode, just begin typing on the Native Environment Pane. Keystrokes are automatically captured to a new Set Screen Text action.
Right-mouse-click anywhere in the Action Model; a contextual menu appears. Select New Action and Set Screen Text.
In the main menu bar, under Action, select New Action and Set Screen Text.
 To
create a Set Screen Text action using menu commands:
To
create a Set Screen Text action using menu commands:
Right-mouse-click anywhere in the Action Model and select New Action, then Set Screen Text, from the contextual menu (or use the Action menu as described above). The Set Screen Text dialog will appear.
To map a DOM element's contents to the buffer, click the XPath radio button, then select a DOM from the pulldown list and type the appropriate XPath node name in the text area (or click the Expression icon at right and build the node name using the Expression Builder).
To specify the buffer's contents using ECMAScript, click the Expression radio button, as shown on the screen above, then use the Expression Builder dialog to create an ECMAScript expression that evaluates to a string.
To specify the Row at which to receive data, type a value in the field. By default, the number you type will be a constant. The down arrow next to the k (constant) allows you to toggle back and forth between entering a constant and an ECMAScript expression.
To specify the Column at which to receive data, type a value in the field. By default, the number you type will be a constant. The down arrow next to the k (constant) allows you to toggle back and forth between entering a constant and an ECMAScript expression
NOTE: When a Set Screen Text action is created automatically for you while recording your session, all of your subsequent keystrokes will be captured to the buffer until you press an attention key or select one from the Send Key dialog.
The Send Key action does simply that - it sends an attention key to the host. This action will generally follow a Set Screen Text action so that the information you wish to transmit to the host gets there. When the Send Key action executes, the data you specified in the Set Screen Text action are actually transmitted to the host. Some Send Key actions, of course, stand alone and can be pressed at any time to receive specific information, clear the screen or navigate to different areas.
The Send Key action can be created in several ways:
In Record mode, press one of the PC keys designated as an attention key (see the previous chapter for a discussion of these keys) to have the attention key executed at the current cursor position.
From the drop down menu, select View, Terminal Keypad, click on an attention key and click OK to have the attention key executed at the current cursor position.
Click on the Send Key icon in the main toolbar to bring up the Send Key dialog box.
To
create a Send Key action using the main toolbar icon:
With focus on the action after which you would like your Send Key action to appear, click on the Send Key icon in the main toolbar. The Send Key dialog will appear.
From the Key Value drop down, select the attention key you would like to send to the host. Remember that the function for each attention key may vary depending on the host application.
If you wish the key to execute at a position other than the current row/column location, check the Override Cursor Position box. This will enable the Row and Column position fields.
To specify the Row at which to transmit the key, type a value in the field. By default, the number you type will be a constant. Alternatively, you can click on the Expression builder to enter the row in the form of an ECMAScript expression.
To specify the Column at which to transmit the key, type a value in the field. By default, the number you type will be a constant. Alternatively, you can click on the Expression builder to enter the column in the form of an ECMAScript expression.
Because of the latency involved in UTS sessions and the possibility that screen data may arrive in an arbitrary, host-application-defined order, it is essential that your component can depend on the terminal screen being in a given state before it operates on the current screen data. The Check Screen action makes it possible for your component to stay "in sync" with the host. You will manually create Check Screen actions at various points in your Action Model so that precisely the correct screens are acted on at precisely the right time(s).
To create a new Check Screen action, you can do one of the following:
Click on the "Create Check Screen Action" button on the main toolbar, or
Perform a right mouse click inside the action list, then select New Action and Check Screen from the contextual menu, or
In the component editor's main menu bar, select Action, then New Action, then Check Screen
While you are in Record mode, with your cursor in the Native Environment Pane, right-click then select Check Screen.
NOTE: You will most often use the toolbar button when you are in Record mode.
To create a
Check Screen action using a menu command:
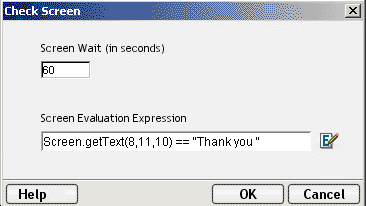
With your cursor positioned in the Action Model on the action item after which you want your new item to appear, perform a right mouse click. Then select New Action and Check Screen from the contextual menu (or use the Action menu in the main menu bar as described above). The Check Screen dialog appears.
Specify a Screen Wait value in seconds. (See discussion below.)
Specify a Screen Evaluation Expression by typing one in directly or clicking on the Expression Builder icon to create one. (See discussion below.)
It is important that the execution of actions in your Action Model not proceed until the host application is ready, and all screen data have arrived (that is, the screen is in a known state).
Your component must have some way of "knowing" when the current screen is ready. The Check Screen Action is how you specify the readiness criteria.
The purpose of the Check Screen Action dialog is twofold:
It allows you to specify a wait time for program synchronization.
It allows you to specify an expression which will be used as a criterion to judge whether the screen is in a state of readiness at execution time.
The Screen Wait value (in seconds) represents the maximum amount of time that your component will wait for screen data to arrive and meet the readiness criterion specified in the expression. If the available screen data do not meet the readiness criteria before the specified number of seconds have elapsed, an exception is thrown.
NOTE: Obviously, since the latency involved in a UTS session can vary greatly from application to application, from connection to connection, or even from screen to screen, a great deal of discretion should be exercised in deciding on a Screen Wait value. Careful testing of the component at design time as well as on the server will be required in order to determine "safe" Screen Wait values.
The default Screen Wait value is determined by what you entered when setting up your UTS Connection Resource.
To determine your "go-ahead" criterion, you can click the Expression radio button in the Check Screen Action dialog and enter an ECMAScript expression in the associated text field. The expression you create will usually check on the existence of some specific data at a location in the Screen Object buffer. At runtime, if the expression evaluates as "true," the screen will be considered ready; but not otherwise. An example of such an expression would be: Screen.getText(1,11,4) == "MARC"
Expressions are discussed in detail below.
The easiest way to create an Action Model for your component is to use Record mode. When you build an Action Model in this way, a new Set Screen Text action is created for you automatically as soon as you begin typing or drag an element from the Input DOM into the appropriate field onscreen. All you need then do is send the appropriate attention key, wait for the next screen to arrive from the host, add a Check Screen action to make sure you are on the right screen and begin the process again, repeatedly. In this fashion, a sequence of Set Screen Texts, Send Keys and Check Screens actions can be built very quickly and naturally.
Working in record mode will be discussed further in Chapter 5, in the section entitled "Recording a UTS Session."
The Connect for UTS exposes several UTS-specific ECMAScript variables and object extensions, which are visible in Expression Builder picklists. The UTS-specific items are listed under the node labelled "UTS." There are two child nodes: Login and Screen Methods. See illustration below.
UTS Connection Resources have two global variables that are accessible from Expression Builder dialogs: USERID and PASSWORD. These properties (available under the Login node of the UTS picktree) specify the User ID and Password values that may be requested by the host system when you connect. You can map these variables into the terminal screen, which eliminates the need for typing user and password information explicitly in a map action.
NOTE: You can also create a Set Screen Text action where the XPath source is defined as $PASSWORD.
When an Expression Builder window is accessed from a Map or Function action in the UTS Component, the picklists at the top of the window expose special UTS-specific ECMAScript extensions, consisting of various methods of the Screen object.
Hover-help is available if you let the mouse loiter over a given picktree item. (See illustration.)
In addition, you can obtain more complete online help by clicking Help in the lower left corner of the dialog.
The Screen object offers methods with the following names, signatures, and usage conventions:
Returns datatype: int
This method returns the display attribute value of the character at the screen position given by aRow, aColumn. The complete set of possible display attribute values is listed in "UTS Display Attributes". An example of using this method is:
  if (Screen.getAttribute( 5, 20 ) == 34) // if character at row 5, col 20 is protected and bold
  ... // do something
Returns datatype: int
This method returns the current column position of the cursor in the UTS emulator screen (Native Environment Pane). Column positions are one-based rather than zero-based. In other words, in 24x80 mode, this method would return a value from 1 to 80, inclusive.
Returns datatype: int
This method returns the current row position of the cursor in the UTS emulator screen (Native Environment Pane). Row positions are one-based rather than zero-based. In other words, in 24x80 mode, this method would return a value from 1 to 24, inclusive.
Returns datatype: int
This method returns the native horizontal dimension of the current screen. (Due to possible mode changes in the course of host-program execution, this value can change from screen to screen. Do not depend on this value staying constant over the life of the component.) When a program is in 24x80 mode, this method will return 80. To loop over all columns of a screen, regardless of its native dimensions, you could do:
  for (var i = 1; i <= Screen.getCols(); i++)
  {
        var myCol = Screen.getTextAt( i, 1, Screen.getCols() );
        // do something with myCol
  }
Returns datatype: string
The result of this method, when placed in a variable, returns the string representing the next captured message. The setMessageCaptureOn() method (see below) must be set in order for this method to return anything. In addition to these, there are two other messaging methods: hasMoreMessages() and setMessageCaptureOff(). Below is an example demonstrating how the four of them might all be used together:
  function msgChecker(theScreen)
  {
    theScreen.setMessageCaptureOn();
    while (theScreen.hasMoreMessages())
      {
         alert(theScreen.getNextMessage());
      }
    theScreen.setMessageCaptureOff();
  }
Returns datatype: string
The result of this method, when placed in a variable, returns the string representing all characters in the cursor's row, starting at column 1 and continuing to, but not including, the value returned by getCursorCol()—in other words, everything from the beginning of the line to the current cursor position. As an example:
  var prompt=Screen.getPrompt();
  alert(prompt);
NOTE: The string returned may or may not actually be a host prompt.
Returns datatype: int
This method returns the native vertical dimension of the current screen. (Due to possible mode changes in the course of host-program execution, this value can change from screen to screen. Do not depend on this value staying constant over the life of the component.) When a program is in 24x80 mode, this method will return 24. To loop over all rows of a screen, regardless of its native dimensions, you could do:
  for (var i = 1; i <= Screen.getRows(); i++)
  {
        var myRow = Screen.getText( i, 1, Screen.getRows() );
        // do something with myRow
  }
  var wholeScreen = Screen.getText( 1, 1 + 24 * 80 ); // ERROR!
Returns datatype: string
The result of this method, when placed in a variable, returns an ECMAScript String that represents the black status line at the bottom of the Native Environment Pane. This status line is only enabled following a Check Screen action.
If you wished to create an alert stating the current status of the screen, for example, you could create a function action like the following:
  var screenStatus = Screen.getStatusLine( );
  alert(screenStatus);
Returns datatype: String
This method returns an ECMAScript String that represents the sequence of characters (of length nLength) in the current screen starting at the row and column position specified. Note that nRow and nColumn are one-based, not zero-based. A zero value for either of these parameters will cause an exception.
To put the first half of the 20th row of a 24x80 screen into a variable, you would do:
var myRow = Screen.getText( 20, 1, 40 );
The getText() technique is used internally both for drag-and-drop Map actions involving screen selections (described in "Selecting Continuous Data" further below) and in the Check Screen action.
NOTE: If the amount of data selected by the function's arguments goes past the end of a screen line, no newlines or other special characters are inserted into the string.
The getTextFromRectangle() method returns a single String consisting of substrings (one per row) comprising all the characters within the bounding box defined by the top left and bottom right row/column coordinates specified as parameters. So for example, in 24x80 mode, you could obtain the upper left quarter of the screen by doing:
var topLeftQuadrant = Screen.getTextFromRectangle(1,1,12,40);
The getTextFromRectangle() method is used internally in drag-and-drop Map actions involving rectangular screen selection regions created using the Shift-selection method (see"Selecting Rectangular Regions" below).
Note that the string returned by this method contains newline delimiters between substrings. That is, there will be one newline at the end of each row's worth of data. The overall length of the returned string will thus be the number of rows times the number of columns, plus the number of rows. For example, Screen.getTextFromRectangle(1,1,4,4).length will equal 20.
The hasMoreMessages() method returns true if more messages are available to obtain via the getNextMessage() method, described above. This method is demonstrated along with the other messaging methods in the getNextMessage() method, described above.
The putString() method allows you to send data to a specific row/column location on the screen programmatically, without explicitly creating a Set Screen Text action. Example:
  var goHome = "HOME";
  Screen.putString(2,14, goHome); // send string to screen
The putStringInField() method allows you to send data to a specific field on the screen programmatically, without explicitly creating a Set Screen Text action. In the MARC system, for example, there are typically two fields, the Action: field on the second line, and the Choice: field on the 21st line. The example below would have the same effect as the putString one above:
  var goHome = "HOME";
  Screen.putStringInField( 1, goHome); // send string to screen
The setMessageCaptureOff() method turns off the message capture feature (see setMessageCaptureOn() below):
The setMessageCaptureOn() method turns on the message capture feature so that all host messages are stored for retrieval by the caller. This method is demonstrated along with the other messaging methods in the getNextMessage() method, described above.
The typeKeys( Str) method allows the keystroke you represent by string to be emulated on the screen. The specified string will be placed at the current cursor position on the screen. A function containing the following text would have the same effect as a SendKey action:
Screen.typekeys( "[Transmit]")
In record mode, it is possible to select multiple rows of data in a continuous stream, for purposes of dragging out to a DOM.
When you drag across multiple rows of data without holding the Shift key down, all characters from the initial screen offset (at the mouse-down event) to the final screen offset (at mouse-up) are selected, as shown in the graphic below. (The selected text is "reversed out." A partial row has been selected, followed by two complete rows, followed by another partial row. 
You will notice that as you drag, the component editor window's status line in the lower left-hand corner reports the beginning and ending rows and columns of your selection. If, while in Record mode, you were to drag this selection out of the Native Environment Pane, into a DOM, a Map action would be generated as follows:

Notice that the getText() method is used. This means the captured screen characters form one string, which is mapped to Output/SCREENINFO/Screen1. No newlines or other special characters are inserted into the string. (Any blank spaces highlighted in darker blue on the screen shown are simply represented as space characters in the string.)
Sometimes you may not want the selection behavior described above. In certain cases, screen data may be grouped into zones with their own natural boundaries. For example, in the screen shown previously, you may want to capture (for drag-out purposes) just the five terms in the bottom left without their definitions and a lot of blank space. To do this, first hold the Control key down, then drag your mouse across the portion of the screen that you want to select. The selected area is highlighted and the appropriate row/column start and end points are displayed in the status line of the component editor's window, as below:

In this instance, when you drag the rectangular highlight region out of the Native Environment Pane, into a DOM, the resulting Map action uses the getTextFromRectangle() method described above. The resulting action looks like this:

This method operates in a different fashion from getText(), because the string returned by getTextFromRectangle() is wrapped at the rectangle's right edge. Newlines are inserted at the wrap points as discussed in the API description of getTextFromRectangle(), further above.
Copyright © 2004 Novell, Inc. All rights reserved. Copyright © 1997, 1998, 1999, 2000, 2001, 2002, 2003 SilverStream Software, LLC. All rights reserved. more ...