Upgrading exteNd Director Applications
CHAPTER 3
This chapter describes how to upgrade an exteNd Director application from Version 4.x to Version 5.2.1. It includes these sections:
To upgrade an exteNd Director application from Version 4.x to 5.x, you'll need to perform these tasks:
|
Step |
Task |
|---|---|
|
1 |
Backup your exteNd Director 4.x project and database. Copy them to a safe location. |
|
2 |
Create a test environment for migration and and post-migration testing. NOTE: You cannot perform the project upgrade and database migration on a running application or a server processing requests. Workflows cannot be active. |
|
3 |
Upgrade your exteNd Director 4.x project.
|
|
4 |
Migrate the data from the 4.x database to a new 5.x database.
|
|
5 |
Deploy and test the upgraded project and migrated database in the test environment. |
|
6 |
Deploy the tested application and database to your production environment. |
To upgrade your 4.x project, follow these steps:
|
Step |
Task |
Description |
|---|---|---|
|
1 |
Create a new 5.2.1 project |
The 5.2.1 project must:
|
|
2 |
Propagate the 4.x customizations to the 5.2.1 project |
For example: |
|
3 |
Copy custom artifacts from the 4.x project to the new 5.2.1 project |
For example, copy these directories: Portal\data\portal-component\*.xml Portal\data\portal-style\*.xml |
|
4 |
Run the Project Upgrade wizard in the 5.2.1 development environment |
|
|
5 |
Review the Upgrade Log and make the changes listed |
For example, you might have changed the value of the com.sssw.cm.search.synch.mode.Default (in the content management's config.xml) from immediate to batch mode. The project upgrader reports this difference. You'll need to apply these changes to the new project. |
|
6 |
Rebuild and rearchive the new project |
|
|
7 |
Create a new database in the test environment |
|
|
8 |
Make the database available to the server in the test environment |
|
|
9 |
Deploy the upgraded exteNd Director project in the test environment |
|
|
10 |
Move the tested project and database into production |
|

The Project Upgrade Wizard:
Generates a report listing the differences in the config.xml and services.xml files between your 4.x project and the new format for these files. Some of these differences are the result of your customizations which you will need to manually modify the files in the 5.x project.
 To run the Project Upgrade wizard:
In the exteNd Director development environment, open your new 5.2.1 project with the 4.x customizations applied (from the task list outlined above).
Choose Project>Director>Upgrade.
Complete the Project Upgrade panel as follows:
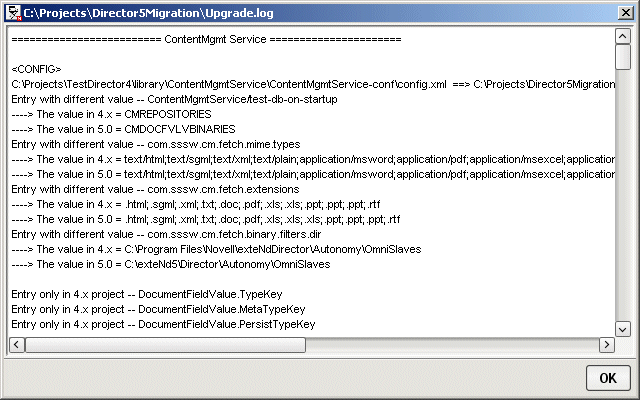
The Project Upgrade Wizard generates a log like the following:
Complete the remaining upgrade steps listed in Upgrading your Version 4.x project.
The Project Upgrade Log lists all of the differences between the 5.2.1 project and your original 4.x project. Some of these changes are a result of enhancements made to the 5.2.1 product; others are customizations that you made to the 4.x project. Review the file and make the identified updates to the new project.
For example, this log entry probably does not require an update:
  Entry with different value -- com.sssw.cm.search.queryport.Default
  ----> The value in 4.x = 2000
  ----> The value in 5.0 = 52000
  Entry with different value -- com.sssw.cm.search.indexport.Default
  ----> The value in 4.x = 2001
  ----> The value in 5.0 = 52001
It just means that between 4.x and 5.x the default ports for content management search changed from 2000 to 52000.
This section contains:
A Version 5.2.1 EAR project defaults the Portal WAR name to ProjectNamePortal. Project upgrade requires that the Version 4.x project and the Version 5.2.1 project have the same name. If your Version 4.x Portal WAR name does not follow this pattern, you'll have to change the Version 5.2.1 Portal WAR name to match the Version 4.x Portal WAR (or Custom Web App name) in these Version 5.2.1 project files:
in these Deployment plan files:
in the config.xml files in these directories:
in these XML files:
For example For example, if you created a Version 5.2.1 EAR project called myTest, the PortalWAR name created is MyTestPortal. If your version 4.x project PortalWAR name is MyWAR, you'd change the MyTestPortal-resource.spf to MyWAR-resource.spf, the MyTestPortal.spf to MyWAR.spf, and so on.
CAUTION: Perform this procedure before deploying the new project for the first time so the exteNd Director tables are created with the correct names. If you deploy before changing the Portal WAR name, delete the exteNd Director tables and redeploy after making this change.
The interface com.sssw.wf.api.EbiActivity was deprecated between 4.x and 5.x. If you used the invoke() method of this interface, follow these steps to update your code:
Change any automatic activities that implemented com.sssw.wf.api.EbiActivity to implement com.sssw.wf.api.EbiJavaActivity.
Remove any code that created a context. Instead, use the context that is passed to the invoke() method now.
Remove the forward call to the QueueDelegate. This is no longer necessary because it is now done for you.
If you upgrade a user or group page from 4.x to 5.2.1 and the page contains the stock quote component, you must repace it with the StockQuote portlet.
The General component category is not used in 5.2.1. Version 4.x components migrated to 5.2.1 that are still listed in the General category will no longer be available in the Portlet list for page personalization. To make components in the General category visible, use the DAC to change the category from General to General Portlet (or some other 5.2.1 category that you find useful).
The exteNd Director database schema changed between Version 4.x and Version 5.x so you must migrate your existing data to the new schema structure. The Data Migration utility copies exteNd Director internal data (the data stored in the exteNd Director database) from 4.x and transforms it to the proper format for 5.x.
The Data Migration utility is run via a batch file (on Windows platforms) or shell script (on UNIX or Linux platforms).
Database driver requirements The following table describes the database driver requirements for the Data Migration utility.
NOTE: The application cannot be servicing requests when you run the Data Migration Utility.
To run the DataMigration utility:
Run the DataMigration utility file:
NOTE: Disregard any error messages that appear in the command prompt window. They occur because the Data Migration Utility retrieves realm name constants. The resulting error messages include Unable to establish database connection and Need to specify class name in environment or system property. These messages do not pertain to the data migration process.
To specify the Source and Target database:
Complete the Source Database panel as follows:
Review the message bar for status messages.
If the migration utility was able to connect successfully to the source database, you'll see a message like:
Test connection successful, Source connection parameters OK.
Otherwise, you'll have to review the error messages on the data utility console.
TIP: If an error occurs and the test connection is not successful, you'll have to re-enter any JDBC URL values because these values are reinitialized when a test connection failure occurs.
Click OK to save the settings for the Source Database panel.
Choose the Target Database panel. Complete it as follows:
Review the message bar for status messages.
If the migration utility was able to connect successfully to the source database, you'll see a message like:
Test connection successful, Source connection parameters OK.
Otherwise, you'll have to review the error messages on the data utility console.
TIP: If an error occurs and the test connection is not successful, you'll have to re-enter any JDBC URL values because it is reinitialized at a test connection failure.
You can click OK to save the settings for the Target Database panel, but you'll have to re-enter the tool to continue.
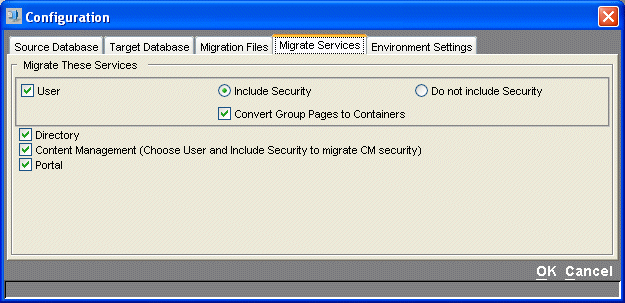
Choosing the services to migrate:
Open the Configuration section of the data migration utility.
Complete the Migrate services panel as follows:
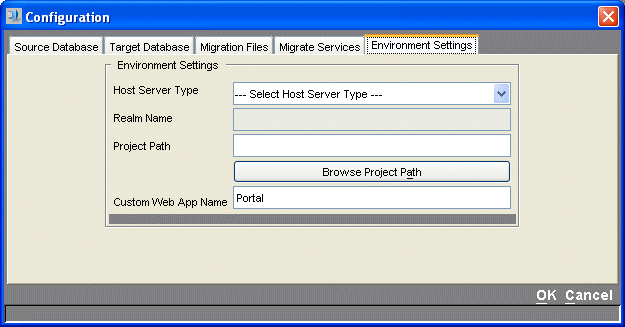
Complete the Environment Settings tab as follows:
|
Field |
What to do |
|---|---|
|
Host Server Type |
Choose the type of Directory service realm used in the 5.2.1 environment. |
|
Realm Name |
If you select Other, you can specify the name of the realm. Otherwise, the name of the realm is the same as the Host Server Type. |
|
Project Path |
The root of the exteNd Director 5.2.1 project. |
|
Custom Web App Name |
Specify the Custom Web App Name for the 5.2.1 project. For EAR projects, this is the name of the WAR containing your exteNd Director application. It's name is not editable when you create your 5.2.1 project. It is always ProjectNamePortal. It is possible to change this name after creating the project as described in Changing the Portal WAR name (EAR projects only). For WAR projects, this is the context name for the WAR (which is also the project name). |
To specify runtime parameters:
Select the menu options under Settings to specify runtime parameters for the migration process. They are:
Click the Start Data Migration (traffic light) icon to initiate the migration process:
The main window displays the status of the data migration. When complete, the window reports the number of rows copied as well as the number of errors detected.
Review the utility console (command prompt window) log file to verify that no errors have been missed. In general, the utility console provides more detail for errors, such as stack traces.
Console output is written to a file named datamigrate.log in the same directory as the DataMigration.bat file. The log file is created every time the Data Migration Utility is run. If there are old log files in the same directory, they are backed up and renamed before the new log file is created.
Edit the migration properties file datamigration.properties, which is created in the same directory as the DataMigration.bat file the first time you run the Data Migration Utility.
Examine the log.lines setting. The default setting (0) prevents the Data Migration Utility from writing logging information to disk until the process is complete.
If you change the setting to something greater than zero (such as 100, for example), the application writes to the log file every time 100 lines (approximately) are written to the application window and clears the application window.
This setting may be necessary when migrating large databases that create many messages in the window. Clearing the window frees some of the application's memory resources.
Shut down the Data Migration Utility and restart it to get the new buffer length.
Copyright © 2004-2005 Novell, Inc. All rights reserved. Copyright © 1997, 1998, 1999, 2000, 2001, 2002, 2003 SilverStream Software, LLC. All rights reserved. more ...
 For more information, see