Director Tutorials
To customize page branding by modifying preferences in the Page Header portlet.
Before you begin See About exteNd Director Tutorials.
Audience These exercises are designed for portal administrators—that is, users who belong to the PortalAdmin administrator ACL group.
This section provides exercises that show you how to perform the following tasks:

As part of the process of customizing page branding, you will configure the Page Header portlet to display new logo and background images on a container page. Before beginning this exercise, be sure you have downloaded the accessory ZIP file required for the exteNd Director tutorials, as described in the section on how to download accessory files.
 To add an image file to the Express Portal project:
Open the accessory archive Director52Tutorial.zip and select the following image files:
Click Extract and extract the files to the images directory of the Express Portal project's resource set:
exteNd suite install directory\Projects\Express\data\images
NOTE: Even though you have just added new resources to your Express Portal application, you do not need to redeploy the project. This is because exteNd Director supports dynamic loading of resources and classes within a resource set.
exteNd Director provides a Page Header portlet that you can add to a portal page to generate content for a header. Often the header on a Web page provides text and images that brand a site with a corporate identity. If you add the Page Header portlet to a container page, it will automatically wrap all other page content in a Web site with the branded look and feel.
In this exercise you will use the Portal Administration tool to modify preferences of the Page Header portlet to customize branding on a particular container page.
NOTE: To modify the Page Header portlet so the changes appear on all pages in your application, you use the Director Administration Console (DAC) to edit preferences of a registered instance of the Page Header portlet. See the section on administering registered portlets.
To modify the logo image in the Page Header portlet:
Log in to the Express Portal application as a portal administrator and start the Portal Administration tool.
TIP: You can review these steps in the section on starting the Portal Administration tool.
In the Portal Administration tool, select Maintain Container Pages.
The container page administration tool opens in your browser.
Select or create a container page that contains a Page Header portlet.
TIP: The default container page in Express Portal —DefaultContainerPage—comes with a Page Header portlet. You can also add a Page Header portlet to a page, as described in the tutorial on creating a container page.
The Content Selector tool for the selected container page opens in a new browser window.
Select Page Header in the Selected Content list and click Content Preferences.
In the Logo Image preference, change the name of the image file in the value field from portal_header_n.gif to new_logo.gif.
NOTE: new_logo.gif is one of the image files you added to the Express Portal project's resource set in the previous exercise.
The value of the Logo Image preference should now read:
${Portal/Url/Resource/images/new_logo.gif}
NOTE: The syntax ${Portal/Url/Resource/images} is a scoped path that allows you to quickly access data in an exteNd Director application. In this example, the scoped path points to the images directory in the application's resource set without requiring that you specify absolute paths.
Now you are ready to modify the background image of the Page Header portlet. Leave the Content Preferences editor running and move to the next exercise.
To modify the background image of the Page Header portlet:
Find the Background Image preference and change the name of the image file in the value field from portal_header_arch_background.jpg to new_background.gif.
NOTE: new_background.gif is one of the image files you added to the Express Portal project's resource set in a previous exercise.
The value of the Background Image preference should now read:
${Portal/Url/Resource/images/new_background.gif}
Find the Repeat Pattern preference and select the value Repeat on x axis from the dropdown menu.
Find the Background Position preference and select the value Top Left from the dropdown menu.
Now you are ready to modify the site name of the Page Header portlet. Leave the Content Preferences editor running and move to the next exercise.
To modify the site name of the Page Header portlet:
In the Content Preferences editor, scroll down to the Site Name preference. In its value field change the text Novell to My Garden Supply Company.
TIP: You may need to scroll right in the value field to find the text Novell.
Scroll further right in the value field and delete the following text:
exteNd™ Director
Click Save Contents to record your changes and dismiss the Content Selector tool.
Now you are ready to view the rebranded page. Move to the next exercise.
In these exercises you will see how your modifications to the Page Header portlet rebrand the container page. You will also learn about the scope of your modifications.
To test the rebranded container page:
Open a new browser and log in to the Express Portal application.
Open the container page that contains the rebranded header.
TIP: You can review how to open a container page in the section on viewing a container page.
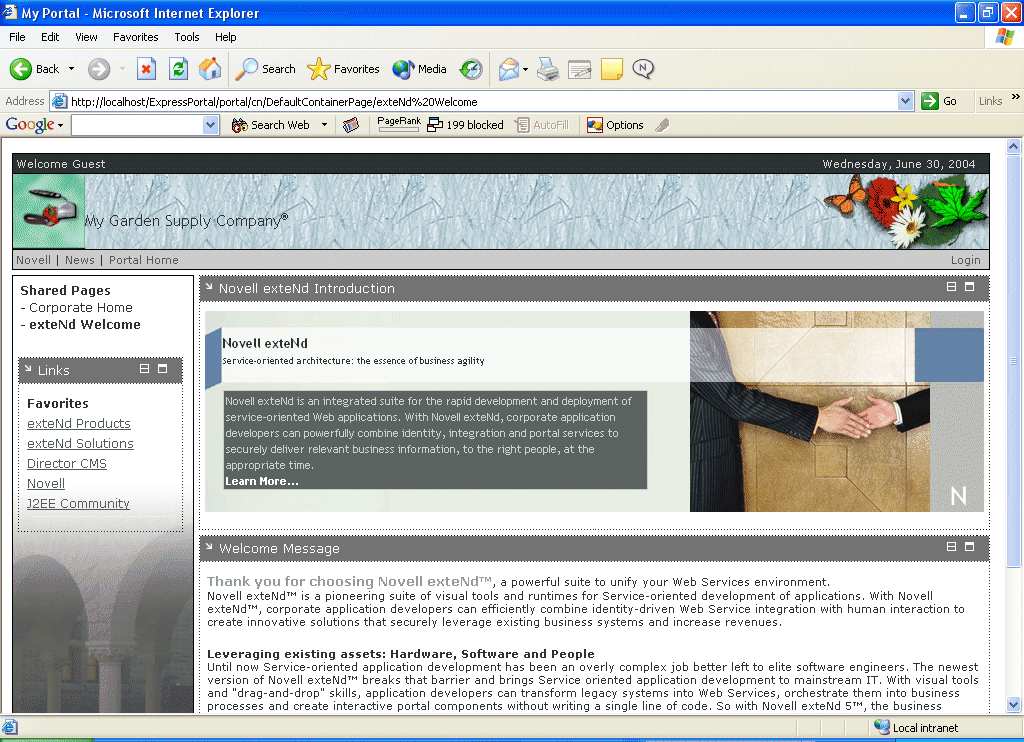
The rebranded header should look like this:
Note the new logo, site name, and background image in the page header.
TIP: The modifications you made apply only to this instance of the Page Header portlet, which appears on this particular container page. This is because you have not changed the registered instance of the Page Header portlet, only the page instance. If you add the registered Page Header portlet to a new page, the original logo, site name, and background will appear. Try this in the next exercise. Leave your modified page open in the browser.
Determining the scope of your Page Header modifications:
With your modified page open in your browser, select Portal Administration.
Create a new container page with these properties:
|
Property |
What to specify |
|---|---|
|
Page Name |
TestContainerPage |
|
Priority |
1 |
TIP: You can review these steps in the section on creating a container page.
Recall that a registered Page Header portlet is added to new container pages by default (along with registered Page Navigation and Page Controller portlets).
In the Content Preferences editor, check the preferences you changed in the previous exercise:
Note that these preferences are set to their original values.
View the rebranded container page and TestContainerPage in a new browser session to compare the headers.
TIP: You can review the steps for viewing a container page in the section on viewing a container page.
Copyright © 2004-2005 Novell, Inc. All rights reserved. Copyright © 1997, 1998, 1999, 2000, 2001, 2002, 2003 SilverStream Software, LLC. All rights reserved. more ...