Installing Novell exteNd
CHAPTER 2
This chapter presents an overview of the Express and Server Express installation options. These options allow you to quickly install the entire suite or the server features of the suite with minimal input required. Topics include:
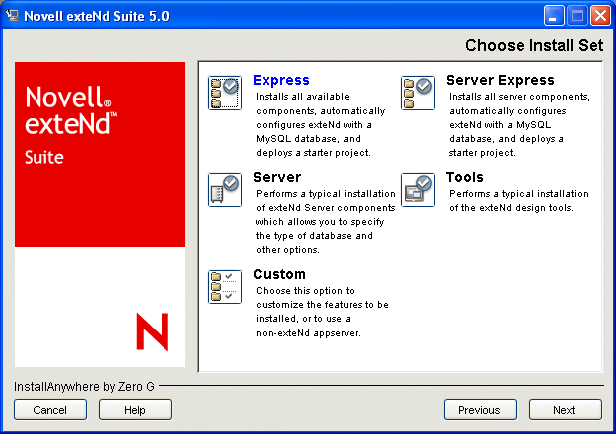
The Express install is the simplest way for you to get started using the exteNd suite of products. In addition to installing all of the design tools and server components (including the exteNd Application Server), it creates and configures a MySQL database for use as SilverMaster and deploys a portal project (Express Portal) that can be used as your starting point for development, testing, or learning. Express is available on Windows and Linux.
The Server Express option installs the server components of exteNd (including the exteNd Application Server), but not the designers and tools used for development. The Server Express install automatically creates and configures a MySQL database for use as SilverMaster and deploys the Express Portal. This install option is appropriate for machines that will be hosting exteNd applications. Server Express is available on Windows and Linux.
Although there are different things happening behind the scenes, the install wizard asks for the same input during the Express and Server Express installations.
IMPORTANT: Novell recommends uninstalling any previous version of exteNd before reinstalling. If you choose to install over an existing exteNd installation and use the Express or Server Express install, the installer will overwrite the existing SilverMaster and ExpressPortal databases. Any changes made to those databases will be lost.
 To install exteNd using the Express or Server Express option:
Exit all other programs (if running on Windows), then launch the exteNd installation program as described in Starting the install.
The product splash screen displays, including a dropdown for selecting the language in which you want to see the install prompts.
When the Introduction panel displays, read it then click Next.
To continue with the install, you must accept the license agreement (by selecting the corresponding radio button). Then click Next.
When the Installation Key panel displays, type your key (note that it's case-sensitive) then click Next.
NOTE: Your installation key determines which product features are available to be installed.
Select Express or Server Express (as appropriate), then click Next.
When the Choose Install Location panel displays, accept the default or specify a different directory where you want exteNd to be installed. Then click Next.
NOTE: If the specified directory doesn't exist, you'll be prompted to confirm that you want it created. Click OK.
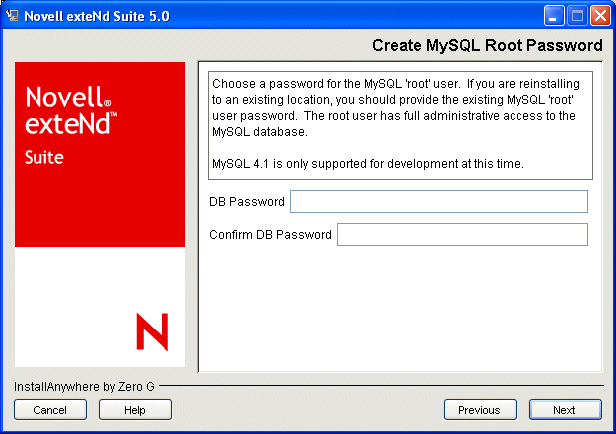
If the Configure MySQL Server panel displays, accept the default (63306) for MySQL Port or specify a different port number on which MySQL is to listen. Then click Next.
 For more information, see Using MySQL with exteNd 5.
Type the database password to be used for the MySQL root user, then click Next.
IMPORTANT: When reinstalling to an existing location, specify the existing MySQL root password.
When the HTTP Port Number panel displays, accept the default (80 on Windows, 8080 on Linux) or specify a different port number on which the exteNd Application Server is to listen. Then click Next.
For more about port usage, see the chapter on running the server in the exteNd Application Server Administrator's Guide.
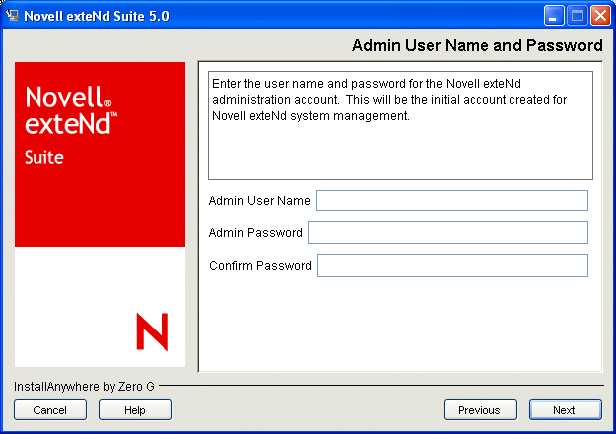
Type the user name and password to be used for the initial exteNd administration account.
When creating this account, the installation program will assign Locksmith privileges to it. Your exteNd administrator will log in to this account when managing the application server and other aspects of the exteNd system.
For more information, see the chapter on setting up users and groups in the exteNd Application Server Administrator's Guide.
Click Next to advance to the Pre-Installation Summary panel.
If the summary matches the result you want, click Install to proceed with the installation.
Copyright © 2004-2005 Novell, Inc. All rights reserved. Copyright © 1997, 1998, 1999, 2000, 2001, 2002, 2003 SilverStream Software, LLC. All rights reserved. more ...