JBoss Migration Guide
CHAPTER 2
This chapter provides instructions for installing and configuring the JBoss Application Server. It includes these topics:
Before you install the JBoss Application Server, you need to have an up-to-date version of the Java Development Kit (JDK) on your machine. Be sure to install the JDK and not the JRE.
NOTE: You need to have JDK 1.4.2.
To install the JDK:
Download the JDK from the Sun web site to a directory on your machine.
Set the JAVA_HOME environment variable to point to the location of the JDK:
Set the PATH environment variable to point to the bin directory of the JDK:
Verify that the JDK is working properly and make sure that the java executable is in your path.
To do this, you can execute java -version at a command prompt. If the JDK installation was successful, you should see output similar to the following:
  C:\>java -version
  java version "1.4.2_05"
  Java(VM) 2 Runtime Environment, Standard Edition (build 1.4.2_05-b04)
  Java Hotspot (TM) Client VM (build 1.4.2_05-b04, mixed mode)
Configuring the JDK to work with exteNd Director Before deploying an exteNd Director project to JBoss, you need to make sure that the exteNd copies of these JAR files are available to the Java runtime:
Copy these files from this exteNd directory:
Common\jre\lib\ext
NOTE: If you are developing on a Windows platform and deploying to a server running on UNIX, copy the Phaos_Crypto_FIPS_UNIX.jar from the Common\lib\other directory to the JRE directory. Rename it Phaos_Crypto_FIPS.jar.
The JBoss Application Server is available in source and binary form. If you are new to JBoss, you should plan on using the binary form, since it runs out of the box. The binary distribution is available in these file formats:
When you download the product, select the file format that is most suitable for your platform.
To install the JBoss Application Server:
Download the product from the JBoss web site.
Extract the server to a folder of your choice.
Once it's been extracted, the folder name should be jboss-4.0.x. The version number suffix will, of course, vary depending on which version you installed.
NOTE: Be sure not to extract JBoss to a directory that contains spaces in the path. Spaces may cause problems for the JBoss installation.
This section provides instructions for starting and stopping the JBoss server.

To start the JBoss Application Server:
Navigate to the bin directory under the main JBoss directory (jboss-4.0.x).
On Windows, you need to execute run.bat. On Linux and UNIX, you need to execute run.sh.
When the server starts, it deploys and starts all components, logging output to the command window. If the server starts successfully, you should see output similar to the following at the end of the log:
23:35:58,786 INFO [Server] JBoss (MX MicroKernel) [4.0.0 (build: CVSTag=JBoss_4_0_0 date=200409200418)]
Adding parameters to the run command
If you issue the run command without any parameters, the default configuration for the server is used. To use one of the other configurations (minimal, all, or a custom configuration), you need to add the -c parameter. For example, to start the server with the all configuration, you would use this command:
run -c all
If you developed a custom server configuration, you would specify the name of this configuration with the -c parameter. For example, if you created a custom configuration called exteNd, you would start the server with this command:
run -c exteNd
To see a listing of available start-up options, add the -h parameter:
run -h
Verifying that the server is working To make sure that the JBoss server is running properly, you can test the server with this URL:
http://localhost:8080

NOTE: 8080 is the default port for the JBoss server. The default HTTP server URL in JBoss points to the ROOT.war in the jbossweb-tomcat50.sar.
To stop the JBoss server:
Navigate to the bin directory under the main JBoss directory (jboss-4.0.x).
Execute the shutdown command with the -S parameter:
shutdown -S
On Windows, you need to execute shutdown.bat. On Linux and UNIX, you need to execute shutdown.sh.
You can also shutdown the server by typing Ctrl-C in a command window.
When you unpack the binary distribution of JBoss, you will see five main folders under the main JBoss directory (jboss-4.0.x):
Quick tour of JBoss The Getting Started with JBoss 4.0 manual includes a chapter called The JBoss Server - A Quick Tour that provides a useful introduction to the JBoss server environment. Read this chapter for more information on basic server configuration.
JBoss uses a set of Java Database Connectivity (JDBC) configuration files to control database access. The JBoss Application Server uses Hypersonic as its default database. To use JBoss with another kind of database, you need to modify these files:
To configure JBoss for Oracle database access:
Copy Oracle's JDBC driver .jar file /jdbc/lib/ojdbc14.jar to the JBoss- 4.0.x/server/config-folder/lib directory, where config-folder is the name of the server configuration folder you want to use.
NOTE: Be sure to download the latest version of the Oracle JDBC driver from the Oracle web site, together with the free Instant Client. This version has significant performance enhancements over previous versions.
Before you begin working on the datasource file, you need to determine whether you will be using Oracle's transactional (XA) support. Once you have made this determination, you can copy one of the example files to your deploy directory, change the name to match the JNDI name for your datasource, and begin making changes, as follows:
If you are using Oracle's transactional (XA) datasource, you can copy /docs/examples/jca/oracle-xa-ds.xml to JBoss- 4.0.x/server/config-folder/deploy directory, where config-folder is the name of the server configuration folder you want to use.
To configure with the non-XA data source, copy /docs/examples/jca/oracle-ds.xml, to JBoss-4.0.x/server/config-folder/deploy directory, where config-folder is the name of the server configuration folder you want to use.
NOTE: The format for the file name is datasource-ds.xml.
The <driver-class/> and <connection-url/> settings for Oracle are presented below:
In the Connection URL setting, host is the HOST value specified in the /network/ADMIN/tnsnames.ora file, and port is the PORT value specified in the tnsnames.ora file, and database is the database name.
The standardjaws.xml file is the standard descriptor for mapping Container Managed Persistence (CMP) entity EJBs. If you plan to use the standard configuration for EJB processing using CMP, you need to edit this file. If you want to use a custom configuration for mapping CMP entity EJBs, you need to edit the jaws.xml file instead.
Whether you use standardjaws.xml or jaws.xml, you need to set the <datasource> and <type-mapping> elements, as shown below:
  <jaws>
    <datasource>java:/OracleDS</datasource>
    <type-mapping>Oracle8</type-mapping>
  </jaws>
Copy the file to the META-INF directory within the EJB jar file.
The standardjbosscmp-jdbc.xml file is the standard descriptor for configuring the JBoss CMP container. If you want to use a custom configuration for the JBoss CMP container, you can edit the jbosscmp-jdbc.xml file instead.
Whether you use standardjbosscmp-jdbc.xml or jbosscmp-jdbc.xml file, you need to set the <datasource> and <datasource-mapping> elements, as shown below:
  <jbosscmp-jdbc>
    <defaults>
      <datasource>java:/OracleDS</datasource>
      <datasource-mapping>Oracle8</datasource-mapping>
    </defaults>
  </jbosscmp-jdbc>
Copy the file to the META-INF directory within the EJB jar file.
To configure JBoss for MySQL database access:
Copy the .jar file \exteNd521\MySQL\jdbc\mysql-connector-java-bin.jar to the JBoss-4.0.x/server/config-folder/lib directory, where config-folder is the name of the server configuration folder you want to use.
Before you begin working on the datasource file, you can copy the MySQL data source from /docs/examples/jca/mysql-ds.xml to the /server/config-folder/deploy directory, where config-folder is the name of the server configuration folder you want to use. Once you've copied the file, change the name to match the JNDI name for your datasource, and begin making modifications, as follows:
Set the <connection-url/> to jdbc:mysql://mysqlhost/database, where mysqlhost is the MySQL host server and database is the MySQL database.
NOTE: The format for the file name is datasource-ds.xml.
Here's an example that shows what the file would contain for the ExpressPortal database:
  <datasources>
    <local-tx-datasource>
      <jndi-name>ExpressPortal</jndi-name>
      <connection-url>jdbc:mysql://localhost:63306/expressportal</connection-url>
      <driver-class>com.mysql.jdbc.Driver</driver-class>
      <user-name>root</user-name>
      <password>novell</password>

    </local-tx-datasource>

  </datasources>
The standardjaws.xml file is the standard descriptor for mapping Container Managed Persistence (CMP) entity EJBs. If you plan to use the standard configuration for EJB processing using CMP, you need to edit this file. If you want to use a custom configuration for mapping CMP entity EJBs, you need to edit the jaws.xml file instead.
Whether you use standardjaws.xml or jaws.xml, you need to set the <datasource> and <type-mapping> elements, as shown below:
  <jaws>
    <datasource>java:/MySqlDS</datasource>
    <type-mapping>mySQL</type-mapping>
  </jaws>
Copy the file to the META-INF directory within the EJB jar file.
The standardjbosscmp-jdbc.xml file is the standard descriptor for configuring the JBoss CMP container. If you want to use a custom configuration for the JBoss CMP container, you can edit the jbosscmp-jdbc.xml file instead.
Whether you use standardjbosscmp-jdbc.xml or jbosscmp-jdbc.xml file, you need to set the <datasource> and <datasource-mapping> elements, as shown below:
  <jbosscmp-jdbc>
    <defaults>
      <datasource>java:/MySqlDS</datasource>
      <datasource-mapping>mySQL</datasource-mapping>
    </defaults>
  </jbosscmp-jdbc>
Copy the file to the META-INF directory within the EJB jar file.
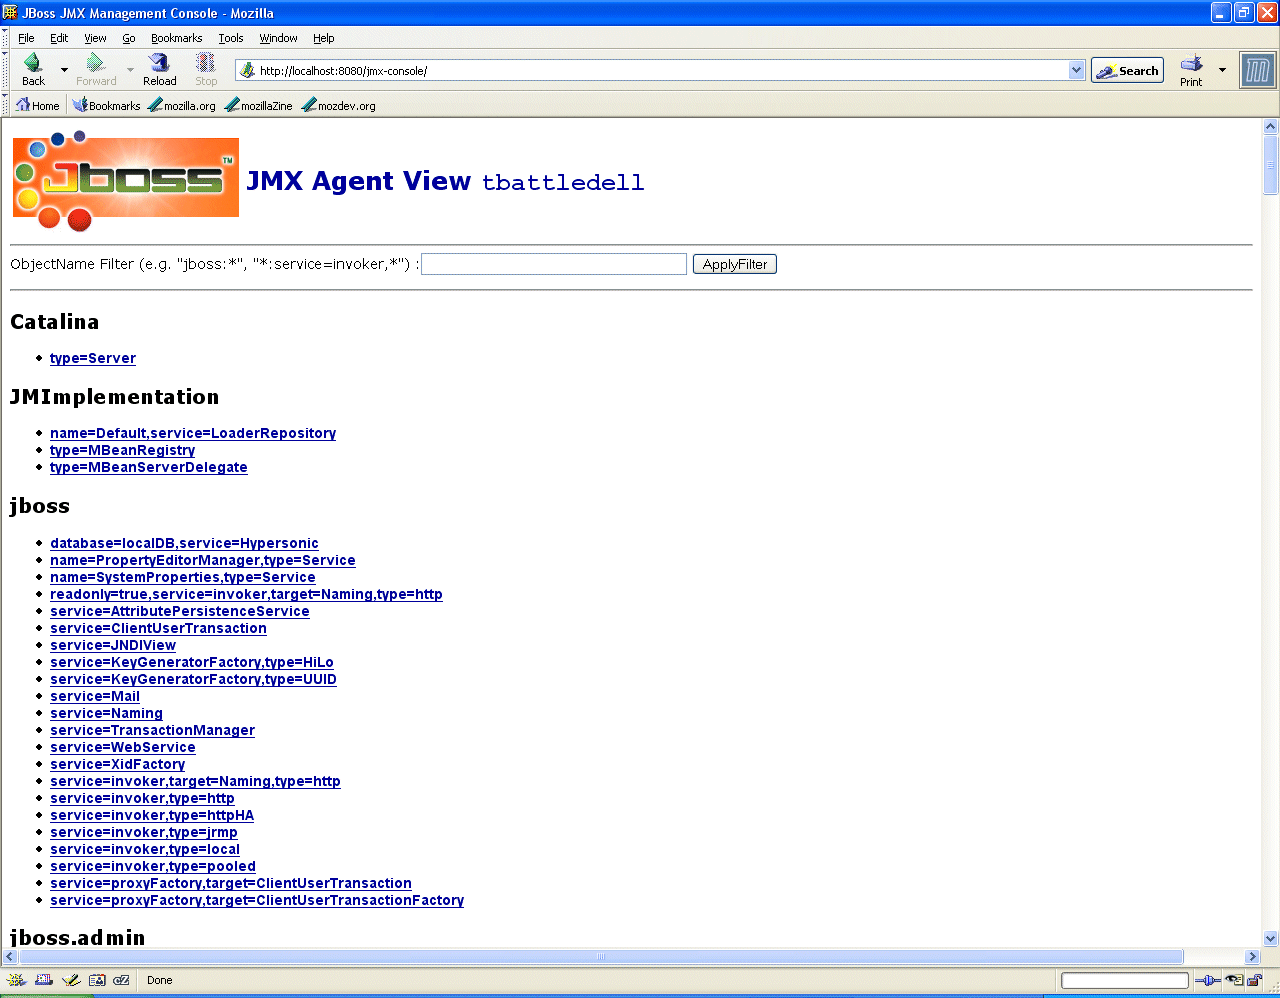
JBoss comes with a JMX Console that provides simple tools for managing the JMX MBeans that make up the running server. The JMX Console lets you display configuration settings, modify these settings, and start or stop components.
To display the JMX Console:
Type http://localhost:8080/jmx-console in a browser window.
When you type this URL, you should see a window that looks like this:
NOTE: JBoss also comes with a Web console that uses a Java applet to handle presentation. To start this facility, type http://localhost:8080/web-console/ in a browser window.
This section provides some useful tips on server management for exteNd users. It lists server management techniques exteNd users would perform in the SMC and shows how one might perform these techniques in the JMX console:
The following table provides links to useful topics on installation, configuration, and server management in the JBoss documentation:
|
Topic |
Where to find more information |
|---|---|
|
JBoss installation |
|
|
Basic JBoss configuration |
|
|
Database configuration |
|
|
JBoss architecture |
|
|
JNDI |
|
|
Transactions |
|
|
Security |
|
|
Web Services |
Copyright © 2004-2005 Novell, Inc. All rights reserved. Copyright © 1997, 1998, 1999, 2000, 2001, 2002, 2003 SilverStream Software, LLC. All rights reserved. more ...