|  |
 |
 |
 |
 |
 |
 |
 |
 |
JBoss Migration Guide
CHAPTER 4
This chapter provides information about creating, modifying, and deploying an exteNd Composer project to a JBoss Application Server. It includes these sections:

Deployment and execution of Composer-built services on the JBoss application server relies on the existence and proper placement of certain files in the JBoss directory structure. This section explains the runtime significance of these files, where the files are located, and why you might want to hand-edit them under certain circumstances.

Composer services rely, for their execution and lifecycle management, on an execution engine called the Composer Enterprise Server. This engine is contained in an archive called exteNdComposer.ear.
At installation time, exteNdComposer.ear is placed under \server\default\deploy as well as \server\all\deploy. (Any other copies of this file that you may see on disk are leftover temporary copies and may be deleted.) When you run your JBoss server in the default configuration, the copy of exteNdComposer.ear under \server\default\deploy is active. When you run your JBoss server in the "all" configuration, the copy of exteNdComposer.ear under \server\all\deploy is active.
In order for the Composer Enterprise Server runtime to function correctly in the JBoss environment, three additional files must be present.
The locations and functions of these files are shown in the following table.
Additional comments about these files follow.
This configuration file is consulted by Composer Enterprise Server upon startup and shutdown (and is overwritten on shutdown; therefore, do not make hand-edits to the file while Composer Enterprise Server is running). Several JBoss-specific pieces of information are located in this file, as indicated below. (Note that the locations of these items are specified in XPath notation in the lefthand column of the table.)
A typical JBOSS_40 entry in xconfig.xml looks like this:
  <JBOSS_40>
        <ADMIN_HOST>localhost</ADMIN_HOST>
        <ADMIN_PORT>8080</ADMIN_PORT>
        <JBOSS_HOME>D:\jboss-4.0.1</JBOSS_HOME>
           <STAGING_LOCATION>D:\jboss-4.0.1\server\all\tmp\deploy</STAGING_LOCATION>
        <DEPLOY_INPUT>deploy/jb/DeployInput.jsp</DEPLOY_INPUT>
        <DEPLOY_HANDLER>Composer.jb.DeployHandler</DEPLOY_HANDLER>
  </JBOSS_40>
If you alter your server's host name or default port, or rename the JBoss installation root directory, you should make appropriate edits of the associated elements (see above) in xconfig.xml using a text editor or XML editor. Normally, these are the only kinds of manual edits you will ever need to make.
For its default file-based access-control functionality, JBoss uses a simple properties-file-based login module to read information from simple text files. For Composer deployments, the files of interest are "users.properties,"which contains username-to-password mappings, and "roles.properties," which contains username-to-role mappings.
NOTE: The names of these properties files may be overridden by the usersProperties and rolesProperties options in the JBoss login-conf.xml file. Consult JBoss documentation for detailed information on security-configuration options.
The users.properties file uses a format:
  username1=password1
  username2=password2
  ...
to define all valid usernames and their corresponding passwords.
The roles.properties file uses a format:
  username1=role1,role2, ...
  username1.RoleGroup1=role3,role4, ...
  username2=role1,role3, ...
to define the sets of roles for valid usernames.
If your server\default\conf or server\all\conf directory (as appropriate) does not contain these files, create them in a text editor and include the following content:
For users.properties, the content should be novell=novell (assuming you accepted the username and password defaults when you installed Composer Enterprise Server).
For roles.properties, the content should be novell=ComposerAdministrators (assuming the username, as given in users.properties, is "novell").
No matter which vendor's app server you are using, the exteNd toolset offers two basic ways to deploy web applications built with exteNd Composer:
Users of exteNd Composer Professional Edition can perform deployments using the Director Designer's utility tools.
Users of Enterprise Edition may deploy either from Director Designer or directly from Composer Designer.
Each of these will now be discussed briefly. For more comprehensive information, consult the deployment chapter of the Composer User's Guide.
Detailed procedure(s) for deploying a Composer project from Director Designer are covered in the deployment chapter of the Composer User's Guide and won't be repeated here. The basic procedure is to create or open an EAR project in Director Designer, import your Composer project into the EAR project, then use Director Designer's wizards to create new servlets, EJBs, JSPs, etc. for use as service triggers, to trigger your Composer services. From that point on, deployment of the EAR proceeds according to the usual exteNd utility tools deployment procedures. (Consult the preceding chapter for additional information on those procedures.)
Enterprise Edition users of Composer have the option of creating Deployment xObjects and deploying projects to JBoss directly from the Composer Designer work environment. Deployment xObjects contain the information Composer Designer needs in order to build service triggers for you and package them appropriately in your project EAR at deploy time. Composer Enterprise Edition offers an easy GUI for configuring service triggers of various kinds, associating triggers in one-to-one or many-to-one fashion with the services inside a project, assigning target URIs, specifying "run in role" information, specifying non-code resources (such as image files) to be added to the deployment archive, specifying external JARs for copackaging into the deployment archive, etc. All of this information is stored in the Deployment xObject. For detailed information on Deployment xObjects, consult your Composer User's Guide.
When you deploy an exteNd Composer project using the exteNd Composer Designer UI, you'll follow these steps:
|
Step |
What to do |
Notes |
|---|---|---|
|
|
Create a server profile for the target JBoss server (if you haven't already done so). |
See To create a JBoss server profile in Composer:, below. |
|
1 |
Create a Deployment xObject for the project. |
This is analogous to creating the deployment settings in a Director project. |
|
2 |
Use the File > Deploy Project command to begin deployment. |
This brings up a dialog in which you can verify your deployment options. (This is where you can choose to deploy according to one particular xObject out of many that might be stored in the project.) Make any needed adjustments, then click the OK button to begin deployment. |
|
3 |
Authenticate to the server via a webform that appears automatically in your browser. |
Enter the appropriate credentials (per the discussion of users.properties, above). For details (including a screenshot) on this, see To deploy your project to JBoss from the Composer Enterprise Edition design-time environment:, further below. |
|
4 |
Fill in the "Select a Composer EAR to deploy" webform (which appears automatically). |
You'll generally accept the default info. When you click the Submit button, files are copied into the appropriate locations in the JBoss folder hierarchy. |
|
5 |
Test the deployment. |
Open a browser. Type the URL for the application. For example, if your Deployment xObject is named GetInfo and the service trigger is a servlet called Request, your service URL might be: http://localhost:8080/GetInfo/Request |
 To create a JBoss server profile in Composer:
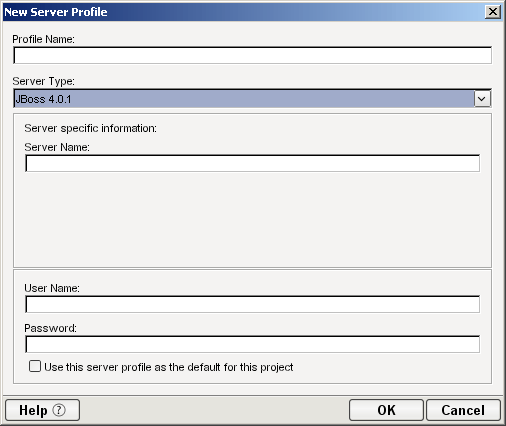
In the Composer Designer, choose Tools > Profiles from the main menubar. A dialog appears.
Bring the Profiles tab to the front, if it is not already the foremost tab.
In the Profiles tab, click the New... button. A dialog appears as follows.
In the New Server Profiles dialog, supply the following info:,
|
Option |
What to do |
|---|---|
|
Profile Name |
Provide the (arbitrary) name by which you wish to identify this profile. |
|
Server Type |
Select JBoss 4.0.1 from the dropdown list. |
|
Server Name |
Enter the host name and (optionally) port number as follows:
|
|
User Name |
Enter the user name (default: "novell") that corresponds to the user-name info provided in users.properties and roles.properties. (See discussion at roles.properties and users.properties above.) |
|
Password |
Enter the password (such as "novell") that corresponds to the password info in users.properties. (See discussion at roles.properties and users.properties above.) |
Optionally check the "use this server profile as the default" checkbox.
Click OK to create the profile. Exit out of the Profiles dialog (with Close) to persist the profile.
To deploy your project to JBoss from the Composer Enterprise Edition design-time environment:
NOTE: Be sure your JBoss server is running before attempting to deploy a project from Composer Enterprise Edition. Note that if you start the server in a default configuration, Composer will deploy your project EAR to the server\default\deploy directory. If your JBoss server is running in "all" mode, Composer deploys files to the server\all\deploy directory.
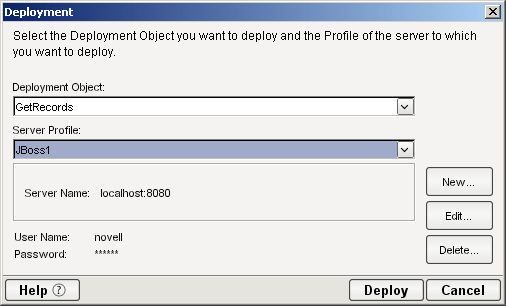
Use the File > Deploy Project command in Composer's main menubar to begin deployment. A dialog will appear:
Using the dropdown list under Deployment Object, choose the Deployment xObject that describes the configuration for this deployment. (If there is just one Deployment xObject in the project, accept the default.)
Under Server Profile, select the server profile that corresponds to the target server in question.
(Optional) If you need to, you can create, edit, or delete a server profile from within this dialog by using the New, Edit, or Delete buttons on the right.
Click the Deploy button to continue the deployment process. A progress thermometer will appear, followed by the opening of an authenticaton form in your browser:
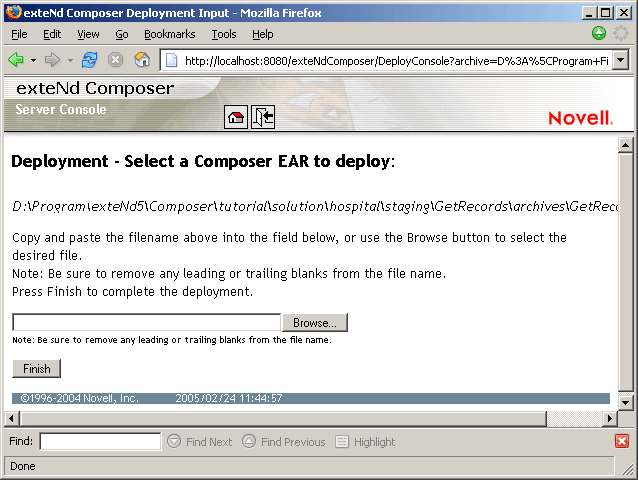
Enter user name and password values appropriate to those stored in roles.properties and users.properties. A new page appears in the browser:
In the text field provided, enter the complete path to the EAR you are deploying. Composer provides the pertinent path in the upper portion of this page, in italics; you can simply copy and paste that text into the text field.
Click Finish. Files will be copied to the \deploy directory of the currently running instance of JBoss.
Composer's Business Process Manager functionality depends on database connection pooling. You will need to accomplish the following setup steps if you intend to use BPM features.
To add a connection pool to JBoss:
In the %JBOSS_HOME%\docs\examples\jca folder, there is a list of "-ds" files (oracle-ds.xml, mysql-ds.xml, etc.) for each database that JBoss supports. Copy the appropriate file to the \deploy folder your instance of JBoss will use. Example: If you are using a MySQL database, and you run your server in default mode, copy mysql-ds.xml into %JBOSS_HOME%\server\default\deploy directory.
Edit the mysql-ds.xml to contain the correct connection info.
Your JBoss server will pick up the pool automatically, but a good practice would be to stop and restart the server at this point.
In your browser, navigate to the exteNd Composer Server Console using a URL like:
http://localhost:8080/exteNdComposer/Console
On the left side of the main console, click the Process link (under "About Products"). When the content frame refreshes, click the Console button. The Process Manager admin console will pop open in a new window.
In the Process Manager console, click the Configure button (under "Database Info"). This brings up a screen in which you can choose a database type (e.g., MySQL) and enter a Pool Name, User Name, and Password. Click the Save button when you are done.
In the Process Manager main console, click the Start button to launch the Process Manager engine.
For additional information on working with databases in JBoss, see the section "Working with databases" in Chapter 2 of this guide, as well as the relevant sections of JBoss documentation.
Copyright © 2004-2005 Novell, Inc. All rights reserved. Copyright © 1997, 1998, 1999, 2000, 2001, 2002, 2003 SilverStream Software, LLC. All rights reserved. more ...