The SilverStream Application Server provides Web Server Integration modules for Microsoft's IIS and Netscape's iPlanet Enterprise servers that run on Windows NT, Windows 2000, and Solaris. The SilverStream Web Server Integration (WSI) modules allow you to integrate a SilverStream Application Server (Version 3.5 and above) into your existing IIS or iPlanet Web server framework. The WSIs support Versions 4.0 and above of IIS and iPlanet servers.
URL requests sent to the Web server are forwarded by the WSI module to the SilverStream server. The WSI then returns the URL reply from the SilverStream server to the requesting browser.
This chapter describes how to integrate the SilverStream server with your existing Web servers using the SilverStream WSI modules. It includes the following topics:
NOTE The WSI modules for IIS and iPlanet supersede SilverStream's SilverJunction and address limitations found in SilverJunction. You should use the WSI modules instead of SilverJunction to integrate a SilverStream server with your Web server.
The WSIs extend the URL name space of your existing Web server directory structure by allowing you to include dynamic content in your existing Web applications. URL masking means users cannot tell when they switch between static content on the Web server and dynamic content on the application server.
With a WSI module, the SilverStream server services a portion of your Web server's URL name space. The SilverStream WSI module services requests for specified URLs to the Web server by opening HTTP connections to a SilverStream server and forwarding the requests to it. The WSI then returns the response. You specify which URLs the WSI module will forward using a configuration file that the WSI reads when the Web server starts.
To improve response time, the WSI module will reuse socket connections between itself and the SilverStream server. The WSI maintains a connection pool to the SilverStream server that reuses these connections as needed.
With the WSI module, there is no direct communication between the browser and the SilverStream server: all calls pass through the WSI.
The following examples show how a WSI might be used in a corporate network. In each example, the WSI module forwards a client request for http://www.ABC.com/daytime/schedule.html to http://sssw.ABC.com/daytime/schedule.html (even though the URL address of the client would not change). Together the four examples show ways to reliably handle an increasing volume of requests.
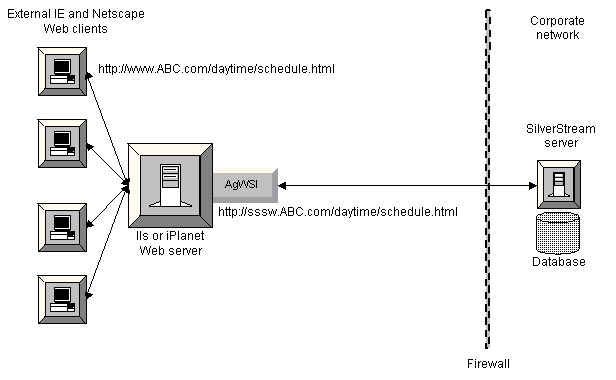
WSI with one SilverStream server
In this simple scenario, the WSI forwards requests from a Web server to a single SilverStream server.
NOTE There are many ways to set up your environment. For example, in each of the following figures, you could position your database behind the inner firewall. Positioning the corporate database outside the DMZ (the area between the two firewalls) helps protect your database.
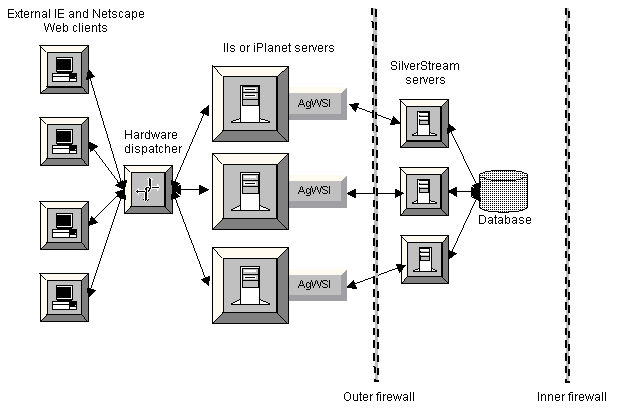
WSI module with several SilverStream servers
Here the WSI forwards requests from a single Web server to a cluster of SilverStream servers. This approach increases database access and reduces the risk of the application server becoming a single point of failure.
Multiple Web servers and SilverStream application servers
Here the WSI forwards requests from multiple Web servers to multiple SilverStream servers. This approach is more reliable for handling a large volume of requests (several Web servers have been added to the front end).
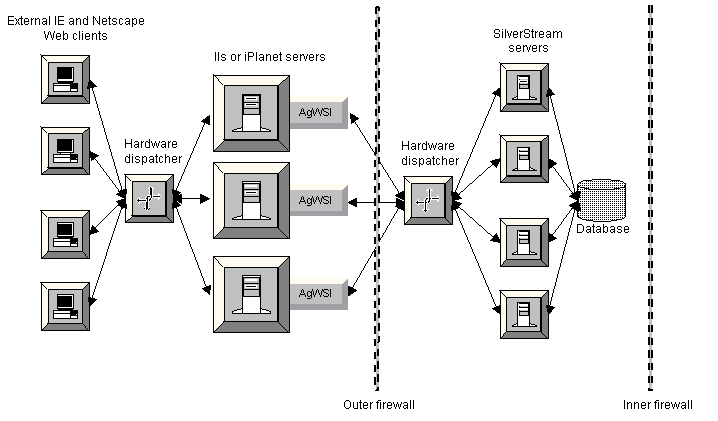
Hardware dispatcher added for load balancing
Here again the WSI forwards requests from multiple Web servers to multiple SilverStream servers. Now the largest volume of requests can be more reliably processed--because of multiple servers at the front and back ends and of the addition of dispatcher load balancing at both ends.
Because the SilverStream Dispatcher load balances server clusters by redirecting URLs instead of masking them, the SilverStream WSI modules do not currently work with the SilverStream Dispatcher. If the SilverStream server is running as part of a cluster, the WSI requires a third-party hardware dispatcher to securely redirect requests to appropriate SilverStream servers through one port in the firewall.
NOTE EJBs will not use the same firewall port as the WSIs. EJBs use the IIOP protocol, controlled by the JBroker ORB. The default name service port for EJBs is 54890. For more information, see the chapter on using EJBs with SilverStream applications in the Programmer's Guide.
The WSI module uses a DLL for Windows operating systems and a shared library file for Solaris. Installing the WSI module is a two-part process: installing the DLL or shared library and then enabling the WSI. Before using the WSIs, follow the IIS and/or iPlanet instructions in the following sections:
or
The WSI module instructions assume that you have already installed the SilverStream server.
The AgWSI.conf file is a text file. The following file shows the default configuration for both the WSI for IIS and the WSI for iPlanet. The settings in bold are variables you will need to enter during the procedure on Installing and configuring the WSI module.
  # ------------------------------------------
  # SilverStream WSI configuration file
  # ------------------------------------------
  SilverServer.host=mysssw.myco.com
  SilverServer.http.port=80
  SilverServer.https.port=443
  WSI.root.dir=/agisapi
  SilverServer.urls=/mydb
  #
  # Optional: Additional URLS
  SilverServer.urls=/SilverMaster
  SilverServer.urls=/SilverStream
  SilverServer.urls=/Pages=/mydb/SilverStream/Pages
  #
  # Optional Settings:
  WSI.debug=0
  WSI.error.url=/myerror.html
  WSI.auth.NTLM.remove=false
  Connection.http.max=100
  Connection.https.max=100
  Connection.idle.time=25
The following section describes each configuration setting, provides defaults and examples, and lists which settings are required.
SilverServer.host is the name of the destination SilverStream server that services URL requests from the Web server.
SilverServer.host=mysssw.myco.com
Required if the SilverStream server HTTP port is not using the default port number (80).
SilverServer.http.port is the nonsecure port of the destination SilverStream server.
SilverServer.http.port=80
Required if the SilverStream server HTTPS port is not using the default port number (443).
SilverServer.https.port is the secure port of the destination SilverStream server.
SilverServer.https.port=443
SilverServer.urls specifies which URLs will be forwarded to the SilverStream server. You must specify a new setting for each URL root you want forwarded to the SilverStream server.
There are two formats: Simple URL forwarding and URL forwarding with translation (masking).
SilverServer.urls=<Root_URL_to_Forward>
  SilverServer.urls=/SilverStream
  SilverServer.urls=/myDb
In the preceding example, all URLs that begin with either /SilverStream or /myDB will be forwarded to the SilverStream server. This includes:
  http://myWebServer/SilverStream/Sessions
  http://myWebServer/SilverStream/Pages
  http://myWebServer/myDb/SilverStream/Pages/MyPage.html
To forward all URLs to the SilverStream server specify the following:
SilverServer.urls=/
SilverServer.urls=<URL_root_at_Web_server>=<translated_URL_root>
SilverServer.urls=/Pages=/myDb/SilverStream/Pages
The first URL will be forwarded to the SilverStream server after the second URL is substituted for it. In this example, all URLs from the Web server that begin with /Pages will be forwarded to the SilverStream server with myDb/SilverStream/Pages substituted for /Pages. The URL sent to Web server as:
http://myWebServer/Pages/MyPage.html
is forwarded to the SilverStream server as:
http://mySilverServer/myDb/SilverStream/Pages/MyPage.html
Connection.http.max is the maximum number of concurrent nonsecure HTTP connections between the WSI and the SilverStream server.
Users will be notified if the connection pooling limit is exceeded if you have created and specified a WSI.error.url file. The WSI reuses socket connections between itself and the SilverStream server.
Connection.http.max=100
Connection.https.max is the maximum number of concurrent secure HTTPS connections between the WSI and the SilverStream server.
If you have created and specified a WSI.error.url file, users will be notified if the connection pooling limit is exceeded. The WSI reuses socket connections between itself and the SilverStream server.
Connection.https.max=100
Connection.idle.time specifies how often (in minutes) the WSI scans the connection pools for idle connections.
Connection.idle.time=25
WSI.root.dir is the WSI virtual directory name and where the WSI module runs from. Since the WSI for IIS is both a filter and an extension, you need to specify the URL for the WSI in the IIS Web root (/wwwroot) directory structure.
You need to install the WSI module for IIS in a directory that is visible from the IIS Web root directory. If you install the WSI in a physical directory beneath the Web root (for example, C:\Inetpub\wwwroot\agisapi) the WSI is automatically visible from within IIS. However, if you install the WSI module in a directory that is outside the IIS root directory, you must create a virtual directory using the MMC so the WSI appears in the IIS directory. You must also set the WSI.root.dir relative to the Web server root directory.
WSI.root.dir=/agISAPI
WSI.debug specifies whether WSI logging is on (1) or off (0). The WSI logs to the AgWSI.log file, which is stored in your WSI module directory.
To log the URLs arriving at the destination server, use the SMC to configure your SilverStream server debug value to 1 or 2. For more information, see the section on low-level debugging in the Administrator's Guide.
WSI.debug=0
WSI.error.url specifies a customized error page that users will see if a WSI connection error occurs. Users will see a generic browser notification when the WSI module cannot connect to the SilverStream server unless you create and then specify a WSI error URL.
It is a good idea to create an HTML file that tells users about the problem and advises them to retry the URL connection later.
Specify the WSI error file name and a directory location on your Web server. You need to store your error page file in your Web server's directory structure, since the WSI redirects the browser to this page on your Web server.
WSI.error.url=\myerror.html
Set WSI.auth.NTLM.remove to true if NT authentication is enabled for your IIS directories. Setting this setting to true removes the NTLM authentication headers so users' requests can be successfully forwarded to the SilverStream server. For more information, see Using IIS NTLM authentication with the WSI module.
WSI.auth.NTLM.remove=false
When the WSI.auth.user is specified, the WSI module intercepts the authentication headers that will be forwarded to the SilverStream server and replaces them with credentials of a single known SilverStream user; then it adds HTTP authentication headers to every request that it forwards to the SilverStream server. Any existing authentication headers on incoming requests to WSI will be replaced by the authentication setting.
To protect the security of the authentication settings, the user name and password are not stored in clear text in the AgWSI.conf file. You must run the AgWSIUser utility to add this authentication setting to your configuration file. This utility will encrypt the user name and password in a way that the WSI can read. For more information on running the utility, see The AgWSIUser utility.
The authentication setting can be used:
The WSI module needs to be on the same machine as the Web server. Also, the WSI configuration file (AgWSI.conf) must be in the same directory as the WSI module, since the WSI will read the configuration file when the Web server starts.
To run WSI modules and maintain separate log files for both IIS and iPlanet, you should create separate directories to store the WSI DLL and the shared library file with an associated AgWSI.conf file. If you are not running both IIS and iPlanet WSI modules on the same machine, you do not need to create separate directories.
You can run the SilverStream server remotely (you do not need to run the SilverStream server from the Web server machine).
The WSI modules for IIS and iPlanet both use the AgWSI.conf file to set configuration settings. The following procedure describes only the required settings. See The WSI configuration file for a complete list of WSI configuration settings.
 To install and configure the WSI module:
NOTE Create a physical directory beneath the Web server root or a virtual directory as described in WSI.root.dir.
The SilverServer.host is the name of the destination SilverStream server that services URL requests from the Web server.
If your IIS or iPlanet Web server is running both HTTP and HTTPS, specify port settings for both protocols and make sure that the SilverStream server is also running both protocols. The WSI will always forward requests to the SilverStream server using the matching protocol.
The SilverServer.urls setting specifies which URLs the SilverStream server will provide. See SilverServer.urls for URL formats.
The WSI.root.dir is the directory the WSI DLL runs from.
This section describes how to enable the WSI for Microsoft IIS. This procedure assumes that you have installed the SilverStream server and edited the AgWSI.conf file. Once enabled, the WSI for IIS will look for the configuration file in the location you specified in Installing and configuring the WSI module.
To enable the WSI module for IIS:
 For more information on Microsoft Web server configuration, see your Microsoft documentation.
If your WSI module does not use a virtual directory, do the following:
NOTE The following step ties the virtual directory to the physical directory. This step is optional if you install the WSI directly under the IIS physical root directory. The virtual path is a subdirectory of the IIS Web root directory. The WSI can be installed in any physical directory, provided it is on the same machine as the Web server.
IIS will use this alias to access the directory that the WSI.DLL runs from. This name should match the name used in the AgWSI.conf file to define the WSI.root.dir setting as described in The WSI configuration file.
The WSI directory is where you installed the SilverStream WSI module.
The WSI module for IIS should appear in the Filter Name list. A green arrow to the left of the WSI Filter Name indicates whether (or not) the filter is enabled.
When the WSI module starts successfully, it starts generating the AgWSI.log file.
Here is a sample AgWSI log file for WSI module for IIS:
  # --------------------------------------------------
  # SilverStream WSI Configuration
  # --------------------------------------------------
   Started at               : Tue Oct 2 14:10:19 2000
   Root Directory           : /sssw/
   Host                     : richg.silverstream.com
   Ports                    : 8080 445
   Maximum HTTP Connection  : 8
   Maximum HTTPS Connection : 8
   Connection Idle Time     : 25 minutes.
   Redirect URL on Error    : /wsi/myerror.html
   Authentication NTLM      : true
  ----------------------------------------------------
This section describes how to enable the WSI module for Netscape iPlanet. The WSI module for Netscape Web servers can run on Windows NT, Windows 2000, or Solaris.
This procedure assumes that you have installed the SilverStream server and edited the AgWSI.conf file as described on Installing and configuring the WSI module. By default, the WSI module for iPlanet (called agnsapi.dll for Windows and libagnsapi.so for Solaris) is installed in the SilverStream\bin directory.
In order to enable the WSI module on a Netscape server, you need to edit its obj.conf file and add four lines of text that match the settings in the AgWSI.conf file. The WSI for iPlanet determines the location of the AgWSI.conf file by the initialization parameters that you specify in the obj.conf file when you enable the WSI.
For more information, see
WSI for iPlanet sample obj.conf file.
To enable the WSI module for iPlanet:
If you are running the WSI module for iPlanet on Windows, enter agnsapi.dll as the name of the WSI module. Enter libagnsapi.so for the WSI module name for Solaris. When you specify the WSI_module-name enter the path to the SilverStream install directory for your system.
For example shlib="C:\AgNSAPI\AgNSAPI.dll" or
shlib="/opt/AgNSAPI/AgNSAPI.so"
Init fn="load-modules" shlib="WSI_module_name" funcs="AgNSAPIInit,AgNSAPINameTrans,AgNSAPIService"
For Windows, enter:
Init fn="AgNSAPIInit" LateInit="yes"
For Solaris, enter:
Init fn="AgNSAPIInit" LateInit=yes agroot="opt/SilverStreamDir/bin"
In the preceding Solaris example, replace SilverStreamDir with your SilverStream install directory.
  NameTrans fn="AgNSAPINameTrans"
  This name translation command submits URLs to the SilverStream server for servicing and determines whether or not the requested URL gets translated.
NameTrans fn="AgNSAPINameTrans" agroot=AnyPath
You only need to set the agroot portion of the NameTrans parameter if you are using the enCommerce getAccess security software.
The getAccess authentication service requires that a URL be mapped to a physical path in order to secure the URL request. The WSI module will use the path you specify to provide the physical path that getAccess requires. Because the WSI does not check for the existence or the validity of the path, you can specify any path. The WSI will set a physical path for URLs that it will service relative to the root path that you specify.
For example, if you enter
agroot=/opt/silverstream
in the preceding NameTrans function, an incoming URL such as
http://server/MyDB/SilverStream/Pages/xyz.html
would be mapped by the WSI to /opt/SilverStream/MyDB/SilverStream/Pages/xyz.html.
For more information, see enCommerce getAccess integration.
Service fn="AgNSAPIService"
This service command forwards each request to the SilverStream server and returns (echoes) a response to each incoming request.
When the WSI is running with a Netscape Web server, its configuration file can reside anywhere, as long as the file's location is specified in the Init section of the obj.conf file under Init fn=load-modules.
The following is an example of a portion of an obj.conf file that specifies the WSI module running on Windows for iPlanet. The WSI entries that you must add are shown in bold.
The sample obj.conf file would also work for a WSI module for Solaris except for the first Init fn entry. Also, if your WSI module was integrated with enCommerce, you would need to enter a different NameTrans entry as described in the procedure on Enabling the WSI module for iPlanet for Windows or Solaris.
For more information about Netscape Web Server configuration, see your Netscape documentation.
  # Use only forward slashes in pathnames--backslashes can cause problems.

  Init fn="load-modules" shlib="c:/SilverStream/bin/AgNSAPI.dll" funcs="AgNSAPIInit,AgNSAPINameTrans,AgNSAPIService"
  Init fn="NSServletEarlyInit" EarlyInit=yes
  Init fn="NSServletLateInit"  LateInit=yes
  Init fn="AgNSAPIInit" LateInit="yes"

  <Object name=default>
  NameTrans fn="NSServletNameTrans" name="servlet"
  NameTrans fn="pfx2dir" from="/servlet" dir="D:/Netscape/Server4/docs/servlet" name="ServletByExt"
  NameTrans fn=pfx2dir from=/ns-icons dir="D:/Netscape/Server4/ns-icons" name="es-internal"
  NameTrans fn=pfx2dir from=/mc-icons dir="D:/Netscape/Server4/ns-icons" name="es-internal"
  NameTrans fn="pfx2dir" from="/help" dir="D:/Netscape/Server4/manual/https/ug" name="es-internal"
  NameTrans fn="pfx2dir" from="/manual" dir="D:/Netscape/Server4/manual/https"
  NameTrans fn="AgNSAPINameTrans"
  name="es-internal"
  NameTrans fn=document-root root="D:/Netscape/Server4/docs"
  PathCheck fn=nt-uri-clean
  PathCheck fn="check-acl" acl="default"
  PathCheck fn=find-pathinfo
  PathCheck fn=find-index index-names="index.html,home.html"
  ObjectType fn=type-by-extension
  ObjectType fn=force-type type=text/plain
  Service method=(GET|HEAD) type=magnus-internal/imagemap fn=imagemap
  Service method=(GET|HEAD) type=magnus-internal/directory fn=index-common
  Service method=(GET|HEAD|POST) type=*~magnus-internal/* fn=send-file
  Service fn="AgNSAPIService"
  AddLog fn=flex-log name="access"
  </Object>
The WSI module uses connection pooling to improve response time. Instead of creating and maintaining a connection to the SilverStream Application Server for each client connected to the Web server, the WSI reuses its connections to the SilverStream server for multiple client connections. The WSI will open new connections to the SilverStream server as needed for concurrent request processing. The number of concurrent connections is limited by the Connection.http.max and the Connection.https.max settings in the AgWSIconf file.
WSI maintains separate connection pools for HTTP and HTTPS protocols. To ensure that these connection pools do not use up too many system resources, the WSI periodically scans the pools and closes any connections that has not been used between scan cycles.
Connections have the following states:
The WSI periodically runs a background thread to check the connection pools for inactive and idle connections to see which connections are connected but not busy. The WSI thread marks all inactive threads as idle and closes any connection that are already marked as idle. When a connection is marked as idle, that connection is closed based on the connection idle time limit you set (or the default of 25 minutes). The interval starts when the WSI module is loaded, not when the connection was created.
A connection needs to remain inactive for two scan cycles before it is disconnected. For example, if the specified connection idle time limit is set to 15 minutes, an inactive connection will be disconnected sometime between 15 and 30 minutes after becoming inactive, because the WSI may not start pooling until the middle of an existing interval. If an idle connection is used during the time interval between the scan cycles, the connection goes back into the connection pool marked as inactive.
Because of variations in server platforms, architecture, and third-party security providers, you may need to be aware of several security considerations when using the WSI:
If you secure your Web site using the Microsoft Windows NT LAN Manager (NTLM) authentication, the WSI default header settings will not work. After authenticating incoming requests, IIS adds an NTLM HTTP authentication header to each request. Because the NTLM HTTP authentication header is not supported by the SilverStream server, incoming requests will be rejected unless you configure the WSI for IIS module in one of the following ways:
AgWSIUser is a command-line utility that sets and stores the encrypted WSI user and password into the WSI.auth.user setting of the AgWSI.conf file. For more information, see WSI.auth.user.
You must run the utility in the same directory as the AgWSI.conf file.
AgWSIUser username password
Use your SilverStream user name and password. If your password is blank, you do not need to enter it.
You can enter any valid SilverStream user. For example, to use NT credentials run the following:
AgWSIUser myNTDomain\myNTUser myNTPassword
The AgWSIUser utility will add the appropriate WSI.auth.user setting with the username and password encrypted into the AgWSI.conf file. At startup, the WSI module will decrypt the user name and password and generate an HTTP authentication header that it will add to every request it forwards to the SilverStream server.
The WSI module cannot forward the client certificate from the browser to the SilverStream server. Because the WSI opens a new HTTPS connection to the SilverStream server, the WSI would need to access the private key of the client certificate to be able to use the client certificate for this connection. The private key is not available, because it is securely stored by the browser on the client machine.
Because the WSI cannot send client certificates to the SilverStream server, the WSI will not work with a SilverStream server that is configured to require client certificates for authentication.
The SilverStream WSI module and the enCommerce getAccess security software can be used together on the IIS Web server. When integrated, getAccess will provide authentication and authorization services at the Web server, and the WSI module will provide access to the SilverStream Application Server.
NOTE If your WSI module for iPlanet is integrated with getAccess security, you need to secure your Web site's URLs by entering a path statement in the NameTrans function of the obj.conf file. For more information, see Enabling the WSI module for iPlanet for Windows or Solaris.
Because authentication and authorization take place at the Web server with the getAccess service, the SilverStream Application Server does not need to know about and check the authorization of every user. Instead, it only needs to authenticate and authorize a single user (the user that the WSI module is configured to use).
As described in The AgWSIUser utility, the WSI module intercepts the authentication headers that will be forwarded to the SilverStream Application Server, and replaces the enCommerce credentials with credentials of a single known SilverStream user.
This section describes the SilverStream and getAccess security models and how to integrate them.
SilverStream
The SilverStream Application Server provides built-in security features including authentication, access control, data privacy, data integrity, and single signon to multiple SilverStream servers. In addition to providing its own internal users and groups, the SilverStream Application Server is integrated with several types of security providers that include NT, LDAP, NisPlus, and client certificates. You can control access to resources using simple access control lists (ACLs) or using advanced security expressions. You can specify the following types of access:
You can set SilverStream security using the SilverStream Management Console (SMC) to set security expressions or using the security management API for programmatic access. You can specify authentication for individual resources or server-wide. Security expressions that you set or for resources at the directory level can be propagated to the children of the directory.
getAccess
The getAccess services include authentication and access control. Browser requests to an IIS Web server are processed by a getAccess plug-in. The plug-in detects unauthenticated browser sessions and routes these session requests to a login page. The client can log in as an internal getAccess user or against one of the getAccess plug-in authentication modules. The getAccess plug-in checks the runtime access of the authenticated user to the URL-specified resource and associated components.
As with SilverStream security, with getAccess you can define users and groups (or roles) that control access to SilverStream resources. SilverStream and getAccess users can be authenticated against external security providers. For getAccess users, you can define password policies governing minimum password length and password expiration. You must individually specify and protect resources on the host Web server.
The SilverStream WSI module for IIS receives browser requests from a client through the Web server and forwards them to the application server.
NOTE You can stack WSI modules to process different groups of requests so that once one WSI module is done with a request the next WSI would receive it.
The following figure shows the architecture and process used to integrate getAccess with the SilverStream server:
getAccess plug-in
The getAccess plug-in initially receives and checks the user request since it is loaded at a higher priority than the SilverStream WSI. The getAccess plug-in checks with the getAccess services to see if the resource URL has been secured. If it has, the getAccess plug-in checks for an authentication header indicating whether the client's getAccess user identity has been established. If it has not, the request is forwarded to a getAccess login page. Once the user has logged in, the getAccess plug-in passes user credentials to the getAccess services to determine if the user is authorized to access the requested resource. If the user is not authorized, the getAccess plug-in returns an access denied error.
If the getAccess plug-in determines that the user is allowed access to a SilverStream server resource, the request is next processed by the SilverStream WSI module.
SilverStream WSI
The SilverStream WSI module forwards the request to the application server host specified in the AgWSI.conf file. Because the SilverStream server cannot verify a getAccess user, the WSI checks the request for an authentication header and then substitutes the credentials set as defaults in the AgWSI.conf file. For more information, see The AgWSIUser utility.
Once the getAccess plug-in determines that the user is allowed access, the SilverStream server returns the requested URL to the plug-in and then to the browser user.
NOTE In the preceding scenario, all security access is controlled by getAccess. The single known set of SilverStream credentials (defined by the AgWSIUser utility) is only used to connect to the application server. You still need to set SilverStream security to secure application resources against users connecting directly to the application server (rather than through getAccess).
This section assumes you have installed enCommerce getAccess and the SilverStream Application Server, Version 3.5 or higher into your existing IIS Web (Version 4.0 and above) server framework.
To configure enCommerce getAccess for the WSI for IIS:
The AgWSIUser utility will add the appropriate WSI.auth.user setting with the user name and password encrypted into the AgWSI.conf file. At startup, the WSI module will decrypt the user name and password and generate an HTTP authentication header that it will add to every request it forwards to the SilverStream server.
This step is required even though getAccess (using a getAccess user login) performs the access control through the Web server. The SilverStream security expressions prevent unauthorized access to resources when a client connects directly to the application server. Because getAccess only provides runtime access, SilverStream expressions should be used to control administrative and design-time access.
A typical scenario would be to assign Read (design-time) access and Write access to the Developers group, Set Permissions access to the Administrators group, and Execute access to both the Developers group and the authenticated WSI user defined in AgWSI.conf file.
If access to the application server is controlled by a firewall, you may want to assign unrestricted Execute access to all users. Once getAccess and the SilverStream WSI module are configured, you should use the getAccess administration tool to protect SilverStream resources.
For more information on configuring getAccess users and roles and plug-in authentication providers, see your enCommerce getAccess documentation.
To protect SilverStream resources:
/myDatabase/Pages/
c:\SilverStream\bin\myDatabase\Pages\paperEdit.html
You may optionally specify any additional referenced resources such as image files.
See your getAccess documentation for appropriate values.
When getAccess users request a resource through the Web server, they are authenticated and authorized by the getAccess plug-in and associated services. If users are authorized by getAccess, the SilverStream WSI module substitutes the WSI authentication headers (defined by the AgWSIUser utility) and then requests the resource from the application server.