This chapter describes how SilverStream manages security, and how you can control security settings at the server level through user authentication, and at the application level using access control.
The chapter contains sections on:
 For information about setting up SilverStream users and groups, see
Setting Up Users and Groups.
For information about setting up SilverStream users and groups, see
Setting Up Users and Groups.

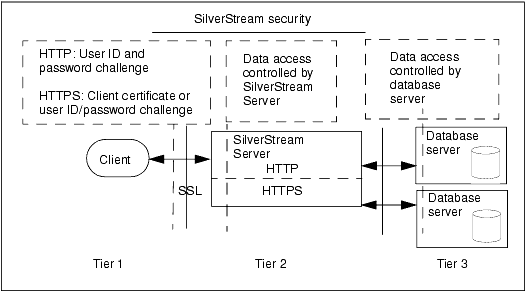
SilverStream supports both regular HTTP and HTTP using the Secure Socket Layer (SSL) 3.0 protocol (HTTPS). HTTPS provides data encryption between the SilverStream client and server to ensure privacy and data integrity.
About SSL
The SSL (Secure Socket Layer) handshake protocol was developed by Netscape to provide security and privacy over the Internet. The protocol supports server and client authentication. The SSL protocol is application-independent, allowing protocols like HTTP and FTP to be layered on top of it transparently. The SSL protocol is able to negotiate encryption keys as well as authenticate the server before data is exchanged by the higher-level application. The SSL protocol maintains the security and integrity of the transmission channel by using encryption, authentication, and message authentication codes.
About HTTPS
With HTTPS, you get a communications channel that provides privacy, user authentication, and message integrity. SSL is implemented in SilverStream as follows:
Types of authentication
Authentication begins and ends with the client session. The session operates in one of three modes:
In the SilverStream three-tiered architecture, security is set up at the server tier, between the client tier and the database tier (see the figure below). The SilverStream Server acts as a single database user with multiple connections into a database. Acting in this manner, the server adds extra user and object security for the database. In effect, the SilverStream Server is treated as just another user with access privileges. Native database activity and security measures are not compromised.
SilverStream security performs four major functions:
The SilverStream security system handles all data integrity and data privacy functions with virtually no administrator involvement. The remainder of this chapter describes how to implement authentication and access control in the SilverStream environment.
When doing administrative tasks such as adding users and adding databases to the server, you probably want a secure (SSL) connection between the server and the client you are using (such as the SMC, the SilverStream Designer, or perhaps a browser) so all communication is encrypted.
By default, all communication to the server is unsecured. This section describes how to establish a secure connection to the server so that all information is encrypted. The procedure depends on whether the client is a Java client (such as the SMC, SilverJRunner, the SilverStream Designer, or an external Java client) or an HTML client (a browser).
 To establish a secure (SSL) connection between a Java client and the SilverStream Server:
For information, see
Creating and installing server certificates.
For information, see
Enabling RSA/DSA ports.
With the SMC, click the Choose (server) icon. With the SilverStream Designer, click the Choose Server icon. In the resulting dialog, specify this server:
https://server:DSA_port
For example:
https://tara:444
With SilverJRunner, specify https://server:DSA_port on the command line for the hostname.
To establish a secure (SSL) connection between an HTML client and the SilverStream Server:
For information, see
Creating and installing server certificates.
For information, see
Enabling RSA/DSA ports.
https://server:RSA_port
For example:
https://tara:443
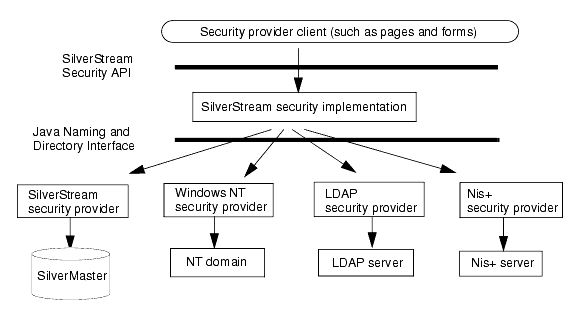
The system verifies users and their permission levels within a SilverStream application according to lists of groups and users that you provide. User and group information can be defined in SilverStream or can be obtained from an external security system. For SilverStream-defined entities, all information is stored in the SilverMaster database catalog. For external security, all information is obtained from the external system.
SilverStream recognizes users and groups from the following security providers:
SilverStream implements the Java Naming and Directory Interface (JNDI), which connects the SilverStream Server to native UNIX security and to Windows NT and LDAP directories.
You can use the SMC to access security provider systems. After you set up access to provider directories, you can use users and groups in expressions to define access control.
For information about setting up SilverStream users and groups, see
Setting Up Users and Groups. For information about access control, see
Setting up access control.
To add security provider access:
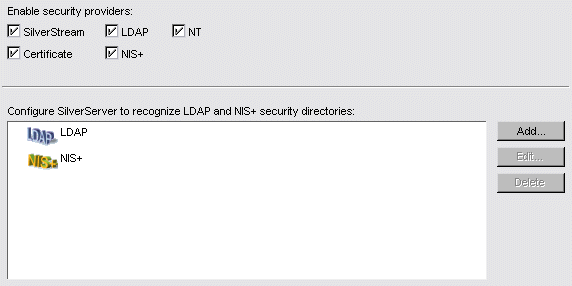
Any LDAP and Nis+ servers that are known to the SilverStream Server are listed.
The SMC also allows you to set the security resource timeout period. This tells the server how frequently to reload the list of available users and groups from defined security providers.
To reset security resource timeout:

This setting determines how frequently the SilverStream Server will upload current lists of users and groups from the NT, LDAP, and/or NIS+ servers, which would include any updates to these lists. The default value is 15 minutes.
You might want to increase this number if the information in the external system does not change frequently or if the connection to it is slow.
To simplify security administration, SilverStream allows you to set up your server so that users can log in using their NT user name and password. Users logging in with their NT user name and password information (when answering a login prompt) only have to do this once per session.
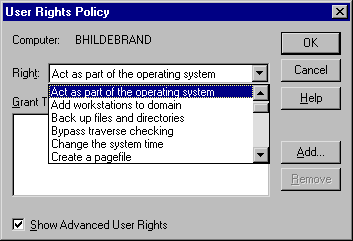
NOTE When running the SilverStream Server as a service in NT under the System account, you need to make two changes to NT Security if SilverStream is running in a multiple domain environment: The user who is logged into on the computer that is running the SilverStream Server must have the following two privileges: Act as Part of the Operating System and Log on as a Service. Also, all users from non-local trusted domains who log into the SilverStream Server need the privilege to Log on Locally.
If you are running NT Server, complete steps 3 to the end. If you are running an NT workstation, go to step 5 and continue to the end.
This is all you have to do if your NT users are in the same domain as the user starting the server. Go to step 11.
But if you have users from trusted domains who need to log in to the server as well, you need to perform the following steps as well.
These users will now be able to log in to the SilverStream Server.
Lightweight Directory Access Protocol (LDAP) is a directory service that allows Internet clients to query and manage an arbitrary database of hierarchical attribute/value pairs over a TCP/IP connection. LDAP provides a specification that allows applications to communicate with the directory service. SilverStream allows you to specify LDAP users and groups, to display LDAP attributes, and to use LDAP users and groups in access control expressions.
A wizard appears.
The following dialog displays. Use this dialog to specify the server and (optionally) the login attribute.
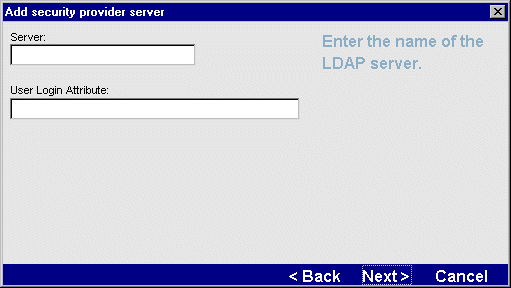
The name of the LDAP server. The server name must be recognized on your network. | |
(Optional) If an attribute is specified as the value of this property, it defines the LDAP attribute that can be used to uniquely identify a user. It is your responsibility to pick an attribute that is unique for all users. Specifying a value here can simplify login for LDAP users. For more information, see Simplifying login for LDAP users. |
The following dialog displays. Use this dialog to specify groups on the LDAP server.
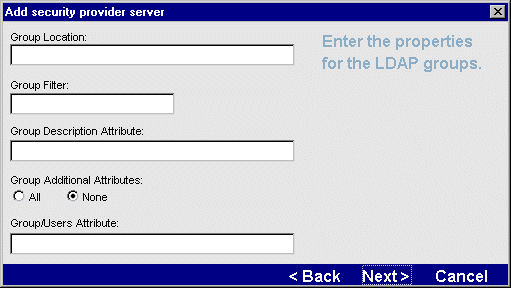
The following describes each item on this panel.
The SMC displays the settings under the LDAP directory. You can access the new settings at any time by selecting Users& Groups in the Security options in the SMC.
NisPlus, also referred to as NIS+ (Network Information Services Plus), is a name service that is available on SunOS 5.x and later operating systems. Users are contained in the NisPlus table identified by passwd.org_dir, and groups by group.org_dir. After you have added users and groups, you can use them in security expressions for access control.
A wizard appears.
You can use the SMC to view users and groups that you have defined for any security provider.

You can expand a selected item to show specific users and groups.
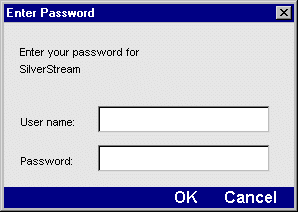
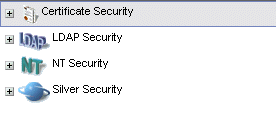
SilverStream supports a number of security realms including SilverStream security, NT security, LDAP security, NisPlus security, and certificate security. All except certificate security involve establishing an identity by providing user name information and a password.
When users log in, they are presented with a dialog similar to the following.
If the authentication dialog is being presented by a browser, the dialog--defined by the browser--will look a little different than the dialog shown above, but will consist of the same fields.
Colons cannot be used in user names or passwords
User authentication in HTTP works by taking the user name and password separated by a colon ( : ). So make sure that user names and passwords don't contain colons. In particular, with LDAP distinguished names, which can be quite long, make sure no component of the name has a colon in it.
User name components
In SilverStream a user name is composed of three parts delimited by backslash characters: Realm\Authority\Name:
SilverStream supports the following security provider realms for login: | |
By default, the SilverStream Server allows shortcuts to the full user login name, as follows:
emilyh is translated to SSSW\\emilyh
NOTE For SilverStream security, the authority is an empty string--nothing between the two backslashes; the authority is not needed because an external security system is not used.
mydomain\craigh is translated to NT\mydomain\craigh
By default, LDAP and NisPlus names must be fully qualified, as follows:
LDAP\serverName\distinguishedNameThe user must enter the entire path name. For example:
LDAP\myServer\cn=Nancy Smith,ou=SilverStream Software
NisPlus\server/nisDomain\usernameThe user must enter the entire path name. Note that the authority has two components, separated by a forward slash. For example:
NisPlus\myServer/domain1.com\jeanw
You can change these default login specifications, as described next.
You can override the defaults for login name components. So if you use only one type of external security system (and perhaps only one external security authority), you can allow your users to provide a shortened name, thus simplifying the login procedure.
To override the defaults for login name components:
A full login name can always be specified, in which case the defaults are ignored.
Example
Suppose your site uses security names from a single LDAP server. You could set the following defaults:
Users that exist in the LDAP server can now just use their LDAP user name and password when logging into the SilverStream Server.
In this same example a user that exists as part of the SilverStream security realm must now specify a full login name:
SSSW\\SilverName
In LDAP, a user name is specified relative to the LDAP naming hierarchy as a distinguished name (DN). The DN is a comma-separated list of nodes that contain attribute-name pairs from the leaf node where the user resides back to the root node.
By default, LDAP users logging in to the SilverStream Server are required to enter the entire DN, which can be quite lengthy. You can simplify login for LDAP users by specifying the User Login Attribute property when adding an LDAP server as a security provider. For more information on this property, see Using LDAP security.
If you have specified a User Login Attribute, when the user credentials are being verified during the login sequence, a search is performed for the specified User Login Attribute, with a value that matches the Name portion of the login user name.
The search starts from a point in the LDAP hierarchy identified as User Location when defining the LDAP server to SilverStream (see Using LDAP security).
If the search is successful, the DN of the corresponding user (the first one found if there are multiple hits), is used to construct a fully qualified login name, and the login operation continues. If the search is not successful, the operation continues as though the Name field were the distinguished name of the LDAP user. This allows LDAP logins using either form when the attribute is set.
Example 1
Assume the following server properties are specified:
Here, a default security realm is defined, and the login attribute is set to mail. At this site, each user's mail attribute is that user's full e-mail address.
A user defined in an LDAP server named myServer, with a distinguished name of uid=ecraig,ou=Development,ou=Burlington,o=SilverStream Software,c=US and an e-mail address of ecraig@silverstream.com (that is, a user whose mail attribute is ecraig@silverstream.com) could use a login name of either:
myServer\uid=ecraig,ou=Development,ou=Burlington,o=SilverStream Software,c=US
myServer\ecraig@silverstream.com
Example 2
Assume the following server properties are specified:
In this example, a default security authority has now been specified, in addition to the default security realm. The login attribute has now been set to uid.
The same user as above (whose uid is ecraig) could use a login name of either:
uid=ecraig,ou=Development,ou=Burlington,o=SilverStream Software,c=US
ecraig
Certificates are required when using HTTP with the Secure Socket Layer (SSL) 3.0 protocol (HTTPS). HTTPS provides data encryption between the SilverStream client and server to ensure privacy and data integrity. Certificates can also be used to authenticate users of SilverStream applications.
This section contains the following topics:
A certificate (also called a public-key certificate, digital ID, or digital certificate) is a file that authenticates the identity of an individual or a group. The certificate is a kind of license issued by a trusted organization called a Certificate Authority. A Certificate Authority might be an external company that offers certificate services, such as VeriSign, or an internal organization, such as a corporate MIS department.
For Internet applications, it is generally a good idea to have a server certificate that is signed by a widely recognized and trusted guarantor. For intranet applications, it may be sufficient to have the guarantor be the company in which the application is running.
Both users and servers can have certificates attesting to their identity. If you want to use SSL for privacy, the SilverStream Server must have a server certificate. Once enabled, the server might request a client certificate from the browser attesting to the identity of the user.
Advantages of certificates
Certificates provide these important security services:
Certificate support in SilverStream
The following is a summary of certificate support in SilverStream.
NOTE The SilverStream Server does not support DSA client certificates.
Using a server certificate with the SilverStream Server involves the following steps:
To help you create and install server certificates, SilverStream provides the following executables:
You invoke these executables at the command line, outside the SilverStream environment. The procedures are described in the following sections:
To enable HTTPS/SSL communications between an HTML client (browser) and the SilverStream Server, you need to install an RSA certificate on the server.
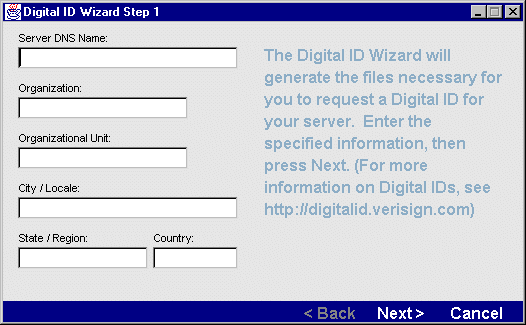
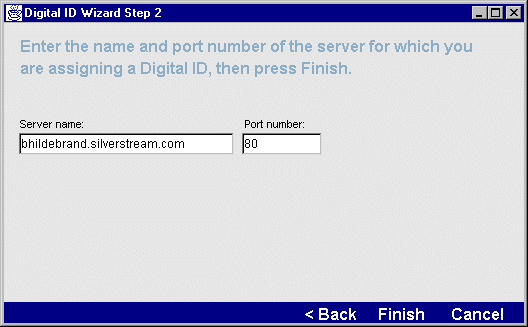
To generate an RSA server certificate for use with HTML clients:
SilverStream\bin.
AgDigitalIDStep1
The following form appears:
NOTE In UNIX, this utility runs using a GUI and cannot be run in a character terminal window. If you log in remotely to the UNIX machine, make sure that you set your DISPLAY environment variable appropriately.
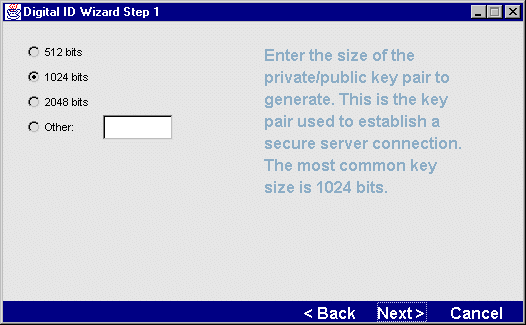
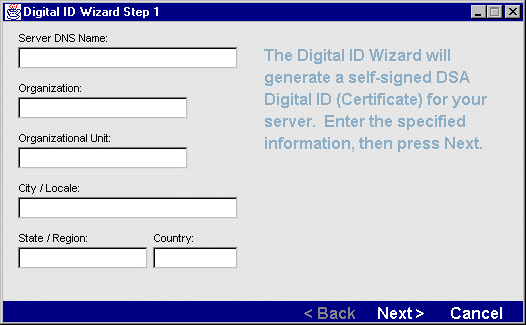
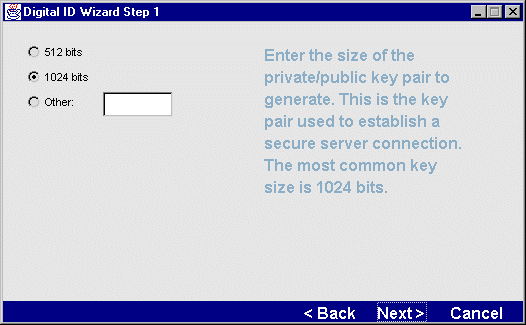
In the domestic version of SilverStream, the following screen appears, allowing you to specify the size of the key pair to generate (in the export version of SilverStream, the key pair is always 512 bits and cannot be changed).
The following screen appears.
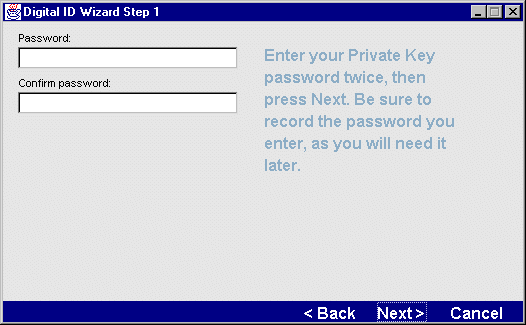
The following screen appears.
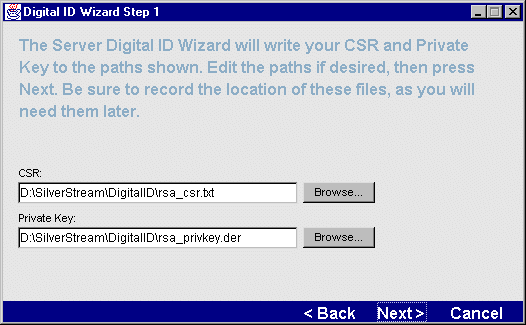
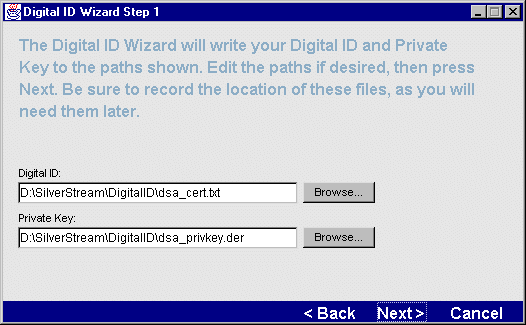
This screen shows the paths for the CSR (Certificate Signing Request) and the password-protected private key. You may edit these paths if you choose. You will use this information later when installing the certificate.
NOTE The file that contains the private key must be kept physically secure. Otherwise, anyone who can obtain the server's certificate can masquerade as the server.
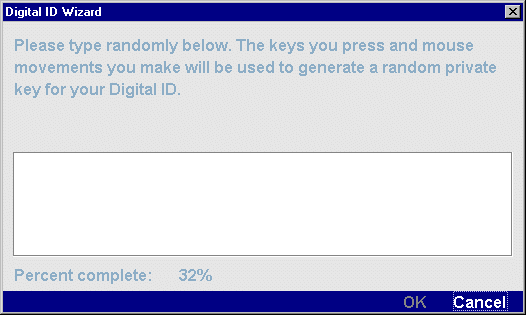
If the wizard hasn't been able to collect enough randomness information to generate cryptographically good keys from the key presses and mouse movements you have made, the following screen appears.
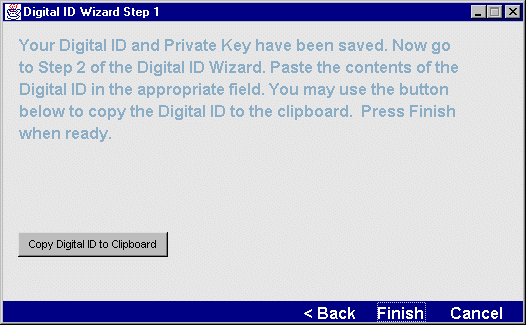
The wizard generates the certificate signing request and private key.
The following screen appears.
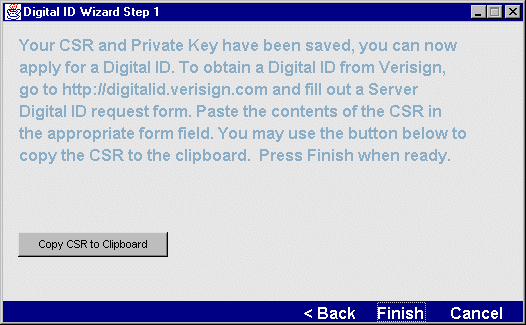
You use AgDigitalIDStep2 to install the certificate. See Installing the certificate.
To enable HTTPS/SSL communications between a Java client and the SilverStream Server, you need to install a DSA certificate on the server.
To generate a DSA server certificate for use with Java clients:
SilverStream\bin.
AgDigitalIDStep1 dsa
The following form appears:
NOTE In UNIX, this utility runs using a GUI and cannot be run in a character terminal window. If you log in remotely to the UNIX machine, make sure that you set your DISPLAY environment variable appropriately.
The following screen appears.
This screen shows the paths for the certificate and the private key. You may edit these paths if you choose. You will use this information later when installing the certificate.
NOTE The file that contains the private key must be kept physically secure. Otherwise, anyone who can obtain the server's certificate can masquerade as the server.
If the wizard hasn't been able to collect enough randomness information to generate cryptographically good keys from the key presses and mouse movements you have made, the following screen appears.
The wizard generates the certificate.
You use AgDigitalIDStep2 to install the certificate. See Installing the certificate next.
Once you receive your RSA certificate from the certificate authority or have generated a DSA certificate using AgDigitalIDStep1, you can install the certificate using the AgDigitalIDStep2 program.
SilverStream\bin.
AgDigitalIDStep2
The following form appears:
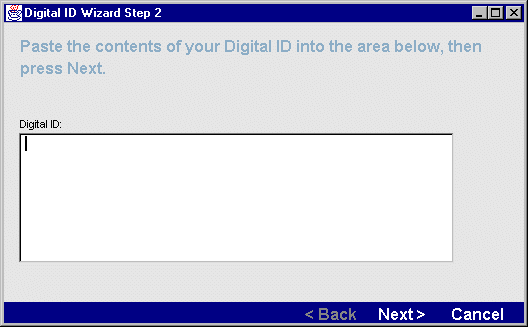
The following screen appears.
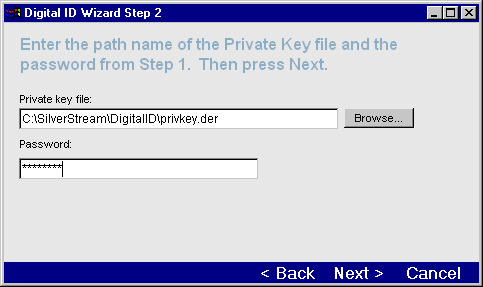
This screen asks you for the path for the private key (you might need to edit the name of the private key, since the names are different for RSA and DSA certificates) and asks you to confirm your password (there is no password for a DSA private key).
The following screen appears.
The Digital ID has been successfully installed in the server "your_server".
When the server is restarted, it is automatically configured to listen using HTTPS at the RSA or DSA port depending on which kind of certificate you just installed (in addition, by default, to listening for HTTP requests at the HTTP port).
For more information, see
Enabling RSA/DSA ports and
Specifying general server properties.
When you are ready for production, use the SMC to enable authorization. See Enabling authentication.
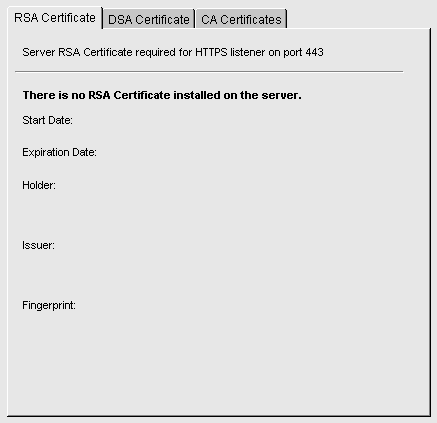
To view certificates that have been installed on the server:
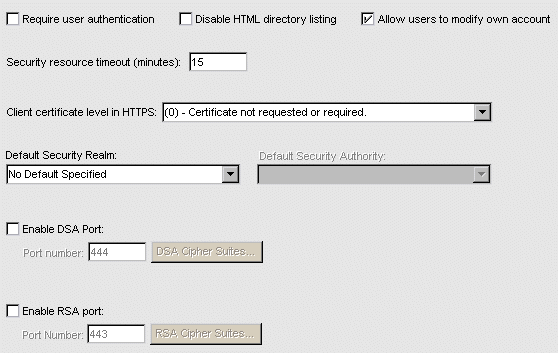
By default, SilverStream uses ports 443 and 444 for RSA and DSA communications respectively. You can use the SMC to enable and modify the port settings.
To enable and change RSA/DSA ports:
NOTE The ports are automatically enabled after the server is restarted after a server certificate has been installed.
For more information, see
Creating and installing server certificates.
With a UNIX server, specify port numbers above 1024 if the server is not being run with root access (ports below 1024 are reserved for root access).
For information about cipher suites, see
Restricting SSL cipher suites.
You can turn off HTTP communications and allow client communications only using HTTPS or RMI.
To disable HTTP communications:
Now the server will not listen on the HTTP server port.
When an SSL connection is initialized, the client and server determine a common cipher value to be used for key exchange and encryption. Various cipher values offer different types of encryption algorithms and levels of security. United States security currently prohibits the export of high-level cipher values. By default the domestic version of the SilverStream Server has a full set of cipher suites. This makes it capable of servicing a range of clients from low-level encryption (such as the International version of the Netscape browser with 40-bit encryption) to high levels (such as the domestic version of Internet Explorer with 128-bit encryption).
You can restrict the levels of encryption (cipher values) used by the server when communicating in HTTPS through the RSA port and through the DSA port. This allows you to have a server capable of high-level encryption while preventing connections from lower-level security clients.
During server startup, the list of allowed cipher suites is read (high level encryption will not be allowed from an international server). Only those cipher suites that are requested and allowed will be used to initialize the appropriate SSL socket.
By default, all cipher suites are allowed. You can use the SMC to disallow certain cipher suites.
To specify which cipher suites are allowed:
Table of cipher suites
The table below shows the cipher suites supported by the server when using secure communications (HTTPS). Note that only the suites marked exportable are available in the international release. The domestic release is capable of handling all of these security protocols and will load them by default.
Example
To allow only greater than 40-bit encryption with RSA communications, select only the following cipher suites under RSA Cipher Suites:
The SilverStream Server maintains a list of Certificate Authorities (CAs) for verifying client certificates. This represents the list of guarantors the server will trust. There are three common CAs installed when the server is initially configured. These CAs are from VeriSign Inc.and represent different levels of trust. Class 1 represents a certificate that has minimal trust. Class 3 represents the highest level of trust.
When a user with a client certificate attempts to access the server, the server first checks the list of CAs to verify that the certificate has been approved by a known party, then checks for a valid timestamp to verify that the certificate has not expired. After completing the verification the server handles the connection request according to the Client Certificate Level parameter that you can set using the SMC. This setting is described in Installing and managing client certificates.
In addition, Silverstream allows the server to extract the CA from an unrecognized client certificate. For more information, see Installing and managing client certificates.
To install or delete a CA certificate:
This tab contains information about each Certificate Authority and allows you to add new CAs to allow a broader range of clients to be trusted, or you can delete CAs to tighten the level of security on the server.
In the HTTPS environment a client certificate establishes the identity of a user when communicating with a server. Client certificates can be obtained from various sources, but to be useful the certificate must be signed by a guarantor (Certificate Authority) that is trusted by the server.
The SilverStream Server supports client certificates from standard Internet browsers (including Netscape and Internet Explorer) that use RSA encryption, and supports X.509 certificates, which is a particular implementation of the Certificate interface used by many certificate issuers.
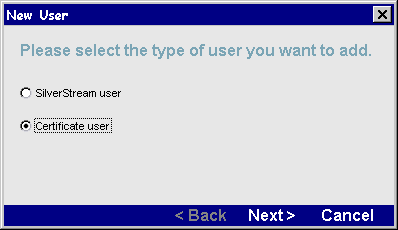
Using the SMC, you can determine how the server will handle connection attempts from users with valid client certificates. Seven parameter options are available, each representing a different level of restriction. Two of the options will automatically install new certificates that are verified by the server and add them to the database as new users in the Certificate Security realm. You can also install the certificates manually (see Manually installing client certificates).
To enable client certificates on the server:

You need to restart the server only if you changed from level 0 to another level.
Your selection determines how the server will handle all valid client certificates. The table that follows describes each option.
The options are numbered from 0 (no verification) to 6 (most restrictive level).
The previous section describes parameter options that automatically add new validated certificates to the database on the server. You might prefer to install the certificates separately. This section describes how to manually add client certificates to the database. It consists of two procedures, one for client machine and the other for the server.
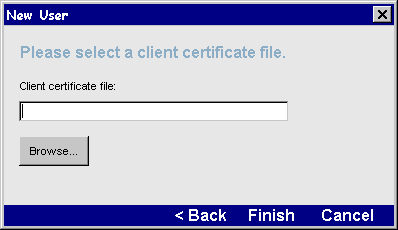
To install a client certificate, client machine:
NOTE For this procedure to work, the certificate validation level on the server must be set to 1, 2, or 4 (see the Certificate verification table in the previous section).
https://server/SilverStream/Meta/Certificates?action=data
where server is the name of your server.
The server will extract the user information from the certificate and send it back to the client.
To install a client certificate, server machine:
 icon at the bottom of the right pane.
 The following dialog appears.
This adds the certificate as a new user to the database on the server.
The SilverStream Server also allows you to extract the CA from a client certificate if the CA is not installed on the server. This section consists of two procedures, one for the client machine and the other for the server.
To extract the CA from a certificate, client machine:
NOTE For this procedure to work the certificate validation level on the server must be set to 1 or 2. (see the Certificate verification table in the previous section.)
https://server/SilverStream/Meta/Certificates?action=dataCA
where server is the name of your server.
The server will extract the CA from the certificate and send it back to the client.
To extract a CA from a client certificate, server:
The program installs the new CA to the database.
Certificate users are added to a security realm called Certificate Security. This realm is included in the lists of users and groups supported by the Silverstream Server.
For more information about users and groups, see
Setting Up Users and Groups.
You can use certificate users in security expressions exactly as you use other users in SilverStream. For more information about security expressions, see Setting up access control.
An X.509 certificate includes a start and end date. A client will not be allowed to connect to the server with a certificate that has expired. You can update the certificate representing an established Certificate Security user by obtaining a new certificate and assigning it to a user already known to the SilverStream Server. This ensures that any security expressions involving the old user will continue to work properly.
Normally an existing certificate user would present the updated certificate to the server using the URL described in Manually installing client certificates.
NOTE If you are running the server with one of the auto-install parameters described previously (level 2 or 3) and an existing client certificate holder attempts to access the server with a new (updated) certificate that the server validates, that client will be installed as a new user. This client might be restricted from resources available to the previous user.
To update an existing certificate user:
 .
. The General tab shows general information concerning the user. The Additional Attributes tab displays information about the certificate. The Update tab allows you to update the certificate for the selected user.
This replaces the old certificate with the new version without changing the identity of the user on the server.
The SMC lets you enable user authentication and activate related settings. Use these settings when you are ready to deploy authentication for both HTTP user/password protection and HTTPS certificates.
To enable user authentication:
Requires users when first accessing the server to authenticate themselves, either through a certificate or user name/password. Once authenticated, users do not have to be authenticated again during the session. Setting this option disallows Anonymous users--if you don't set this option, a user can access the server without logging in or sending a certificate, in which case the user is known as Anonymous. If you are using this option with HTTPS, activate Client certificate level in HTTPS as well. NOTE You can also require login on a per-object basis. See Changing access. | |
Disables the listing of server directory contents in a browser when the browser points to the directory's URL. Prevents users from seeing directory contents. If this option is turned on, the server returns a FORBIDDEN error. | |
By default, users can change their own user properties. You can turn off this privilege by deselecting this check box. If this privilege is turned off, only administrators (that is, individuals with Read Server Configuration and Modify Server Configuration permissions) can change user properties.
| |
Specifies how frequently the SilverStream Server will upload current lists of users and groups from the NT, LDAP, and/or NIS+ servers, which would include any updates to these lists.
| |
Activates the use of client certificates for HTTPS security (requires a server certificate).
|
SilverStream supports the Java security Access Control List (ACL) API, allowing developers to programmatically control access to any SilverStream object, including data and application objects. This Java security is complementary to the security provided by the SMC and the SilverStream Server Administration API.
For more information about the SilverStream API, see
Using the Server Administration API.
You can use the SMC to control SilverStream Server administration at the server or cluster level and to control access to the following:
You specify access by setting permissions, as described next.
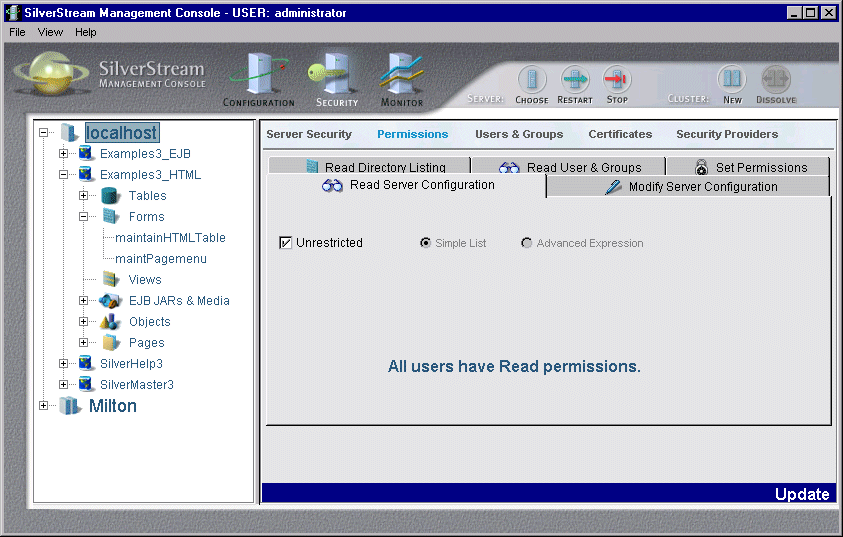
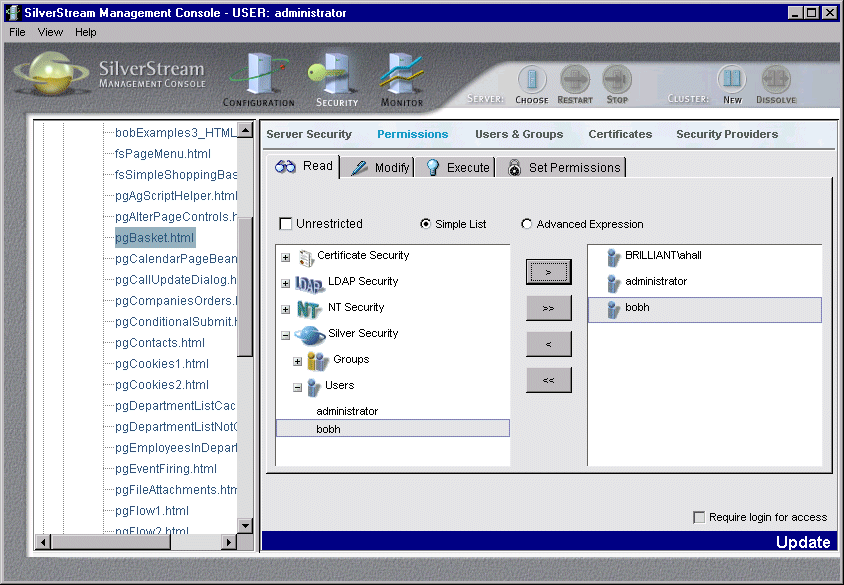
SilverStream allows you to set up access control on various operations through permissions. Each object type has a different set of supported permissions. You can set the following permissions:
Lets the user view administration settings and connection parameters. | |
Lets the user administer the server or cluster by, for example, changing connection parameters. Also lets a user add users and groups and change user passwords. | |
Lets the user browse the server directories. Does not affect whether a user can access an object. | |
Lets the user see users and groups that have been defined on the server. Users must have this permission in order to set permissions, because otherwise they cannot see the users and groups. | |
For an object, lets the user look at the object but not make modifications to it. For a database or directory, lets the user list the contents of the database or directory and look at objects in that database or directory. To easily prevent users from accessing objects in a database or directory, deny them Read access at the database or directory level. | |
Lets the user limit who can alter access control information on an object. For example, you may decide that only administrators should be able to change the security properties on this object. | |
Sets the default Execute permission for objects within the database or directory. | |
Lets the user run an object, such as a form, page, view, or business object. In order to run an object, the user does not need Read permission for the object, but does need Read permission for the directory containing the object. | |
Lets the user set up row-level retrieval access on individual tables by creating selection criteria through the Expression Builder. This is useful if you want to set up row-level security in a table. To restrict write access to the table's data, you need to write a business object. For more information, see the chapter on table-modified business objects in the Programmer's Guide. |
SilverStream sets up security by default. Object security defaults are set as follows:
Any new object takes on the access security of the immediate parent object. For example, if you create a new form in a SilverStream database, the form is saved in the Forms directory and takes on the security settings of the Forms directory.
For more information, see the chapter on table-modified business objects in the Programmer's Guide.
You can change object security at the server or cluster level, at the directory level, or at the object level by setting permissions in the SMC.
NOTE In addition to setting permissions in the SMC, you can also set permissions at the command line using a SilverCmd utility. For more information, see SetSecurity in the SilverCmd Reference in the online Tools Guide.
The SMC view changes: All the clusters, servers, and databases being administered by the SMC are now expandable, allowing you to list their contents in order to set permissions at any level you want.
Setting permissions on multiple objects
You can set permissions on more than one object at a time as long as all the objects are in one directory (that is, the objects are all the same type, such as forms or pages, and they are all on the same server): Select Shift+Click for contiguous entries or Ctrl+Click for non-contiguous entries and specify the permissions for all the selected objects.
Setting the scope of the permissions and whether login is required
The buttons that appear at the bottom of the Permissions panel depend on whether you selected a directory or an object. The following is a description of each button that might appear.
Appears for directory selections only. Applies permissions only to the selected directory, and becomes the default setting for new objects in the directory structure. This selection does not change permissions for existing objects in the directory. | |
Appears for directory selections only. Applies permissions to the selected directory and all existing objects within that directory (including subdirectories) as well as new objects. This selection overrides any existing settings for existing objects. | |
Appears for object selections only. Requires the user accessing the object to be authenticated, either by a client certificate or by being logged on. This sets authentication on a per-object basis. You can also require authentication at the server level. See Enabling authentication. |
Each tab on the form represents a permission type that applies to the selected directory or object. By default, all access is unrestricted. To restrict access, select a tab, deselect Unrestricted, then select either Simple list or Advanced expression.
CAUTION! When you uncheck Unrestricted, be sure to modify the Simple list or Advanced expression, otherwise, no one will have access. This problem will also occur if you clear all previous Simple list entries. If you find yourself in the situation where no one has read access to the server, you can run SilverMasterInit using the -a command-line option. For more information, see Using the SilverMasterInit program.
This option allows you to specify users and groups that are known to a security provider and have access permission as defined in the provider setup.
To remove the permission from users or groups, select the user or group and click <. To remove all users and groups, select <<.
Use this option to build expressions that let you specify access according to particular criteria. To use advanced expressions, select Advanced Expression instead of Simple List (see the previous procedure). Expressions can include any of the following:
The SilverStream Expression Builder displays selection panes for variables, functions, and operators.
Examples of advanced expressions
The following are examples of advanced security expressions.
day() method to disallow access to the object on weekends (the day() function returns a number from 0 to 6, where 0 indicates Sunday, 1 indicates Monday, and so on):
day(now()) >= 1 and day(now())<= 5
  (day(now()) >= 1) and
  (day(now()) <= 5) and
  (hour(now()) >= 9) and
  (hour(now()) <= 17)
For more information about specifying expressions, see the chapter on expressions in the Programmer's Guide.
The Expression Builder supports Universally Unique Identifiers (UUIDs) for security expressions. These provide a more secure system than simple integer IDs. UUIDs are used by default in simple security expressions, and are available in advanced expressions.
You can enter UUID expressions directly in the Expression Builder, or access them from the ID section in the Functions panel.
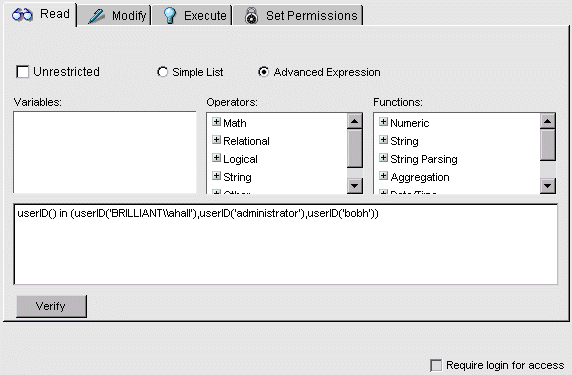
Examples
The following are examples of security expressions using UUID.
userID() in (userID('administrator'),userID('bobh'))
userID() in (userID('bobh'),userID('DEVA\\JWilkins'))
userID() in (userID('administrator')) or userID() userin (groupID('Developers'))
userID() in (userID('administrator')) or userID() userin (groupID('DEVA\\Accounting'))
For more information about specifying expressions, see the chapter on expressions in the Programmer's Guide.
You can perform database table and row-based access control through the SELECT expression on a table. Row-level expressions work as follows:
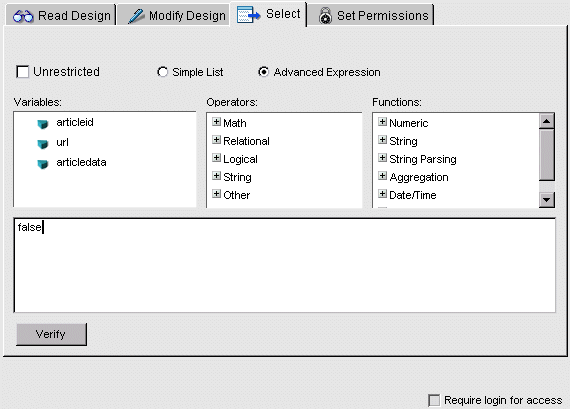
Examples of SELECT expressions
The following are examples of row-level SELECT expressions.
userID() userin (groupID('NorthEast-Sales')) AND orders.SalesCode BETWEEN 100 AND 200
  if (userID() userin(groupID('Managers')))
  then (employees.status>0)
  else (employees.status<>3)
  endif
For more information about specifying expressions, see the chapter on expressions in the Programmer's Guide.
The INLIST operator is a SilverStream construct that can be used in an advanced SELECT security expression. For example, you may have special columns in your tables that contain information about who can view them. The rows are retrieved and then filtered through this expression using the column's values.
Example
Suppose a user named Dev1 belonging to the Developers group logs in to the server. The following shows the SELECT security expression on table Project.
userID() userin (inlist(PROJECT.ALLOWED_GROUPS))
Next, Dev1 creates a form against Project table and runs it. The server retrieves three rows and applies the SELECT expression to every row before giving the form back to the client. Because Dev1 belongs to the Developers group, the server shows only the first and third rows, but not the second row, which is restricted to the Administrators group.
Robots are programs, such as search engines and web crawlers, that can traverse many pages on a Web site by recursively retrieving linked pages. The SilverStream Server supports the commonly used robot exclusion protocol that allows you to specify exactly what files and directories robots that conform to the exclusion protocol can access on your Web site.
NOTE The robot exclusion protocol is purely voluntary. There is no guarantee that a robot conforms to the protocol, but most do.
In this exclusion protocol, the access policy for robots is specified in a file called robots.txt. The robots.txt file that is shipped with SilverStream tells robots not to proceed below the root of the server (that is, it disallows all access to all robots that conform to the exclusion protocol). So by default, conforming robots are disallowed all access to the Web site you have developed with SilverStream.
You can modify robots.txt to specify the kind of access you want to provide to robots. For example, you might want to allow search-engine access to some directories but not to others.
For information about the protocol's format and semantics, including examples, see http://info.webcrawler.com/mak/projects/robots/norobots.html.
The next time a conforming robot requests the access policy from the server, the updated robots.txt file will be read and the information sent back to the robot.
At certain points in the development and deployment process, you will want to lock down an application database, a server, or an entire cluster, that is, secure it so that the appropriate access permissions are set. For example, when deploying an application, you might want to lock down the application database so no one can access it except you, then progressively unlock it as appropriate in the production environment.
Included with the SilverStream Server (in the SilverStream\DTDs directory) are three sample XML files that are input files for the SilverCmd SetSecurity command. These files show how you can lock down an application, a server, or a cluster using SilverCmd.
All the files are well-commented with usage notes.
For information on using SilverCmd, see the SilverCmd Reference in the online Tools Guide.
About the XML
If you look at the XML files, you will see that permissions are set differently and sometimes have different names than you are accustomed to in the SMC. That's because the SMC has an interface designed to make it as easy as possible for you to administer the server. Under the covers, permissions are set by assigning values to resources; it is those resources that are referenced in the XML files. You don't need to know anything about the specific resources when using the SMC.
The secure_application_sample.xml input file shows you how to lock down an application.
You might want to apply this file to an application database just before deploying it in order to secure it properly.
The secure_server_sample.xml input file shows you how to lock down an entire server.
You might want to apply this file to a server when putting it into production.
The secure_cluster_sample.xml input file shows you how to lock down a cluster.
You might want to apply this file after you have secured each server in a production cluster using secure_server_sample.xml.
The levels and types of security that you implement depend on the scale and demands of your particular enterprise. This section provides a security checklist for the production and development server environments, and recapitulates some of the security features covered in this chapter.
The following is a security checklist for the production environment.
For more information, see
Server Configuration.
For more information, see
Setting up a supported database.
For more information, see
Using certificates.
For more information, see
Setting Up Users and Groups.
For more information, see
Enabling authentication.
For more information, see
Setting up access control and
Locking down an application or a server.
The following is a security checklist for the development environment.
For more information, see
Setting Up Users and Groups.
For more information, see
Using certificates.
You can require login for forms, tables, views, and pages by activating Require login for access.
Secure access by directory or object type, for example:
NOTE The ability to write a business object is like "superuser" access. A business object can bypass other SilverStream security and shut down the server or otherwise compromise data.
For more information, see
Setting up access control and
Locking down an application or a server.
You must limit server administration to authorized individuals. The following is a checklist for administrative security.
For more information, see
Using the Locksmith privilege.
For more information, see
Setting up access control.