EJB Session Bean Quick Start
This chapter provides a quick tutorial that teaches you how use the SilverStream Application Server IDE to build and deploy a stateful session bean using the SilverStream Application Server IDE. This quick start includes these sections:
 For more information on SilverStream support for EJBs, see the chapter on using EJBs in the Programmer's Guide. For more information on session beans, see the chapter on writing session beans in the Programmer's Guide.
Prerequisites 
This quick start assumes you have:
-
Sybase Adaptive Server Anywhere installed on your system
-
Some working knowledge of the SilverStream Application Server design environment
You do not need any EJB knowledge. But keep in mind that the intent of this quick start is to teach you how to use SilverStream to build session beans; it is not intended to teach you EJB theory or best practices.
Setting up your environment
Before doing the quick start exercises, you must set up your environment.
 To set up your environment:
-
Add the Examples3_EJB database to your SilverStream server.
Examples3_EJB is a Sybase Adaptive Server Anywhere database that is installed and configured as part of the SilverStream Full or Typical install. You can use the username dba and password sql to add Examples3_EJB to your server.
For information on adding a database, see the chapter on database configuration in the online Tools Guide.
-
Open the Objects directory of the Examples3_EJB database, but do not select anything.
If you select an object, you will not be able to create a top-level package as required unless you close and restart the Main Designer.
-
Create a top-level package called quickstart in the Objects directory of the Examples3_EJB database.
For more information on creating packages, see the chapter on the Business Object Designer in the online Tools Guide.
-
Select the quickstart package, then create a subpackage called calculatordemo.
About the session bean and its components
The session bean that you will build calculates a running total based on user-entered values.
You will create the following EJB components in the quickstart.calculatordemo package:
Component
|
Description
|
|---|
SBCalculatorBean
|
The session bean class. It contains the business logic that does the calculation and returns the value.
|
SBCalculator
|
The bean's remote interface.
|
SBCalculatorHome
|
The bean's home interface.
|
QuickStartSB.jar
|
The EJB JAR file. It contains the bean class, its home and remote interfaces, and a deployment descriptor.
|
You will call the session bean from the SilverStream HTML page described here:
Component
|
Description
|
|---|
pgCalculate2.html
|
The user interface. It lets users enter two integer values. When the user presses a button, the value is calculated and the running total is displayed.
You will save the SilverStream provided page pgCalculate.html as pgCalculate2.html. This allows you to modify the code to run your own SBCalculatorBean.
|
Exercise 1: Creating the bean components
In this exercise you will create the:
-
SBCalculatorBean session bean class
-
SBCalculator remote interface
-
SBCalculatorHome home interface
To create the SBCalculatorBean bean class:
-
In the Examples3_EJB database, click Objects.
-
Choose the quickstart package, then choose the calculatordemo package you created in
Setting up your environment.
-
Choose the New icon, then choose New Object to invoke the Business Object Wizard.
-
Follow the wizard instructions using these values:
-
Choose the switch to single-method view button (if not already selected).
-
Access the General/Imports section and add the following:
  import javax.ejb.*;
  import java.rmi.RemoteException;
-
Access the General/Declarations section and add the following:
public int m_iTotal = 0;
-
Save the bean class.
To add the ejbCreate() method to SBCalculatorBean:
-
Choose Tools>Add New Method to invoke the Add New Method Wizard.
-
Follow the wizard instructions using these values:
-
Method Name: ejbCreate
-
Visibility: public
-
Return Type: void
-
# of parameters: 0
-
Check the Throws exceptions check box and add the javax.ejb.CreateException and java.rmi.RemoteException.
-
Choose Finish.
SilverStream constructs the ejbCreate() method that looks like this:
  public void ejbCreate()
     throws javax.ejb.CreateException, java.rmi.RemoteException
  {
  }
-
Save the bean class.
To add the doCalculation() business method to SBCalculatorBean:
-
Choose Tools>Add New Method to invoke the Add New Method Wizard.
-
Follow the wizard instructions and use the following values:
-
Method Name: doCalculation
-
Visibility: public
-
Return Type: int
-
# of parameters: 2
-
Check the Throws exceptions check box.
-
Enter the following values for Parameter 1 and Parameter 2:
Field
|
Value for Parameter 1
|
Value for Parameter 2
|
|---|
Parameter name
|
piFirstValue
|
piSecondValue
|
Type
|
int
|
int
|
-
In the Exceptions pane, choose Add, then enter: java.rmi.RemoteException
-
Choose Finish.
SilverStream constructs a doCalculation() method that looks like this:
  public int doCalculation(int piFirstValue, int piSecondValue)
     throws java.rmi.RemoteException
  {
  }
-
Add the following code to the method (between the {})
  int iTotal = piFirstValue + piSecondValue;
  m_iTotal += iTotal;
  return m_iTotal;
-
Save the bean and exit the Business Object Designer.
To create the SBCalculator remote interface:
-
With the quickstart.calculatordemo package selected, choose the New icon.
-
Choose New Interface to invoke the Interface Wizard.
-
Follow the wizard instructions provided these values:
-
Extend the interface javax.ejb.EJBObject (by selecting Add)
-
Name the interface SBCalculator
-
Choose Finish.
SilverStream constructs a shell for the SBCalculatorRemote interface that looks like this:
  public interface SBCalculator extends javax.ejb.EJBObject
  {
  }
-
Add the following imports:
  import javax.ejb.*;
  import java.rmi.RemoteException;
-
Add the following signature for the doCalculation() method to the interface (between the {}):
  public int doCalculation(int piFirstValue, int piSecondValue)
  throws RemoteException;
-
Save the interface and close the Business Object Designer.
To create the SBCalculatorHome home interface:
-
With the quickstart.calculatordemo package selected, choose the New icon.
-
Choose New Interface to invoke the Interface Wizard.
-
Follow the wizard instructions using these values:
-
Extend the javax.ejb.EJBHome (by selecting Add)
-
Name the interface SBCalculatorHome
-
Choose Finish.
SilverStream constructs a shell for the SBCalculatorHome interface that looks like this:
  public interface SBCalculatorHome extends javax.ejb.EJBHome
  {
  }
-
Import the following packages:
  import javax.ejb.*;
  import java.rmi.RemoteException;
-
Add the following create() method signature to the interface (between the {}):
  SBCalculator create() throws javax.ejb.CreateException,
  java.rmi.RemoteException;
-
Save the interface and exit the Business Object Designer.
Exercise 2: Deploying the bean
Now you will deploy the EJB components by:
-
Creating an EJB JAR file and providing a deployment descriptor
-
Creating a deployment plan
-
Deploying the EJB JAR to the SilverStream server
To create an EJB JAR file:
-
From the Main Designer, choose EJB JARS and Media.
-
Choose Jars, then choose the New icon.
-
Choose Create EJB JAR.
-
In the left side of the JAR Contents tab, expand Objects.
-
Expand quickstart, then expand calculatordemo.
-
Choose Package contents and add it to the JAR by choosing >.
-
Save the JAR naming it QuickStartSB.
To create the Deployment descriptor:
-
From within the JAR Designer, choose the Descriptor tab.
-
Choose Enterprise JavaBeans and right-click.
-
Choose Add Session Bean.
The JAR Designer creates an entry called UntitledSessionBean.
-
Choose UntitledSessionBean, right-click, and choose Properties.
-
Complete the Property Inspector so it looks like this:

NOTE You can choose the ellipsis button (...) to launch a dialog that lists the possible valid entries. When you select an entry from the dialog, the JAR Designer populates the text box with the selected value.
-
Close the Property Inspector and save the EJB JAR.
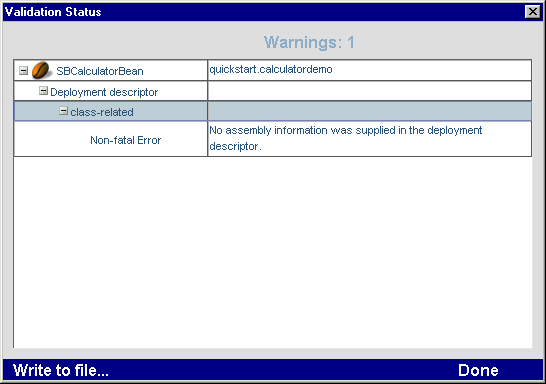
For this exercise, you can expect the Validation Status dialog to appear with the warning message shown here. This warning does not affect your ability to run the session bean.
-
Choose Done.
SilverStream launches a final dialog asking if you want to save the JAR even though it has errors.
-
Choose Yes.
-
Exit the JAR Designer.
To deploy the EJB JAR:
-
From the Main Designer, choose EJB JARs & Media
-
Expand Jars, then choose the QuickStartSB JAR from the list.
-
Right-click and choose Create EJB JAR Deployment Plan.
SilverStream launches the Deployment Plan Designer.
-
In the Deployment pane, choose Enterprise JavaBeans.
-
Right-click and choose Properties.
-
Make sure that Enabled is set to True.
-
Leaving the Property Inspector open, choose the SBCalculatorBean.
-
Enter SBCalculator as the JNDI deployment name.
-
Choose Save.
-
Accept the default name for the deployment plan (QuickStartSBDeplPlan) and choose OK.
-
Choose Save and Deploy.
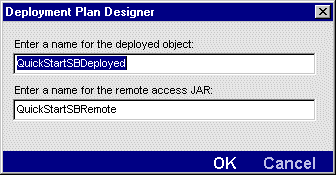
The Deployment Plan Designer displays the following dialog.
-
Accept the default names and choose OK.
SilverStream launches the rmi-iiop compiler to generate the deployment classes for this EJB application (the collection of classes is called the deployed object) and places them on the server. It also creates a remote access JAR file that contains all of the classes an EJB client needs to access the EJB classes on the server.
SilverStream again displays this Validation Status dialog.
-
Choose Done.
SilverStream displays the following message in the designer's message area:
The JAR was successfully saved and activated.
-
Close the JAR Designer.
Now you can see the objects created during the deployment process. They are located in the JARs directory and include:
Object
|
Description
|
|---|
QuickStartSBDeployed
|
Represents the EJB deployment object. The deployment object is a collection of classes that the SilverStream server requires to execute EJBs.
You cannot manipulate the EJB deployment object except to activate or deactivate it using the SMC.
|
QuickStartSBDeplPlan
|
Represents the deployment plan for the EJB deployment object.
You can create multiple deployment plans for an EJB JAR.
|
QuickStartSBRemote.jar
|
Represents the collection of classes required by EJB clients.
You must make this JAR available to any clients wishing to call any of the EJBs that are part of this deployment object.
|
Exercise 3: Calling the bean
Before you test your bean, you will see how it should execute by running the SilverStream-provided page (pgCalculate.html).
Then you will open pgCalculate.html and modify the code that:
-
Imports the quickstart.calculatordemo package
-
Change the name of the remote JAR that the page references.
-
Does a JNDI lookup to find the bean's home interface
-
Calls the javax.rmi.PortableRemoteObject.narrow() method to obtain the correct object type
Finally, you will call your bean from your own version of pgCalculate2.html.
To run the SilverStream-provided page:
You see that it prompts the user for two values. The SBCalculatorBean session bean contains a member variable that keeps a running total and is able to maintain this state across calls from the page. When the user clicks the Add to running total button, the page gets the new running total from the bean.
To modify the page to call your bean:
-
Choose the Pages directory in the Examples3_EJB database.
-
Open the pgCalculate.html page, then choose File>Save As and accept the default name.
-
Open the Programming Editor and choose the switch to single method view button.
-
In the General/Imports section, comment out the com.examples.calculatordemo import statement shown here:
// import com.examples.calculatordemo.*;
and add the import quickstart statement, as shown here:
import quickstart.calculatordemo.*;
-
Choose File>Jar Files and change the JAR file used by the page from:
Examples3_EJB/CalculatorDemoRemote.jar
to:
Examples3_EJB/QuickStartSBRemote.jar
-
In the General/getTheCalculator method, comment out this JNDI lookup:
  // Object obj =
  //    initialContext.lookup("RMI/sssw/Examples3_EJB/
  //    CalculatorDemo/SBCalculator");
and replace it with the following:
Object obj = initialContext.lookup("RMI/SBCalculator");
-
Still in the General/getTheCalculator method, comment out the reference to the com.examples.calculatordemo.SBCalculatorHome.class shown here:
  // javax.rmi.PortableRemoteObject.narrow(obj,
  // com.examples.calculatordemo.SBCalculatorHome.class);
and replace it with this line of code:
  javax.rmi.PortableRemoteObject.narrow(obj,
      quickstart.calculatordemo.SBCalculatorHome.class);
-
Save the page and close the Programming Editor.
To call the bean:
-
Run the pgCalculate2.html page in test mode.
-
Enter a number in the First Value and Second Value fields, then click Add to Running Total.
The page should display the sum of the two values.
-
Repeat step 2.
The bean should return the running total.
Copyright © 2000, SilverStream Software, Inc. All rights
reserved.