HTML data view controls let you display data from one or more database tables in a tabular (row and column) format. This chapter introduces the HTML data view. It covers the following topics:

SilverStream's HTML data view is a specialized HTML table whose cells can contain a combination of data-bound and non-databound controls. You can bind the controls to database columns, display images or other in-memory data. SilverStream uses the AgpViewPanel class to represent an HTML data view.
Unlike its counterpart in the View Designer, the HTML data view does not support hierarchical drill-down. However, you can create the effect of hierarchical navigation by coordinating the display of several data views inside a page.
 For an example of a master/detail application that links multiple data views in a page, see Application Techniques>HTML Client Techniques in the help system: Building a Master/Detail Page.
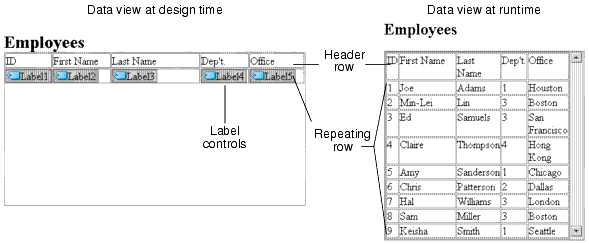
A data view consists of two rows. The first row is called the header row. The header row contains static text for column headers. The second row is called the repeating or data row. You normally place controls (usually label controls) in the repeating row to display data in the body of the data view. This row is called the repeating row because SilverStream dynamically evaluates the controls at runtime, and repeats the row as many times as necessary to display the data. The following diagram shows the HTML data view at design time and at runtime.
At design time, you can examine and modify the properties of the data view and its labels using the Property Inspector.
You can bind an HTML data view to any data source that implements the AgiRowCursor interface for data navigation and the AgiRowSetManager interface for data updates.
You can bind the data at design time using the Property Inspector or dynamically at runtime.
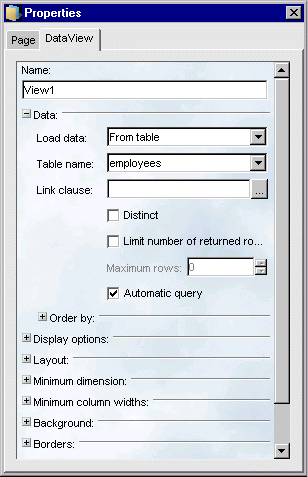
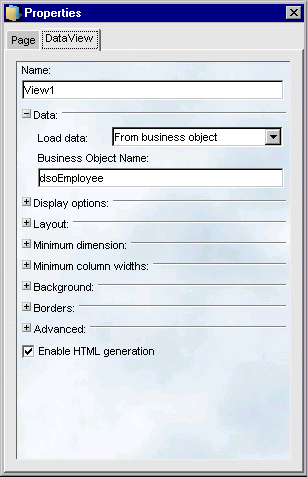
In the Property Inspector for a data view, you can bind the view to a database table or a data source business object (DSO).
To bind to a database table, you select From Table in the Load Data dropdown and select the table in the Table Name dropdown. When you bind to a database table, you can restrict the data for the view by checking the Distinct checkbox, specifying a Link clause, or limiting the number of rows returned for the view.
To bind to a DSO, you select From Business Object in the Load Data dropdown and specify the DSO in the Business Object Name edit box. The options for restricting the data are not supported when you bind a data view to a DSO.
Most of the time, you will want to bind your HTML data views at design time. However, SilverStream does give you the option to bind at runtime as well. At runtime, you can bind an HTML data view to an AgpData object by calling the setDataProvider() method or to a DSO by calling the setDataSource() method. You would typically do this once in the PageLoaded event. For example, this code changes the data source to an AgpData object named agpData3.
View1.setDataProvider(agpData3);
When using this method, controls in the data view must refer only to fields within the specified data source. Also, SilverStream does not recommend programmatically scrolling this data source outside of the data view as it will affect the data view's behavior.
The setDataSource() method lets you dynamically associate a DSO with a data view. For example, this statement binds a data view to the data source object called "mydso" in the com.dso package.
View1.setDataSource("com.dso.mydso");
If you bind a data view to an AgpData that gets data from a DSO, you need to call the invokeQuery() method on the AgpData object to initialize the view. Similarly, if you bind a data view directly to a DSO, you need to call the invokeQuery() method on AgpViewPanel. The invokeQuery() method allows you to initialize any arguments required by the DSO. To force the view to query again programmatically, or to change the query and order-by parameters, call query().
If you bind a data view to a data source dynamically, you also need to bind the controls in the view's detail row dynamically. Rather than using the Property Inspector to bind the controls at design time, you call agDataMgr.bind() at runtime to accomplish the same goal. The agDataMgr object is an instance variable provided on every page. You typically bind controls in a view's detail row either directly to the view or to an AgpData object on the page. The following code associates a DSO with a data view and binds three labels in the view's detail row to columns in the DSO:
  View1.setDataSource("dsoEmployee");
  agDataMgr.bind(Label1, "Value", "getText", "setText", View1, new
     Integer (0));
  agDataMgr.bind(Label2, "Value", "getText", "setText", View1, new
     Integer (1));
  agDataMgr.bind(Label3, "Value", "getText", "setText", View1, new
     Integer (2));
When working with a data view, you can restrict the data that is displayed and link it to another control's data. You can also specify when the data view is loaded.
You can restrict the set of rows that display in the data view in these ways:
query() method at runtime
Checking the Distinct checkbox
You can filter out duplications by checking the Distinct checkbox in the Property Inspector. When this checkbox is checked, only one copy of each row appears in the dataset, even if duplicates of it are present in the underlying database.
Calling the query() method at runtime
Call the query() method to restrict the dataset at runtime. For example:
View1.query("employees.deptid=300");
Both the Where clause and the query() method restrict the set of rows retrieved. SilverStream appends queries that are set programmatically to the Where clause specified in the data view's property sheet using the AND operator.
The query() method provides additional flexibility in determining what data the data view displays, but it has these restrictions:
Using a Link clause
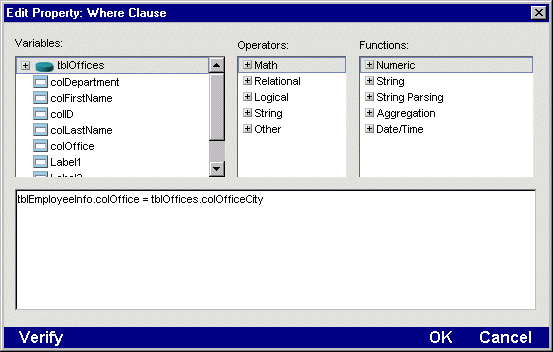
You can restrict the rows that are displayed in the data view by making them dependent on data displayed by another control on the page. For example, you might display a customer name in a text field and that customer's orders in a data view. When the customer field changes, the displayed orders also change. You can ensure that this happens by specifying a Link clause in the data view's property sheet. The Link clause expression describes a join operation between the datasets of the page and the Data View. You might think of the Link clause as a refinement of the data view's Where clause.
SilverStream automatically generates the Link clause, if possible, as you specify the data properties of the data view. If SilverStream cannot determine a relationship between the datasets, it does not generate a Link clause. You can use the Property Inspector to add a Link clause or change an existing Link clause.
The window for entering a Link clause looks like this.
You can also use the Link clause to specify selection criteria for a data view. In this case, the expression you enter filters the data in the same way that a Where clause for an agpData object does. For example, to narrow the dataset to include only employees of department 300, you could specify this expression:
employees.deptid=300
Link clauses are not supported for views bound to DSOs.
Specifying the maximum number of rows returned
In the Property Inspector, you can specify the maximum number of rows that will be returned for a data view. To do this, you need to check the Limit Number of Rows Returned checkbox and specify the number of rows in the Maximum Rows edit box.
Regardless of how you specify the data view's dataset and its dependencies, you must decide when to populate it with data.
If you want to load data to the data view when the page is loaded in the browser, check the Automatic Query checkbox on the data view's property sheet. When Automatic Query is true (checked), the data view is populated when the page is loaded.
If Automatic Query is not checked, the data view does not populate until a call to the query() method or refreshRows() method is made.
You can choose the scope of updating data on a data view. The choice that you make depends on the requirements of your application. You can update changes just for the data view or for the entire page.
updateRows() on the Data View object to update changes just for the data view. The changes on the data view are updated as a single transaction. When you choose this option, no other data from the parent page or any other object is included in the transaction.updateRows() on the parent page's agData to update changes for the entire page. The changes on the parent page and any data views or other children of the parent are also updated as a single transaction.
You can programmatically navigate the rows, manipulate the data, and control the visual elements of the data view (such as limiting the number of rows and whether scrolling is emulated in the browser).
The AgiRowCursor interface supplies methods to navigate and manipulate the data view's dataset. The AgiRowCursor is a pointer that you use to navigate or manipulate rows of data.
To get the data view's AgiRowCursor, call either getCurrentRowCursor() or getRootRowCursor(). For example:
  AgiRowCursor rc = View1.getCurrentRowCursor();
  AgiRowCursor rc = View1.getRootRowCursor();
Both methods return an object of type AgiRowCursor. The differences between the methods are the following:
getCurrentRowCursor() method returns the current row. This method is only valid while processing an event from a control contained in a data row of the view (for example, PageActionPerformed event from a button or a link event from a label).getRootRowCursor() method always returns an AgiRowCursor, even if no row is current. It returns a cursor even if there is no data. This is important when you are using a data view to insert rows and the data view might not contain rows. After using this method, the row cursor is positioned arbitrarily within the data view data. You may need to call scrollToFirstRow() to position it on the first row.
Using the AgiRowCursor for the data view, you can navigate the rows in the dataset with these methods:
Navigating an AgiRowCursor retrieved from a view does not affect the view's display.
You can manipulate the individual properties and rows within a data view. In addition, you can perform operations on the entire data set.
Use the AgiRowCursor for the data view to manipulate properties in the current row with these methods:
You can perform operations on entire rows with these methods:
Data views also support methods that let you manipulate an entire dataset. These methods are available on the AgiRowSetManager interface. Since AgpViewPanel implements this interface, you can call these methods on the data view itself (not on its AgiRowCursor):
By default, the number of rows displayed at one time in the data view is 10. You can change this at design time in the Property Inspector. In addition, you can change it programmatically by calling one of the following methods.
Use the get..() forms of these methods to find out the current settings.
The data view is actually implemented as a table in the HTML output to the browser. SilverStream emulates scrolling for a data view with image buttons for scrolling up and down. You can turn the default scrolling off as well as scroll the data programmatically, perhaps to support your own implementation of scrolling. This table lists the methods you use to control scrolling.
Use getEnableScrolling() to find out whether the default scrolling mechanism is being used.
The scrollUpPage() and scrollDownPage() methods (as well as the scroll buttons presented to the user) take into account the page overlap count specified with the setOverlapRowCount().
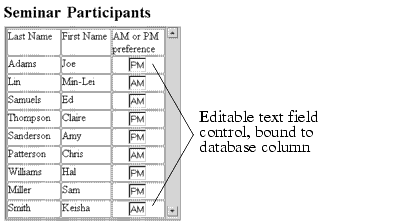
Data views can contain editable controls, allowing the user to modify data. You can bind the editable controls to database columns through the Property Inspector. Some examples of editable controls are text fields and checkboxes. In the following example, the user can type "AM" or "PM" into a text field.
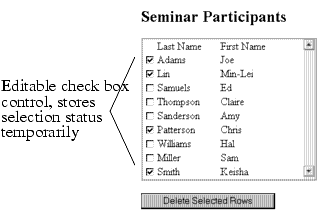
You might require an editable control in a data view that is not bound to a database column. For example, a text input field could track the quantity of a product that a customer wants to purchase. Or, in the following example, a checkbox indicates the selection of one or more rows in a data view.
The checkbox control must maintain a selection status for each row; however, this is not a value you typically store in the database. A data view requires that all of its controls get their values from the same data source, so this situation requires some special handling.
You have three options for creating temporary data storage to hold the values for this type of editable control. You could add an extra column to the database table, create a DSO that includes a dummy expression column, or use row-level processing to manipulate the unbound control.
updateRows().
This option is easy for the programmer. You can choose the view's dataset by simply selecting it in the Property Inspector.
However, changing the database schema might not be desirable. Also, everyone must remember how to use the extra column.
executeSQL() to select your data. In the SQL SELECT statement, add a dummy expression column representing the editable control. For example, your dummy expression might look like this:
  "SELECT Products.ID, Products.Name, 'dummy value' from
     Products"
For a checkbox, you might want to specify 0 instead of 'dummy value' as the default value.
Specify column definitions and include the new column. In the page, associate the data view with the DSO you've created.
For more information about populating an unbound edit control, see Manipulating unbound controls.
The HTML data view provides an event called rowGenerateBegin that is fired just before SilverStream generates the HTML for each data row of the view. This event gives you an opportunity to format each row individually.
The rowGenerateBegin event supplies a single argument, an AgoEvent object. The source in the event object is the view itself. The argument in the event object is an AgpTag object corresponding to the <TR> tag at the beginning of the repeated view row. This tag object is supplied to allow the application programmer to set row-level properties. Properties of view cells, text, and other controls can be set by marking these objects as programmable in the property inspector and calling methods on them directly. (Note that many earlier versions of browsers do not support properties on <TR> tags. The same functionality can generally be achieved using cell properties.) The application can get the AgiRowCursor object for the row about to be generated by calling the getCurrentRowCursor() method on the view.
Keep in mind that attributes of controls in the view's repeating row are not automatically reset between the generation of subsequent rows. This means that if the application changes the background color of a row cell in the rowGenerateBegin event for a certain row, this change persists in the rows that follow it until the application changes the color again. For this reason, most applications should be written not to make any assumptions about the state of a control or cell in the rowGenerateBegin event, but instead always set the appropriate properties for that row.
The rowGenerateBegin event allows for various kinds of row-level formatting. By adding code for this event, you can:
If you create a large data view with many rows, it might be helpful to the user to alternate the colors of the rows to make it easier to read the data or to associate the data in the left-hand columns with the data in the right-hand columns.
 To alternate background colors in each row:
private boolean m_green = false;
       AgpTag trTag = (AgpTag) evt.getArgument();
       if (m_green)
           trTag.setProperty("BGCOLOR", "#F0FFF0");  // green
       else
           trTag.setProperty("BGCOLOR", "#FFFFFF");  // white
  // Invert the boolean variable for the next row.
       m_green = !m_green;
Handling browsers that do not support <TR> tags
If your users have browsers that do not support properties on the <TR> tag, you can mark all cells in the detail row as programmable and set their background colors instead of using the <TR> tag argument of the event as shown here:
  String color = "#FFFFFF";  // white
  if (m_green)
     color = "#F0FFF0";  // green
  Cell1.setProperty("BGCOLOR", color);
  Cell2.setProperty("BGCOLOR", color);
  Cell3.setProperty("BGCOLOR", color);
  // etc.
  // Invert the boolean variable for the next row.
  m_green = !m_green;
You might want to control the formatting of a row based on the data that appear in that row. For example, you might to highlight new products using a special icon; you might want to display negative numbers in red, or show delinquent accounts with a different background color from other rows. You can achieve these effects using the getCurrentRowCursor() method on the view in the rowGenerateBegin event as shown here:
  AgiRowCursor c = View1.getCurrentRowCursor();
  // Set the color of a text span containing profit/loss information
  double profit = ((Double)
     c.getProperty("Accounts.ProfitLoss")).doubleValue();
  if (profit < 0)
     spanProfitLoss.setProperty("COLOR", "#FF8080");  // red
  else
     spanProfitLoss.setProperty("COLOR", "#000000");  // black
  // Set the background color of cells for delinquent accounts
  Date dueDate = (Date) c.getProperty("Accounts.DueDate");
  // Compute whether the account is delinquent
  boolean delinquent = ...
  if (delinquent)
  {
     Cell1.setProperty("BGCOLOR", "#A080A0");        // purple
     Cell2.setProperty("BGCOLOR", "#A080A0");
  }
  else
  {
     Cell1.removeProperty("BGCOLOR");        // default
     Cell2.removeProperty("BGCOLOR");
  }
As an alternative, you can use images that vary based on row data using an image expression set in the Property Inspector without any programming; such an expression might look like this:
  if Products.IsNewProduct
     then "../Objectstore/Images/ProductNew.gif"
     else "../ObjectStore/Images/ProductNormal.gif" endif
One of the powerful features of HTML data views is that the data they display is loaded from a database table or AgpData object. Controls in a view can be bound to values from this data source. HTML data views support both read-only controls (labels, images) and read/write controls (text fields, drop-down lists, etc.). Suppose, however, that the application needs some controls in the view loaded from a database table and some controls loaded only from in-memory storage used by the application. An example is a view displaying a list of products along with an editable text field control for the number of each product to be ordered by the end user. The text field cannot be bound to a field in the products table, because the order quantity for a particular end user is not a column in the table. The values cannot simply be read out of the control because there is only a single control in the server-side page object, but multiple controls (one per row) in the generated HTML.
The rowGenerateBegin event provides a mechanism to manipulate unbound controls. While the page is generating its HTML, an application can use the rowGenerateBegin event to populate an unbound control from in-memory storage. While the page is processing POSTed values from the browser, the application can use the control's valueChanged event to read new values and store them into the in-memory storage.
For example, in the declarations section of the page, initialize a HashMap to store product order quantity values:
private HashMap m_quantity = new HashMap();
In the rowGenerateBegin event for the view, get the value for the text field control that corresponds to the row being generated and store it into the control:
  AgiRowCursor c = View1.getCurrentRowCursor();
  Object productID = c.getProperty("products.productid");
  String value = m_quantity.get(productID);
  txfldQuantity.setText(value);
In the valueChanged event of the txfldQuantity control, get the new value and store it back into the HashMap. Note that it is perfectly correct for an application to use the getCurrentRowCursor() method on a view during event processing for a control in the view:
  String newValue = (String) evt.getNewValue();
  AgiRowCursor c = View1.getCurrentRowCursor();
  Object productID = c.getProperty("products.productid");
  m_quantity.put(productID, newValue);
Then, in processing the pageActionPerformed event for the Order button (or equivalent), the application can read the quantities ordered from the m_quantity HashMap. This technique can be used for any number of unbound controls in a view.
You can use HTML data views to group data rows by some value; for example, you might group products by product category. When displaying grouped data, applications typically want to display the grouping value only on the first row in which it occurs. This is easily accomplished using the rowGenerateBegin event because the values of data-bound controls are set before the rowGenerateBegin event is fired. This allows the application to change (or clear) the values of controls as part of the HTML generation of the row.
products.categoryid Ascending
products.product_categories.categoryname
private String lastRowValue;
lastRowValue = null;
  String labelValue = lblCategory.getText();
  if (labelValue != null && labelValue.equals(lastRowValue))
     lblCategory.setText(null);
  lastRowValue = labelValue;
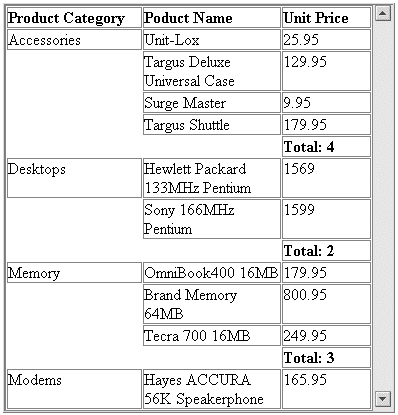
You can implement additional grouping capabilities in an HTML data view by inserting raw HTML that includes additional rows. One common use for this technique is to generate subtotals for the rows in each group. For example, in a view that displays a list of products, you might use this technique to generate subtotals for each product category.
To include additional rows by inserting raw HTML:
The control appears inside the table cell and inside the table row in the generated HTML.
  <TR>  beginning of the row
     <TD>  beginning of cell one
           contents of cell one
     </TD>  end of cell one
     <TD>  beginning of cell two
           contents of cell two
           inserted HTML (contents of raw HTML control)
     </TD>  end of cell two
  </TR>  end of the row
To set an HTML control to provide raw HTML, you need to call the setEnableHTMLParsing() and setEmbedHTMLInTable() methods, passing a value of false to each:
  HTMLControl1.setEnableHTMLParsing(false);
  HTMLControl1.setEmbedHTMLInTable(false);
To set a label control to provide raw HTML, you need to call the setRawHTMLMode() method, passing a value of true:
Label1.setRawHTMLMode(true);
The raw HTML control must close the cell and row in which it is contained, open a new row, and fill in the desired contents. For example:
</TD></TR><TR><TD><!-- skip first cell --></TD><TD>Total: 10
The raw HTML control should not close its final cell (by inserting </TD> or its row (by inserting </TR>). These closing tags are inserted automatically as part of normal row generation in a view.
The biggest challenge in inserting extra rows in a view is determining when to do so. To do this, the code in the rowGenerateBegin must examine the current row and determine if this row is the last row in the group. This can be accomplished by getting the row cursor, advancing it to the next row, and checking to see whether that row belongs to the next group. Note that you can freely navigate the row cursor for a view without affecting the display of data. The following example illustrates how this is done:
  AgiRowCursor c = View1.getCurrentRowCursor();
  Object thisCategory = c.getProperty("products.categoryid");
  boolean endOfGroup = false;

  groupTotal++;
  if (!c.gotoNext())
     endOfGroup = true; //last row in the view
  else
  {
     Object nextCategory = c.getProperty("products.categoryid");
     if (!thisCategory.equals(nextCategory))
        endOfGroup = true;
  }
  if (!endOfGroup)
     Label4.setText(null);
  else
  {
     //Optionally compute additional row information here...
     Label4.setText("</TD></TR>
        <TR><TD></TD><TD>Total:" + groupTotal);
     groupTotal = 0;
  }
This code presumes that the page has a member variable called groupTotal:
private int groupTotal;
This variable is set to zero in the PageGenerateBegin event:
groupTotal = 0;
The most useful place to write code that handles row-level formatting is in the rowGenerateBegin event. The rowGenerateBegin event is part of a listener interface called AgiHTMLViewListener.
If you want to create re-usable objects to handle row formatting, you can create an object that also implements the AgiHTMLViewListener interface. You then register it with any view using the view's addAgiHTMLViewListener() method.